User login
Customized Dermal Curette: An Alternative and Effective Shaving Tool in Nail Surgery
Practice Gap
Longitudinal melanonychia (LM) is characterized by the presence of a dark brown, longitudinal, pigmented band on the nail unit, often caused by melanocytic activation or melanocytic hyperplasia in the nail matrix. Distinguishing between benign and early malignant LM is crucial due to their similar clinical presentations.1 Hence, surgical excision of the pigmented nail matrix followed by histopathologic examination is a common procedure aimed at managing LM and reducing the risk for delayed diagnosis of subungual melanoma.
Tangential matrix excision combined with the nail window technique has emerged as a common and favored surgical strategy for managing LM.2 This method is highly valued for its ability to minimize the risk for severe permanent nail dystrophy and effectively reduce postsurgical pigmentation recurrence.
The procedure begins with the creation of a matrix window along the lateral edge of the pigmented band followed by 1 lateral incision carefully made on each side of the nail fold. This meticulous approach allows for the complete exposure of the pigmented lesion. Subsequently, the nail fold is separated from the dorsal surface of the nail plate to facilitate access to the pigmented nail matrix. Finally, the target pigmented area is excised using a scalpel.
Despite the recognized efficacy of this procedure, challenges do arise, particularly when the width of the pigmented matrix lesion is narrow. Holding the scalpel horizontally to ensure precise excision can prove to be demanding, leading to difficulty achieving complete lesion removal and obtaining the desired cosmetic outcomes. As such, there is a clear need to explore alternative tools that can effectively address these challenges while ensuring optimal surgical outcomes for patients with LM. We propose the use of the customized dermal curette.
The Technique
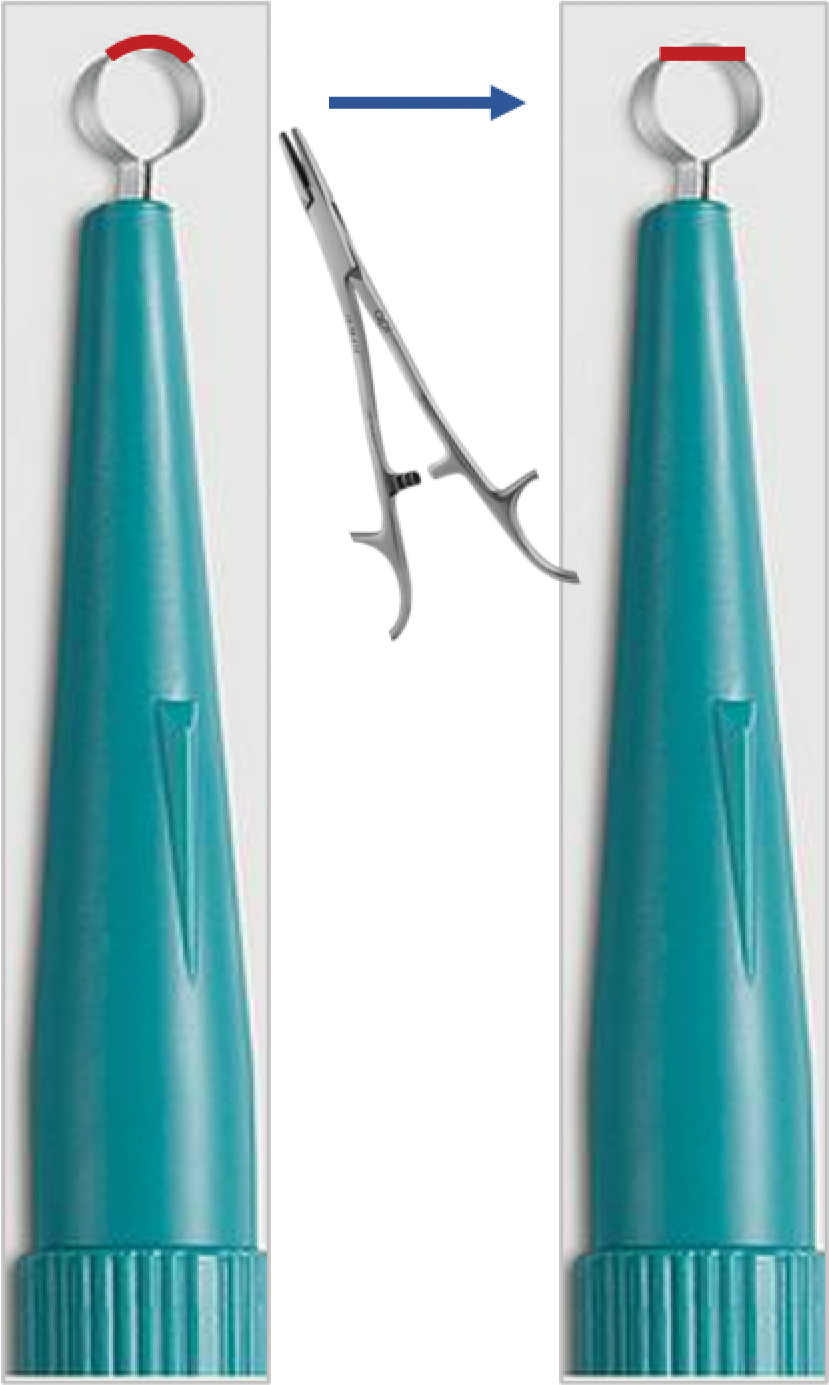
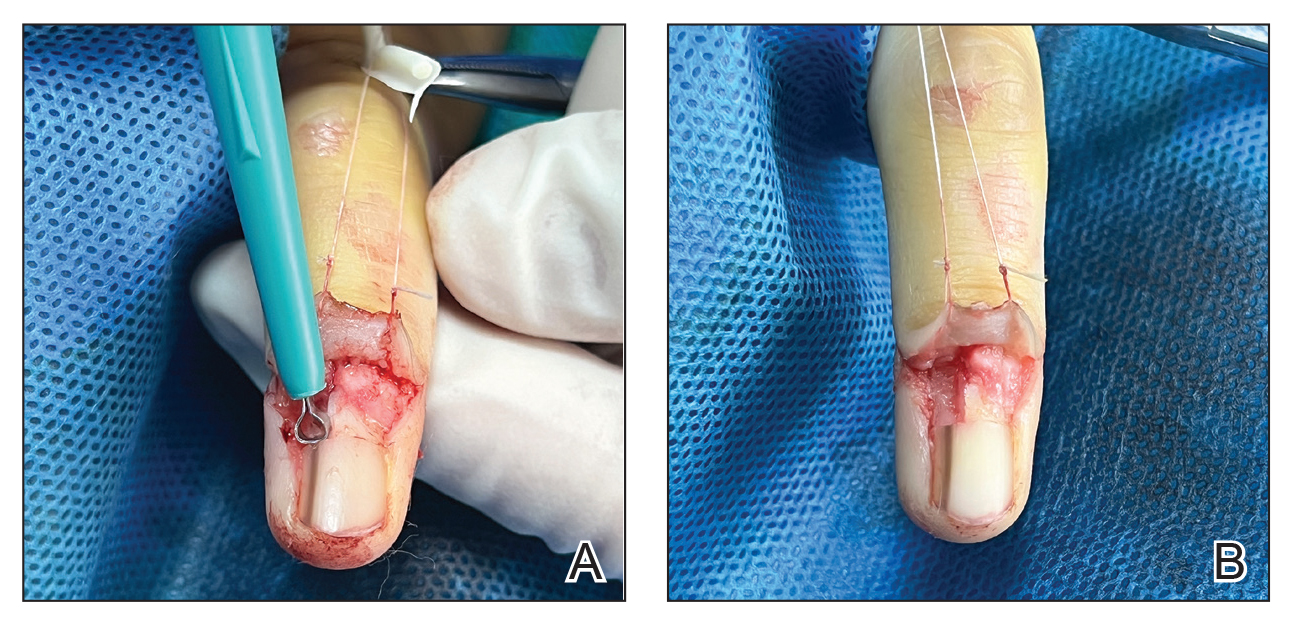
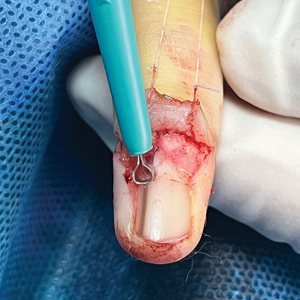
An improved curette tool is a practical solution for complete removal of the pigmented nail matrix. This enhanced instrument is crafted from a sterile disposable dermal curette with its top flattened using a needle holder(Figure 1). Termed the customized dermal curette, this device is a simple yet accurate tool for the precise excision of pigmented lesions within the nail matrix. Importantly, it offers versatility by accommodating different widths of pigmented lesions through the availability of various sizes of dermal curettes (Figure 2).
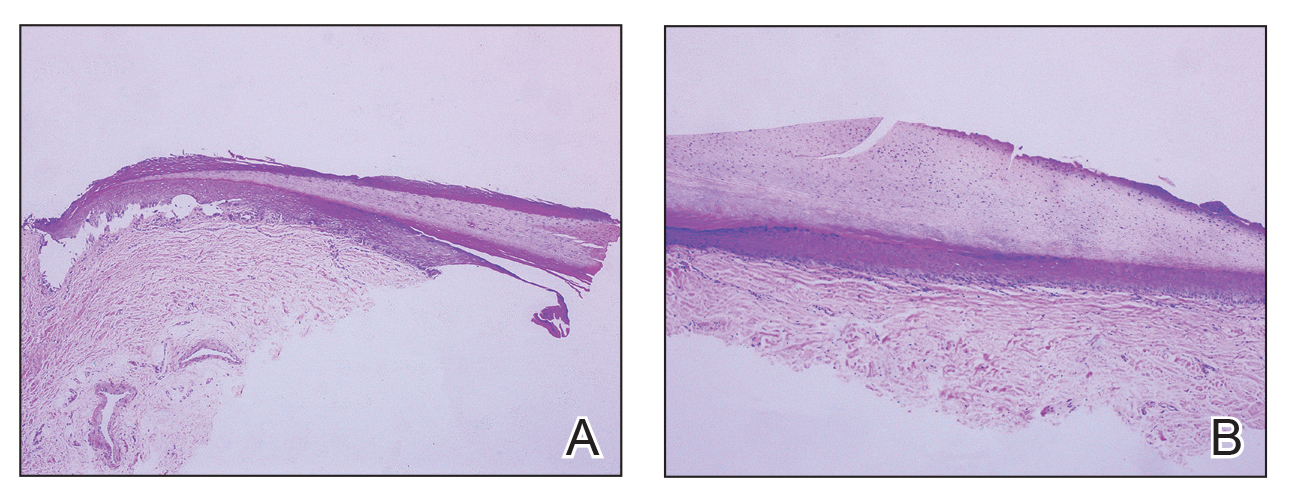
Histopathologically, we have found that the scalpel technique may lead to variable tissue removal, resulting in differences in tissue thickness, fragility, and completeness (Figure 3A). Conversely, the customized dermal curette consistently provides more accurate tissue excision, resulting in uniform tissue thickness and integrity (Figure 3B).
Practice Implications
Compared to the traditional scalpel, this modified tool offers distinct advantages. Specifically, the customized dermal curette provides enhanced maneuverability and control during the procedure, thereby improving the overall efficacy of the excision process. It also offers a more accurate approach to completely remove pigmented bands, which reduces the risk for postoperative recurrence. The simplicity, affordability, and ease of operation associated with customized dermal curettes holds promise as an effective alternative for tissue shaving, especially in cases involving narrow pigmented matrix lesions, thereby addressing a notable practice gap and enhancing patient care.
- Tan WC, Wang DY, Seghers AC, et al. Should we biopsy melanonychia striata in Asian children? a retrospective observational study. Pediatr Dermatol. 2019;36:864-868. doi:10.1111/pde.13934
- Zhou Y, Chen W, Liu ZR, et al. Modified shave surgery combined with nail window technique for the treatment of longitudinal melanonychia: evaluation of the method on a series of 67 cases. J Am Acad Dermatol. 2019;81:717-722. doi:10.1016/j.jaad.2019.03.065
Practice Gap
Longitudinal melanonychia (LM) is characterized by the presence of a dark brown, longitudinal, pigmented band on the nail unit, often caused by melanocytic activation or melanocytic hyperplasia in the nail matrix. Distinguishing between benign and early malignant LM is crucial due to their similar clinical presentations.1 Hence, surgical excision of the pigmented nail matrix followed by histopathologic examination is a common procedure aimed at managing LM and reducing the risk for delayed diagnosis of subungual melanoma.
Tangential matrix excision combined with the nail window technique has emerged as a common and favored surgical strategy for managing LM.2 This method is highly valued for its ability to minimize the risk for severe permanent nail dystrophy and effectively reduce postsurgical pigmentation recurrence.
The procedure begins with the creation of a matrix window along the lateral edge of the pigmented band followed by 1 lateral incision carefully made on each side of the nail fold. This meticulous approach allows for the complete exposure of the pigmented lesion. Subsequently, the nail fold is separated from the dorsal surface of the nail plate to facilitate access to the pigmented nail matrix. Finally, the target pigmented area is excised using a scalpel.
Despite the recognized efficacy of this procedure, challenges do arise, particularly when the width of the pigmented matrix lesion is narrow. Holding the scalpel horizontally to ensure precise excision can prove to be demanding, leading to difficulty achieving complete lesion removal and obtaining the desired cosmetic outcomes. As such, there is a clear need to explore alternative tools that can effectively address these challenges while ensuring optimal surgical outcomes for patients with LM. We propose the use of the customized dermal curette.
The Technique
An improved curette tool is a practical solution for complete removal of the pigmented nail matrix. This enhanced instrument is crafted from a sterile disposable dermal curette with its top flattened using a needle holder(Figure 1). Termed the customized dermal curette, this device is a simple yet accurate tool for the precise excision of pigmented lesions within the nail matrix. Importantly, it offers versatility by accommodating different widths of pigmented lesions through the availability of various sizes of dermal curettes (Figure 2).
Histopathologically, we have found that the scalpel technique may lead to variable tissue removal, resulting in differences in tissue thickness, fragility, and completeness (Figure 3A). Conversely, the customized dermal curette consistently provides more accurate tissue excision, resulting in uniform tissue thickness and integrity (Figure 3B).
Practice Implications
Compared to the traditional scalpel, this modified tool offers distinct advantages. Specifically, the customized dermal curette provides enhanced maneuverability and control during the procedure, thereby improving the overall efficacy of the excision process. It also offers a more accurate approach to completely remove pigmented bands, which reduces the risk for postoperative recurrence. The simplicity, affordability, and ease of operation associated with customized dermal curettes holds promise as an effective alternative for tissue shaving, especially in cases involving narrow pigmented matrix lesions, thereby addressing a notable practice gap and enhancing patient care.
- Tan WC, Wang DY, Seghers AC, et al. Should we biopsy melanonychia striata in Asian children? a retrospective observational study. Pediatr Dermatol. 2019;36:864-868. doi:10.1111/pde.13934
- Zhou Y, Chen W, Liu ZR, et al. Modified shave surgery combined with nail window technique for the treatment of longitudinal melanonychia: evaluation of the method on a series of 67 cases. J Am Acad Dermatol. 2019;81:717-722. doi:10.1016/j.jaad.2019.03.065
Two Techniques to Avoid Cyst Spray During Excision
Practice Gap
Epidermoid cysts are asymptomatic, well-circumscribed, mobile, subcutaneous masses that elevate the skin. Also known as epidermal, keratin, or infundibular cysts, epidermoid cysts are caused by proliferation of surface epidermoid cells within the dermis and can arise anywhere on the body, most commonly on the face, neck, and trunk.1 Cutaneous cysts often contain fluid or semifluid contents and can be aesthetically displeasing or cause mild pain, prompting patients to seek removal. Definitive treatment of epidermoid cysts is complete surgical removal,2 which can be performed in office in a sterile or clean manner by either dermatologists or primary care providers.
Prior to incision, a local anesthetic—commonly lidocaine with epinephrine—is injected in the region surrounding the cyst sac so as not to rupture the cyst wall. Maintaining the cyst wall throughout the procedure ensures total cyst removal and minimizes the risk for recurrence. However, it often is difficult to approximate the cyst border because it cannot be visualized prior to incision.
Throughout the duration of the procedure, cyst contents may suddenly spray out of the area and pose a risk to providers and their staff (Figure, A). Even with careful application around the periphery, either puncture or pericystic anesthesia between the cyst wall and the dermis can lead to splatter. Larger and wider peripheral anesthesia may not be possible given a shortage of lidocaine and a desire to minimize injection. Even with meticulous use of personal protective equipment in cutaneous surgery, infectious organisms found in ruptured cysts and abscesses may spray the surgical field.3 Therefore, it is in our best interest to minimize the trajectory of cyst spray contents.
The Tools
We have employed 2 simple techniques using equipment normally found on a standard surgical tray for easy safe injection of cysts. Supplies needed include 4×4-inch gauze pads, alcohol and chlorhexidine, a marker, all instruments necessary for cyst excision, and a small clear biohazard bag.
The Technique
Prior to covering the cyst, care is taken to locate the cyst opening. At times, a comedo or punctum can be seen overlying the cyst bulge. We mark the lumen and cyst opening with a surgical marker. If the pore is not easily identified, we draw an 8-mm circle around the mound of the cyst.
One option is to apply a gauze pad over the cyst to allow for stabilization of the surgical field and blanket the area from splatter (Figure, B). Then we cover the cyst using antiseptic-soaked gauze as a protective barrier to avoid potentially contaminated spray. This tool can be constructed from a 4×4-inch gauze pad with the addition of alcohol and chlorhexidine. When the cyst is covered, the surgeon can inject the lesion and surrounding tissue without biohazard splatter.
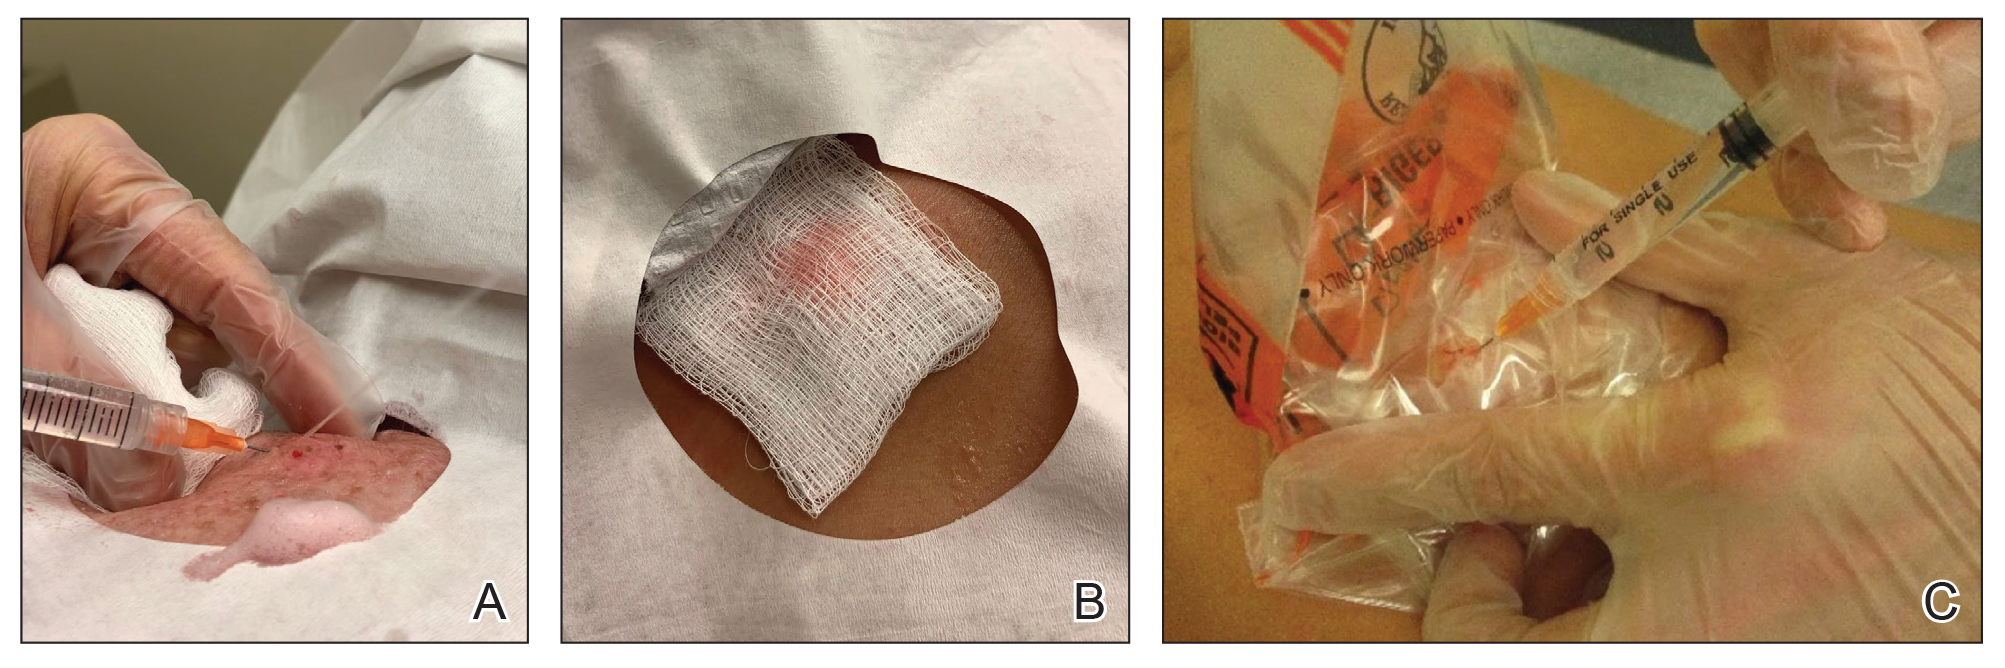
Another method is to cover the cyst with a small clear biohazard bag (Figure, C). When injecting anesthetic through the bag, the spray is captured by the bag and does not reach the surgeon or staff. This method is potentially more effective given that the cyst can still be visualized fully for more accurate injection.
Practice Implications
Outpatient surgical excision is a common effective procedure for epidermoid cysts. However, it is not uncommon for cyst contents to spray during the injection of anesthetic, posing a nuisance to the surgeon, health care staff, and patient. The technique of covering the lesion with antiseptic-soaked gauze or a small clear biohazard bag prevents cyst contents from spraying and reduces risk for contamination. In addition to these protective benefits, the use of readily available items replaces the need to order a splatter control shield.
Limitations—Although we seldom see spray using our technique, covering the cyst with gauze may disguise the region of interest and interfere with accurate incision. Marking the lesion prior to anesthesia administration or using a clear biohazard bag minimizes difficulty visualizing the cyst opening.
- Zito PM, Scharf R. Epidermoid cyst. StatPearls [Internet]. Updated August 8, 2023. Accessed June 13, 2024. https://www.ncbi.nlm.nih.gov/books/NBK499974
- Weir CB, St. Hilaire NJ. Epidermal inclusion cyst. StatPearls [Internet]. Updated August 8, 2023. Accessed June3, 2024. https://www.ncbi.nlm.nih.gov/books/NBK532310/
- Kuniyuki S, Yoshida Y, Maekawa N, et al. Bacteriological study of epidermal cysts. Acta Derm Venereol. 2018;88:23-25. doi:10.2340/00015555-0348
Practice Gap
Epidermoid cysts are asymptomatic, well-circumscribed, mobile, subcutaneous masses that elevate the skin. Also known as epidermal, keratin, or infundibular cysts, epidermoid cysts are caused by proliferation of surface epidermoid cells within the dermis and can arise anywhere on the body, most commonly on the face, neck, and trunk.1 Cutaneous cysts often contain fluid or semifluid contents and can be aesthetically displeasing or cause mild pain, prompting patients to seek removal. Definitive treatment of epidermoid cysts is complete surgical removal,2 which can be performed in office in a sterile or clean manner by either dermatologists or primary care providers.
Prior to incision, a local anesthetic—commonly lidocaine with epinephrine—is injected in the region surrounding the cyst sac so as not to rupture the cyst wall. Maintaining the cyst wall throughout the procedure ensures total cyst removal and minimizes the risk for recurrence. However, it often is difficult to approximate the cyst border because it cannot be visualized prior to incision.
Throughout the duration of the procedure, cyst contents may suddenly spray out of the area and pose a risk to providers and their staff (Figure, A). Even with careful application around the periphery, either puncture or pericystic anesthesia between the cyst wall and the dermis can lead to splatter. Larger and wider peripheral anesthesia may not be possible given a shortage of lidocaine and a desire to minimize injection. Even with meticulous use of personal protective equipment in cutaneous surgery, infectious organisms found in ruptured cysts and abscesses may spray the surgical field.3 Therefore, it is in our best interest to minimize the trajectory of cyst spray contents.
The Tools
We have employed 2 simple techniques using equipment normally found on a standard surgical tray for easy safe injection of cysts. Supplies needed include 4×4-inch gauze pads, alcohol and chlorhexidine, a marker, all instruments necessary for cyst excision, and a small clear biohazard bag.
The Technique
Prior to covering the cyst, care is taken to locate the cyst opening. At times, a comedo or punctum can be seen overlying the cyst bulge. We mark the lumen and cyst opening with a surgical marker. If the pore is not easily identified, we draw an 8-mm circle around the mound of the cyst.
One option is to apply a gauze pad over the cyst to allow for stabilization of the surgical field and blanket the area from splatter (Figure, B). Then we cover the cyst using antiseptic-soaked gauze as a protective barrier to avoid potentially contaminated spray. This tool can be constructed from a 4×4-inch gauze pad with the addition of alcohol and chlorhexidine. When the cyst is covered, the surgeon can inject the lesion and surrounding tissue without biohazard splatter.
Another method is to cover the cyst with a small clear biohazard bag (Figure, C). When injecting anesthetic through the bag, the spray is captured by the bag and does not reach the surgeon or staff. This method is potentially more effective given that the cyst can still be visualized fully for more accurate injection.
Practice Implications
Outpatient surgical excision is a common effective procedure for epidermoid cysts. However, it is not uncommon for cyst contents to spray during the injection of anesthetic, posing a nuisance to the surgeon, health care staff, and patient. The technique of covering the lesion with antiseptic-soaked gauze or a small clear biohazard bag prevents cyst contents from spraying and reduces risk for contamination. In addition to these protective benefits, the use of readily available items replaces the need to order a splatter control shield.
Limitations—Although we seldom see spray using our technique, covering the cyst with gauze may disguise the region of interest and interfere with accurate incision. Marking the lesion prior to anesthesia administration or using a clear biohazard bag minimizes difficulty visualizing the cyst opening.
- Zito PM, Scharf R. Epidermoid cyst. StatPearls [Internet]. Updated August 8, 2023. Accessed June 13, 2024. https://www.ncbi.nlm.nih.gov/books/NBK499974
- Weir CB, St. Hilaire NJ. Epidermal inclusion cyst. StatPearls [Internet]. Updated August 8, 2023. Accessed June3, 2024. https://www.ncbi.nlm.nih.gov/books/NBK532310/
- Kuniyuki S, Yoshida Y, Maekawa N, et al. Bacteriological study of epidermal cysts. Acta Derm Venereol. 2018;88:23-25. doi:10.2340/00015555-0348
Need a Wood Lamp Alternative? Grab Your Smartphone
Practice Gap
The Wood lamp commonly is used as a diagnostic tool for pigmentary skin conditions (eg, vitiligo) or skin conditions that exhibit fluorescence (eg, erythrasma).1 Recently, its diagnostic efficacy has extended to scabies, in which it unveils a distinctive wavy, bluish-white, linear fluorescence upon illumination.2
Functionally, the Wood lamp operates by subjecting phosphors to UV light within the wavelength range of 320 to 400 nm, inducing fluorescence in substances such as collagen and elastin. In the context of vitiligo, this process manifests as a preferential chalk white fluorescence in areas lacking melanin.1
Despite its demonstrated effectiveness, the Wood lamp is not without limitations. It comes with a notable financial investment ranging from $70 to $500, requires periodic maintenance such as light bulb replacements, and can be unwieldy.3 Furthermore, its reliance on a power source poses a challenge in settings where immediate access to convenient power outlets is limited, such as inpatient and rural dermatology clinics. These limitations underscore the need for alternative solutions and innovations to address challenges and ensure accessibility in diverse health care environments.
The Tools
Free smartphone applications (apps), such as Ultraviolet Light-UV Lamp by AppBrain or Blacklight UV Light Simulator by That Smile, can simulate UV light and functionally serve as a Wood lamp.
The Technique
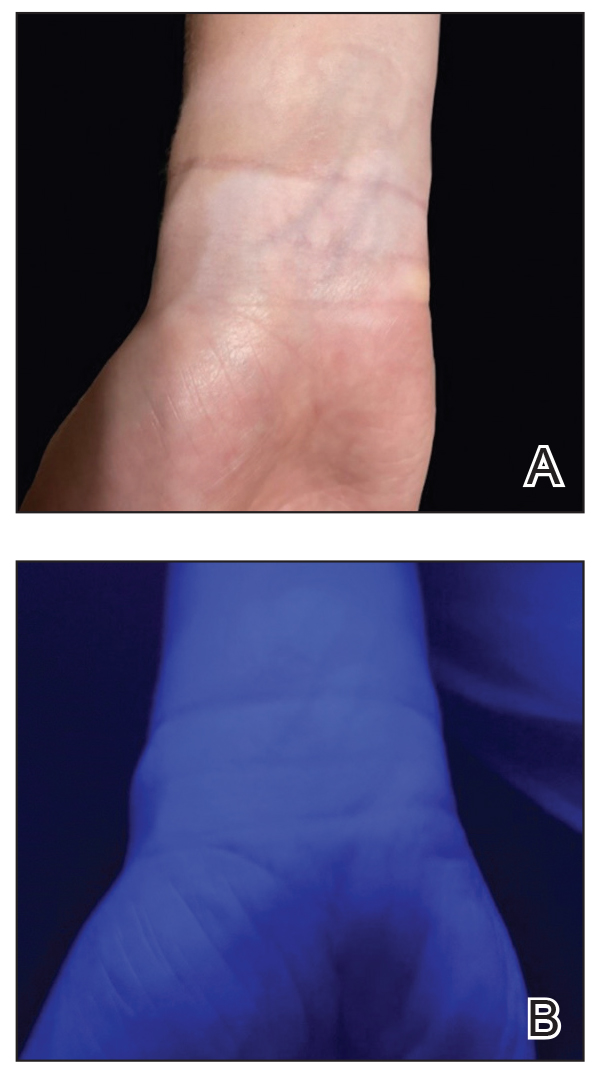
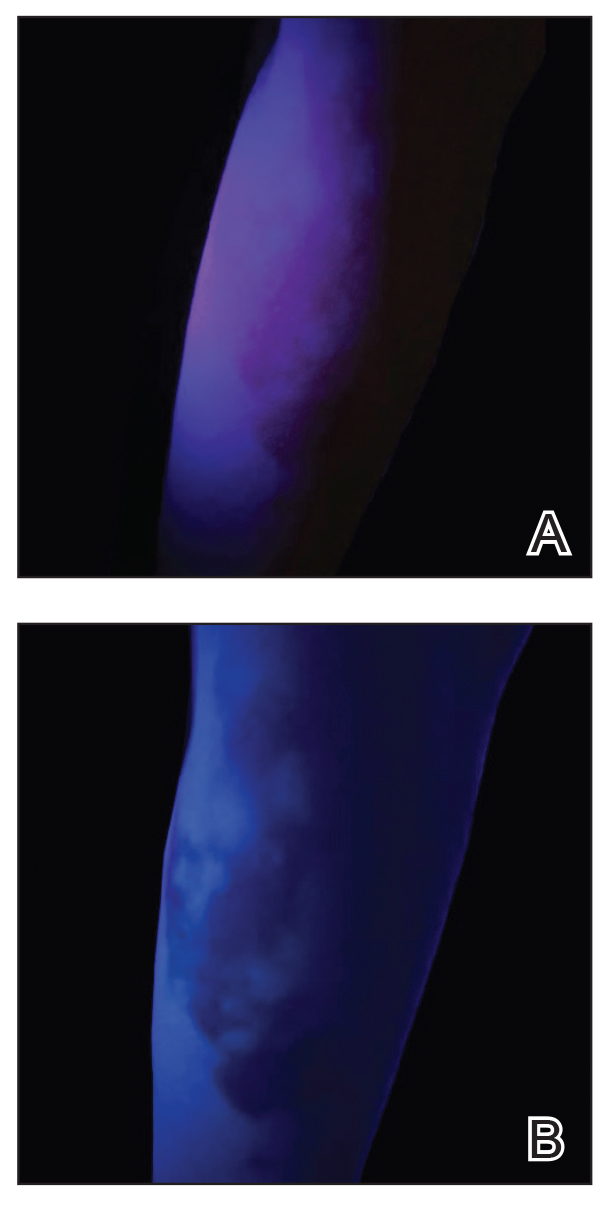
UV light apps use LED or organic LED screen pixels to emit a blue light equivalent at 467 nm.4 Although these apps are not designed specifically for dermatologic uses, they are mostly free, widely available for Android and iPhone users, and portable. Importantly, they can demonstrate good performance in visualizing vitiligo, as shown in Figure 1—albeit perhaps not reaching the same level as the Wood lamp (Figure 2).
Because these UV light apps are not regulated and their efficacy for medical use has not been firmly established, the Wood lamp remains the gold standard. Therefore, we propose the use of UV light apps in situations when a Wood lamp is not available or convenient, such as in rural, inpatient, or international health care settings.
Practice Implications
Exploring and adopting these free alternatives can contribute to improved accessibility and diagnostic capabilities in diverse health care environments, particularly for communities facing financial constraints. Continued research and validation of these apps in clinical settings will be essential to establish their reliability and effectiveness in enhancing diagnostic practices.
- Dyer JM, Foy VM. Revealing the unseen: a review of Wood’s lamp in dermatology. J Clin Aesthet Dermatol. 2022;15:25-30.
- Scanni G. Facilitations in the clinical diagnosis of human scabies through the use of ultraviolet light (UV-scab scanning): a case-series study. Trop Med Infect Dis. 2022;7:422. doi:10.3390/tropicalmed7120422
- USA Medical and Surgical Supplies. Top 9 medical diagnostic applications for a Woods lamp. February 26, 2019. Accessed May 20, 2024.
- Huang Y, Hsiang E-L, Deng M-Y, et al. Mini-led, micro-led and OLED displays: present status and future perspectives. Light Sci Appl. 2020;9:105. doi:10.1038/s41377-020-0341-9
Practice Gap
The Wood lamp commonly is used as a diagnostic tool for pigmentary skin conditions (eg, vitiligo) or skin conditions that exhibit fluorescence (eg, erythrasma).1 Recently, its diagnostic efficacy has extended to scabies, in which it unveils a distinctive wavy, bluish-white, linear fluorescence upon illumination.2
Functionally, the Wood lamp operates by subjecting phosphors to UV light within the wavelength range of 320 to 400 nm, inducing fluorescence in substances such as collagen and elastin. In the context of vitiligo, this process manifests as a preferential chalk white fluorescence in areas lacking melanin.1
Despite its demonstrated effectiveness, the Wood lamp is not without limitations. It comes with a notable financial investment ranging from $70 to $500, requires periodic maintenance such as light bulb replacements, and can be unwieldy.3 Furthermore, its reliance on a power source poses a challenge in settings where immediate access to convenient power outlets is limited, such as inpatient and rural dermatology clinics. These limitations underscore the need for alternative solutions and innovations to address challenges and ensure accessibility in diverse health care environments.
The Tools
Free smartphone applications (apps), such as Ultraviolet Light-UV Lamp by AppBrain or Blacklight UV Light Simulator by That Smile, can simulate UV light and functionally serve as a Wood lamp.
The Technique
UV light apps use LED or organic LED screen pixels to emit a blue light equivalent at 467 nm.4 Although these apps are not designed specifically for dermatologic uses, they are mostly free, widely available for Android and iPhone users, and portable. Importantly, they can demonstrate good performance in visualizing vitiligo, as shown in Figure 1—albeit perhaps not reaching the same level as the Wood lamp (Figure 2).
Because these UV light apps are not regulated and their efficacy for medical use has not been firmly established, the Wood lamp remains the gold standard. Therefore, we propose the use of UV light apps in situations when a Wood lamp is not available or convenient, such as in rural, inpatient, or international health care settings.
Practice Implications
Exploring and adopting these free alternatives can contribute to improved accessibility and diagnostic capabilities in diverse health care environments, particularly for communities facing financial constraints. Continued research and validation of these apps in clinical settings will be essential to establish their reliability and effectiveness in enhancing diagnostic practices.
- Dyer JM, Foy VM. Revealing the unseen: a review of Wood’s lamp in dermatology. J Clin Aesthet Dermatol. 2022;15:25-30.
- Scanni G. Facilitations in the clinical diagnosis of human scabies through the use of ultraviolet light (UV-scab scanning): a case-series study. Trop Med Infect Dis. 2022;7:422. doi:10.3390/tropicalmed7120422
- USA Medical and Surgical Supplies. Top 9 medical diagnostic applications for a Woods lamp. February 26, 2019. Accessed May 20, 2024.
- Huang Y, Hsiang E-L, Deng M-Y, et al. Mini-led, micro-led and OLED displays: present status and future perspectives. Light Sci Appl. 2020;9:105. doi:10.1038/s41377-020-0341-9
A Structured Approach for the Management of Orodynia (Burning Mouth Syndrome)
Practice Gap
Orodynia (OD)—together with glossodynia colloquially termed “burning mouth syndrome”—is a chronic disorder characterized by a burning sensation within the oral cavity without objective clinical signs. It is most common in perimenopausal and postmenopausal women.1,2
Orodynia is a diagnosis of exclusion and is considered after 4 to 6 months of normal imaging and laboratory test results.1,2 Its pathophysiology is poorly understood, as it can be intermittent or continuous, manifest with a variety of symptoms, and affect various entities of the oral cavity.3,4 The most common structure affected is the tongue, and symptoms may include xerostomia, dysgeusia, and discomfort.1,2 Orodynia is a frustrating condition, as many patients do not respond to treatment and experience symptoms for years.1-4
The current approach to management of OD typically involves a combination of psychosocial strategies and pharmacologic agents. The psychosocial component consists of coping mechanisms (eg, stress management techniques and behavioral therapies) aimed at alleviating the psychological impact of the condition. Pharmacologic agents such as antidepressants, anticonvulsants, and topical medications often are prescribed to address neuropathic pain and dry mouth symptoms.1,2 Additionally, oral rinses, saliva substitutes, and dietary supplements may be recommended to counteract the discomfort associated with xerostomia.1,2 However, there is no stepwise protocol, leaving these treatments to be trialed in a disorganized manner.2
The Tools
In our unique approach to managing OD, physicians may employ a variety of tools, including autoantibody profiles, noninvasive salivary gland analysis, saliva analysis, patch testing for allergens, and—if deemed necessary—a minor salivary gland biopsy. The use of specific prescription medications is included in the later stages of our approach.
The Technique
First, exclude inflammatory conditions such as geographic tongue, oral lichen planus, autoimmune bullous disorders, and other treatable conditions such as dyspepsia and Sjögren syndrome using the tools described above. Noninvasive modalities should be exhausted first, and dermatologists/clinicians should exercise clinical judgement to determine whether all options should be trialed, including more invasive/costly ones.
If symptoms persist, clinicians may want to obtain a culture for oral candida. If results are positive, candida may be treated quickly with oral fluconazole. If that treatment fails and fissuring is present, advise the patient on treating the tongue; we recommend lightly brushing the tongue once daily with a hydrogen peroxide 3% solution, followed by rinsing. Next, the patient can allow an active probiotic yogurt to sit on the tongue for at least 1 minute to repopulate it with healthy oral bacteria.
If symptoms persist, prescribe gabapentin 100 to 300 mg to be taken at bedtime. Cevimeline 30 mg 3 times daily can be added to treat symptoms of xerostomia. As a last resort, a low daily dose of trifluoperazine 1 to 2 mg may alleviate the dysesthesia of OD. Because this medication is an antipsychotic, there is an increased risk for adverse effects such as tardive dyskinesia; however, given that we recommend using at most one-twentieth of the dose recommended for psychiatric illnesses such as schizophrenia, the risk appears to be minimal.5
We have found this protocol to be more structured, and in our practice, it has led to better outcomes than previously described therapeutic interventions.
Practice Implications
As a chronic condition, OD can be frustrating for patients, as many of them have attempted multiple treatments without success. It also may be challenging for dermatologists who are unfamiliar with its management. This approach to OD provides simple step-by-step diagnostic and therapeutic plans for a condition with an often-uncertain etiology and stubborn response to initial treatments. By following this protocol, dermatologists can be confident in their ability to help patients find relief from OD.
- Klein B, Thoppay JR, De Rossi SS, et al. Burning mouth syndrome. Dermatol Clin. 2020;38:477-483. doi:10.1016/j.det.2020.05.008
- Bender SD. Burning mouth syndrome. Dent Clin North Am. 2018;62:585-596. doi:10.1016/j.cden.2018.05.006
- Javali MA. Burning mouth syndrome: an enigmatic disorder. Kathmandu Univ Med J. 2013;11:175-178. doi:10.3126/kumj.v11i2.12498
- Sardella A, Lodi G, Demarosi F, et al. Burning mouth syndrome: a retrospective study investigating spontaneous remission and response to treatments. Oral Dis. 2006;12:152-155. doi:10.1111/j.1601-0825.2005.01174
- Macdonald R, Watts TP. Trifluoperazine dihydrochloride (stelazine) in paranoid schizophrenia. Br Med J. 1959;1:549-550. doi:10.1136/bmj.1.5121.549
Practice Gap
Orodynia (OD)—together with glossodynia colloquially termed “burning mouth syndrome”—is a chronic disorder characterized by a burning sensation within the oral cavity without objective clinical signs. It is most common in perimenopausal and postmenopausal women.1,2
Orodynia is a diagnosis of exclusion and is considered after 4 to 6 months of normal imaging and laboratory test results.1,2 Its pathophysiology is poorly understood, as it can be intermittent or continuous, manifest with a variety of symptoms, and affect various entities of the oral cavity.3,4 The most common structure affected is the tongue, and symptoms may include xerostomia, dysgeusia, and discomfort.1,2 Orodynia is a frustrating condition, as many patients do not respond to treatment and experience symptoms for years.1-4
The current approach to management of OD typically involves a combination of psychosocial strategies and pharmacologic agents. The psychosocial component consists of coping mechanisms (eg, stress management techniques and behavioral therapies) aimed at alleviating the psychological impact of the condition. Pharmacologic agents such as antidepressants, anticonvulsants, and topical medications often are prescribed to address neuropathic pain and dry mouth symptoms.1,2 Additionally, oral rinses, saliva substitutes, and dietary supplements may be recommended to counteract the discomfort associated with xerostomia.1,2 However, there is no stepwise protocol, leaving these treatments to be trialed in a disorganized manner.2
The Tools
In our unique approach to managing OD, physicians may employ a variety of tools, including autoantibody profiles, noninvasive salivary gland analysis, saliva analysis, patch testing for allergens, and—if deemed necessary—a minor salivary gland biopsy. The use of specific prescription medications is included in the later stages of our approach.
The Technique
First, exclude inflammatory conditions such as geographic tongue, oral lichen planus, autoimmune bullous disorders, and other treatable conditions such as dyspepsia and Sjögren syndrome using the tools described above. Noninvasive modalities should be exhausted first, and dermatologists/clinicians should exercise clinical judgement to determine whether all options should be trialed, including more invasive/costly ones.
If symptoms persist, clinicians may want to obtain a culture for oral candida. If results are positive, candida may be treated quickly with oral fluconazole. If that treatment fails and fissuring is present, advise the patient on treating the tongue; we recommend lightly brushing the tongue once daily with a hydrogen peroxide 3% solution, followed by rinsing. Next, the patient can allow an active probiotic yogurt to sit on the tongue for at least 1 minute to repopulate it with healthy oral bacteria.
If symptoms persist, prescribe gabapentin 100 to 300 mg to be taken at bedtime. Cevimeline 30 mg 3 times daily can be added to treat symptoms of xerostomia. As a last resort, a low daily dose of trifluoperazine 1 to 2 mg may alleviate the dysesthesia of OD. Because this medication is an antipsychotic, there is an increased risk for adverse effects such as tardive dyskinesia; however, given that we recommend using at most one-twentieth of the dose recommended for psychiatric illnesses such as schizophrenia, the risk appears to be minimal.5
We have found this protocol to be more structured, and in our practice, it has led to better outcomes than previously described therapeutic interventions.
Practice Implications
As a chronic condition, OD can be frustrating for patients, as many of them have attempted multiple treatments without success. It also may be challenging for dermatologists who are unfamiliar with its management. This approach to OD provides simple step-by-step diagnostic and therapeutic plans for a condition with an often-uncertain etiology and stubborn response to initial treatments. By following this protocol, dermatologists can be confident in their ability to help patients find relief from OD.
- Klein B, Thoppay JR, De Rossi SS, et al. Burning mouth syndrome. Dermatol Clin. 2020;38:477-483. doi:10.1016/j.det.2020.05.008
- Bender SD. Burning mouth syndrome. Dent Clin North Am. 2018;62:585-596. doi:10.1016/j.cden.2018.05.006
- Javali MA. Burning mouth syndrome: an enigmatic disorder. Kathmandu Univ Med J. 2013;11:175-178. doi:10.3126/kumj.v11i2.12498
- Sardella A, Lodi G, Demarosi F, et al. Burning mouth syndrome: a retrospective study investigating spontaneous remission and response to treatments. Oral Dis. 2006;12:152-155. doi:10.1111/j.1601-0825.2005.01174
- Macdonald R, Watts TP. Trifluoperazine dihydrochloride (stelazine) in paranoid schizophrenia. Br Med J. 1959;1:549-550. doi:10.1136/bmj.1.5121.549
Enhancing Cosmetic and Functional Improvement of Recalcitrant Nail Lichen Planus With Resin Nail
Practice Gap
Lichen planus (LP)—a chronic inflammatory disorder affecting the nails—is prevalent in 10% to 15% of patients and is more common in the fingernails than toenails. Clinical manifestation includes longitudinal ridges, nail plate atrophy, and splitting, which all contribute to cosmetic disfigurement and difficulty with functionality. Quality of life and daily activities may be impacted profoundly.1 First-line therapies include intralesional and systemic corticosteroids; however, efficacy is limited and recurrence is common.1,2 Lichen planus is one of the few conditions that may cause permanent and debilitating nail loss.
Tools
A resin nail can be used to improve cosmetic appearance and functionality in patients with recalcitrant nail LP. The composite resin creates a flexible nonporous nail and allows the underlying natural nail to grow. Application of resin nails has been used for toenail onychodystrophies to improve cosmesis and functionality but has not been reported for fingernails. The resin typically lasts 6 to 8 weeks on toenails.
The Technique
Application of a resin nail involves several steps (see video online). First, the affected nail should be debrided and a bonding agent applied. Next, multiple layers of resin are applied until the patient’s desired thickness is achieved (typically 2 layers), followed by a sealing agent. Finally, the nail is cured with UV light. We recommend applying sunscreen to the hand(s) prior to curing with UV light. The liquid resin allows the nail to be customized to the patient’s desired length and shape. The overall procedure takes approximately 20 minutes for a single nail.
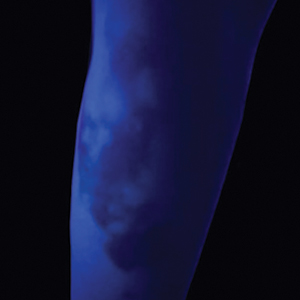
We applied resin nail to the thumbnail of a 46-year-old woman with recalcitrant isolated nail LP of 7 years’ duration (Figure). She previously had difficulties performing everyday activities, and the resin improved her functionality. She also was pleased with the cosmetic appearance. After 2 weeks, the resin started falling off with corresponding natural nail growth. The patient denied any adverse events.

Practice Implications
Resin nail application may serve as a temporary solution to improve cosmesis and functionality in patients with recalcitrant nail LP. As shown in our patient, the resin may fall off faster on the fingernails than the toenails, likely because of the faster growth rate of fingernails and more frequent exposure from daily activities. Further studies of resin nail application for the fingernails are needed to establish duration in patients with varying levels of activity (eg, washing dishes, woodworking).
Because the resin nail may be removed easily at any time, resin nail application does not interfere with treatments such as intralesional steroid injections. For patients using a topical medication regimen, the resin nail may be applied slightly distal to the cuticle so that the medication can still be applied by the proximal nail fold of the underlying natural nail.
The resin nail should be kept short and removed after 2 to 4 weeks for the fingernails and 6 to 8 weeks for the toenails to examine the underlying natural nail. Patients may go about their daily activities with the resin nail, including applying nail polish to the resin nail, bathing, and swimming. Resin nail application may complement medical treatments and improve quality of life for patients with nail LP.
- Gupta MK, Lipner SR. Review of nail lichen planus: epidemiology, pathogenesis, diagnosis, and treatment. Dermatol Clin. 2021;39:221-230. doi:10.1016/j.det.2020.12.002
- Iorizzo M, Tosti A, Starace M, et al. Isolated nail lichen planus: an expert consensus on treatment of the classical form. J Am Acad Dermatol. 2020;83:1717-1723. doi:10.1016/j.jaad.2020.02.056
Practice Gap
Lichen planus (LP)—a chronic inflammatory disorder affecting the nails—is prevalent in 10% to 15% of patients and is more common in the fingernails than toenails. Clinical manifestation includes longitudinal ridges, nail plate atrophy, and splitting, which all contribute to cosmetic disfigurement and difficulty with functionality. Quality of life and daily activities may be impacted profoundly.1 First-line therapies include intralesional and systemic corticosteroids; however, efficacy is limited and recurrence is common.1,2 Lichen planus is one of the few conditions that may cause permanent and debilitating nail loss.
Tools
A resin nail can be used to improve cosmetic appearance and functionality in patients with recalcitrant nail LP. The composite resin creates a flexible nonporous nail and allows the underlying natural nail to grow. Application of resin nails has been used for toenail onychodystrophies to improve cosmesis and functionality but has not been reported for fingernails. The resin typically lasts 6 to 8 weeks on toenails.
The Technique
Application of a resin nail involves several steps (see video online). First, the affected nail should be debrided and a bonding agent applied. Next, multiple layers of resin are applied until the patient’s desired thickness is achieved (typically 2 layers), followed by a sealing agent. Finally, the nail is cured with UV light. We recommend applying sunscreen to the hand(s) prior to curing with UV light. The liquid resin allows the nail to be customized to the patient’s desired length and shape. The overall procedure takes approximately 20 minutes for a single nail.
We applied resin nail to the thumbnail of a 46-year-old woman with recalcitrant isolated nail LP of 7 years’ duration (Figure). She previously had difficulties performing everyday activities, and the resin improved her functionality. She also was pleased with the cosmetic appearance. After 2 weeks, the resin started falling off with corresponding natural nail growth. The patient denied any adverse events.
Practice Implications
Resin nail application may serve as a temporary solution to improve cosmesis and functionality in patients with recalcitrant nail LP. As shown in our patient, the resin may fall off faster on the fingernails than the toenails, likely because of the faster growth rate of fingernails and more frequent exposure from daily activities. Further studies of resin nail application for the fingernails are needed to establish duration in patients with varying levels of activity (eg, washing dishes, woodworking).
Because the resin nail may be removed easily at any time, resin nail application does not interfere with treatments such as intralesional steroid injections. For patients using a topical medication regimen, the resin nail may be applied slightly distal to the cuticle so that the medication can still be applied by the proximal nail fold of the underlying natural nail.
The resin nail should be kept short and removed after 2 to 4 weeks for the fingernails and 6 to 8 weeks for the toenails to examine the underlying natural nail. Patients may go about their daily activities with the resin nail, including applying nail polish to the resin nail, bathing, and swimming. Resin nail application may complement medical treatments and improve quality of life for patients with nail LP.
- Gupta MK, Lipner SR. Review of nail lichen planus: epidemiology, pathogenesis, diagnosis, and treatment. Dermatol Clin. 2021;39:221-230. doi:10.1016/j.det.2020.12.002
- Iorizzo M, Tosti A, Starace M, et al. Isolated nail lichen planus: an expert consensus on treatment of the classical form. J Am Acad Dermatol. 2020;83:1717-1723. doi:10.1016/j.jaad.2020.02.056

How to Optimize Epidermal Approximation During Wound Suturing Using a Smartphone Camera
Practice Gap
Precise wound approximation during cutaneous suturing is of vital importance for optimal closure and long-term scar outcomes. Although buried dermal sutures achieve wound-edge approximation and eversion, meticulous placement of epidermal sutures allows for fine-tuning of the wound edges through epidermal approximation, eversion, and the correction of minor height discrepancies (step-offs).
Several percutaneous suture techniques and materials are available to dermatologic surgeons. However, precise, gap- and tension-free approximation of the wound edges is desired for prompt re-epithelialization and a barely visible scar.1,2
Epidermal sutures should be placed under minimal tension to align the papillary dermis and epidermis precisely. The dermatologic surgeon can evaluate the effectiveness of their suturing technique by carefully examining the closure for visibility of the bilateral wound edges, which should show equally if approximation is precise; small gaps between the wound edges (undesired); or dermal bleeding, which is a manifestation of inaccurate approximation.
Advances in smartphone camera technology have led to high-quality photography in a variety of settings. Although smartphone photography often is used for documentation purposes in health care, we recommend incorporating it as a quality-control checkpoint for objective evaluation, allowing the dermatologic surgeon to scrutinize the wound edges and refine their surgical technique to improve scar outcomes.
The Technique
After suturing the wound closed, we routinely use a 12-megapixel smartphone camera (up to 2× optical zoom) to photograph the closed wound at 1× or 2× magnification to capture more details and use the zoom function to further evaluate the wound edges close-up (Figure). In any area where inadequate epidermal approximation is noted on the photograph, an additional stitch can be placed. Photography can be repeated until ideal reapproximation occurs.

Practice Implications
Most smartphones released in recent years have a 12-megapixel camera, making them more easily accessible than surgical loupes. Additionally, surgical loupes are expensive, come with a learning curve, and can be intimidating to new or inexperienced surgeons or dermatology residents. Because virtually every dermatologic surgeon has access to a smartphone and snapping an image takes no more than a few seconds, we believe this technique is a valuable new self-assessment tool for dermatologic surgeons. It may be particularly valuable to dermatology residents and new/inexperienced surgeons looking to improve their techniques and scar outcomes.
- Perry AW, McShane RH. Fine-tuning of the skin edges in the closure of surgical wounds. Controlling inversion and eversion with the path of the needle—the right stitch at the right time. J Dermatol Surg Oncol. 1981;7:471-476. doi:10.1111/j.1524-4725.1981.tb00680.x
- Miller CJ, Antunes MB, Sobanko JF. Surgical technique for optimal outcomes: part II. repairing tissue: suturing. J Am Acad Dermatol. 2015;72:389-402. doi:10.1016/j.jaad.2014.08.006
Practice Gap
Precise wound approximation during cutaneous suturing is of vital importance for optimal closure and long-term scar outcomes. Although buried dermal sutures achieve wound-edge approximation and eversion, meticulous placement of epidermal sutures allows for fine-tuning of the wound edges through epidermal approximation, eversion, and the correction of minor height discrepancies (step-offs).
Several percutaneous suture techniques and materials are available to dermatologic surgeons. However, precise, gap- and tension-free approximation of the wound edges is desired for prompt re-epithelialization and a barely visible scar.1,2
Epidermal sutures should be placed under minimal tension to align the papillary dermis and epidermis precisely. The dermatologic surgeon can evaluate the effectiveness of their suturing technique by carefully examining the closure for visibility of the bilateral wound edges, which should show equally if approximation is precise; small gaps between the wound edges (undesired); or dermal bleeding, which is a manifestation of inaccurate approximation.
Advances in smartphone camera technology have led to high-quality photography in a variety of settings. Although smartphone photography often is used for documentation purposes in health care, we recommend incorporating it as a quality-control checkpoint for objective evaluation, allowing the dermatologic surgeon to scrutinize the wound edges and refine their surgical technique to improve scar outcomes.
The Technique
After suturing the wound closed, we routinely use a 12-megapixel smartphone camera (up to 2× optical zoom) to photograph the closed wound at 1× or 2× magnification to capture more details and use the zoom function to further evaluate the wound edges close-up (Figure). In any area where inadequate epidermal approximation is noted on the photograph, an additional stitch can be placed. Photography can be repeated until ideal reapproximation occurs.
Practice Implications
Most smartphones released in recent years have a 12-megapixel camera, making them more easily accessible than surgical loupes. Additionally, surgical loupes are expensive, come with a learning curve, and can be intimidating to new or inexperienced surgeons or dermatology residents. Because virtually every dermatologic surgeon has access to a smartphone and snapping an image takes no more than a few seconds, we believe this technique is a valuable new self-assessment tool for dermatologic surgeons. It may be particularly valuable to dermatology residents and new/inexperienced surgeons looking to improve their techniques and scar outcomes.
- Perry AW, McShane RH. Fine-tuning of the skin edges in the closure of surgical wounds. Controlling inversion and eversion with the path of the needle—the right stitch at the right time. J Dermatol Surg Oncol. 1981;7:471-476. doi:10.1111/j.1524-4725.1981.tb00680.x
- Miller CJ, Antunes MB, Sobanko JF. Surgical technique for optimal outcomes: part II. repairing tissue: suturing. J Am Acad Dermatol. 2015;72:389-402. doi:10.1016/j.jaad.2014.08.006

Punch Biopsy Extraction With Fingers
Practice Gap
Punch biopsies are utilized frequently by dermatologists to aid in the diagnosis of various skin diseases.1 When performing a punch biopsy, dermatologists are taught to use either forceps or skin hooks in addition to scissors to extract the tissue from the skin.2 However, the use of these sterile instruments for a simple biopsy adds extra costs to the procedure. Herein, a cheaper and often faster method of obtaining the specimen from the patient is described.
The Technique
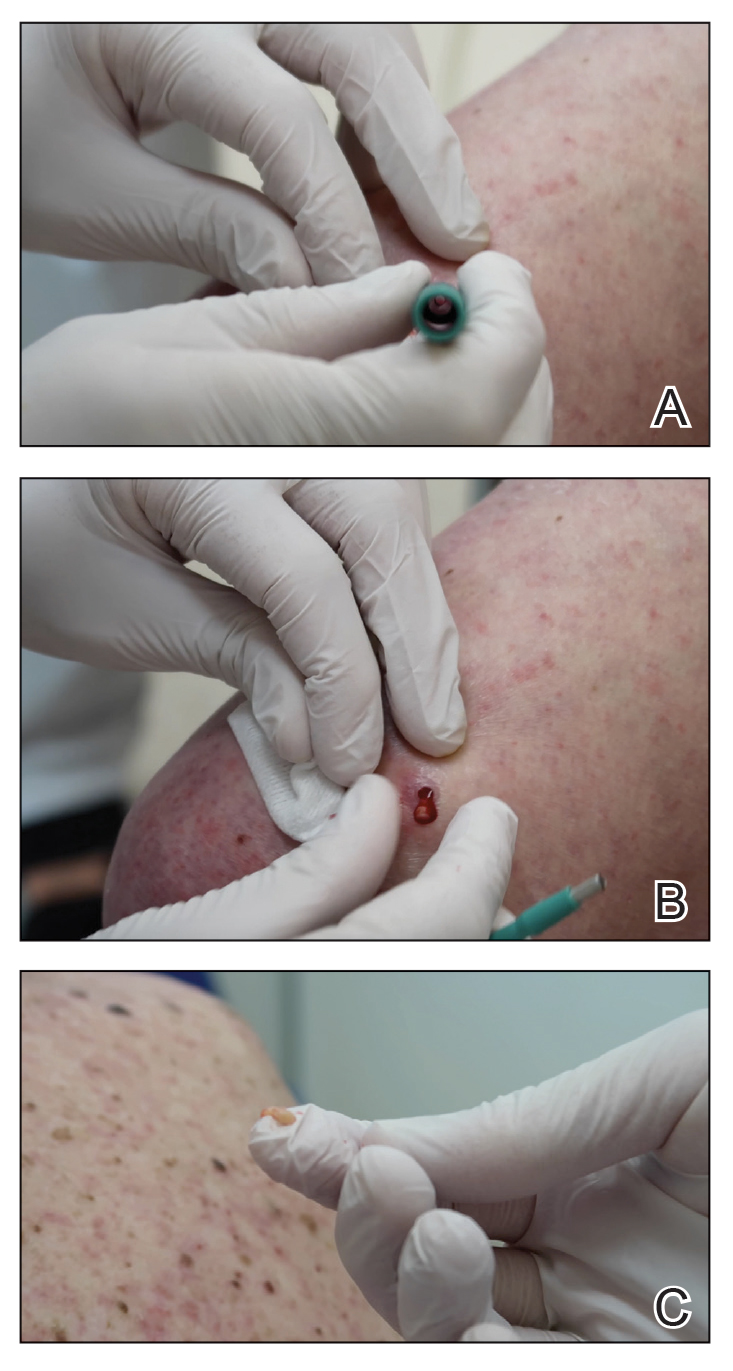
A 3- or 4-mm disposable punch biopsy tool is employed for this method. After locally anesthetizing the skin, the skin is punched to a subcutaneous depth utilizing the full length of the blade and a little extra pressure is applied downward while stretching the skin around (Figure, A). This may be helpful to dislodge the punch specimen from the surrounding skin. The specimen now can be easily removed by gently grasping it with the thumb and index finger (Figure, B and C). It then can be transferred immediately to the formalin container.
Practice Implications
This technique saves time as well as financial and environmental costs associated with the use of sterile instruments. An additional advantage to this simple method is avoiding specimen crush injuries, which are common when using forceps. This solution works in most cases but may not be suitable for certain special anatomic locations such as the scalp, nose, and ears.
- Gronbeck C, Feng H. Volume and distribution of skin biopsies performed by dermatologists and other health care providers in the Medicare population in 2019. J Am Acad Dermatol. 2022;87:675-678.
- Bolognia JL, Schaffer JV, Cerroni L. Dermatology. Elsevier; 2018.
Practice Gap
Punch biopsies are utilized frequently by dermatologists to aid in the diagnosis of various skin diseases.1 When performing a punch biopsy, dermatologists are taught to use either forceps or skin hooks in addition to scissors to extract the tissue from the skin.2 However, the use of these sterile instruments for a simple biopsy adds extra costs to the procedure. Herein, a cheaper and often faster method of obtaining the specimen from the patient is described.
The Technique
A 3- or 4-mm disposable punch biopsy tool is employed for this method. After locally anesthetizing the skin, the skin is punched to a subcutaneous depth utilizing the full length of the blade and a little extra pressure is applied downward while stretching the skin around (Figure, A). This may be helpful to dislodge the punch specimen from the surrounding skin. The specimen now can be easily removed by gently grasping it with the thumb and index finger (Figure, B and C). It then can be transferred immediately to the formalin container.
Practice Implications
This technique saves time as well as financial and environmental costs associated with the use of sterile instruments. An additional advantage to this simple method is avoiding specimen crush injuries, which are common when using forceps. This solution works in most cases but may not be suitable for certain special anatomic locations such as the scalp, nose, and ears.
- Gronbeck C, Feng H. Volume and distribution of skin biopsies performed by dermatologists and other health care providers in the Medicare population in 2019. J Am Acad Dermatol. 2022;87:675-678.
- Bolognia JL, Schaffer JV, Cerroni L. Dermatology. Elsevier; 2018.
- Gronbeck C, Feng H. Volume and distribution of skin biopsies performed by dermatologists and other health care providers in the Medicare population in 2019. J Am Acad Dermatol. 2022;87:675-678.
- Bolognia JL, Schaffer JV, Cerroni L. Dermatology. Elsevier; 2018.

The Many Uses of the Humble Alcohol Swab
Practice Gap
In light of inflation, rising costs of procedures, and decreased reimbursements,1 there is an increased need to identify and utilize inexpensive multitasking tools that can serve the dermatologic surgeon from preoperative to postoperative care. The 70% isopropyl alcohol swab may be the dermatologist’s most cost-effective and versatile surgical tool.
The Technique
When assessing a lesion, alcohol swabs can remove scale, crust, or residue from personal care products to help reveal primary morphology. They aid in the diagnosis of porokeratosis by highlighting the cornoid lamella when used following application of gentian violet.2 The alcohol swab also can lay down a liquid interface to facilitate contact dermoscopy and improve visualization while also reducing the transmission of pathogens by the dermatoscope.3 Rubbing an area with an alcohol swab can induce vasodilation of scar tissue, which also may help localize a prior biopsy or surgical site (Figure).

Before a surgical site is marked, an initial cleanse with an alcohol swab serves to both remove debris and provide antisepsis ahead of the procedure. Additionally, the swab may improve adherence of skin markers by clearing excess lipid from the skin surface. Assessing the amount of debris and oil removed in the process can help determine a patient’s baseline level of hygiene, which can aid postoperative wound care planning. In extreme cases, use of an alcohol swab may help diagnose dermatitis neglecta or terra firma-forme dermatosis by completely removing any pigmentation.4
After surgery, the alcohol swab can remove skin marker(s) and blood and prepare the site for the surgical dressing. There also is some evidence to suggest that cleansing the surgical site with an alcohol swab as part of routine postoperative wound care may decrease incidence of surgical-site infection.5 At follow-up, the swab can remove crust and clean the skin before suture removal. If infection is suspected, the swab can cleanse skin before a wound culture is obtained to remove skin commensals and flora on the outer surface of the wound.
Practice Implications
The 70% isopropyl alcohol swab can assist the dermatologist in numerous tasks related to everyday procedures. It is readily available in every clinic and costs only a few cents.
- Pollock JR, Chen JY, Dorius DA, et al. Decreasing physician Medicare reimbursement for dermatology services. J Am Acad Dermatol. 2022;86:1154-1156.
- Thomas CJ, Elston DM. Medical pearl: Gentian violet to highlight the cornoid lamella in disseminated superficial actinic porokeratosis.J Am Acad Dermatol. 2005;52(3 pt 1):513-514.
- Kelly SC, Purcell SM. Prevention of nosocomial infection during dermoscopy? Dermatol Surg. 2006;32:552-555.
- Blattner CM, Perry B, Snider K, et al. Clinical pearl: increasing utility of isopropyl alcohol for cutaneous dyschromia. Cutis. 2016;97:287;301.
- Vogt KN, Chadi S, Parry N, et al. Daily incision cleansing with alcohol reduces the rate of surgical site infections: a pilot study. Am Surg. 2015;81:1182-1186.
Practice Gap
In light of inflation, rising costs of procedures, and decreased reimbursements,1 there is an increased need to identify and utilize inexpensive multitasking tools that can serve the dermatologic surgeon from preoperative to postoperative care. The 70% isopropyl alcohol swab may be the dermatologist’s most cost-effective and versatile surgical tool.
The Technique
When assessing a lesion, alcohol swabs can remove scale, crust, or residue from personal care products to help reveal primary morphology. They aid in the diagnosis of porokeratosis by highlighting the cornoid lamella when used following application of gentian violet.2 The alcohol swab also can lay down a liquid interface to facilitate contact dermoscopy and improve visualization while also reducing the transmission of pathogens by the dermatoscope.3 Rubbing an area with an alcohol swab can induce vasodilation of scar tissue, which also may help localize a prior biopsy or surgical site (Figure).
Before a surgical site is marked, an initial cleanse with an alcohol swab serves to both remove debris and provide antisepsis ahead of the procedure. Additionally, the swab may improve adherence of skin markers by clearing excess lipid from the skin surface. Assessing the amount of debris and oil removed in the process can help determine a patient’s baseline level of hygiene, which can aid postoperative wound care planning. In extreme cases, use of an alcohol swab may help diagnose dermatitis neglecta or terra firma-forme dermatosis by completely removing any pigmentation.4
After surgery, the alcohol swab can remove skin marker(s) and blood and prepare the site for the surgical dressing. There also is some evidence to suggest that cleansing the surgical site with an alcohol swab as part of routine postoperative wound care may decrease incidence of surgical-site infection.5 At follow-up, the swab can remove crust and clean the skin before suture removal. If infection is suspected, the swab can cleanse skin before a wound culture is obtained to remove skin commensals and flora on the outer surface of the wound.
Practice Implications
The 70% isopropyl alcohol swab can assist the dermatologist in numerous tasks related to everyday procedures. It is readily available in every clinic and costs only a few cents.
- Pollock JR, Chen JY, Dorius DA, et al. Decreasing physician Medicare reimbursement for dermatology services. J Am Acad Dermatol. 2022;86:1154-1156.
- Thomas CJ, Elston DM. Medical pearl: Gentian violet to highlight the cornoid lamella in disseminated superficial actinic porokeratosis.J Am Acad Dermatol. 2005;52(3 pt 1):513-514.
- Kelly SC, Purcell SM. Prevention of nosocomial infection during dermoscopy? Dermatol Surg. 2006;32:552-555.
- Blattner CM, Perry B, Snider K, et al. Clinical pearl: increasing utility of isopropyl alcohol for cutaneous dyschromia. Cutis. 2016;97:287;301.
- Vogt KN, Chadi S, Parry N, et al. Daily incision cleansing with alcohol reduces the rate of surgical site infections: a pilot study. Am Surg. 2015;81:1182-1186.

Blood Glucose Testing Lancet and Paper Clip as a Milia Extractor
Practice Gap
In low-resource settings, dermatologists may not have the preferred tools to evaluate a patient or perform a procedure. Commonplace affordable supplies can be substituted when needed.
Traditionally, tools readily available for comedone extraction in dermatology clinics include sterile disposable hypodermic needles to open the skin and either a comedone extractor or 2 cotton-tip applicators to apply pressure for extraction. However, when these tools are not available, resourceful techniques have been utilized. Ashique and Srinivas1 described a less-painful method for extracting conchae comedones that they called “pen punching,” which involved using the rim of the tip of a ballpoint pen to apply pressure to extract lesions. Mukhtar and Gupta2 used a 3-mL disposable syringe as a comedone extractor; the syringe was cut at the needle hub using a surgical blade, with one half at 30° to 45°. Kaya et al3 used sharp-tipped cautery to puncture closed macrocomedones. Cvancara and Meffert4 described how an autoclaved paper clip could be fashioned into a disposable comedone extractor, highlighting its potential use in humanitarian work or military deployments. A sterilized safety pin has been demonstrated to be an inexpensive tool to extract open and closed comedones without a surgical blade.5 We describe the use of a blood glucose testing lancet and a paper clip for comedone extraction.
Tools and Technique
A patient presented to a satellite clinic requesting extraction of multiple bothersome milia. A comedone extractor was unavailable at that location, and the patient’s access to care elsewhere was limited.
To perform extraction of milia in this case, we used a sterile, twist-top, stainless steel, 30-gauge blood glucose testing lancet and a paper clip sterilized with an isopropyl alcohol wipe (Figure). The beveled edge of the lancet was used to make a superficial opening to the skin, and the end loop of the paper clip was used as a comedone extractor. Applying moderate vertical pressure, 15 milia were expressed from the forearms. The patient tolerated the procedure well and reported minimal pain.

Practical Implications
The cost of the paper clip and lancet for our technique was $0.07. These materials are affordable, easy to use, and readily found in a variety of settings, making them a feasible option for performing this procedure.
- Ashique KT, Srinivas CR. Pen punching: an innovative technique for comedone extraction from the well of the concha. J Am Acad Dermatol. 2015;73:E177. doi:10.1016/j.jaad.2015.07.033
- Mukhtar M, Gupta S. Surgical pearl: disposable syringe as modified customized comedone extractor. J Cutan Aesthet Surg. 2022;15:185-186. doi:10.4103/JCAS.JCAS_112_21
- Kaya TI, Tursen U, Kokturk A, et al. An effective extraction technique for the treatment of closed macrocomedones. Dermatol Surg. 2003;29:741-744. doi:10.1046/j.1524-4725.2003.29190.x
- Cvancara JL, Meffert JJ. Surgical pearl: versatile paper clip comedo extractor for acne surgery. J Am Acad Dermatol. 1999;40:477-478. doi:10.1016/s0190-9622(99)70501-3
- Mukhtar M, Sharma R. Surgical pearl: the safety pin as a better alternative to the versatile paper clip comedo extractor. Int J Dermatol. 2004;43:967-968. doi:10.1111/j.1365-4632.2004.02293.x
Practice Gap
In low-resource settings, dermatologists may not have the preferred tools to evaluate a patient or perform a procedure. Commonplace affordable supplies can be substituted when needed.
Traditionally, tools readily available for comedone extraction in dermatology clinics include sterile disposable hypodermic needles to open the skin and either a comedone extractor or 2 cotton-tip applicators to apply pressure for extraction. However, when these tools are not available, resourceful techniques have been utilized. Ashique and Srinivas1 described a less-painful method for extracting conchae comedones that they called “pen punching,” which involved using the rim of the tip of a ballpoint pen to apply pressure to extract lesions. Mukhtar and Gupta2 used a 3-mL disposable syringe as a comedone extractor; the syringe was cut at the needle hub using a surgical blade, with one half at 30° to 45°. Kaya et al3 used sharp-tipped cautery to puncture closed macrocomedones. Cvancara and Meffert4 described how an autoclaved paper clip could be fashioned into a disposable comedone extractor, highlighting its potential use in humanitarian work or military deployments. A sterilized safety pin has been demonstrated to be an inexpensive tool to extract open and closed comedones without a surgical blade.5 We describe the use of a blood glucose testing lancet and a paper clip for comedone extraction.
Tools and Technique
A patient presented to a satellite clinic requesting extraction of multiple bothersome milia. A comedone extractor was unavailable at that location, and the patient’s access to care elsewhere was limited.
To perform extraction of milia in this case, we used a sterile, twist-top, stainless steel, 30-gauge blood glucose testing lancet and a paper clip sterilized with an isopropyl alcohol wipe (Figure). The beveled edge of the lancet was used to make a superficial opening to the skin, and the end loop of the paper clip was used as a comedone extractor. Applying moderate vertical pressure, 15 milia were expressed from the forearms. The patient tolerated the procedure well and reported minimal pain.
Practical Implications
The cost of the paper clip and lancet for our technique was $0.07. These materials are affordable, easy to use, and readily found in a variety of settings, making them a feasible option for performing this procedure.
- Ashique KT, Srinivas CR. Pen punching: an innovative technique for comedone extraction from the well of the concha. J Am Acad Dermatol. 2015;73:E177. doi:10.1016/j.jaad.2015.07.033
- Mukhtar M, Gupta S. Surgical pearl: disposable syringe as modified customized comedone extractor. J Cutan Aesthet Surg. 2022;15:185-186. doi:10.4103/JCAS.JCAS_112_21
- Kaya TI, Tursen U, Kokturk A, et al. An effective extraction technique for the treatment of closed macrocomedones. Dermatol Surg. 2003;29:741-744. doi:10.1046/j.1524-4725.2003.29190.x
- Cvancara JL, Meffert JJ. Surgical pearl: versatile paper clip comedo extractor for acne surgery. J Am Acad Dermatol. 1999;40:477-478. doi:10.1016/s0190-9622(99)70501-3
- Mukhtar M, Sharma R. Surgical pearl: the safety pin as a better alternative to the versatile paper clip comedo extractor. Int J Dermatol. 2004;43:967-968. doi:10.1111/j.1365-4632.2004.02293.x

Suture Selection to Minimize Postoperative Postinflammatory Hyperpigmentation in Patients With Skin of Color During Mohs Micrographic Surgery
Practice Gap
Proper suture selection is imperative for appropriate wound healing to minimize the risk for infection and inflammation and to reduce scarring. In Mohs micrographic surgery (MMS), suture selection should be given high consideration in patients with skin of color.1 Using the right type of suture and wound closure technique can lead to favorable aesthetic outcomes by preventing postoperative postinflammatory hyperpigmentation (PIH) and keloids. Data on the choice of suture material in patients with skin of color are limited.
Suture selection depends on a variety of factors including but not limited to the location of the wound on the body, risk for infection, cost, availability, and the personal preference and experience of the MMS surgeon. During the COVID-19 pandemic, suturepreference among dermatologic surgeons shifted to fast-absorbing gut sutures,2 offering alternatives to synthetic monofilament polypropylene and nylon sutures. Absorbable sutures reduced the need for in-person follow-up visits without increasing the incidence of postoperative complications.
Despite these benefits, research suggests that natural absorbable gut sutures induce cutaneous inflammation and should be avoided in patients with skin of color.1,3,4 Nonabsorbable sutures are less reactive, reducing PIH after MMS in patients with skin of color.
Tools and Technique
Use of nonabsorbable stitches is a practical solution to reduce the risk for inflammation in patients with skin of color. Increased inflammation can lead to PIH and increase the risk for keloids in this patient population. Some patients will experience PIH after a surgical procedure regardless of the sutures used to repair the closure; however, one of our goals with patients with skin of color undergoing MMS is to reduce the inflammatory risk that could lead to PIH to ensure optimal aesthetic outcomes.
A middle-aged African woman with darker skin and a history of developing PIH after trauma to the skin presented to our clinic for MMS of a dermatofibrosarcoma protuberans on the upper abdomen. We used a simple running suture with 4-0 nylon to close the surgical wound. We avoided fast-absorbing gut sutures because they have high tissue reactivity1,4; use of sutures with low tissue reactivity, such as nylon and polypropylene, decreases the risk for inflammation without compromising alignment of wound edges and overall cosmesis of the repair. Prolene also is cost-effective and presents a decreased risk for wound dehiscence.5 After cauterizing the wound, we placed multiple synthetic absorbable sutures first to close the wound. We then did a double-running suture of nonabsorbable monofilament suture to reapproximate the epidermal edges with minimal tension. We placed 2 sets of running stitches to minimize the risk for dehiscence along the scar.
The patient was required to return for removal of the nonabsorbable sutures; this postoperative visit was covered by health insurance at no additional cost to the patient. In comparison, long-term repeat visits to treat PIH with a laser or chemical peel would have been more costly. Given that treatment of PIH is considered cosmetic, laser treatment would have been priced at several hundred dollars per session at our institution, and the patient would likely have had a copay for a pretreatment lightening cream such as hydroquinone. Our patient had a favorable cosmetic outcome and reported no or minimal evidence of PIH months after the procedure.
Patients should be instructed to apply petrolatum twice daily, use sun-protective clothing, and cover sutures to minimize exposure to the sun and prevent crusting of the wound. Postinflammatory hyperpigmentation can be proactively treated postoperatively with topical hydroquinone, which was not needed in our patient.
Practice Implications
Although some studies suggest that there are no cosmetic differences between absorbable and nonabsorbable sutures, the effect of suture type in patients with skin of color undergoing MMS often is unreported or is not studied.6,7 The high reactivity and cutaneous inflammation associated with absorbable gut sutures are important considerations in this patient population.
In patients with skin of color undergoing MMS, we use nonabsorbable epidermal sutures such as nylon and Prolene because of their low reactivity and association with favorable aesthetic outcomes. Nonabsorbable sutures can be safely used in patients of all ages who are undergoing MMS under local anesthesia.
An exception would be the use of the absorbable suture Monocryl (J&J MedTech) in patients with skin of color who need a running subcuticular wound closure because it has low tissue reactivity and maintains high tensile strength. Monocryl has been shown to create less-reactive scars, which decreases the risk for keloids.8,9
More clinical studies are needed to assess the increased susceptibility to PIH in patients with skin of color when using absorbable gut sutures.
- Williams R, Ciocon D. Mohs micrographic surgery in skin of color. J Drugs Dermatol. 2022;21:536-541. doi:10.36849/JDD.6469
- Gallop J, Andrasik W, Lucas J. Successful use of percutaneous dissolvable sutures during COVID-19 pandemic: a retrospective review. J Cutan Med Surg. 2023;27:34-38. doi:10.1177/12034754221143083
- Byrne M, Aly A. The surgical suture. Aesthet Surg J. 2019;39(suppl 2):S67-S72. doi:10.1093/asj/sjz036
- Koppa M, House R, Tobin V, et al. Suture material choice can increase risk of hypersensitivity in hand trauma patients. Eur J Plast Surg. 2023;46:239-243. doi:10.1007/s00238-022-01986-7
- Pandey S, Singh M, Singh K, et al. A prospective randomized study comparing non-absorbable polypropylene (Prolene®) and delayed absorbable polyglactin 910 (Vicryl®) suture material in mass closure of vertical laparotomy wounds. Indian J Surg. 2013;75:306-310. doi:10.1007/s12262-012-0492-x
- Parell GJ, Becker GD. Comparison of absorbable with nonabsorbable sutures in closure of facial skin wounds. Arch Facial Plast Surg. 2003;5:488-490. doi:10.1001/archfaci.5.6.488
- Kim J, Singh Maan H, Cool AJ, et al. Fast absorbing gut suture versus cyanoacrylate tissue adhesive in the epidermal closure of linear repairs following Mohs micrographic surgery. J Clin Aesthet Dermatol. 2015;8:24-29.
- Niessen FB, Spauwen PH, Kon M. The role of suture material in hypertrophic scar formation: Monocryl vs. Vicryl-Rapide. Ann Plast Surg. 1997;39:254-260. doi:10.1097/00000637-199709000-00006
- Fosko SW, Heap D. Surgical pearl: an economical means of skin closure with absorbable suture. J Am Acad Dermatol. 1998;39(2 pt 1):248-250. doi:10.1016/s0190-9622(98)70084-2
Practice Gap
Proper suture selection is imperative for appropriate wound healing to minimize the risk for infection and inflammation and to reduce scarring. In Mohs micrographic surgery (MMS), suture selection should be given high consideration in patients with skin of color.1 Using the right type of suture and wound closure technique can lead to favorable aesthetic outcomes by preventing postoperative postinflammatory hyperpigmentation (PIH) and keloids. Data on the choice of suture material in patients with skin of color are limited.
Suture selection depends on a variety of factors including but not limited to the location of the wound on the body, risk for infection, cost, availability, and the personal preference and experience of the MMS surgeon. During the COVID-19 pandemic, suturepreference among dermatologic surgeons shifted to fast-absorbing gut sutures,2 offering alternatives to synthetic monofilament polypropylene and nylon sutures. Absorbable sutures reduced the need for in-person follow-up visits without increasing the incidence of postoperative complications.
Despite these benefits, research suggests that natural absorbable gut sutures induce cutaneous inflammation and should be avoided in patients with skin of color.1,3,4 Nonabsorbable sutures are less reactive, reducing PIH after MMS in patients with skin of color.
Tools and Technique
Use of nonabsorbable stitches is a practical solution to reduce the risk for inflammation in patients with skin of color. Increased inflammation can lead to PIH and increase the risk for keloids in this patient population. Some patients will experience PIH after a surgical procedure regardless of the sutures used to repair the closure; however, one of our goals with patients with skin of color undergoing MMS is to reduce the inflammatory risk that could lead to PIH to ensure optimal aesthetic outcomes.
A middle-aged African woman with darker skin and a history of developing PIH after trauma to the skin presented to our clinic for MMS of a dermatofibrosarcoma protuberans on the upper abdomen. We used a simple running suture with 4-0 nylon to close the surgical wound. We avoided fast-absorbing gut sutures because they have high tissue reactivity1,4; use of sutures with low tissue reactivity, such as nylon and polypropylene, decreases the risk for inflammation without compromising alignment of wound edges and overall cosmesis of the repair. Prolene also is cost-effective and presents a decreased risk for wound dehiscence.5 After cauterizing the wound, we placed multiple synthetic absorbable sutures first to close the wound. We then did a double-running suture of nonabsorbable monofilament suture to reapproximate the epidermal edges with minimal tension. We placed 2 sets of running stitches to minimize the risk for dehiscence along the scar.
The patient was required to return for removal of the nonabsorbable sutures; this postoperative visit was covered by health insurance at no additional cost to the patient. In comparison, long-term repeat visits to treat PIH with a laser or chemical peel would have been more costly. Given that treatment of PIH is considered cosmetic, laser treatment would have been priced at several hundred dollars per session at our institution, and the patient would likely have had a copay for a pretreatment lightening cream such as hydroquinone. Our patient had a favorable cosmetic outcome and reported no or minimal evidence of PIH months after the procedure.
Patients should be instructed to apply petrolatum twice daily, use sun-protective clothing, and cover sutures to minimize exposure to the sun and prevent crusting of the wound. Postinflammatory hyperpigmentation can be proactively treated postoperatively with topical hydroquinone, which was not needed in our patient.
Practice Implications
Although some studies suggest that there are no cosmetic differences between absorbable and nonabsorbable sutures, the effect of suture type in patients with skin of color undergoing MMS often is unreported or is not studied.6,7 The high reactivity and cutaneous inflammation associated with absorbable gut sutures are important considerations in this patient population.
In patients with skin of color undergoing MMS, we use nonabsorbable epidermal sutures such as nylon and Prolene because of their low reactivity and association with favorable aesthetic outcomes. Nonabsorbable sutures can be safely used in patients of all ages who are undergoing MMS under local anesthesia.
An exception would be the use of the absorbable suture Monocryl (J&J MedTech) in patients with skin of color who need a running subcuticular wound closure because it has low tissue reactivity and maintains high tensile strength. Monocryl has been shown to create less-reactive scars, which decreases the risk for keloids.8,9
More clinical studies are needed to assess the increased susceptibility to PIH in patients with skin of color when using absorbable gut sutures.
- Williams R, Ciocon D. Mohs micrographic surgery in skin of color. J Drugs Dermatol. 2022;21:536-541. doi:10.36849/JDD.6469
- Gallop J, Andrasik W, Lucas J. Successful use of percutaneous dissolvable sutures during COVID-19 pandemic: a retrospective review. J Cutan Med Surg. 2023;27:34-38. doi:10.1177/12034754221143083
- Byrne M, Aly A. The surgical suture. Aesthet Surg J. 2019;39(suppl 2):S67-S72. doi:10.1093/asj/sjz036
- Koppa M, House R, Tobin V, et al. Suture material choice can increase risk of hypersensitivity in hand trauma patients. Eur J Plast Surg. 2023;46:239-243. doi:10.1007/s00238-022-01986-7
- Pandey S, Singh M, Singh K, et al. A prospective randomized study comparing non-absorbable polypropylene (Prolene®) and delayed absorbable polyglactin 910 (Vicryl®) suture material in mass closure of vertical laparotomy wounds. Indian J Surg. 2013;75:306-310. doi:10.1007/s12262-012-0492-x
- Parell GJ, Becker GD. Comparison of absorbable with nonabsorbable sutures in closure of facial skin wounds. Arch Facial Plast Surg. 2003;5:488-490. doi:10.1001/archfaci.5.6.488
- Kim J, Singh Maan H, Cool AJ, et al. Fast absorbing gut suture versus cyanoacrylate tissue adhesive in the epidermal closure of linear repairs following Mohs micrographic surgery. J Clin Aesthet Dermatol. 2015;8:24-29.
- Niessen FB, Spauwen PH, Kon M. The role of suture material in hypertrophic scar formation: Monocryl vs. Vicryl-Rapide. Ann Plast Surg. 1997;39:254-260. doi:10.1097/00000637-199709000-00006
- Fosko SW, Heap D. Surgical pearl: an economical means of skin closure with absorbable suture. J Am Acad Dermatol. 1998;39(2 pt 1):248-250. doi:10.1016/s0190-9622(98)70084-2