User login
Knead a Hand? Use of a Portable Massager to Reduce Patient Pain and Anxiety During Nail Surgery
Practice Gap
Pain and anxiety are common in fully conscious patients undergoing dermatologic surgery with local anesthesia. Particularly during nail surgery, pain from anesthetic injection—caused by both needle insertion and fluid infiltration—occurs because the nail unit is highly vascularized and innervated.1 Current methods to improve patient comfort during infiltration include use of a buffered anesthetic solution, warming the anesthetic, slower technique, and direct cold application.2
Perioperative anxiety correlates with increased postoperative pain, analgesic use, and delayed recovery. Furthermore, increased perioperative anxiety reduces the pain threshold and elevates estimates of pain intensity.3 Therefore, reducing procedure-related anxiety and pain may improve quality of care and ease patient discomfort.
Distraction is a common and practical nonpharmacotherapeutic technique for reducing pain and anxiety during medical procedures. The refocusing method of distraction aims to divert attention away from pain to more pleasant stimuli to reduce pain perception.3 Several methods of distraction—using stress balls, engaging in conversation, hand-holding, applying virtual reality, and playing videos—can decrease perioperative anxiety and pain.3-6
Procedural pain and distraction techniques have been evaluated in the pediatric population more than in adults.4 Nail surgery–associated pain and distraction techniques for nail surgery have been inadequately studied.7
We offer a distraction technique utilizing a portable massager to ensure that patients are as comfortable as possible when the local anesthetic is injected prior to the first incision.
The Technique
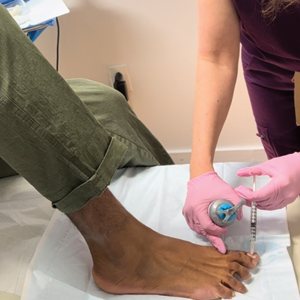
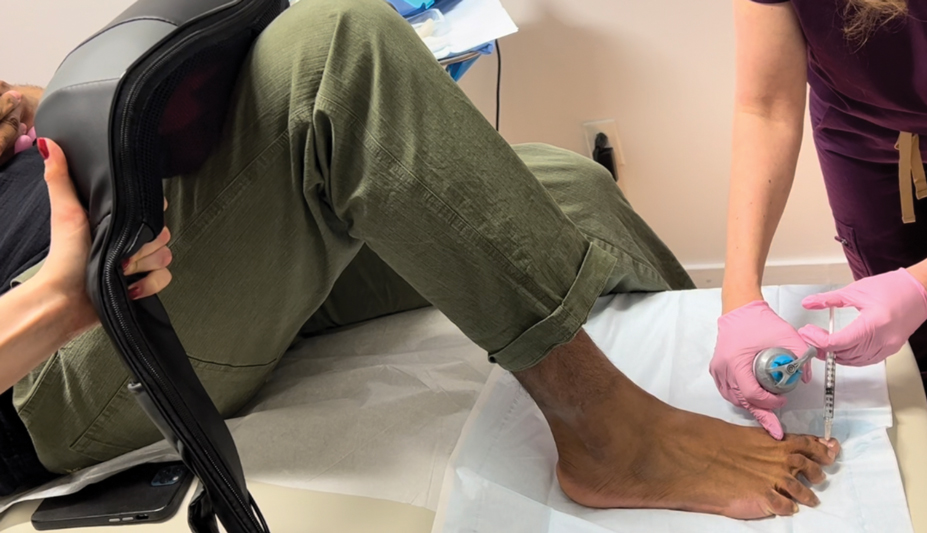
A portable shiatsu massager that uses heat and deep-tissue kneading is placed on the upper thigh for toenail cases or lower arm for fingernail cases during injection of anesthetic to divert the patient’s attention from the surgical site (Figure). Kneading from the massage helps distract the patient from pain by introducing a competing, more pleasant, vibrating sensation that overrides pain signals; the relaxation component helps to diminish patient anxiety during injection.
Practice Implications
Use of a portable massager may reduce pain through both distraction and vibration. In a randomized clinical trial of 115 patients undergoing hand or facial surgery, patients who viewed a distraction video during the procedure reported a lower pain score compared to the control group (mean [SD] visual analog scale of pain score, 3.4 [2.6] vs 4.5 [2.6][P=.01]).4 In another randomized clinical trial of 25 patients undergoing lip augmentation, 92% of patients (23/25) in the vibration-assisted arm endorsed less pain during procedures compared to the arm without vibration (mean [SD] pain score, 3.82 [1.73] vs 5.6 [1.76][P<.001]).8
Utilization of a portable massager is a safe means of improving the patient experience; the distracting and relaxing effects and intense pulsations simultaneously reduce anxiety and pain during nail surgery. Controlled clinical trials are needed to evaluate its efficacy in diminishing both anxiety and pain during nail procedures compared to other analgesic methods.
- Lipner SR. Pain-minimizing strategies for nail surgery. Cutis. 2018;101:76-77.
- Ricardo JW, Lipner SR. Air cooling for improved analgesia during local anesthetic infiltration for nail surgery. J Am Acad Dermatol. 2021;84:E231-E232. doi:10.1016/j.jaad.2019.11.032
- Hudson BF, Ogden J, Whiteley MS. Randomized controlled trial to compare the effect of simple distraction interventions on pain and anxiety experienced during conscious surgery. Eur J Pain. 2015;19:1447-1455. doi:10.1002/ejp.675
- Molleman J, Tielemans JF, Braam MJI, et al. Distraction as a simple and effective method to reduce pain during local anesthesia: a randomized controlled trial. J Plast Reconstr Aesthet Surg. 2019;72:1979-1985. doi:10.1016/j.bjps.2019.07.023
- Ricardo JW, Lipner SR. Utilization of a stress ball to diminish anxiety during nail surgery. Cutis. 2020;105:294.
- Ricardo JW, Lipner SR. Utilizing a sleep mask to reduce patient anxiety during nail surgery. Cutis. 2021;108:36. doi:10.12788/cutis.0285
- Ricardo JW, Qiu Y, Lipner SR. Longitudinal perioperative pain assessment in nail surgery. J Am Acad Dermatol. 2022;87:874-876. doi:10.1016/j.jaad.2021.11.042
- Guney K, Sezgin B, Yavuzer R. The efficacy of vibration anesthesia on reducing pain levels during lip augmentation: worth the buzz? Aesthet Surg J. 2017;37:1044-1048. doi:10.1093/asj/sjx073
Practice Gap
Pain and anxiety are common in fully conscious patients undergoing dermatologic surgery with local anesthesia. Particularly during nail surgery, pain from anesthetic injection—caused by both needle insertion and fluid infiltration—occurs because the nail unit is highly vascularized and innervated.1 Current methods to improve patient comfort during infiltration include use of a buffered anesthetic solution, warming the anesthetic, slower technique, and direct cold application.2
Perioperative anxiety correlates with increased postoperative pain, analgesic use, and delayed recovery. Furthermore, increased perioperative anxiety reduces the pain threshold and elevates estimates of pain intensity.3 Therefore, reducing procedure-related anxiety and pain may improve quality of care and ease patient discomfort.
Distraction is a common and practical nonpharmacotherapeutic technique for reducing pain and anxiety during medical procedures. The refocusing method of distraction aims to divert attention away from pain to more pleasant stimuli to reduce pain perception.3 Several methods of distraction—using stress balls, engaging in conversation, hand-holding, applying virtual reality, and playing videos—can decrease perioperative anxiety and pain.3-6
Procedural pain and distraction techniques have been evaluated in the pediatric population more than in adults.4 Nail surgery–associated pain and distraction techniques for nail surgery have been inadequately studied.7
We offer a distraction technique utilizing a portable massager to ensure that patients are as comfortable as possible when the local anesthetic is injected prior to the first incision.
The Technique
A portable shiatsu massager that uses heat and deep-tissue kneading is placed on the upper thigh for toenail cases or lower arm for fingernail cases during injection of anesthetic to divert the patient’s attention from the surgical site (Figure). Kneading from the massage helps distract the patient from pain by introducing a competing, more pleasant, vibrating sensation that overrides pain signals; the relaxation component helps to diminish patient anxiety during injection.

Practice Implications
Use of a portable massager may reduce pain through both distraction and vibration. In a randomized clinical trial of 115 patients undergoing hand or facial surgery, patients who viewed a distraction video during the procedure reported a lower pain score compared to the control group (mean [SD] visual analog scale of pain score, 3.4 [2.6] vs 4.5 [2.6][P=.01]).4 In another randomized clinical trial of 25 patients undergoing lip augmentation, 92% of patients (23/25) in the vibration-assisted arm endorsed less pain during procedures compared to the arm without vibration (mean [SD] pain score, 3.82 [1.73] vs 5.6 [1.76][P<.001]).8
Utilization of a portable massager is a safe means of improving the patient experience; the distracting and relaxing effects and intense pulsations simultaneously reduce anxiety and pain during nail surgery. Controlled clinical trials are needed to evaluate its efficacy in diminishing both anxiety and pain during nail procedures compared to other analgesic methods.
Practice Gap
Pain and anxiety are common in fully conscious patients undergoing dermatologic surgery with local anesthesia. Particularly during nail surgery, pain from anesthetic injection—caused by both needle insertion and fluid infiltration—occurs because the nail unit is highly vascularized and innervated.1 Current methods to improve patient comfort during infiltration include use of a buffered anesthetic solution, warming the anesthetic, slower technique, and direct cold application.2
Perioperative anxiety correlates with increased postoperative pain, analgesic use, and delayed recovery. Furthermore, increased perioperative anxiety reduces the pain threshold and elevates estimates of pain intensity.3 Therefore, reducing procedure-related anxiety and pain may improve quality of care and ease patient discomfort.
Distraction is a common and practical nonpharmacotherapeutic technique for reducing pain and anxiety during medical procedures. The refocusing method of distraction aims to divert attention away from pain to more pleasant stimuli to reduce pain perception.3 Several methods of distraction—using stress balls, engaging in conversation, hand-holding, applying virtual reality, and playing videos—can decrease perioperative anxiety and pain.3-6
Procedural pain and distraction techniques have been evaluated in the pediatric population more than in adults.4 Nail surgery–associated pain and distraction techniques for nail surgery have been inadequately studied.7
We offer a distraction technique utilizing a portable massager to ensure that patients are as comfortable as possible when the local anesthetic is injected prior to the first incision.
The Technique
A portable shiatsu massager that uses heat and deep-tissue kneading is placed on the upper thigh for toenail cases or lower arm for fingernail cases during injection of anesthetic to divert the patient’s attention from the surgical site (Figure). Kneading from the massage helps distract the patient from pain by introducing a competing, more pleasant, vibrating sensation that overrides pain signals; the relaxation component helps to diminish patient anxiety during injection.

Practice Implications
Use of a portable massager may reduce pain through both distraction and vibration. In a randomized clinical trial of 115 patients undergoing hand or facial surgery, patients who viewed a distraction video during the procedure reported a lower pain score compared to the control group (mean [SD] visual analog scale of pain score, 3.4 [2.6] vs 4.5 [2.6][P=.01]).4 In another randomized clinical trial of 25 patients undergoing lip augmentation, 92% of patients (23/25) in the vibration-assisted arm endorsed less pain during procedures compared to the arm without vibration (mean [SD] pain score, 3.82 [1.73] vs 5.6 [1.76][P<.001]).8
Utilization of a portable massager is a safe means of improving the patient experience; the distracting and relaxing effects and intense pulsations simultaneously reduce anxiety and pain during nail surgery. Controlled clinical trials are needed to evaluate its efficacy in diminishing both anxiety and pain during nail procedures compared to other analgesic methods.
- Lipner SR. Pain-minimizing strategies for nail surgery. Cutis. 2018;101:76-77.
- Ricardo JW, Lipner SR. Air cooling for improved analgesia during local anesthetic infiltration for nail surgery. J Am Acad Dermatol. 2021;84:E231-E232. doi:10.1016/j.jaad.2019.11.032
- Hudson BF, Ogden J, Whiteley MS. Randomized controlled trial to compare the effect of simple distraction interventions on pain and anxiety experienced during conscious surgery. Eur J Pain. 2015;19:1447-1455. doi:10.1002/ejp.675
- Molleman J, Tielemans JF, Braam MJI, et al. Distraction as a simple and effective method to reduce pain during local anesthesia: a randomized controlled trial. J Plast Reconstr Aesthet Surg. 2019;72:1979-1985. doi:10.1016/j.bjps.2019.07.023
- Ricardo JW, Lipner SR. Utilization of a stress ball to diminish anxiety during nail surgery. Cutis. 2020;105:294.
- Ricardo JW, Lipner SR. Utilizing a sleep mask to reduce patient anxiety during nail surgery. Cutis. 2021;108:36. doi:10.12788/cutis.0285
- Ricardo JW, Qiu Y, Lipner SR. Longitudinal perioperative pain assessment in nail surgery. J Am Acad Dermatol. 2022;87:874-876. doi:10.1016/j.jaad.2021.11.042
- Guney K, Sezgin B, Yavuzer R. The efficacy of vibration anesthesia on reducing pain levels during lip augmentation: worth the buzz? Aesthet Surg J. 2017;37:1044-1048. doi:10.1093/asj/sjx073
Cadaveric Split-Thickness Skin Graft With Partial Guiding Closure for Scalp Defects Extending to the Periosteum
Practice Gap
Scalp defects that extend to or below the periosteum often pose a reconstructive conundrum. Secondary-intention healing is challenging without an intact periosteum, and complex rotational flaps are required in these scenarios.1 For a tumor that is at high risk for recurrence or when adjuvant therapy is necessary, tissue distortion of flaps can make monitoring for recurrence difficult. Similarly, for patients in poor health or who are elderly and have substantial skin atrophy, extensive closure may be undesirable or more technically challenging with a higher risk for adverse events. In these scenarios, additional strategies are necessary to optimize wound healing and cosmesis. A cadaveric split-thickness skin graft (STSG) consisting of biologically active tissue can be used to expedite granulation.2
Technique
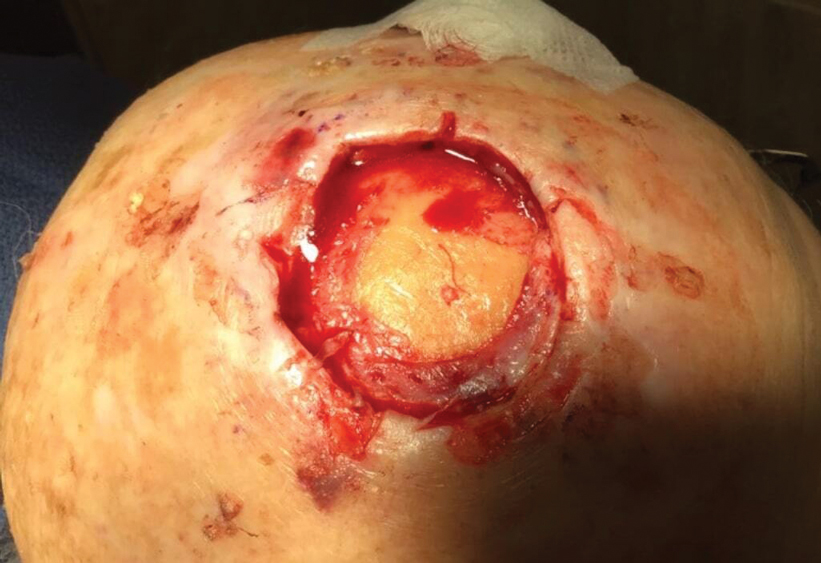
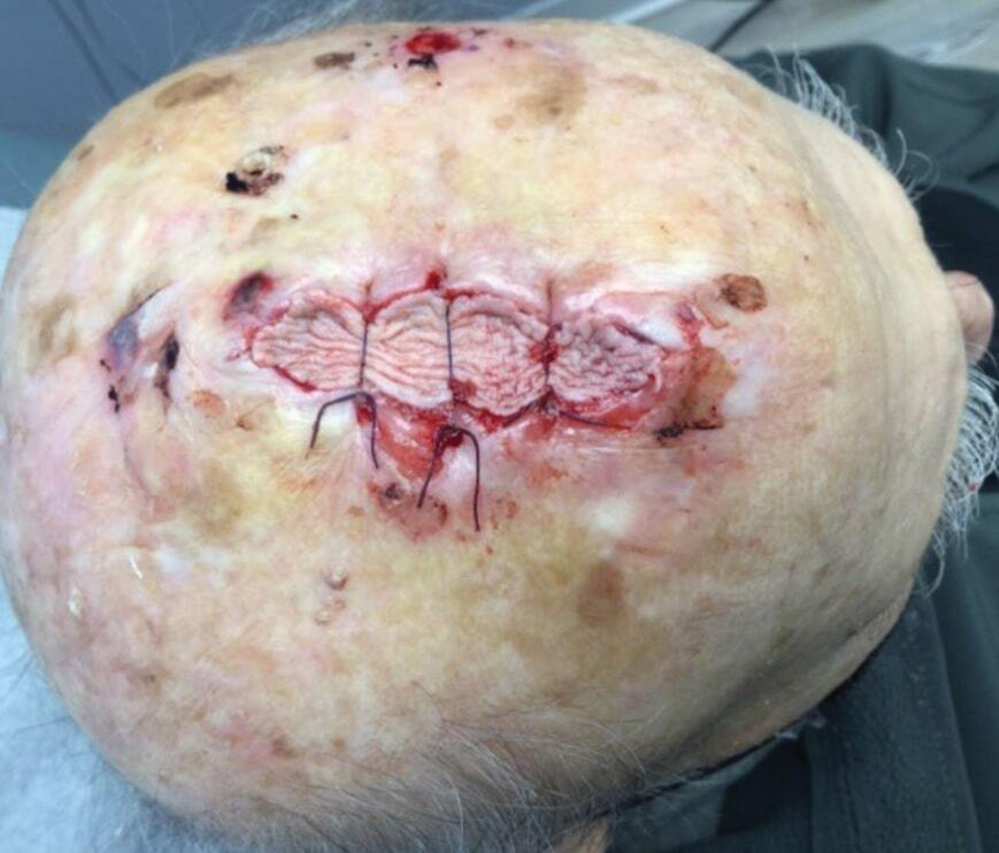
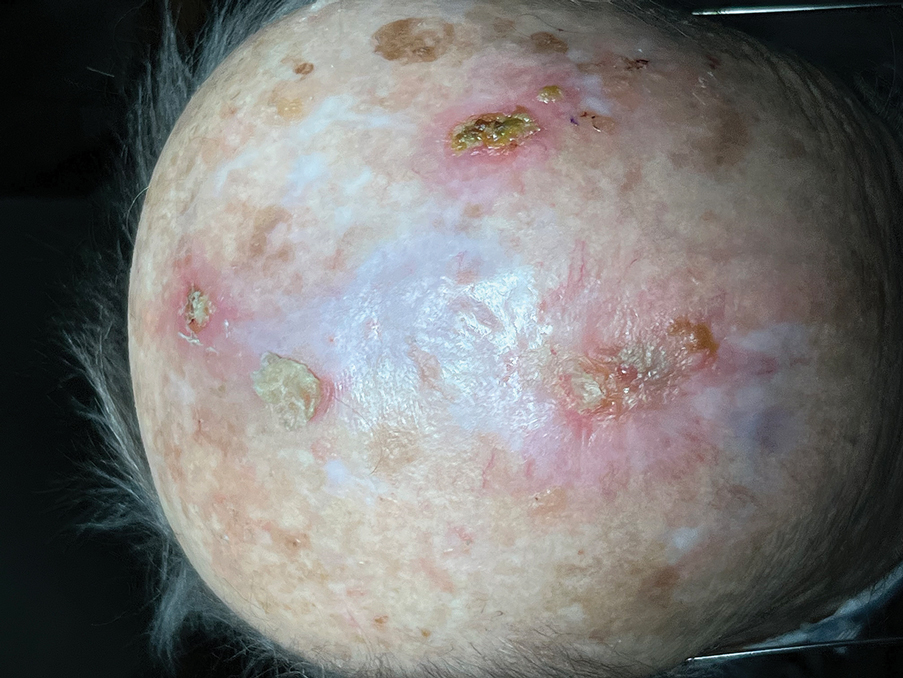
Following tumor clearance on the scalp (Figure 1), wide undermining is performed and 3-0 polyglactin 910 epidermal pulley sutures are placed to partially close the defect. A cadaveric STSG is placed over the remaining exposed periosteum and secured under the pulley sutures (Figure 2). The cadaveric STSG is replaced at 1-week intervals. At 4 weeks, sutures typically are removed. The cadaveric STSG is used until the exposed periosteum is fully granulated and the surgeon decides that granulation arrest is unlikely. The wound then heals by unassisted granulation. This approach provides an excellent final cosmetic outcome while avoiding extensive reconstruction (Figure 3).
Practice Implications
Scalp defects requiring closure are common for dermatologic surgeons. Several techniques to promote tissue granulation in defects that involve exposed periosteum have been reported, including (1) creation of small holes with a scalpel or chisel to access cortical circulation and (2) using laser modalities to stimulate granulation (eg, an erbium:YAG or CO2 laser).3,4 Although direct comparative studies are needed, the cadaveric STSG provides an approach that increases tissue granulation but does not require more invasive techniques or equipment.
Autologous STSGs need a wound bed and can fail with an exposed periosteum. Furthermore, an autologous STSG that survives may leave an unsightly, hypopigmented, depressed defect. When a defect involves the periosteum and a primary closure or flap is not ideal, a skin substitute may be an option.
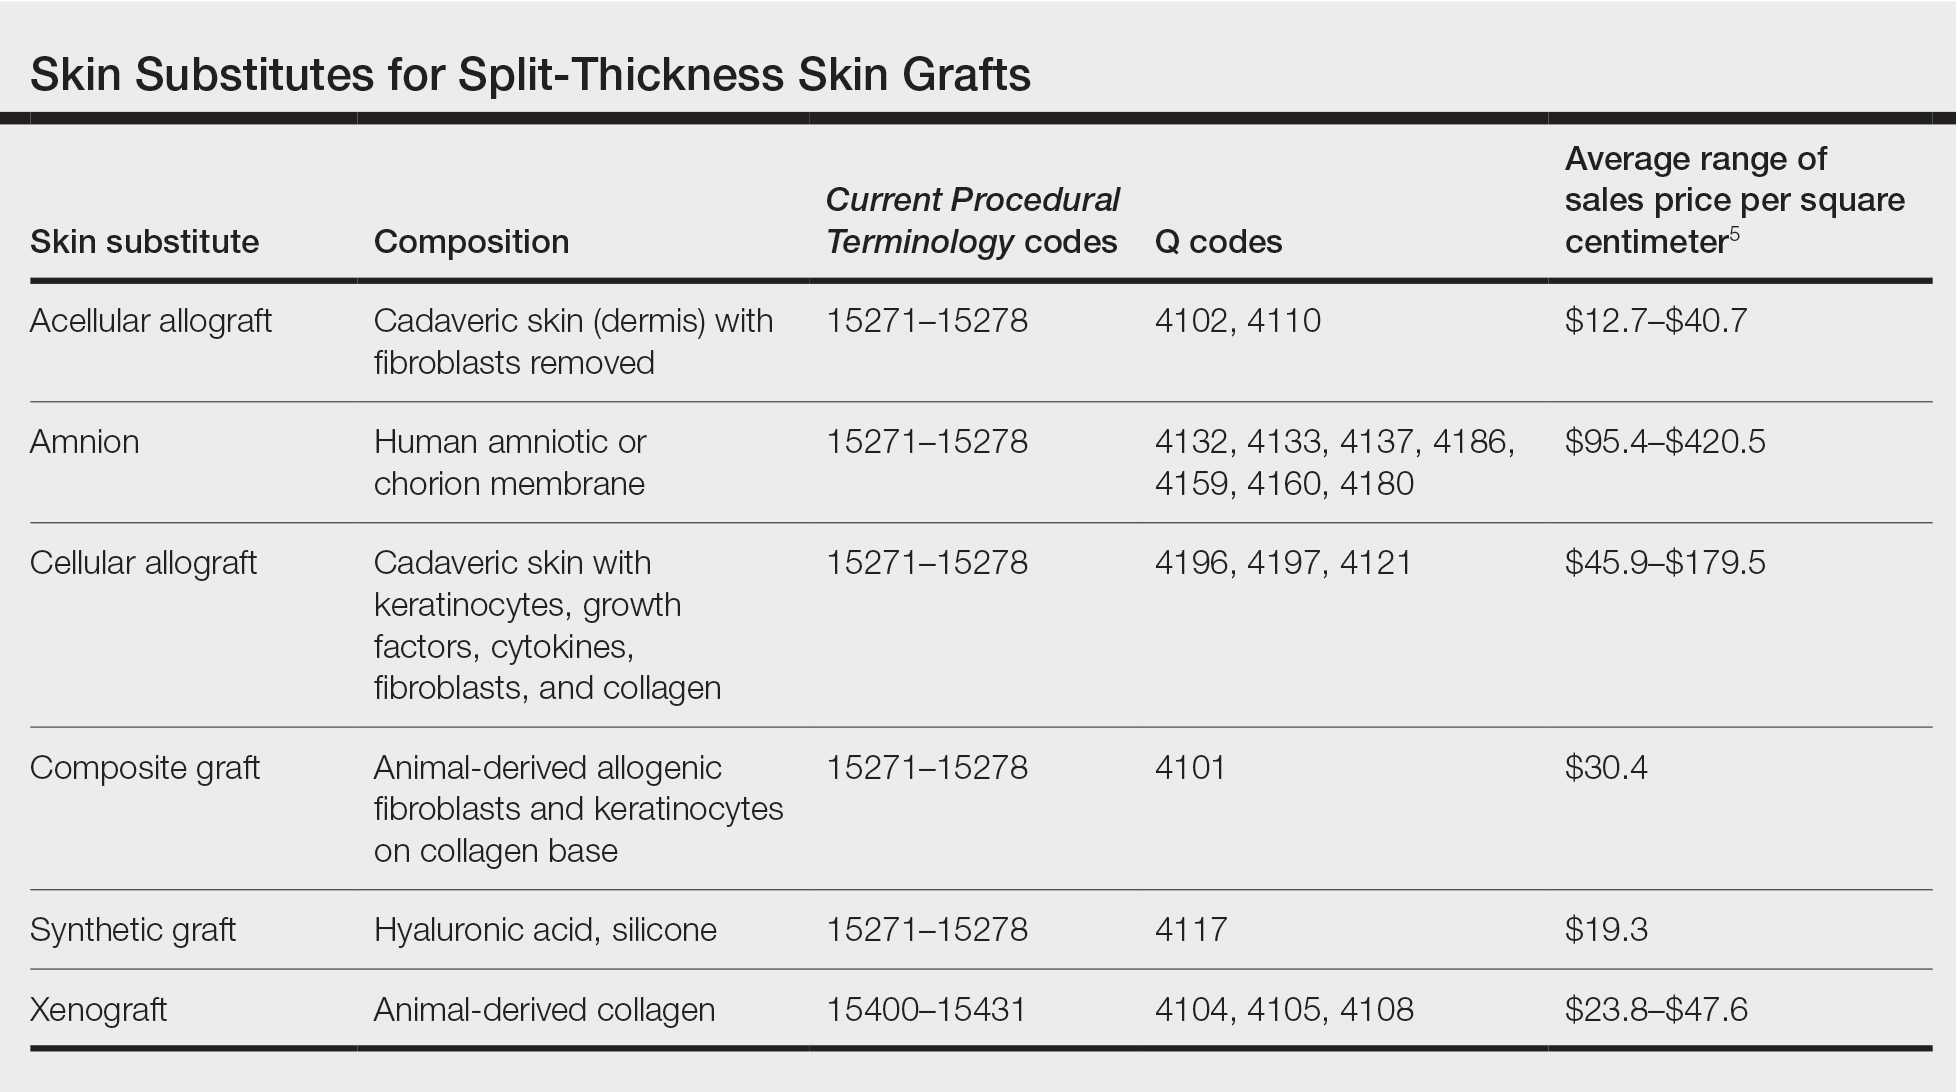
Skin substitutes, including cadaveric STSG, generally are classified as bioengineered skin equivalents, amniotic tissue, or cadaveric bioproducts (Table). Unlike autologous grafts, these skin substitutes can provide rapid coverage of the defect and do not require a highly vascularized wound bed.6 They also minimize the inflammatory response and potentially improve the final cosmetic outcome by improving granulation rather than immediate STSG closure creating a step-off in deep wounds.6
Cadaveric STSGs also have been used in nonhealing ulcerations; diabetic foot ulcers; and ulcerations in which muscle, tendon, or bone are exposed, demonstrating induction of wound healing with superior scar quality and skin function.2,7,8 The utility of the cadaveric STSG is further highlighted by its potential to reduce costs9 compared to bioengineered skin substitutes, though considerable variability exists in pricing (Table).
Consider using a cadaveric STSG with a guiding closure in cases in which there is concern for delayed or absent tissue granulation or when monitoring for recurrence is essential.
- Jibbe A, Tolkachjov SN. An efficient single-layer suture technique for large scalp flaps. J Am Acad Dermatol. 2020;83:E395-E396. doi:10.1016/j.jaad.2019.07.062
- Mosti G, Mattaliano V, Magliaro A, et al. Cadaveric skin grafts may greatly increase the healing rate of recalcitrant ulcers when used both alone and in combination with split-thickness skin grafts. Dermatol Surg. 2020;46:169-179. doi:10.1097/dss.0000000000001990
- Valesky EM, Vogl T, Kaufmann R, et al. Trepanation or complete removal of the outer table of the calvarium for granulation induction: the erbium:YAG laser as an alternative to the rose head burr. Dermatology. 2015;230:276-281. doi:10.1159/000368749
- Drosou A, Trieu D, Goldberg LH. Scalpel-made holes on exposed scalp bone to promote second intention healing. J Am Acad Dermatol. 2014;71:387-388. doi:10.1016/j.jaad.2014.04.020
- Centers for Medicare & Medicaid Services. April 2023 ASP Pricing. Accessed August 25, 2023. https://www.cms.gov/medicare/medicare-part-b-drug-average-sales-price/asp-pricing-files
- Shores JT, Gabriel A, Gupta S. Skin substitutes and alternatives: a review. Adv Skin Wound Care. 2007;20(9 Pt 1):493-508. doi:10.1097/01.ASW.0000288217.83128.f3
- Li X, Meng X, Wang X, et al. Human acellular dermal matrix allograft: a randomized, controlled human trial for the long-term evaluation of patients with extensive burns. Burns. 2015;41:689-699. doi:10.1016/j.burns.2014.12.007
- Juhasz I, Kiss B, Lukacs L, et al. Long-term followup of dermal substitution with acellular dermal implant in burns and postburn scar corrections. Dermatol Res Pract. 2010;2010:210150. doi:10.1155/2010/210150
- Towler MA, Rush EW, Richardson MK, et al. Randomized, prospective, blinded-enrollment, head-to-head venous leg ulcer healing trial comparing living, bioengineered skin graft substitute (Apligraf) with living, cryopreserved, human skin allograft (TheraSkin). Clin Podiatr Med Surg. 2018;35:357-365. doi:10.1016/j.cpm.2018.02.006
Practice Gap
Scalp defects that extend to or below the periosteum often pose a reconstructive conundrum. Secondary-intention healing is challenging without an intact periosteum, and complex rotational flaps are required in these scenarios.1 For a tumor that is at high risk for recurrence or when adjuvant therapy is necessary, tissue distortion of flaps can make monitoring for recurrence difficult. Similarly, for patients in poor health or who are elderly and have substantial skin atrophy, extensive closure may be undesirable or more technically challenging with a higher risk for adverse events. In these scenarios, additional strategies are necessary to optimize wound healing and cosmesis. A cadaveric split-thickness skin graft (STSG) consisting of biologically active tissue can be used to expedite granulation.2

Technique
Following tumor clearance on the scalp (Figure 1), wide undermining is performed and 3-0 polyglactin 910 epidermal pulley sutures are placed to partially close the defect. A cadaveric STSG is placed over the remaining exposed periosteum and secured under the pulley sutures (Figure 2). The cadaveric STSG is replaced at 1-week intervals. At 4 weeks, sutures typically are removed. The cadaveric STSG is used until the exposed periosteum is fully granulated and the surgeon decides that granulation arrest is unlikely. The wound then heals by unassisted granulation. This approach provides an excellent final cosmetic outcome while avoiding extensive reconstruction (Figure 3).

Practice Implications
Scalp defects requiring closure are common for dermatologic surgeons. Several techniques to promote tissue granulation in defects that involve exposed periosteum have been reported, including (1) creation of small holes with a scalpel or chisel to access cortical circulation and (2) using laser modalities to stimulate granulation (eg, an erbium:YAG or CO2 laser).3,4 Although direct comparative studies are needed, the cadaveric STSG provides an approach that increases tissue granulation but does not require more invasive techniques or equipment.

Autologous STSGs need a wound bed and can fail with an exposed periosteum. Furthermore, an autologous STSG that survives may leave an unsightly, hypopigmented, depressed defect. When a defect involves the periosteum and a primary closure or flap is not ideal, a skin substitute may be an option.
Skin substitutes, including cadaveric STSG, generally are classified as bioengineered skin equivalents, amniotic tissue, or cadaveric bioproducts (Table). Unlike autologous grafts, these skin substitutes can provide rapid coverage of the defect and do not require a highly vascularized wound bed.6 They also minimize the inflammatory response and potentially improve the final cosmetic outcome by improving granulation rather than immediate STSG closure creating a step-off in deep wounds.6
Cadaveric STSGs also have been used in nonhealing ulcerations; diabetic foot ulcers; and ulcerations in which muscle, tendon, or bone are exposed, demonstrating induction of wound healing with superior scar quality and skin function.2,7,8 The utility of the cadaveric STSG is further highlighted by its potential to reduce costs9 compared to bioengineered skin substitutes, though considerable variability exists in pricing (Table).

Consider using a cadaveric STSG with a guiding closure in cases in which there is concern for delayed or absent tissue granulation or when monitoring for recurrence is essential.
Practice Gap
Scalp defects that extend to or below the periosteum often pose a reconstructive conundrum. Secondary-intention healing is challenging without an intact periosteum, and complex rotational flaps are required in these scenarios.1 For a tumor that is at high risk for recurrence or when adjuvant therapy is necessary, tissue distortion of flaps can make monitoring for recurrence difficult. Similarly, for patients in poor health or who are elderly and have substantial skin atrophy, extensive closure may be undesirable or more technically challenging with a higher risk for adverse events. In these scenarios, additional strategies are necessary to optimize wound healing and cosmesis. A cadaveric split-thickness skin graft (STSG) consisting of biologically active tissue can be used to expedite granulation.2

Technique
Following tumor clearance on the scalp (Figure 1), wide undermining is performed and 3-0 polyglactin 910 epidermal pulley sutures are placed to partially close the defect. A cadaveric STSG is placed over the remaining exposed periosteum and secured under the pulley sutures (Figure 2). The cadaveric STSG is replaced at 1-week intervals. At 4 weeks, sutures typically are removed. The cadaveric STSG is used until the exposed periosteum is fully granulated and the surgeon decides that granulation arrest is unlikely. The wound then heals by unassisted granulation. This approach provides an excellent final cosmetic outcome while avoiding extensive reconstruction (Figure 3).

Practice Implications
Scalp defects requiring closure are common for dermatologic surgeons. Several techniques to promote tissue granulation in defects that involve exposed periosteum have been reported, including (1) creation of small holes with a scalpel or chisel to access cortical circulation and (2) using laser modalities to stimulate granulation (eg, an erbium:YAG or CO2 laser).3,4 Although direct comparative studies are needed, the cadaveric STSG provides an approach that increases tissue granulation but does not require more invasive techniques or equipment.

Autologous STSGs need a wound bed and can fail with an exposed periosteum. Furthermore, an autologous STSG that survives may leave an unsightly, hypopigmented, depressed defect. When a defect involves the periosteum and a primary closure or flap is not ideal, a skin substitute may be an option.
Skin substitutes, including cadaveric STSG, generally are classified as bioengineered skin equivalents, amniotic tissue, or cadaveric bioproducts (Table). Unlike autologous grafts, these skin substitutes can provide rapid coverage of the defect and do not require a highly vascularized wound bed.6 They also minimize the inflammatory response and potentially improve the final cosmetic outcome by improving granulation rather than immediate STSG closure creating a step-off in deep wounds.6
Cadaveric STSGs also have been used in nonhealing ulcerations; diabetic foot ulcers; and ulcerations in which muscle, tendon, or bone are exposed, demonstrating induction of wound healing with superior scar quality and skin function.2,7,8 The utility of the cadaveric STSG is further highlighted by its potential to reduce costs9 compared to bioengineered skin substitutes, though considerable variability exists in pricing (Table).

Consider using a cadaveric STSG with a guiding closure in cases in which there is concern for delayed or absent tissue granulation or when monitoring for recurrence is essential.
- Jibbe A, Tolkachjov SN. An efficient single-layer suture technique for large scalp flaps. J Am Acad Dermatol. 2020;83:E395-E396. doi:10.1016/j.jaad.2019.07.062
- Mosti G, Mattaliano V, Magliaro A, et al. Cadaveric skin grafts may greatly increase the healing rate of recalcitrant ulcers when used both alone and in combination with split-thickness skin grafts. Dermatol Surg. 2020;46:169-179. doi:10.1097/dss.0000000000001990
- Valesky EM, Vogl T, Kaufmann R, et al. Trepanation or complete removal of the outer table of the calvarium for granulation induction: the erbium:YAG laser as an alternative to the rose head burr. Dermatology. 2015;230:276-281. doi:10.1159/000368749
- Drosou A, Trieu D, Goldberg LH. Scalpel-made holes on exposed scalp bone to promote second intention healing. J Am Acad Dermatol. 2014;71:387-388. doi:10.1016/j.jaad.2014.04.020
- Centers for Medicare & Medicaid Services. April 2023 ASP Pricing. Accessed August 25, 2023. https://www.cms.gov/medicare/medicare-part-b-drug-average-sales-price/asp-pricing-files
- Shores JT, Gabriel A, Gupta S. Skin substitutes and alternatives: a review. Adv Skin Wound Care. 2007;20(9 Pt 1):493-508. doi:10.1097/01.ASW.0000288217.83128.f3
- Li X, Meng X, Wang X, et al. Human acellular dermal matrix allograft: a randomized, controlled human trial for the long-term evaluation of patients with extensive burns. Burns. 2015;41:689-699. doi:10.1016/j.burns.2014.12.007
- Juhasz I, Kiss B, Lukacs L, et al. Long-term followup of dermal substitution with acellular dermal implant in burns and postburn scar corrections. Dermatol Res Pract. 2010;2010:210150. doi:10.1155/2010/210150
- Towler MA, Rush EW, Richardson MK, et al. Randomized, prospective, blinded-enrollment, head-to-head venous leg ulcer healing trial comparing living, bioengineered skin graft substitute (Apligraf) with living, cryopreserved, human skin allograft (TheraSkin). Clin Podiatr Med Surg. 2018;35:357-365. doi:10.1016/j.cpm.2018.02.006
Affixing a Scalp Dressing With Hairpins
Practice Gap
Wound dressings protect the skin and prevent contamination. The hair often makes it difficult to affix a dressing after a minor scalp trauma or local surgery on the head. Traditional approaches for fastening a dressing on the head include bandage winding or adhesive tape, but these methods often affect aesthetics or cause discomfort—bandage winding can make it inconvenient for the patient to move their head, and adhesive tape can cause pain by pulling the hair during removal.
To better position a scalp dressing, tie-over dressings, braid dressings, and paper clips have been used as fixators.1-3 These methods have benefits and disadvantages.
Tie-over Dressing—The dressing is clasped with long sutures that were reserved during wound closure. This method is sturdy, can slightly compress the wound, and is applicable to any part of the scalp. However, it requires more sutures, and more careful wound care may be required due to the edge of the dressing being close to the wound.
Braid Dressing—Tape, a rubber band, or braided hair is used to bind the gauze pad. This dressing is simple and inexpensive. However, it is limited to patients with long hair; even then, it often is difficult to anchor the dressing by braiding hair. Moreover, removal of the rubber band and tape can cause discomfort or pain.
Paper Clip—This is a simple scalp dressing fixator. However, due to the short and circular structure of the clip, it is not conducive to affixing a gauze dressing for patients with short hair, and it often hooks the gauze and hair, making it inconvenient for the physician and a source of discomfort for the patient when the paper clip is being removed.
The Technique
To address shortcomings of traditional methods, we encourage the use of hairpins to affix a dressing after a scalp wound is sutured. Two steps are required:
- Position the gauze to cover the wound and press the gauze down with your hand.
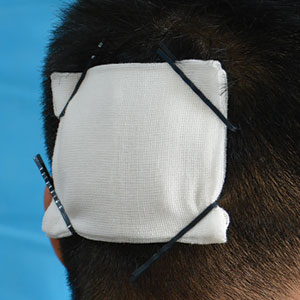
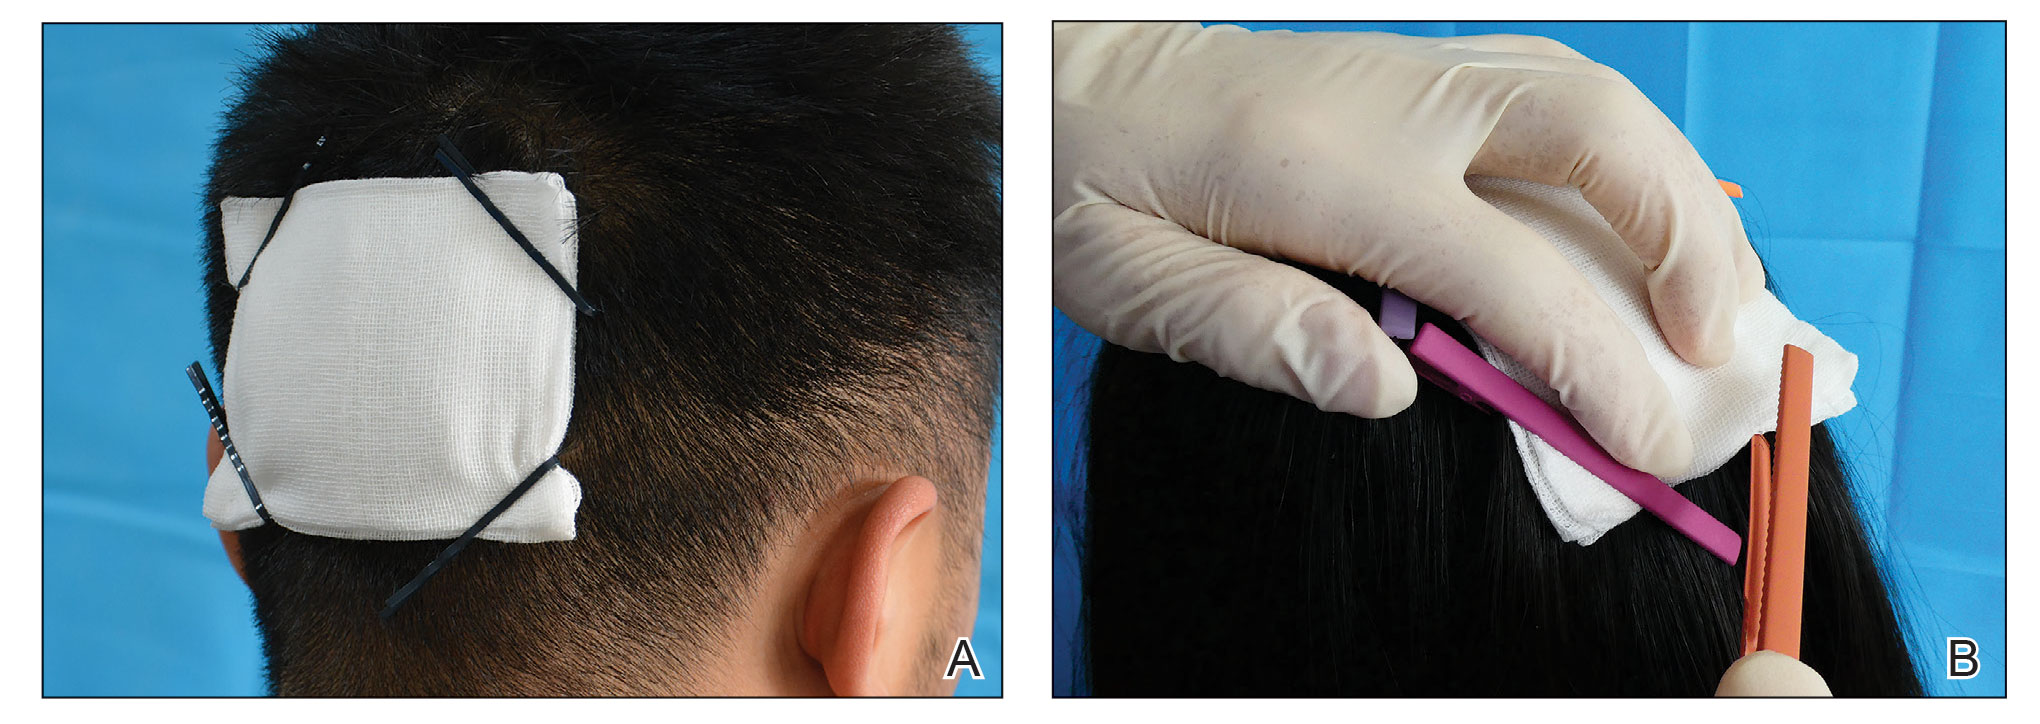
- Clamp the 4 corners of the dressing and adjacent hair with hairpins (Figure, A).
Practical Implications
Hairpins are common for fixing hairstyles and decorating hair. They are inexpensive, easy to obtain, simple in structure, convenient to use without additional discomfort, and easy to remove (Figure, B). Because most hairpins have a powerful clamping force, they can affix dressings in short hair (Figure, A). All medical staff can use hairpins to anchor the scalp dressing. Even a patient’s family members can carry out simple dressing replacement and wound cleaning using this method. Patients also have many options for hairpin styles, which is especially useful in easing the apprehension of surgery in pediatric patients.
- Ginzburg A, Mutalik S. Another method of tie-over dressing for surgical wounds of hair-bearing areas. Dermatol Surg. 1999;25:893-894. doi:10.1046/j.1524-4725.1999.99155.x
- Yanaka K, Nose T. Braid dressing for hair-bearing scalp wound. Neurocrit Care. 2004;1:217-218. doi:10.1385/NCC:1:2:217
- Bu W, Zhang Q, Fang F, et al. Fixation of head dressing gauzes with paper clips is similar to and better than using tape. J Am Acad Dermatol. 2019;81:E95-E96. doi:10.1016/j.jaad.2018.10.046
Practice Gap
Wound dressings protect the skin and prevent contamination. The hair often makes it difficult to affix a dressing after a minor scalp trauma or local surgery on the head. Traditional approaches for fastening a dressing on the head include bandage winding or adhesive tape, but these methods often affect aesthetics or cause discomfort—bandage winding can make it inconvenient for the patient to move their head, and adhesive tape can cause pain by pulling the hair during removal.
To better position a scalp dressing, tie-over dressings, braid dressings, and paper clips have been used as fixators.1-3 These methods have benefits and disadvantages.
Tie-over Dressing—The dressing is clasped with long sutures that were reserved during wound closure. This method is sturdy, can slightly compress the wound, and is applicable to any part of the scalp. However, it requires more sutures, and more careful wound care may be required due to the edge of the dressing being close to the wound.
Braid Dressing—Tape, a rubber band, or braided hair is used to bind the gauze pad. This dressing is simple and inexpensive. However, it is limited to patients with long hair; even then, it often is difficult to anchor the dressing by braiding hair. Moreover, removal of the rubber band and tape can cause discomfort or pain.
Paper Clip—This is a simple scalp dressing fixator. However, due to the short and circular structure of the clip, it is not conducive to affixing a gauze dressing for patients with short hair, and it often hooks the gauze and hair, making it inconvenient for the physician and a source of discomfort for the patient when the paper clip is being removed.
The Technique
To address shortcomings of traditional methods, we encourage the use of hairpins to affix a dressing after a scalp wound is sutured. Two steps are required:
- Position the gauze to cover the wound and press the gauze down with your hand.
- Clamp the 4 corners of the dressing and adjacent hair with hairpins (Figure, A).

Practical Implications
Hairpins are common for fixing hairstyles and decorating hair. They are inexpensive, easy to obtain, simple in structure, convenient to use without additional discomfort, and easy to remove (Figure, B). Because most hairpins have a powerful clamping force, they can affix dressings in short hair (Figure, A). All medical staff can use hairpins to anchor the scalp dressing. Even a patient’s family members can carry out simple dressing replacement and wound cleaning using this method. Patients also have many options for hairpin styles, which is especially useful in easing the apprehension of surgery in pediatric patients.
Practice Gap
Wound dressings protect the skin and prevent contamination. The hair often makes it difficult to affix a dressing after a minor scalp trauma or local surgery on the head. Traditional approaches for fastening a dressing on the head include bandage winding or adhesive tape, but these methods often affect aesthetics or cause discomfort—bandage winding can make it inconvenient for the patient to move their head, and adhesive tape can cause pain by pulling the hair during removal.
To better position a scalp dressing, tie-over dressings, braid dressings, and paper clips have been used as fixators.1-3 These methods have benefits and disadvantages.
Tie-over Dressing—The dressing is clasped with long sutures that were reserved during wound closure. This method is sturdy, can slightly compress the wound, and is applicable to any part of the scalp. However, it requires more sutures, and more careful wound care may be required due to the edge of the dressing being close to the wound.
Braid Dressing—Tape, a rubber band, or braided hair is used to bind the gauze pad. This dressing is simple and inexpensive. However, it is limited to patients with long hair; even then, it often is difficult to anchor the dressing by braiding hair. Moreover, removal of the rubber band and tape can cause discomfort or pain.
Paper Clip—This is a simple scalp dressing fixator. However, due to the short and circular structure of the clip, it is not conducive to affixing a gauze dressing for patients with short hair, and it often hooks the gauze and hair, making it inconvenient for the physician and a source of discomfort for the patient when the paper clip is being removed.
The Technique
To address shortcomings of traditional methods, we encourage the use of hairpins to affix a dressing after a scalp wound is sutured. Two steps are required:
- Position the gauze to cover the wound and press the gauze down with your hand.
- Clamp the 4 corners of the dressing and adjacent hair with hairpins (Figure, A).

Practical Implications
Hairpins are common for fixing hairstyles and decorating hair. They are inexpensive, easy to obtain, simple in structure, convenient to use without additional discomfort, and easy to remove (Figure, B). Because most hairpins have a powerful clamping force, they can affix dressings in short hair (Figure, A). All medical staff can use hairpins to anchor the scalp dressing. Even a patient’s family members can carry out simple dressing replacement and wound cleaning using this method. Patients also have many options for hairpin styles, which is especially useful in easing the apprehension of surgery in pediatric patients.
- Ginzburg A, Mutalik S. Another method of tie-over dressing for surgical wounds of hair-bearing areas. Dermatol Surg. 1999;25:893-894. doi:10.1046/j.1524-4725.1999.99155.x
- Yanaka K, Nose T. Braid dressing for hair-bearing scalp wound. Neurocrit Care. 2004;1:217-218. doi:10.1385/NCC:1:2:217
- Bu W, Zhang Q, Fang F, et al. Fixation of head dressing gauzes with paper clips is similar to and better than using tape. J Am Acad Dermatol. 2019;81:E95-E96. doi:10.1016/j.jaad.2018.10.046
Use of the Retroauricular Pull-Through Sandwich Flap for Repair of an Extensive Conchal Bowl Defect With Complete Cartilage Loss
Practice Gap
Repair of a conchal defect requires careful consideration to achieve an optimal outcome. Reconstruction should resurface exposed cartilage, restore the natural projection of the auricle, and direct sound into the external auditory meatus. Patients also should be able to wear glasses and a hearing aid.
The reconstructive ladder for most conchal bowl defects includes secondary intention healing, full-thickness skin grafting (FTSG), and either a revolving-door flap or a flip-flop flap. Secondary intention and FTSG are appropriate for superficial defects, in which the loss of cartilage is not substantial.1,2 Revolving-door and flip-flop flaps are single-stage retroauricular approaches used to repair relatively small defects of the conchal bowl.3 However, reconstructive options are limited for a large defect in which there is extensive loss of cartilage; 3-stage retroauricular approaches have been utilized. The anterior pedicled retroauricular flap is a 3-stage repair that can be utilized to reconstruct a through-and-through defect of the central ear:
- Stage 1: an anteriorly based retroauricular pedicle is incised, hinged over, and sutured to the medial aspect of the defect, resurfacing the posterior ear.
- Stage 2: the pedicle is severed and the flap is folded on itself to resurface the anterior ear.
- Stage 3: the folded edge is de-epithelialized and set into the lateral defect.4
The revolving-door flap also uses a 3-stage approach and is utilized for a full-thickness central auricular defect:
- Stage 1: a revolving-door flap is used to resurface the anterior ear.
- Stage 2: a cartilage graft provides structural support.
- Stage 3: division and inset with an FTSG is used to resurface the posterior ear.
The anterior pedicled retroauricular flap and revolving-door flap techniques are useful for defects when there is intact posterior auricular skin but not when there is extensive loss of cartilage. Other downsides to these 3-stage approaches are the time and multiple procedures required.5
We describe the technique of a retroauricular pull-through sandwich flap for repair of a large conchal bowl defect with extensive cartilage loss and intact posterior auricular skin.
Technique
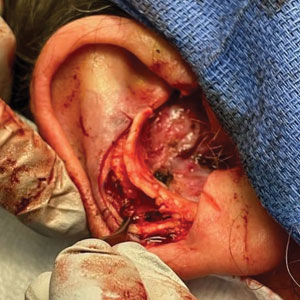
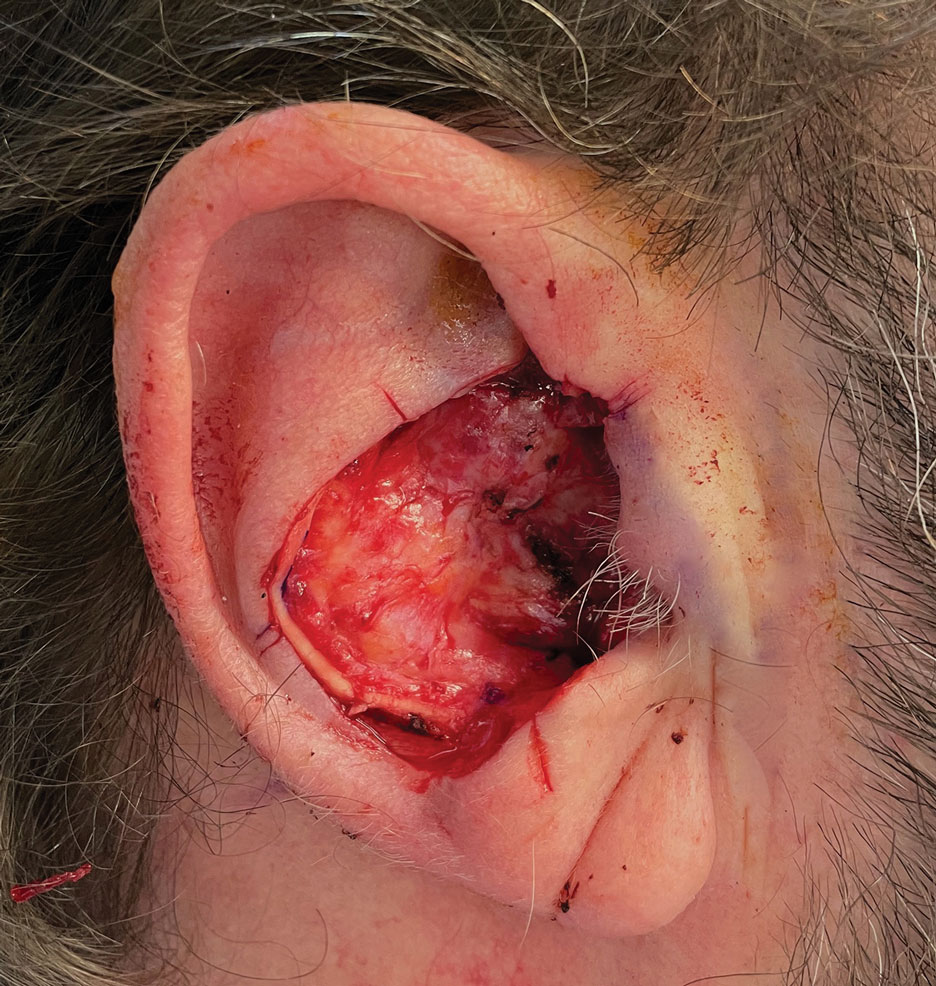
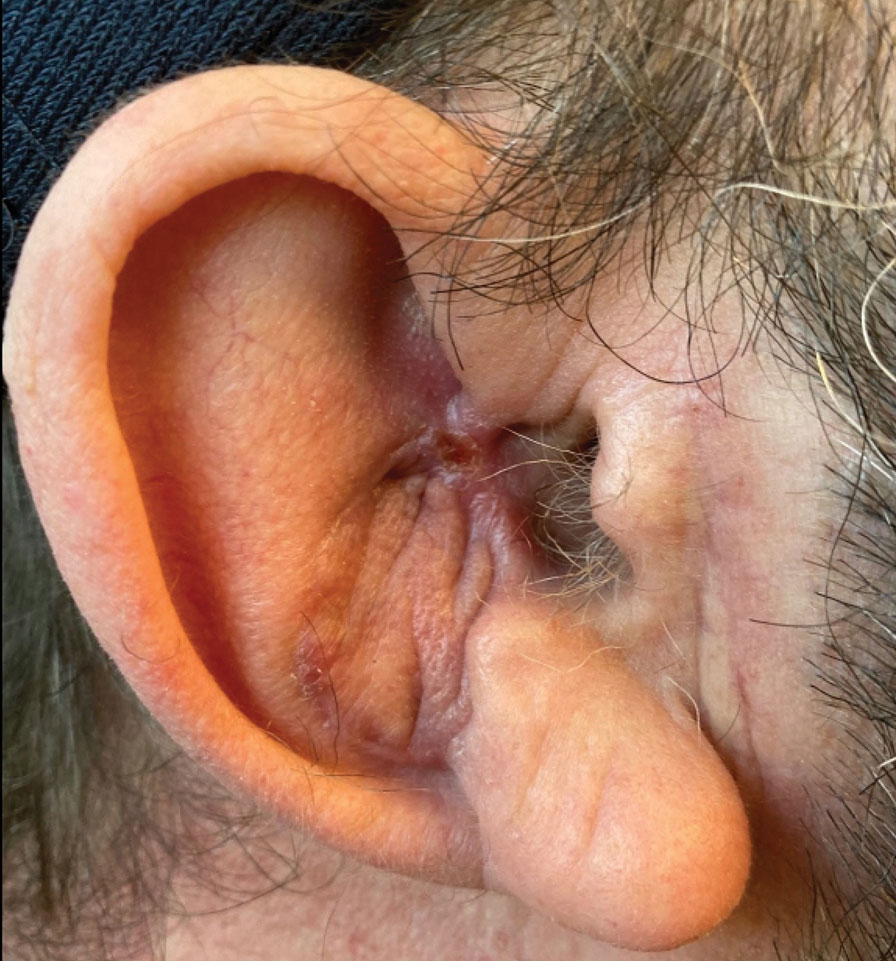
A 62-year-old man presented for treatment of a 2.6×2.4-cm nodular and infiltrative basal cell carcinoma of the right conchal bowl. The tumor was cleared with 3 stages of Mohs micrographic surgery, resulting in a 5.5×4.2-cm defect with complete loss of cartilage throughout the concha, helical crus, and inner rim of the antihelix (Figure 1). A 2-stage repair was performed utilizing a cartilage graft and a pull-through retroauricular interpolation flap.
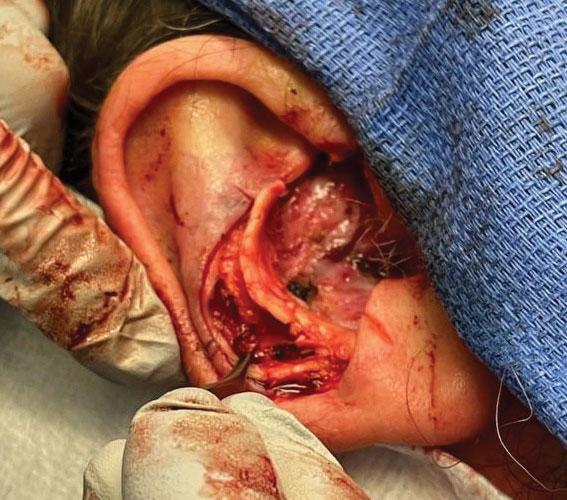
Stage 1—A cartilage graft was harvested from the left concha and sutured into the central defect for structural support (Figure 2). An incision was then made through the posterior auricular skin, just medial to the residual antihelical cartilage, and a retroauricular interpolation flap was pulled through this incision to resurface the lateral two-thirds of the conchal bowl defect. This created a “sandwich” of tissue, with the following layers (ordered from anterior to posterior): retroauricular interpolation flap, cartilage graft, and intact posterior auricular skin.
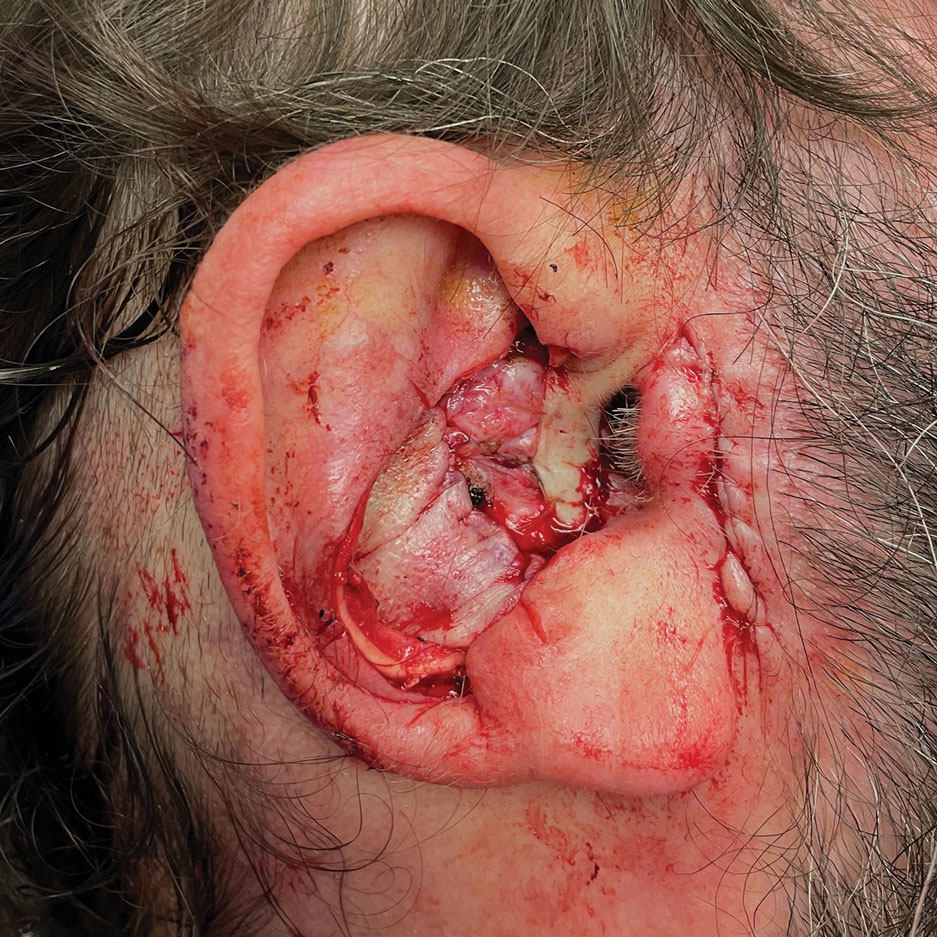
A preauricular banner transposition flap was used to repair the medial one-third of the conchal defect. A small area was left to heal by secondary intention (Figure 3).
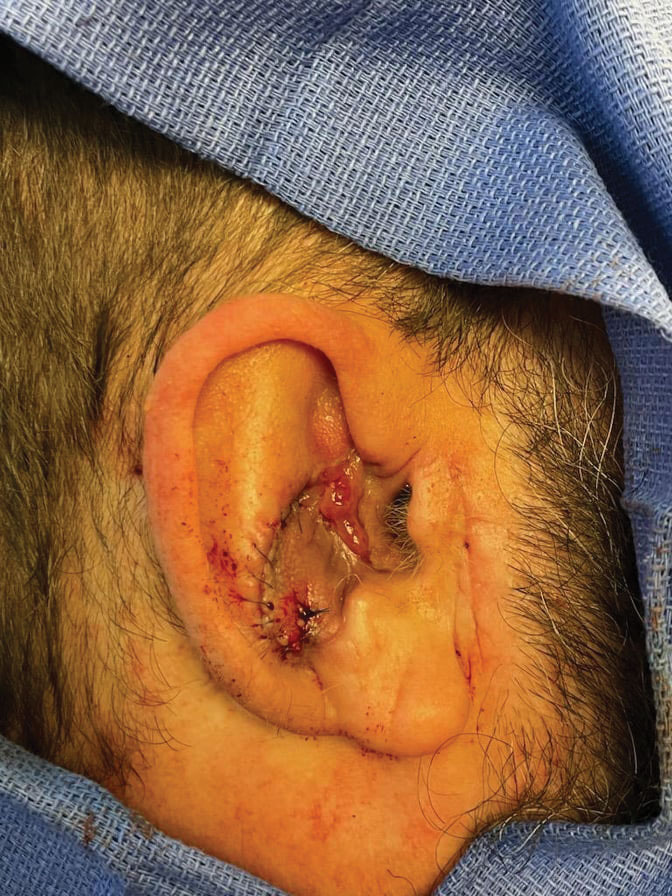
Stage 2—The patient returned 3 weeks later for division and inset of the retroauricular interpolation flap. The pedicle of the flap was severed and its free edge was sutured into the lateral aspect of the defect. The posterior auricular incision that the flap had been pulled through in stage 1 of the repair was closed in a layered fashion, and the secondary defect of the postauricular scalp was left to heal by secondary intention (Figure 4).
Final Results—At follow-up 1 month later, the patient was noted to have good aesthetic and functional outcomes (Figure 5).
Practice Implications
The retroauricular pull-through sandwich flap combines a cartilage graft and a retroauricular interpolation flap pulled through an incision in the posterior auricular skin to resurface the anterior ear. This repair is most useful for a large conchal bowl defect in which there is extensive missing cartilage but intact posterior auricular skin.
The retroauricular scalp is a substantial tissue reservoir with robust vasculature; an interpolation flap from this area frequently is used to repair an extensive ear defect. The most common use of an interpolation flap is for a large helical defect; however, the flap also can be pulled through an incision in the posterior auricular skin to the front of the ear in a manner similar to revolving-door and flip-flop flaps, thus allowing for increased flap reach.
A cartilage graft provides structural support, helping to maintain auricular projection. The helical arcades provide a robust vascular supply and maintain viability of the helical rim tissue, despite the large aperture created for the pull-through flap.
We recommend this 2-stage repair for large conchal bowl defects with extensive cartilage loss and intact posterior auricular skin.
- Clark DP, Hanke CW. Neoplasms of the conchal bowl: treatment with Mohs micrographic surgery. J Dermatol Surg Oncol. 1988;14:1223-1228. doi:10.1111/j.1524-4725.1988.tb03479.x
- Dessy LA, Figus A, Fioramonti P, et al. Reconstruction of anterior auricular conchal defect after malignancy excision: revolving-door flap versus full-thickness skin graft. J Plast Reconstr Aesthet Surg. 2010;63:746-752. doi:10.1016/j.bjps.2009.01.073
- Golash A, Bera S, Kanoi AV, et al. The revolving door flap: revisiting an elegant but forgotten flap for ear defect reconstruction. Indian J Plast Surg. 2020;53:64-70. doi:10.1055/s-0040-1709531
- Heinz MB, Hölzle F, Ghassemi A. Repairing a non-marginal full-thickness auricular defect using a reversed flap from the postauricular area. J Oral Maxillofac Surg. 2015;73:764-768. doi:10.1016/j.joms.2014.11.005
- Leitenberger JJ, Golden SK. Reconstruction after full-thickness loss of the antihelix, scapha, and triangular fossa. Dermatol Surg. 2016;42:893-896. doi:10.1097/DSS.0000000000000664
Practice Gap
Repair of a conchal defect requires careful consideration to achieve an optimal outcome. Reconstruction should resurface exposed cartilage, restore the natural projection of the auricle, and direct sound into the external auditory meatus. Patients also should be able to wear glasses and a hearing aid.
The reconstructive ladder for most conchal bowl defects includes secondary intention healing, full-thickness skin grafting (FTSG), and either a revolving-door flap or a flip-flop flap. Secondary intention and FTSG are appropriate for superficial defects, in which the loss of cartilage is not substantial.1,2 Revolving-door and flip-flop flaps are single-stage retroauricular approaches used to repair relatively small defects of the conchal bowl.3 However, reconstructive options are limited for a large defect in which there is extensive loss of cartilage; 3-stage retroauricular approaches have been utilized. The anterior pedicled retroauricular flap is a 3-stage repair that can be utilized to reconstruct a through-and-through defect of the central ear:
- Stage 1: an anteriorly based retroauricular pedicle is incised, hinged over, and sutured to the medial aspect of the defect, resurfacing the posterior ear.
- Stage 2: the pedicle is severed and the flap is folded on itself to resurface the anterior ear.
- Stage 3: the folded edge is de-epithelialized and set into the lateral defect.4
The revolving-door flap also uses a 3-stage approach and is utilized for a full-thickness central auricular defect:
- Stage 1: a revolving-door flap is used to resurface the anterior ear.
- Stage 2: a cartilage graft provides structural support.
- Stage 3: division and inset with an FTSG is used to resurface the posterior ear.
The anterior pedicled retroauricular flap and revolving-door flap techniques are useful for defects when there is intact posterior auricular skin but not when there is extensive loss of cartilage. Other downsides to these 3-stage approaches are the time and multiple procedures required.5
We describe the technique of a retroauricular pull-through sandwich flap for repair of a large conchal bowl defect with extensive cartilage loss and intact posterior auricular skin.
Technique
A 62-year-old man presented for treatment of a 2.6×2.4-cm nodular and infiltrative basal cell carcinoma of the right conchal bowl. The tumor was cleared with 3 stages of Mohs micrographic surgery, resulting in a 5.5×4.2-cm defect with complete loss of cartilage throughout the concha, helical crus, and inner rim of the antihelix (Figure 1). A 2-stage repair was performed utilizing a cartilage graft and a pull-through retroauricular interpolation flap.

Stage 1—A cartilage graft was harvested from the left concha and sutured into the central defect for structural support (Figure 2). An incision was then made through the posterior auricular skin, just medial to the residual antihelical cartilage, and a retroauricular interpolation flap was pulled through this incision to resurface the lateral two-thirds of the conchal bowl defect. This created a “sandwich” of tissue, with the following layers (ordered from anterior to posterior): retroauricular interpolation flap, cartilage graft, and intact posterior auricular skin.

A preauricular banner transposition flap was used to repair the medial one-third of the conchal defect. A small area was left to heal by secondary intention (Figure 3).

Stage 2—The patient returned 3 weeks later for division and inset of the retroauricular interpolation flap. The pedicle of the flap was severed and its free edge was sutured into the lateral aspect of the defect. The posterior auricular incision that the flap had been pulled through in stage 1 of the repair was closed in a layered fashion, and the secondary defect of the postauricular scalp was left to heal by secondary intention (Figure 4).

Final Results—At follow-up 1 month later, the patient was noted to have good aesthetic and functional outcomes (Figure 5).

Practice Implications
The retroauricular pull-through sandwich flap combines a cartilage graft and a retroauricular interpolation flap pulled through an incision in the posterior auricular skin to resurface the anterior ear. This repair is most useful for a large conchal bowl defect in which there is extensive missing cartilage but intact posterior auricular skin.
The retroauricular scalp is a substantial tissue reservoir with robust vasculature; an interpolation flap from this area frequently is used to repair an extensive ear defect. The most common use of an interpolation flap is for a large helical defect; however, the flap also can be pulled through an incision in the posterior auricular skin to the front of the ear in a manner similar to revolving-door and flip-flop flaps, thus allowing for increased flap reach.
A cartilage graft provides structural support, helping to maintain auricular projection. The helical arcades provide a robust vascular supply and maintain viability of the helical rim tissue, despite the large aperture created for the pull-through flap.
We recommend this 2-stage repair for large conchal bowl defects with extensive cartilage loss and intact posterior auricular skin.
Practice Gap
Repair of a conchal defect requires careful consideration to achieve an optimal outcome. Reconstruction should resurface exposed cartilage, restore the natural projection of the auricle, and direct sound into the external auditory meatus. Patients also should be able to wear glasses and a hearing aid.
The reconstructive ladder for most conchal bowl defects includes secondary intention healing, full-thickness skin grafting (FTSG), and either a revolving-door flap or a flip-flop flap. Secondary intention and FTSG are appropriate for superficial defects, in which the loss of cartilage is not substantial.1,2 Revolving-door and flip-flop flaps are single-stage retroauricular approaches used to repair relatively small defects of the conchal bowl.3 However, reconstructive options are limited for a large defect in which there is extensive loss of cartilage; 3-stage retroauricular approaches have been utilized. The anterior pedicled retroauricular flap is a 3-stage repair that can be utilized to reconstruct a through-and-through defect of the central ear:
- Stage 1: an anteriorly based retroauricular pedicle is incised, hinged over, and sutured to the medial aspect of the defect, resurfacing the posterior ear.
- Stage 2: the pedicle is severed and the flap is folded on itself to resurface the anterior ear.
- Stage 3: the folded edge is de-epithelialized and set into the lateral defect.4
The revolving-door flap also uses a 3-stage approach and is utilized for a full-thickness central auricular defect:
- Stage 1: a revolving-door flap is used to resurface the anterior ear.
- Stage 2: a cartilage graft provides structural support.
- Stage 3: division and inset with an FTSG is used to resurface the posterior ear.
The anterior pedicled retroauricular flap and revolving-door flap techniques are useful for defects when there is intact posterior auricular skin but not when there is extensive loss of cartilage. Other downsides to these 3-stage approaches are the time and multiple procedures required.5
We describe the technique of a retroauricular pull-through sandwich flap for repair of a large conchal bowl defect with extensive cartilage loss and intact posterior auricular skin.
Technique
A 62-year-old man presented for treatment of a 2.6×2.4-cm nodular and infiltrative basal cell carcinoma of the right conchal bowl. The tumor was cleared with 3 stages of Mohs micrographic surgery, resulting in a 5.5×4.2-cm defect with complete loss of cartilage throughout the concha, helical crus, and inner rim of the antihelix (Figure 1). A 2-stage repair was performed utilizing a cartilage graft and a pull-through retroauricular interpolation flap.

Stage 1—A cartilage graft was harvested from the left concha and sutured into the central defect for structural support (Figure 2). An incision was then made through the posterior auricular skin, just medial to the residual antihelical cartilage, and a retroauricular interpolation flap was pulled through this incision to resurface the lateral two-thirds of the conchal bowl defect. This created a “sandwich” of tissue, with the following layers (ordered from anterior to posterior): retroauricular interpolation flap, cartilage graft, and intact posterior auricular skin.

A preauricular banner transposition flap was used to repair the medial one-third of the conchal defect. A small area was left to heal by secondary intention (Figure 3).

Stage 2—The patient returned 3 weeks later for division and inset of the retroauricular interpolation flap. The pedicle of the flap was severed and its free edge was sutured into the lateral aspect of the defect. The posterior auricular incision that the flap had been pulled through in stage 1 of the repair was closed in a layered fashion, and the secondary defect of the postauricular scalp was left to heal by secondary intention (Figure 4).

Final Results—At follow-up 1 month later, the patient was noted to have good aesthetic and functional outcomes (Figure 5).

Practice Implications
The retroauricular pull-through sandwich flap combines a cartilage graft and a retroauricular interpolation flap pulled through an incision in the posterior auricular skin to resurface the anterior ear. This repair is most useful for a large conchal bowl defect in which there is extensive missing cartilage but intact posterior auricular skin.
The retroauricular scalp is a substantial tissue reservoir with robust vasculature; an interpolation flap from this area frequently is used to repair an extensive ear defect. The most common use of an interpolation flap is for a large helical defect; however, the flap also can be pulled through an incision in the posterior auricular skin to the front of the ear in a manner similar to revolving-door and flip-flop flaps, thus allowing for increased flap reach.
A cartilage graft provides structural support, helping to maintain auricular projection. The helical arcades provide a robust vascular supply and maintain viability of the helical rim tissue, despite the large aperture created for the pull-through flap.
We recommend this 2-stage repair for large conchal bowl defects with extensive cartilage loss and intact posterior auricular skin.
- Clark DP, Hanke CW. Neoplasms of the conchal bowl: treatment with Mohs micrographic surgery. J Dermatol Surg Oncol. 1988;14:1223-1228. doi:10.1111/j.1524-4725.1988.tb03479.x
- Dessy LA, Figus A, Fioramonti P, et al. Reconstruction of anterior auricular conchal defect after malignancy excision: revolving-door flap versus full-thickness skin graft. J Plast Reconstr Aesthet Surg. 2010;63:746-752. doi:10.1016/j.bjps.2009.01.073
- Golash A, Bera S, Kanoi AV, et al. The revolving door flap: revisiting an elegant but forgotten flap for ear defect reconstruction. Indian J Plast Surg. 2020;53:64-70. doi:10.1055/s-0040-1709531
- Heinz MB, Hölzle F, Ghassemi A. Repairing a non-marginal full-thickness auricular defect using a reversed flap from the postauricular area. J Oral Maxillofac Surg. 2015;73:764-768. doi:10.1016/j.joms.2014.11.005
- Leitenberger JJ, Golden SK. Reconstruction after full-thickness loss of the antihelix, scapha, and triangular fossa. Dermatol Surg. 2016;42:893-896. doi:10.1097/DSS.0000000000000664
Glitter Effects of Nail Art on Optical Coherence Tomography
Practice Gap
Nail art can skew the results of optical coherence tomography (OCT), a noninvasive imaging technology that is used to visualize nail morphology in diseases such as psoriatic arthritis and onychomycosis, with a penetration depth of 2 mm and high-resolution images.1 Few studies have evaluated the effects of nail art on OCT. Saleah and colleagues1 found that clear, semitransparent, and red nail polishes do not interfere with visualization of the nail plate, whereas nontransparent gel polish and art stones obscure the image. They did not comment on the effect of glitter nail art in their study, though they did test 1 nail that contained glitter.1 Monpeurt et al2 compared matte and glossy nail polishes. They found that matte polish was readily identifiable from the nail plate, whereas glossy polish presented a greater number of artifacts.2
The Solution
We looked at 3 glitter nail polishes—gold, pink, and silver—that were scanned by OCT to assess the effect of the polish on the resulting image. We determined that glitter particles completely obscured the nail bed and nail plate, regardless of color (Figure 1). Glossy clear polish imparted a distinct film on the top of the nail plate that did not obscure the nail plate or the nail bed (Figure 2).

We conclude that glitter nail polish contains numerous reflective solid particles that interfere with OCT imaging of the nail plate and nail bed. As a result, we recommend removal of nail art to properly assess nail pathology. Because removal may need to be conducted by a nail technician, the treating clinician should inform the patient ahead of time to come to the appointment with bare (ie, unpolished) nails.

Practice Implications
Bringing awareness to the necessity of removing nail art prior to OCT imaging is crucial because many patients partake in its application, and removal may require the involvement of a professional nail technician. If a patient can be made aware that they should remove all nail art in advance, they will be better prepared for an OCT imaging session. Such a protocol increases efficiency, decreases diagnostic delay, and reduces cost associated with multiple office visits.
- Saleah S, Kim P, Seong D, et al. A preliminary study of post-progressive nail-art effects on in vivo nail plate using optical coherence tomography-based intensity profiling assessment. Sci Rep. 2021;11:666. doi:10.1038/s41598-020-79497-3
- Monpeurt C, Cinotti E, Hebert M, et al. Thickness and morphology assessment of nail polishes applied on nails by high-definition optical coherence tomography. Skin Res Technol. 2018;24:156-157. doi:10.1111/srt.12406
Practice Gap
Nail art can skew the results of optical coherence tomography (OCT), a noninvasive imaging technology that is used to visualize nail morphology in diseases such as psoriatic arthritis and onychomycosis, with a penetration depth of 2 mm and high-resolution images.1 Few studies have evaluated the effects of nail art on OCT. Saleah and colleagues1 found that clear, semitransparent, and red nail polishes do not interfere with visualization of the nail plate, whereas nontransparent gel polish and art stones obscure the image. They did not comment on the effect of glitter nail art in their study, though they did test 1 nail that contained glitter.1 Monpeurt et al2 compared matte and glossy nail polishes. They found that matte polish was readily identifiable from the nail plate, whereas glossy polish presented a greater number of artifacts.2
The Solution
We looked at 3 glitter nail polishes—gold, pink, and silver—that were scanned by OCT to assess the effect of the polish on the resulting image. We determined that glitter particles completely obscured the nail bed and nail plate, regardless of color (Figure 1). Glossy clear polish imparted a distinct film on the top of the nail plate that did not obscure the nail plate or the nail bed (Figure 2).

We conclude that glitter nail polish contains numerous reflective solid particles that interfere with OCT imaging of the nail plate and nail bed. As a result, we recommend removal of nail art to properly assess nail pathology. Because removal may need to be conducted by a nail technician, the treating clinician should inform the patient ahead of time to come to the appointment with bare (ie, unpolished) nails.

Practice Implications
Bringing awareness to the necessity of removing nail art prior to OCT imaging is crucial because many patients partake in its application, and removal may require the involvement of a professional nail technician. If a patient can be made aware that they should remove all nail art in advance, they will be better prepared for an OCT imaging session. Such a protocol increases efficiency, decreases diagnostic delay, and reduces cost associated with multiple office visits.
Practice Gap
Nail art can skew the results of optical coherence tomography (OCT), a noninvasive imaging technology that is used to visualize nail morphology in diseases such as psoriatic arthritis and onychomycosis, with a penetration depth of 2 mm and high-resolution images.1 Few studies have evaluated the effects of nail art on OCT. Saleah and colleagues1 found that clear, semitransparent, and red nail polishes do not interfere with visualization of the nail plate, whereas nontransparent gel polish and art stones obscure the image. They did not comment on the effect of glitter nail art in their study, though they did test 1 nail that contained glitter.1 Monpeurt et al2 compared matte and glossy nail polishes. They found that matte polish was readily identifiable from the nail plate, whereas glossy polish presented a greater number of artifacts.2
The Solution
We looked at 3 glitter nail polishes—gold, pink, and silver—that were scanned by OCT to assess the effect of the polish on the resulting image. We determined that glitter particles completely obscured the nail bed and nail plate, regardless of color (Figure 1). Glossy clear polish imparted a distinct film on the top of the nail plate that did not obscure the nail plate or the nail bed (Figure 2).

We conclude that glitter nail polish contains numerous reflective solid particles that interfere with OCT imaging of the nail plate and nail bed. As a result, we recommend removal of nail art to properly assess nail pathology. Because removal may need to be conducted by a nail technician, the treating clinician should inform the patient ahead of time to come to the appointment with bare (ie, unpolished) nails.

Practice Implications
Bringing awareness to the necessity of removing nail art prior to OCT imaging is crucial because many patients partake in its application, and removal may require the involvement of a professional nail technician. If a patient can be made aware that they should remove all nail art in advance, they will be better prepared for an OCT imaging session. Such a protocol increases efficiency, decreases diagnostic delay, and reduces cost associated with multiple office visits.
- Saleah S, Kim P, Seong D, et al. A preliminary study of post-progressive nail-art effects on in vivo nail plate using optical coherence tomography-based intensity profiling assessment. Sci Rep. 2021;11:666. doi:10.1038/s41598-020-79497-3
- Monpeurt C, Cinotti E, Hebert M, et al. Thickness and morphology assessment of nail polishes applied on nails by high-definition optical coherence tomography. Skin Res Technol. 2018;24:156-157. doi:10.1111/srt.12406
Polyurethane Tubing to Minimize Pain During Nail Injections
Practice Gap
Nail matrix and nail bed injections with triamcinolone acetonide are used to treat trachyonychia and inflammatory nail conditions, including nail psoriasis and nail lichen planus. The procedure should be quick in well-trained hands, with each nail injection taking only seconds to perform. Typically, patients have multiple nails involved, requiring at least 1 injection into the nail matrix or the nail bed (or both) in each nail at each visit. Patients often are anxious when undergoing nail injections; the nail unit is highly innervated and vascular, which can cause notable transient discomfort during the procedure1,2 as well as postoperative pain.3
Nail injections must be repeated every 4 to 6 weeks to sustain clinical benefit and maximize outcomes, which can lead to heightened anxiety and apprehension before and during the visit. Furthermore, pain and anxiety associated with the procedure may deter patients from returning for follow-up injections, which can impact treatment adherence and clinical outcomes.
Dermatologists should implement strategies to decrease periprocedural anxiety to improve the nail injection experience. In our practice, we routinely incorporate stress-reducing techniques—music, talkesthesia, a sleep mask, cool air, ethyl chloride, and squeezing a stress ball—into the clinical workflow of the procedure. The goal of these techniques is to divert attention away from painful stimuli. Most patients, however, receive injections in both hands, making it impractical to employ some of these techniques, particularly squeezing a stress ball. We employed a unique method involving polyurethane tubing to reduce stress and anxiety during nail procedures.
The Technique
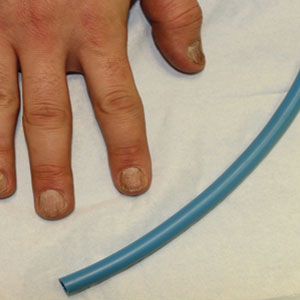
A patient was receiving treatment with intralesional triamcinolone injections to the nail matrix for trachyonychia involving all of the fingernails. He worked as an equipment and facilities manager, giving him access to polyurethane tubing, which is routinely used in the manufacture of some medical devices that require gas or liquid to operate. He found the nail injections to be painful but was motivated to proceed with treatment. He brought in a piece of polyurethane tubing to a subsequent visit to bite on during the injections (Figure) and reported considerable relief of pain.
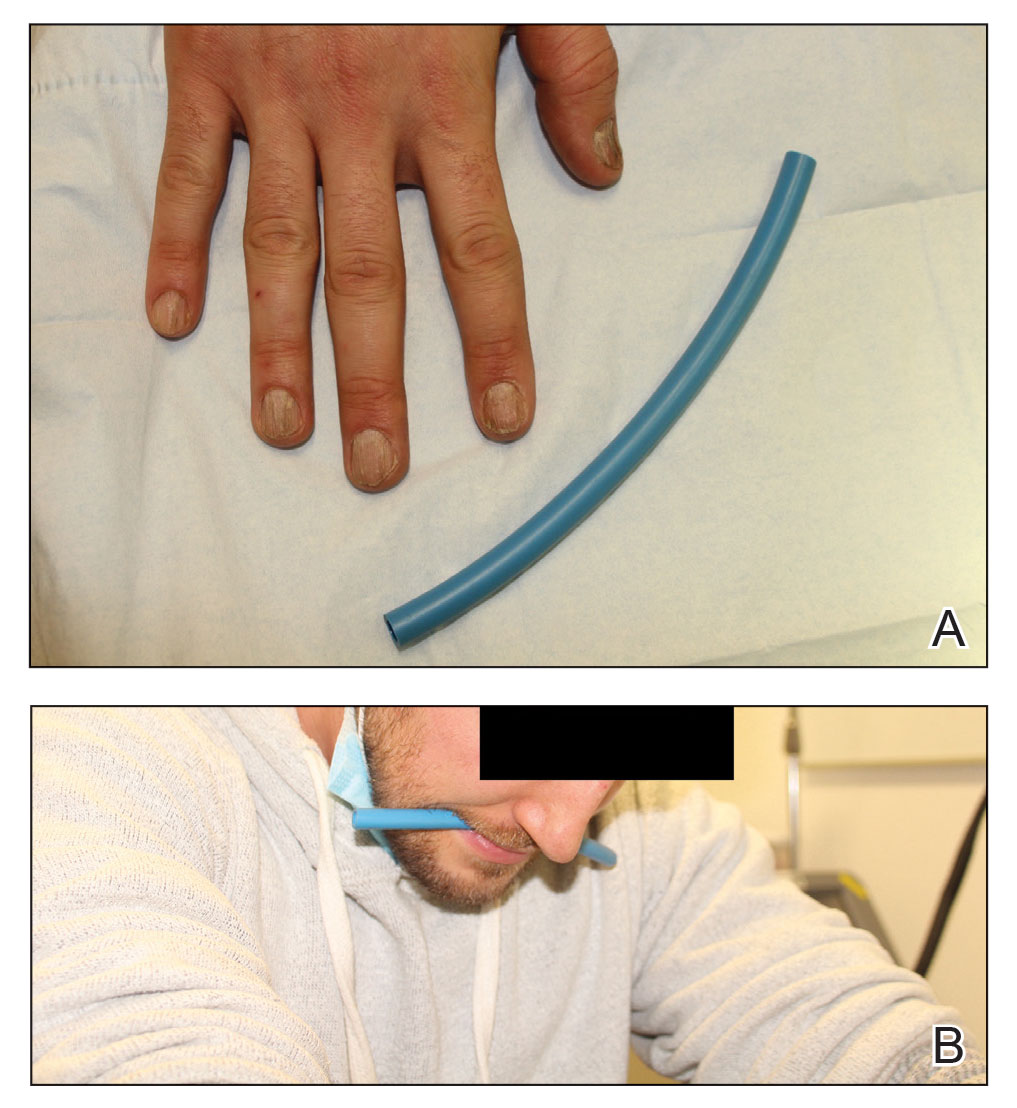
What you were not taught in United States history class was that this method—clenching an object orally—dates to the era before the Civil War, before appropriate anesthetics and analgesics were developed, when patients and soldiers bit on a bullet or leather strap during surgical procedures.4 Clenching and chewing have been shown to promote relaxation and reduce acute pain and stress.5
Practical Implications
Polyurethane tubing can be purchased in bulk, is inexpensive ($0.30/foot on Amazon), and unlikely to damage teeth due to its flexibility. It can be cut into 6-inch pieces and given to the patient at their first nail injection appointment. The patient can then bring the tubing to subsequent appointments to use as a mastication tool during nail injections.
We instruct the patient to disinfect the dedicated piece of tubing after the initial visit and each subsequent visit by soaking it for 15 minutes in either a 3% hydrogen peroxide solution, antibacterial mouthwash, a solution of baking soda (bicarbonate of soda) and water (1 cup of water to 2 teaspoons of baking soda), or white vinegar. We instruct them to thoroughly dry the disinfected polyurethane tube and store it in a clean, reusable, resealable zipper storage bag between appointments.
In addition to reducing anxiety and pain, this method also distracts the patient and therefore promotes patient and physician safety. Patients are less likely to jump or startle during the injection, thereby reducing the risk of physically interfering with the nail surgeon or making an unanticipated advance into the surgical field.
Although frustrated patients with nail disease may need to “bite the bullet” when they accept treatment with nail injections, lessons from our patient and from United States history offer a safe and cost-effective pain management strategy. Minimizing discomfort and anxiety during the first nail injection is crucial because doing so is likely to promote adherence with follow-up injections and therefore improve clinical outcomes.
Future clinical studies should validate the clinical utility of oral mastication and clenching during nail procedures compared to other perioperative stress- and anxiety-reducing techniques.
- Ricardo JW, Lipner SR. Utilization of a stress ball to diminish anxiety during nail surgery. Cutis. 2020;105:294. doi:10.12788/cutis.0013
- Ricardo JW, Lipner SR. Utilizing a sleep mask to reduce patient anxiety during nail surgery. Cutis. 2021;108:36. doi:10.12788/cutis.0285
- Ip HYV, Abrishami A, Peng PW, et al. Predictors of postoperative pain and analgesic consumption: a qualitative systematic review. Anesthesiology. 2009;111:657-677. doi:10.1097/ALN.0b013e3181aae87a
- Albin MS. The use of anesthetics during the Civil War, 1861-1865. Pharm Hist. 2000;42:99-114.
- Tahara Y, Sakurai K, Ando T. Influence of chewing and clenching on salivary cortisol levels as an indicator of stress. J Prosthodont. 2007;16:129-135. doi:10.1111/j.1532-849X.2007.00178.x
Practice Gap
Nail matrix and nail bed injections with triamcinolone acetonide are used to treat trachyonychia and inflammatory nail conditions, including nail psoriasis and nail lichen planus. The procedure should be quick in well-trained hands, with each nail injection taking only seconds to perform. Typically, patients have multiple nails involved, requiring at least 1 injection into the nail matrix or the nail bed (or both) in each nail at each visit. Patients often are anxious when undergoing nail injections; the nail unit is highly innervated and vascular, which can cause notable transient discomfort during the procedure1,2 as well as postoperative pain.3
Nail injections must be repeated every 4 to 6 weeks to sustain clinical benefit and maximize outcomes, which can lead to heightened anxiety and apprehension before and during the visit. Furthermore, pain and anxiety associated with the procedure may deter patients from returning for follow-up injections, which can impact treatment adherence and clinical outcomes.
Dermatologists should implement strategies to decrease periprocedural anxiety to improve the nail injection experience. In our practice, we routinely incorporate stress-reducing techniques—music, talkesthesia, a sleep mask, cool air, ethyl chloride, and squeezing a stress ball—into the clinical workflow of the procedure. The goal of these techniques is to divert attention away from painful stimuli. Most patients, however, receive injections in both hands, making it impractical to employ some of these techniques, particularly squeezing a stress ball. We employed a unique method involving polyurethane tubing to reduce stress and anxiety during nail procedures.
The Technique
A patient was receiving treatment with intralesional triamcinolone injections to the nail matrix for trachyonychia involving all of the fingernails. He worked as an equipment and facilities manager, giving him access to polyurethane tubing, which is routinely used in the manufacture of some medical devices that require gas or liquid to operate. He found the nail injections to be painful but was motivated to proceed with treatment. He brought in a piece of polyurethane tubing to a subsequent visit to bite on during the injections (Figure) and reported considerable relief of pain.

What you were not taught in United States history class was that this method—clenching an object orally—dates to the era before the Civil War, before appropriate anesthetics and analgesics were developed, when patients and soldiers bit on a bullet or leather strap during surgical procedures.4 Clenching and chewing have been shown to promote relaxation and reduce acute pain and stress.5
Practical Implications
Polyurethane tubing can be purchased in bulk, is inexpensive ($0.30/foot on Amazon), and unlikely to damage teeth due to its flexibility. It can be cut into 6-inch pieces and given to the patient at their first nail injection appointment. The patient can then bring the tubing to subsequent appointments to use as a mastication tool during nail injections.
We instruct the patient to disinfect the dedicated piece of tubing after the initial visit and each subsequent visit by soaking it for 15 minutes in either a 3% hydrogen peroxide solution, antibacterial mouthwash, a solution of baking soda (bicarbonate of soda) and water (1 cup of water to 2 teaspoons of baking soda), or white vinegar. We instruct them to thoroughly dry the disinfected polyurethane tube and store it in a clean, reusable, resealable zipper storage bag between appointments.
In addition to reducing anxiety and pain, this method also distracts the patient and therefore promotes patient and physician safety. Patients are less likely to jump or startle during the injection, thereby reducing the risk of physically interfering with the nail surgeon or making an unanticipated advance into the surgical field.
Although frustrated patients with nail disease may need to “bite the bullet” when they accept treatment with nail injections, lessons from our patient and from United States history offer a safe and cost-effective pain management strategy. Minimizing discomfort and anxiety during the first nail injection is crucial because doing so is likely to promote adherence with follow-up injections and therefore improve clinical outcomes.
Future clinical studies should validate the clinical utility of oral mastication and clenching during nail procedures compared to other perioperative stress- and anxiety-reducing techniques.
Practice Gap
Nail matrix and nail bed injections with triamcinolone acetonide are used to treat trachyonychia and inflammatory nail conditions, including nail psoriasis and nail lichen planus. The procedure should be quick in well-trained hands, with each nail injection taking only seconds to perform. Typically, patients have multiple nails involved, requiring at least 1 injection into the nail matrix or the nail bed (or both) in each nail at each visit. Patients often are anxious when undergoing nail injections; the nail unit is highly innervated and vascular, which can cause notable transient discomfort during the procedure1,2 as well as postoperative pain.3
Nail injections must be repeated every 4 to 6 weeks to sustain clinical benefit and maximize outcomes, which can lead to heightened anxiety and apprehension before and during the visit. Furthermore, pain and anxiety associated with the procedure may deter patients from returning for follow-up injections, which can impact treatment adherence and clinical outcomes.
Dermatologists should implement strategies to decrease periprocedural anxiety to improve the nail injection experience. In our practice, we routinely incorporate stress-reducing techniques—music, talkesthesia, a sleep mask, cool air, ethyl chloride, and squeezing a stress ball—into the clinical workflow of the procedure. The goal of these techniques is to divert attention away from painful stimuli. Most patients, however, receive injections in both hands, making it impractical to employ some of these techniques, particularly squeezing a stress ball. We employed a unique method involving polyurethane tubing to reduce stress and anxiety during nail procedures.
The Technique
A patient was receiving treatment with intralesional triamcinolone injections to the nail matrix for trachyonychia involving all of the fingernails. He worked as an equipment and facilities manager, giving him access to polyurethane tubing, which is routinely used in the manufacture of some medical devices that require gas or liquid to operate. He found the nail injections to be painful but was motivated to proceed with treatment. He brought in a piece of polyurethane tubing to a subsequent visit to bite on during the injections (Figure) and reported considerable relief of pain.

What you were not taught in United States history class was that this method—clenching an object orally—dates to the era before the Civil War, before appropriate anesthetics and analgesics were developed, when patients and soldiers bit on a bullet or leather strap during surgical procedures.4 Clenching and chewing have been shown to promote relaxation and reduce acute pain and stress.5
Practical Implications
Polyurethane tubing can be purchased in bulk, is inexpensive ($0.30/foot on Amazon), and unlikely to damage teeth due to its flexibility. It can be cut into 6-inch pieces and given to the patient at their first nail injection appointment. The patient can then bring the tubing to subsequent appointments to use as a mastication tool during nail injections.
We instruct the patient to disinfect the dedicated piece of tubing after the initial visit and each subsequent visit by soaking it for 15 minutes in either a 3% hydrogen peroxide solution, antibacterial mouthwash, a solution of baking soda (bicarbonate of soda) and water (1 cup of water to 2 teaspoons of baking soda), or white vinegar. We instruct them to thoroughly dry the disinfected polyurethane tube and store it in a clean, reusable, resealable zipper storage bag between appointments.
In addition to reducing anxiety and pain, this method also distracts the patient and therefore promotes patient and physician safety. Patients are less likely to jump or startle during the injection, thereby reducing the risk of physically interfering with the nail surgeon or making an unanticipated advance into the surgical field.
Although frustrated patients with nail disease may need to “bite the bullet” when they accept treatment with nail injections, lessons from our patient and from United States history offer a safe and cost-effective pain management strategy. Minimizing discomfort and anxiety during the first nail injection is crucial because doing so is likely to promote adherence with follow-up injections and therefore improve clinical outcomes.
Future clinical studies should validate the clinical utility of oral mastication and clenching during nail procedures compared to other perioperative stress- and anxiety-reducing techniques.
- Ricardo JW, Lipner SR. Utilization of a stress ball to diminish anxiety during nail surgery. Cutis. 2020;105:294. doi:10.12788/cutis.0013
- Ricardo JW, Lipner SR. Utilizing a sleep mask to reduce patient anxiety during nail surgery. Cutis. 2021;108:36. doi:10.12788/cutis.0285
- Ip HYV, Abrishami A, Peng PW, et al. Predictors of postoperative pain and analgesic consumption: a qualitative systematic review. Anesthesiology. 2009;111:657-677. doi:10.1097/ALN.0b013e3181aae87a
- Albin MS. The use of anesthetics during the Civil War, 1861-1865. Pharm Hist. 2000;42:99-114.
- Tahara Y, Sakurai K, Ando T. Influence of chewing and clenching on salivary cortisol levels as an indicator of stress. J Prosthodont. 2007;16:129-135. doi:10.1111/j.1532-849X.2007.00178.x
Habit Reversal Therapy for Skin Picking Disorder
Practice Gap
Skin picking disorder is characterized by repetitive deliberate manipulation of the skin that causes noticeable tissue damage. It affects approximately 1.6% of adults in the United States and is associated with marked distress as well as a psychosocial impact.1 Complications of skin picking disorder can include ulceration, infection, scarring, and disfigurement.
Cognitive behavioral therapy (CBT) techniques have been established to be effective in treating skin picking disorder.2 Although referral to a mental health professional is appropriate for patients with skin picking disorder, many of them may not be interested. Cognitive behavioral therapy for diseases at the intersection of psychiatry and dermatology typically is not included in dermatology curricula. Therefore, dermatologists should be aware of CBT techniques that can mitigate the impact of skin picking disorder for patients who decline referral to a mental health professional.
The Technique
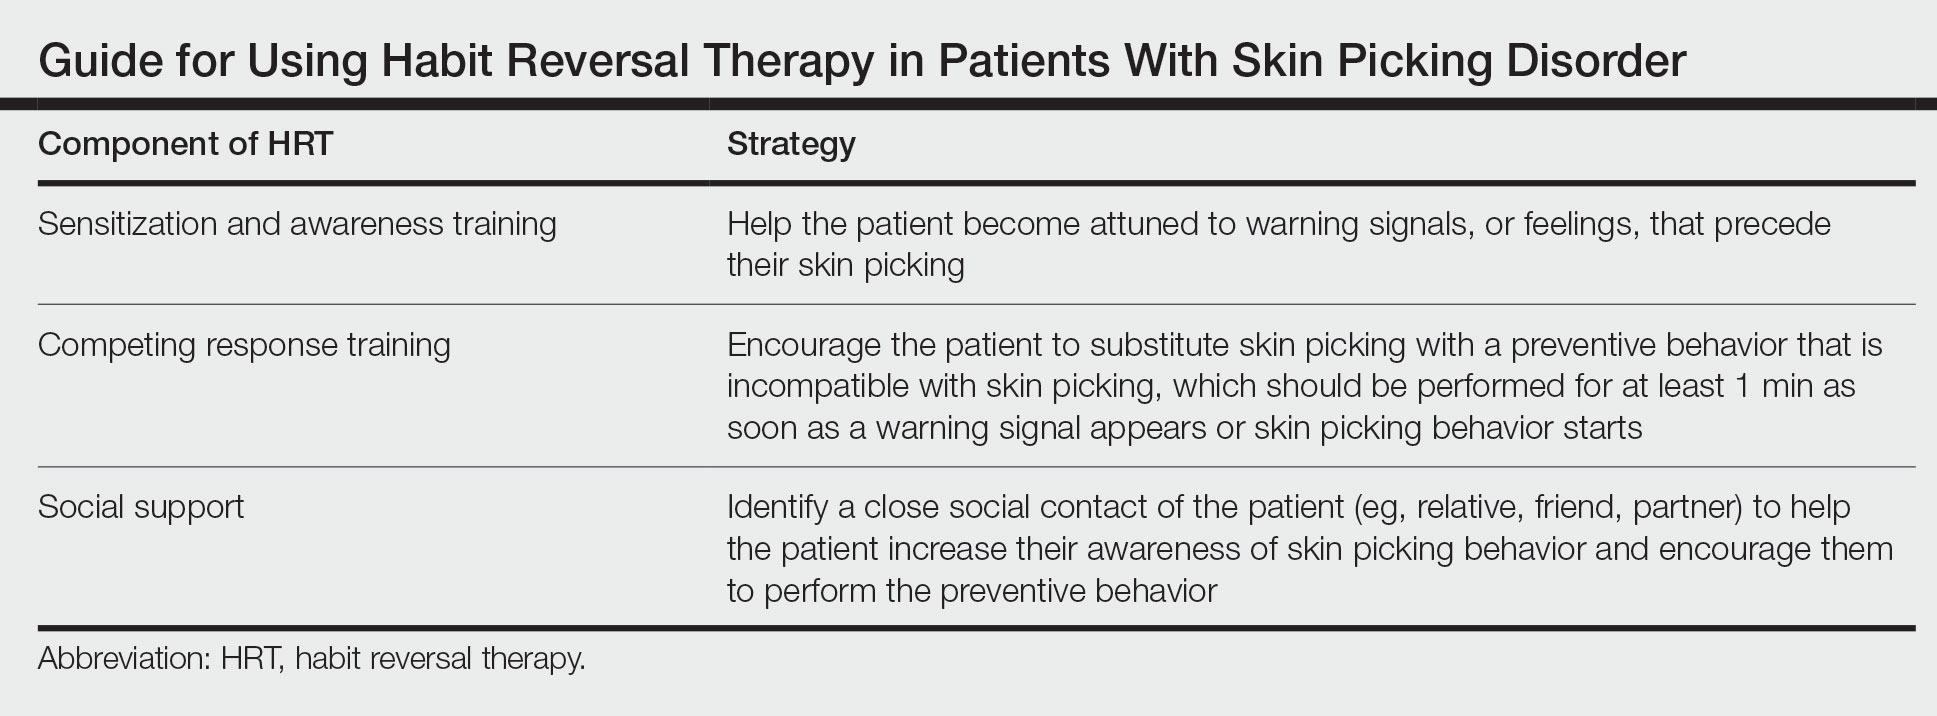
Cognitive behavioral therapy is one of the more effective forms of psychotherapy for the treatment of skin picking disorder. Consistent utilization of CBT techniques can achieve relatively permanent change in brain function and contribute to long-term treatment outcomes. A particularly useful CBT technique for skin picking disorder is habit reversal therapy (HRT)(Table). Studies have shown that HRT techniques have demonstrated efficacy in skin picking disorder with sustained impact.3 Patients treated with HRT have reported a greater decrease in skin picking compared with controls after only 3 sessions (P<.01).4 There are 3 elements to HRT:
1. Sensitization and awareness training: This facet of HRT involves helping the patient become attuned to warning signals, or feelings, that precede their skin picking, as skin picking often occurs automatically without the patient noticing. Such feelings can include tingling of the skin, tension, and a feeling of being overwhelmed.5 Ideally, the physician works with the patient to identify 2 or 3 warning signals that precede skin picking behavior.
2. Competing response training: The patient is encouraged to substitute skin picking with a preventive behavior—for example, crossing the arms and gently squeezing the fists—that is incompatible with skin picking. The preventive behavior should be performed for at least 1 minute as soon as a warning signal appears or skin picking behavior starts. After 1 minute, if the urge for skin picking recurs, then the patient should repeat the preventive behavior.5 It can be helpful to practice the preventive behavior with the patient once in the clinic.
3. Social support: This technique involves identifying a close social contact of the patient (eg, relative, friend, partner) to help the patient increase their awareness of skin picking behavior and encourage them to perform the preventive behavior.5 The purpose of identifying a close social contact is to ensure accountability for the patient in their day-to-day life, given the limited scope of the relationship between the patient and the dermatologist.
Other practical solutions to skin picking include advising patients to cut their nails short; using finger cots to cover the nails and thus lessen the potential for skin injury; and using a sensory toy, such as a fidget spinner, to distract or occupy the patient when they feel the urge for skin picking.
Practice Implications
Although skin picking disorder is a challenging condition to manage, there are proven techniques for treatment. Techniques drawn from HRT are quite practical and can be implemented by dermatologists for patients with skin picking disorder to reduce the burden of their disease.
- Keuthen NJ, Koran LM, Aboujaoude E, et al. The prevalence of pathologic skin picking in US adults. Compr Psychiatry. 2010;51:183-186. doi:10.1016/j.comppsych.2009.04.003
- Jafferany M, Mkhoyan R, Arora G, et al. Treatment of skin picking disorder: interdisciplinary role of dermatologist and psychiatrist. Dermatol Ther. 2020;33:E13837. doi:10.1111/dth.13837
- Schuck K, Keijsers GP, Rinck M. The effects of brief cognitive-behaviour therapy for pathological skin picking: a randomized comparison to wait-list control. Behav Res Ther. 2011;49:11-17. doi:10.1016/j.brat.2010.09.005
- Teng EJ, Woods DW, Twohig MP. Habit reversal as a treatment for chronic skin picking: a pilot investigation. Behav Modif. 2006;30:411-422. doi:10.1177/0145445504265707
- Torales J, Páez L, O’Higgins M, et al. Cognitive behavioral therapy for excoriation (skin picking) disorder. Telangana J Psych. 2016;2:27-30.
Practice Gap
Skin picking disorder is characterized by repetitive deliberate manipulation of the skin that causes noticeable tissue damage. It affects approximately 1.6% of adults in the United States and is associated with marked distress as well as a psychosocial impact.1 Complications of skin picking disorder can include ulceration, infection, scarring, and disfigurement.
Cognitive behavioral therapy (CBT) techniques have been established to be effective in treating skin picking disorder.2 Although referral to a mental health professional is appropriate for patients with skin picking disorder, many of them may not be interested. Cognitive behavioral therapy for diseases at the intersection of psychiatry and dermatology typically is not included in dermatology curricula. Therefore, dermatologists should be aware of CBT techniques that can mitigate the impact of skin picking disorder for patients who decline referral to a mental health professional.

The Technique
Cognitive behavioral therapy is one of the more effective forms of psychotherapy for the treatment of skin picking disorder. Consistent utilization of CBT techniques can achieve relatively permanent change in brain function and contribute to long-term treatment outcomes. A particularly useful CBT technique for skin picking disorder is habit reversal therapy (HRT)(Table). Studies have shown that HRT techniques have demonstrated efficacy in skin picking disorder with sustained impact.3 Patients treated with HRT have reported a greater decrease in skin picking compared with controls after only 3 sessions (P<.01).4 There are 3 elements to HRT:
1. Sensitization and awareness training: This facet of HRT involves helping the patient become attuned to warning signals, or feelings, that precede their skin picking, as skin picking often occurs automatically without the patient noticing. Such feelings can include tingling of the skin, tension, and a feeling of being overwhelmed.5 Ideally, the physician works with the patient to identify 2 or 3 warning signals that precede skin picking behavior.
2. Competing response training: The patient is encouraged to substitute skin picking with a preventive behavior—for example, crossing the arms and gently squeezing the fists—that is incompatible with skin picking. The preventive behavior should be performed for at least 1 minute as soon as a warning signal appears or skin picking behavior starts. After 1 minute, if the urge for skin picking recurs, then the patient should repeat the preventive behavior.5 It can be helpful to practice the preventive behavior with the patient once in the clinic.
3. Social support: This technique involves identifying a close social contact of the patient (eg, relative, friend, partner) to help the patient increase their awareness of skin picking behavior and encourage them to perform the preventive behavior.5 The purpose of identifying a close social contact is to ensure accountability for the patient in their day-to-day life, given the limited scope of the relationship between the patient and the dermatologist.
Other practical solutions to skin picking include advising patients to cut their nails short; using finger cots to cover the nails and thus lessen the potential for skin injury; and using a sensory toy, such as a fidget spinner, to distract or occupy the patient when they feel the urge for skin picking.
Practice Implications
Although skin picking disorder is a challenging condition to manage, there are proven techniques for treatment. Techniques drawn from HRT are quite practical and can be implemented by dermatologists for patients with skin picking disorder to reduce the burden of their disease.
Practice Gap
Skin picking disorder is characterized by repetitive deliberate manipulation of the skin that causes noticeable tissue damage. It affects approximately 1.6% of adults in the United States and is associated with marked distress as well as a psychosocial impact.1 Complications of skin picking disorder can include ulceration, infection, scarring, and disfigurement.
Cognitive behavioral therapy (CBT) techniques have been established to be effective in treating skin picking disorder.2 Although referral to a mental health professional is appropriate for patients with skin picking disorder, many of them may not be interested. Cognitive behavioral therapy for diseases at the intersection of psychiatry and dermatology typically is not included in dermatology curricula. Therefore, dermatologists should be aware of CBT techniques that can mitigate the impact of skin picking disorder for patients who decline referral to a mental health professional.

The Technique
Cognitive behavioral therapy is one of the more effective forms of psychotherapy for the treatment of skin picking disorder. Consistent utilization of CBT techniques can achieve relatively permanent change in brain function and contribute to long-term treatment outcomes. A particularly useful CBT technique for skin picking disorder is habit reversal therapy (HRT)(Table). Studies have shown that HRT techniques have demonstrated efficacy in skin picking disorder with sustained impact.3 Patients treated with HRT have reported a greater decrease in skin picking compared with controls after only 3 sessions (P<.01).4 There are 3 elements to HRT:
1. Sensitization and awareness training: This facet of HRT involves helping the patient become attuned to warning signals, or feelings, that precede their skin picking, as skin picking often occurs automatically without the patient noticing. Such feelings can include tingling of the skin, tension, and a feeling of being overwhelmed.5 Ideally, the physician works with the patient to identify 2 or 3 warning signals that precede skin picking behavior.
2. Competing response training: The patient is encouraged to substitute skin picking with a preventive behavior—for example, crossing the arms and gently squeezing the fists—that is incompatible with skin picking. The preventive behavior should be performed for at least 1 minute as soon as a warning signal appears or skin picking behavior starts. After 1 minute, if the urge for skin picking recurs, then the patient should repeat the preventive behavior.5 It can be helpful to practice the preventive behavior with the patient once in the clinic.
3. Social support: This technique involves identifying a close social contact of the patient (eg, relative, friend, partner) to help the patient increase their awareness of skin picking behavior and encourage them to perform the preventive behavior.5 The purpose of identifying a close social contact is to ensure accountability for the patient in their day-to-day life, given the limited scope of the relationship between the patient and the dermatologist.
Other practical solutions to skin picking include advising patients to cut their nails short; using finger cots to cover the nails and thus lessen the potential for skin injury; and using a sensory toy, such as a fidget spinner, to distract or occupy the patient when they feel the urge for skin picking.
Practice Implications
Although skin picking disorder is a challenging condition to manage, there are proven techniques for treatment. Techniques drawn from HRT are quite practical and can be implemented by dermatologists for patients with skin picking disorder to reduce the burden of their disease.
- Keuthen NJ, Koran LM, Aboujaoude E, et al. The prevalence of pathologic skin picking in US adults. Compr Psychiatry. 2010;51:183-186. doi:10.1016/j.comppsych.2009.04.003
- Jafferany M, Mkhoyan R, Arora G, et al. Treatment of skin picking disorder: interdisciplinary role of dermatologist and psychiatrist. Dermatol Ther. 2020;33:E13837. doi:10.1111/dth.13837
- Schuck K, Keijsers GP, Rinck M. The effects of brief cognitive-behaviour therapy for pathological skin picking: a randomized comparison to wait-list control. Behav Res Ther. 2011;49:11-17. doi:10.1016/j.brat.2010.09.005
- Teng EJ, Woods DW, Twohig MP. Habit reversal as a treatment for chronic skin picking: a pilot investigation. Behav Modif. 2006;30:411-422. doi:10.1177/0145445504265707
- Torales J, Páez L, O’Higgins M, et al. Cognitive behavioral therapy for excoriation (skin picking) disorder. Telangana J Psych. 2016;2:27-30.
A “Solution” for Patients Unable to Swallow a Pill: Crushed Terbinafine Mixed With Syrup
Practice Gap
Terbinafine can be used safely and effectively in adult and pediatric patients to treat superficial fungal infections, including onychomycosis.1 These superficial fungal infections have become increasingly prevalent in children and often require oral therapy2; however, children are frequently unable to swallow a pill.
Until 2016, terbinafine was available as oral granules that could be sprinkled on food, but this formulation has been discontinued.3 In addition, terbinafine tablets have a bitter taste. Therefore, the inability to swallow a pill—typical of young children and other patients with pill dysphagia—is a barrier to prescribing terbinafine.
The Technique
For patients who cannot swallow a pill, a terbinafine tablet can be crushed and mixed with food or a syrup without loss of efficacy. Terbinafine in tablet form has been shown to have relatively unchanged properties after being crushed and mixed in solution, even several weeks after preparation.4 Crushing and mixing a terbinafine tablet with food or a syrup therefore is an effective option for patients who cannot swallow a pill but can safely swallow food.
The food or syrup used for this purpose should have a pH of at least 5 because greater acidity reduces absorption of terbinafine. Therefore, avoid mixing it with fruit juices, applesauce, or soda. Given the bitter taste of the terbinafine tablet, mixing it with a sweet food or syrup improves taste and compliance, which makes pudding a particularly good food option for this purpose.
However, because younger patients might not finish an entire serving of pudding or other food into which the tablet has been crushed and mixed, inconsistent dosing might result. Therefore, we recommend mixing the crushed terbinafine tablet with 1 oz (30 mL) of chocolate syrup or corn syrup (Figure). This solution is sweet, easy to prepare and consume, widely available, and affordable (as low as $0.28/oz for corn syrup and as low as $0.10/oz for chocolate syrup, as priced on Amazon).
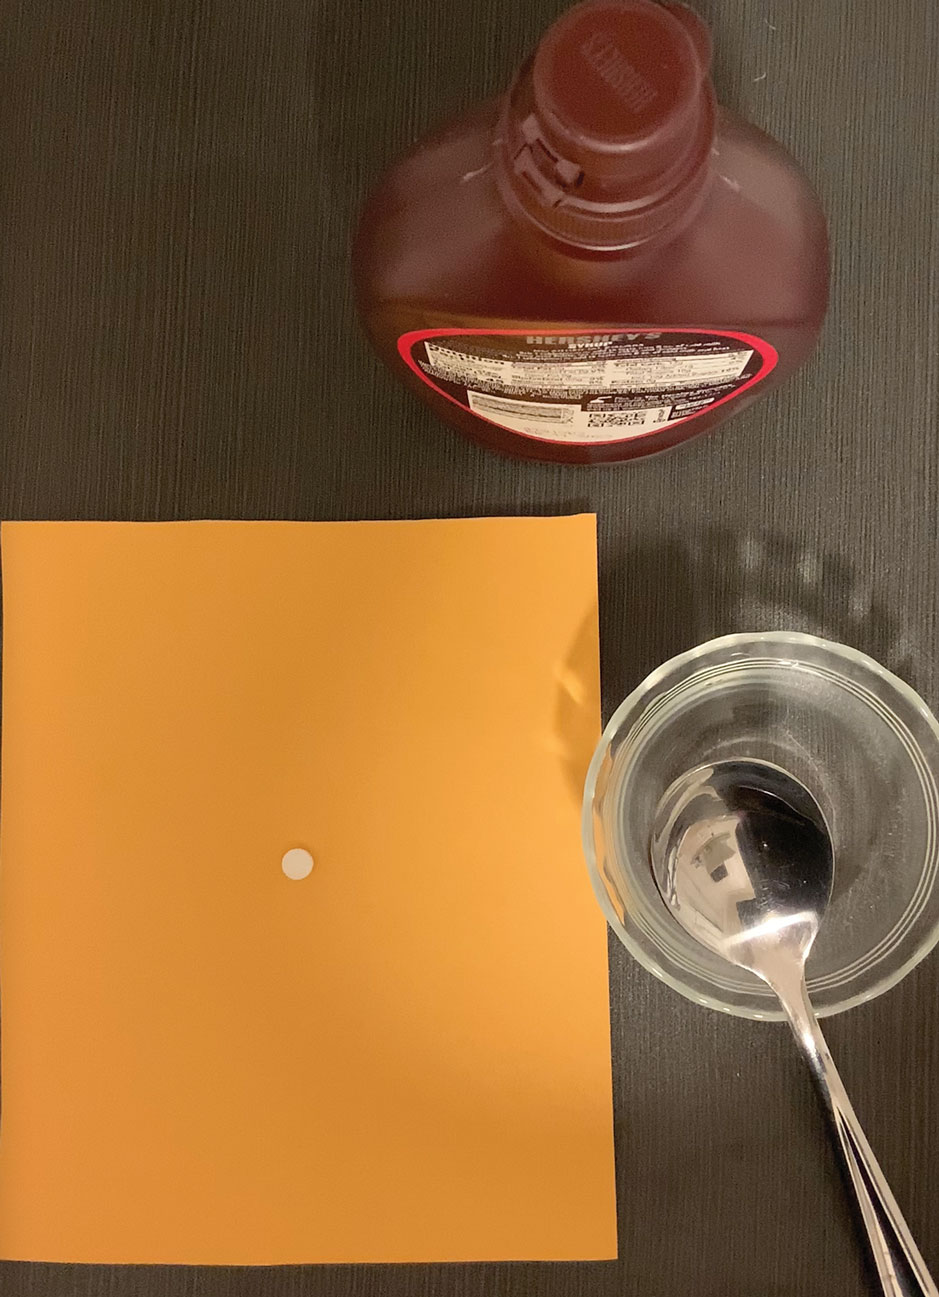
The tablet can be crushed using a pill crusher ($5–$10 at pharmacies or on Amazon) or by placing it on a piece of paper and crushing it with the back of a metal spoon. For children, the recommended dosing of terbinafine with a 250-mg tablet is based on weight: one-quarter of a tablet for a child weighing 10 to 20 kg; one-half of a tablet for a child weighing 20 to 40 kg; and a full tablet for a child weighing more than 40 kg.5 Because terbinafine tablets are not scored, a combined pill splitter–crusher can be used (also available at pharmacies or on Amazon; the price of this device is within the same price range as a pill crusher).
Practical Implication
Use of this method for crushing and mixing the terbinafine tablet allows patients who are unable to swallow a pill to safely and effectively use oral terbinafine.
- Solís-Arias MP, García-Romero MT. Onychomycosis in children. a review. Int J Dermatol. 2017;56:123-130. doi:10.1111/ijd.13392
- Wang Y, Lipner SR. Retrospective analysis of abnormal laboratory test results in pediatric patients prescribed terbinafine for superficial fungal infections. J Am Acad Dermatol. 2021;85:1042-1044. doi:10.1016/j.jaad.2021.01.073
- Lamisil (terbinafine hydrochloride) oral granules. Prescribing information. Novartis Pharmaceutical Corporation; 2013. Accessed February 6, 2023. https://www.accessdata.fda.gov/drugsatfda_docs/label/2013/022071s009lbl.pdf
- Abdel-Rahman SM, Nahata MC. Stability of terbinafine hydrochloride in an extemporaneously prepared oral suspension at 25 and 4 degrees C. Am J Health Syst Pharm. 1999;56:243-245. doi:10.1093/ajhp/56.3.243
- Gupta AK, Adamiak A, Cooper EA. The efficacy and safety of terbinafine in children. J Eur Acad Dermatol Venereol. 2003;17:627-640. doi: 10.1046/j.1468-3083.2003.00691.x
Practice Gap
Terbinafine can be used safely and effectively in adult and pediatric patients to treat superficial fungal infections, including onychomycosis.1 These superficial fungal infections have become increasingly prevalent in children and often require oral therapy2; however, children are frequently unable to swallow a pill.
Until 2016, terbinafine was available as oral granules that could be sprinkled on food, but this formulation has been discontinued.3 In addition, terbinafine tablets have a bitter taste. Therefore, the inability to swallow a pill—typical of young children and other patients with pill dysphagia—is a barrier to prescribing terbinafine.
The Technique
For patients who cannot swallow a pill, a terbinafine tablet can be crushed and mixed with food or a syrup without loss of efficacy. Terbinafine in tablet form has been shown to have relatively unchanged properties after being crushed and mixed in solution, even several weeks after preparation.4 Crushing and mixing a terbinafine tablet with food or a syrup therefore is an effective option for patients who cannot swallow a pill but can safely swallow food.
The food or syrup used for this purpose should have a pH of at least 5 because greater acidity reduces absorption of terbinafine. Therefore, avoid mixing it with fruit juices, applesauce, or soda. Given the bitter taste of the terbinafine tablet, mixing it with a sweet food or syrup improves taste and compliance, which makes pudding a particularly good food option for this purpose.
However, because younger patients might not finish an entire serving of pudding or other food into which the tablet has been crushed and mixed, inconsistent dosing might result. Therefore, we recommend mixing the crushed terbinafine tablet with 1 oz (30 mL) of chocolate syrup or corn syrup (Figure). This solution is sweet, easy to prepare and consume, widely available, and affordable (as low as $0.28/oz for corn syrup and as low as $0.10/oz for chocolate syrup, as priced on Amazon).

The tablet can be crushed using a pill crusher ($5–$10 at pharmacies or on Amazon) or by placing it on a piece of paper and crushing it with the back of a metal spoon. For children, the recommended dosing of terbinafine with a 250-mg tablet is based on weight: one-quarter of a tablet for a child weighing 10 to 20 kg; one-half of a tablet for a child weighing 20 to 40 kg; and a full tablet for a child weighing more than 40 kg.5 Because terbinafine tablets are not scored, a combined pill splitter–crusher can be used (also available at pharmacies or on Amazon; the price of this device is within the same price range as a pill crusher).
Practical Implication
Use of this method for crushing and mixing the terbinafine tablet allows patients who are unable to swallow a pill to safely and effectively use oral terbinafine.
Practice Gap
Terbinafine can be used safely and effectively in adult and pediatric patients to treat superficial fungal infections, including onychomycosis.1 These superficial fungal infections have become increasingly prevalent in children and often require oral therapy2; however, children are frequently unable to swallow a pill.
Until 2016, terbinafine was available as oral granules that could be sprinkled on food, but this formulation has been discontinued.3 In addition, terbinafine tablets have a bitter taste. Therefore, the inability to swallow a pill—typical of young children and other patients with pill dysphagia—is a barrier to prescribing terbinafine.
The Technique
For patients who cannot swallow a pill, a terbinafine tablet can be crushed and mixed with food or a syrup without loss of efficacy. Terbinafine in tablet form has been shown to have relatively unchanged properties after being crushed and mixed in solution, even several weeks after preparation.4 Crushing and mixing a terbinafine tablet with food or a syrup therefore is an effective option for patients who cannot swallow a pill but can safely swallow food.
The food or syrup used for this purpose should have a pH of at least 5 because greater acidity reduces absorption of terbinafine. Therefore, avoid mixing it with fruit juices, applesauce, or soda. Given the bitter taste of the terbinafine tablet, mixing it with a sweet food or syrup improves taste and compliance, which makes pudding a particularly good food option for this purpose.
However, because younger patients might not finish an entire serving of pudding or other food into which the tablet has been crushed and mixed, inconsistent dosing might result. Therefore, we recommend mixing the crushed terbinafine tablet with 1 oz (30 mL) of chocolate syrup or corn syrup (Figure). This solution is sweet, easy to prepare and consume, widely available, and affordable (as low as $0.28/oz for corn syrup and as low as $0.10/oz for chocolate syrup, as priced on Amazon).

The tablet can be crushed using a pill crusher ($5–$10 at pharmacies or on Amazon) or by placing it on a piece of paper and crushing it with the back of a metal spoon. For children, the recommended dosing of terbinafine with a 250-mg tablet is based on weight: one-quarter of a tablet for a child weighing 10 to 20 kg; one-half of a tablet for a child weighing 20 to 40 kg; and a full tablet for a child weighing more than 40 kg.5 Because terbinafine tablets are not scored, a combined pill splitter–crusher can be used (also available at pharmacies or on Amazon; the price of this device is within the same price range as a pill crusher).
Practical Implication
Use of this method for crushing and mixing the terbinafine tablet allows patients who are unable to swallow a pill to safely and effectively use oral terbinafine.
- Solís-Arias MP, García-Romero MT. Onychomycosis in children. a review. Int J Dermatol. 2017;56:123-130. doi:10.1111/ijd.13392
- Wang Y, Lipner SR. Retrospective analysis of abnormal laboratory test results in pediatric patients prescribed terbinafine for superficial fungal infections. J Am Acad Dermatol. 2021;85:1042-1044. doi:10.1016/j.jaad.2021.01.073
- Lamisil (terbinafine hydrochloride) oral granules. Prescribing information. Novartis Pharmaceutical Corporation; 2013. Accessed February 6, 2023. https://www.accessdata.fda.gov/drugsatfda_docs/label/2013/022071s009lbl.pdf
- Abdel-Rahman SM, Nahata MC. Stability of terbinafine hydrochloride in an extemporaneously prepared oral suspension at 25 and 4 degrees C. Am J Health Syst Pharm. 1999;56:243-245. doi:10.1093/ajhp/56.3.243
- Gupta AK, Adamiak A, Cooper EA. The efficacy and safety of terbinafine in children. J Eur Acad Dermatol Venereol. 2003;17:627-640. doi: 10.1046/j.1468-3083.2003.00691.x
Bone Wax as a Physical Hemostatic Agent
Practice Gap
Hemostasis after cutaneous surgery typically can be aided by mechanical occlusion with petrolatum and gauze known as a pressure bandage. However, in certain scenarios such as bone bleeding or irregularly shaped areas (eg, conchal bowl), difficulty applying a pressure bandage necessitates alternative hemostatic measures.1 In those instances, physical hemostatic agents, such as gelatin, oxidized cellulose, microporous polysaccharide spheres, hydrophilic polymers with potassium salts, microfibrillar collagen, and chitin, also can be used.2 However, those agents are expensive and often adhere to wound edges, inducing repeat trauma with removal. To avoid such concerns, we propose the use of bone wax as an effective hemostatic technique.
The Technique
When secondary intention healing is chosen or a temporary bandage needs to be placed, we offer the use of bone wax as an alternative to help achieve hemostasis. Bone wax—a combination of beeswax, isopropyl palmitate, and a stabilizing agent such as almond oils or sterilized salicylic acid3—helps achieve hemostasis by purely mechanical means. It is malleable and can be easily adapted to the architecture of the surgical site (Figure 1). The bone wax can be applied immediately following surgery and removed during bandage change.
Practice Implications
Use of bone wax as a physical hemostatic agent provides a practical alternative to other options commonly used in dermatologic surgery for deep wounds or irregular surfaces. It offers several advantages.
Bone wax is not absorbed and does not adhere to wound surfaces, which makes removal easy and painless. Furthermore, bone wax allows for excellent growth of granulation tissue2 (Figure 2), most likely due to the healing and emollient properties of the beeswax and the moist occlusive environment created by the bone wax.
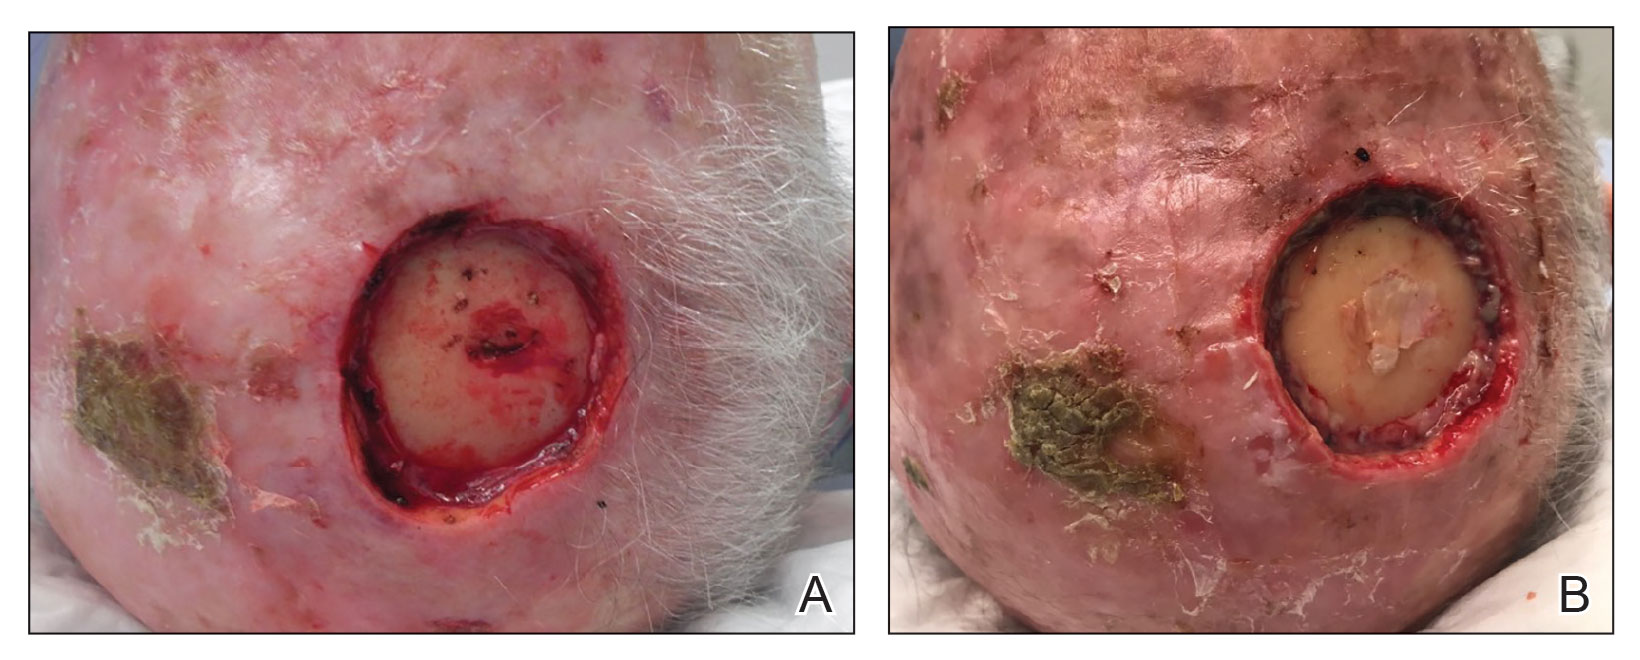
Additional advantages are its low cost, especially compared to other hemostatic agents, and long shelf-life (approximately 5 years).2 Furthermore, in scenarios when cutaneous tumors extend into the calvarium, bone wax can prevent air emboli from entering noncollapsible emissary veins.4
When bone wax is used as a temporary measure in a dermatologic setting, complications inherent to its use in bone healing (eg, granulomatous reaction, infection)—for which it is left in place indefinitely—are avoided.
- Perandones-González H, Fernández-Canga P, Rodríguez-Prieto MA. Bone wax as an ideal dressing for auricle concha. J Am Acad Dermatol. 2021;84:e75-e76. doi:10.1016/j.jaad.2019.08.002
- Palm MD, Altman JS. Topical hemostatic agents: a review. Dermatol Surg. 2008;34:431-445. doi:10.1111/j.1524-4725.2007.34090.x
- Alegre M, Garcés JR, Puig L. Bone wax in dermatologic surgery. Actas Dermosifiliogr. 2013;104:299-303. doi:10.1016/j.adengl.2013.03.001
- Goldman G, Altmayer S, Sambandan P, et al. Development of cerebral air emboli during Mohs micrographic surgery. Dermatol Surg. 2009;35:1414-1421. doi:10.1111/j.1524-4725.2009.01250.x
Practice Gap
Hemostasis after cutaneous surgery typically can be aided by mechanical occlusion with petrolatum and gauze known as a pressure bandage. However, in certain scenarios such as bone bleeding or irregularly shaped areas (eg, conchal bowl), difficulty applying a pressure bandage necessitates alternative hemostatic measures.1 In those instances, physical hemostatic agents, such as gelatin, oxidized cellulose, microporous polysaccharide spheres, hydrophilic polymers with potassium salts, microfibrillar collagen, and chitin, also can be used.2 However, those agents are expensive and often adhere to wound edges, inducing repeat trauma with removal. To avoid such concerns, we propose the use of bone wax as an effective hemostatic technique.
The Technique
When secondary intention healing is chosen or a temporary bandage needs to be placed, we offer the use of bone wax as an alternative to help achieve hemostasis. Bone wax—a combination of beeswax, isopropyl palmitate, and a stabilizing agent such as almond oils or sterilized salicylic acid3—helps achieve hemostasis by purely mechanical means. It is malleable and can be easily adapted to the architecture of the surgical site (Figure 1). The bone wax can be applied immediately following surgery and removed during bandage change.

Practice Implications
Use of bone wax as a physical hemostatic agent provides a practical alternative to other options commonly used in dermatologic surgery for deep wounds or irregular surfaces. It offers several advantages.
Bone wax is not absorbed and does not adhere to wound surfaces, which makes removal easy and painless. Furthermore, bone wax allows for excellent growth of granulation tissue2 (Figure 2), most likely due to the healing and emollient properties of the beeswax and the moist occlusive environment created by the bone wax.

Additional advantages are its low cost, especially compared to other hemostatic agents, and long shelf-life (approximately 5 years).2 Furthermore, in scenarios when cutaneous tumors extend into the calvarium, bone wax can prevent air emboli from entering noncollapsible emissary veins.4
When bone wax is used as a temporary measure in a dermatologic setting, complications inherent to its use in bone healing (eg, granulomatous reaction, infection)—for which it is left in place indefinitely—are avoided.
Practice Gap
Hemostasis after cutaneous surgery typically can be aided by mechanical occlusion with petrolatum and gauze known as a pressure bandage. However, in certain scenarios such as bone bleeding or irregularly shaped areas (eg, conchal bowl), difficulty applying a pressure bandage necessitates alternative hemostatic measures.1 In those instances, physical hemostatic agents, such as gelatin, oxidized cellulose, microporous polysaccharide spheres, hydrophilic polymers with potassium salts, microfibrillar collagen, and chitin, also can be used.2 However, those agents are expensive and often adhere to wound edges, inducing repeat trauma with removal. To avoid such concerns, we propose the use of bone wax as an effective hemostatic technique.
The Technique
When secondary intention healing is chosen or a temporary bandage needs to be placed, we offer the use of bone wax as an alternative to help achieve hemostasis. Bone wax—a combination of beeswax, isopropyl palmitate, and a stabilizing agent such as almond oils or sterilized salicylic acid3—helps achieve hemostasis by purely mechanical means. It is malleable and can be easily adapted to the architecture of the surgical site (Figure 1). The bone wax can be applied immediately following surgery and removed during bandage change.

Practice Implications
Use of bone wax as a physical hemostatic agent provides a practical alternative to other options commonly used in dermatologic surgery for deep wounds or irregular surfaces. It offers several advantages.
Bone wax is not absorbed and does not adhere to wound surfaces, which makes removal easy and painless. Furthermore, bone wax allows for excellent growth of granulation tissue2 (Figure 2), most likely due to the healing and emollient properties of the beeswax and the moist occlusive environment created by the bone wax.

Additional advantages are its low cost, especially compared to other hemostatic agents, and long shelf-life (approximately 5 years).2 Furthermore, in scenarios when cutaneous tumors extend into the calvarium, bone wax can prevent air emboli from entering noncollapsible emissary veins.4
When bone wax is used as a temporary measure in a dermatologic setting, complications inherent to its use in bone healing (eg, granulomatous reaction, infection)—for which it is left in place indefinitely—are avoided.
- Perandones-González H, Fernández-Canga P, Rodríguez-Prieto MA. Bone wax as an ideal dressing for auricle concha. J Am Acad Dermatol. 2021;84:e75-e76. doi:10.1016/j.jaad.2019.08.002
- Palm MD, Altman JS. Topical hemostatic agents: a review. Dermatol Surg. 2008;34:431-445. doi:10.1111/j.1524-4725.2007.34090.x
- Alegre M, Garcés JR, Puig L. Bone wax in dermatologic surgery. Actas Dermosifiliogr. 2013;104:299-303. doi:10.1016/j.adengl.2013.03.001
- Goldman G, Altmayer S, Sambandan P, et al. Development of cerebral air emboli during Mohs micrographic surgery. Dermatol Surg. 2009;35:1414-1421. doi:10.1111/j.1524-4725.2009.01250.x
How to Optimize Wound Closure in Thin Skin
Practice Gap
Cutaneous surgery involves many areas where skin is quite thin and fragile, which often is encountered in elderly patients; the forearms and lower legs are the most frequent locations for thin skin.1 Dermatologic surgeons frequently encounter these situations, making this a highly practical arena for technical improvements.
For many of these patients, there is little meaningful dermis for placement of subcutaneous sutures. Therefore, a common approach following surgery, particularly following Mohs micrographic surgery in which tumors and defects typically are larger, is healing by secondary intention.2 Although healing by secondary intention often is a reasonable option, we have found that maximizing the use of epidermal skin for primary closure can be an effective means of closing many such defects. Antimicrobial reinforced skin closure strips have been incorporated in wound closure for thin skin. However, earlier efforts involving reinforcement perpendicular to the wound lacked critical details or used a different technique.3
The Technique
We developed a novel effective closure technique that minimizes these problems. Our technique has been used on the wounds of hundreds of patients with satisfying results. Early on, we used multiple variations to optimize outcomes, including different sizes of sutures and reinforced skin closure strips, application of medical liquid adhesive, liquid adhesive, and varying postoperative dressings. For 3 years, we tracked outcomes in-house and gradually narrowed down our successes into a single, user-friendly paradigm.
Supplies—To perform this technique, required supplies include:
• 2-0 Polypropylene suture with a PS-2 needle, or the equivalent. Polyglactin or silk suture can be utilized if a less-rigid suture is desired; however, we primarily have used polypropylene for repairs with good results. Each repair requires at least 2 sutures.
• Reinforced skin closure strips (1×5 inches). This width affords increased strength.
• Conforming stretch bandage and elastic self-adherent wrap.
• Polysporin (bacitracin zinc, polymyxin B sulfate, and petrolatum)(Johnson & Johnson).
• All usual surgical instruments and supplies, including paper tape and nonadherent gauze (surgeon dependent).
Step-by-step Technique—Close the wound using the following steps:
1. Once the defect is finalized following Mohs micrographic surgery or excision, excise the ellipse to be utilized for the closure and perform complete hemostasis.
2. Place 2 layers of reinforced skin closure strips—one on top of the other—along each side of the defect, leaving approximately 1 cm of uncovered skin between the wound edges and the reinforced skin closure strips (Figure, A).
3. Take a big-bite pulley suture about one-third of the way from one end of the ellipse, with both punctures passing through the reinforced skin closure strips. Leave that in place or have the assistant hold it and wait. Place a second suture immediately adjacent to the pulley suture. Once that suture is placed but still untied, have the assistant carefully pull the pulley suture outward away from the wound edge while you carefully bring the suture together and tie it off gently (Figure, B). Doing this utilizes the pulley ability of the suture to protect the skin from tearing and releases sufficient pressure on the single suture so that it can be easily tightened without risk to the fragile skin.
4. Repeat step 3, this time placing a pulley suture near the midline of the ellipse and the subsequent single suture adjacent to it.
5. Take pulley sutures repeatedly as in steps 3 and 4 until multiple sutures are secured in place. Replace the pulley sutures with single sutures because the double-pulley sutures in areas of lower vascularity tend to have, in our experience, a slightly increased incidence of focal necrosis in comparison to single sutures.
6. Make a concerted attempt to keep as much blood as possible off the reinforced skin closure strips throughout the procedure; the less dried blood on the reinforced skin closure strips, the cleaner and better the final closure (Figure, C).
7. Most of these cases involve the forearms and the legs below the knees. Because any increase in pressure or swelling on the wound can result in skin breakdown, postoperative dressing is critical. We use a layered approach; the following sequence can be modified to the preference of the surgeon: Polysporin (bacitracin zinc, polymyxin B sulfate, and petrolatum), nonadherent gauze, paper tape, conforming stretch bandage, and elastic self-adherent wrap. Minimizing swelling and infection are the primary goals. The wrap is left on for 1 week and should be kept dry.
8. Have the patient return to the office in 1 week. Unwrap the entire wound; trim back the reinforced skin closure strips; and have the patient utilize typical wound care at home thereafter consisting of cleaning and application of Polysporin or plain petrolatum, nonadherent gauze, and a paper-tape bandage. Because liquid adhesive is not utilized in this technique, the reinforced skin closure strips can be carefully removed without tearing skin. Leave sutures in for 3 weeks for arm procedures and 4 weeks for leg procedures, unless irritation develops or rapid suture overgrowth occurs in either location.
Complications
Most outcomes after using this technique are typical of optimized linear surgeries, with reduced scarring and complete wound healing (Figure, D). We seldom see complications but the following are possible:
• Bleeding occurs but rarely; the weeklong wrap likely provides great benefit.
• Infection is rare but does occur occasionally, as in any surgical procedure.
• Breakdown of the entire wound is rare; however, we occasionally see focal necrosis near 1 stitch—or rarely 2 stitches—that does not require intervention, apart from longer use of topical Polysporin or petrolatum alone to maximize healing by secondary intention in those small areas.• Despite simple suture placement far from the edge of the wound, wound inversion is seldom a problem because these taut closures have a tendency to expand slightly due to postoperative swelling.
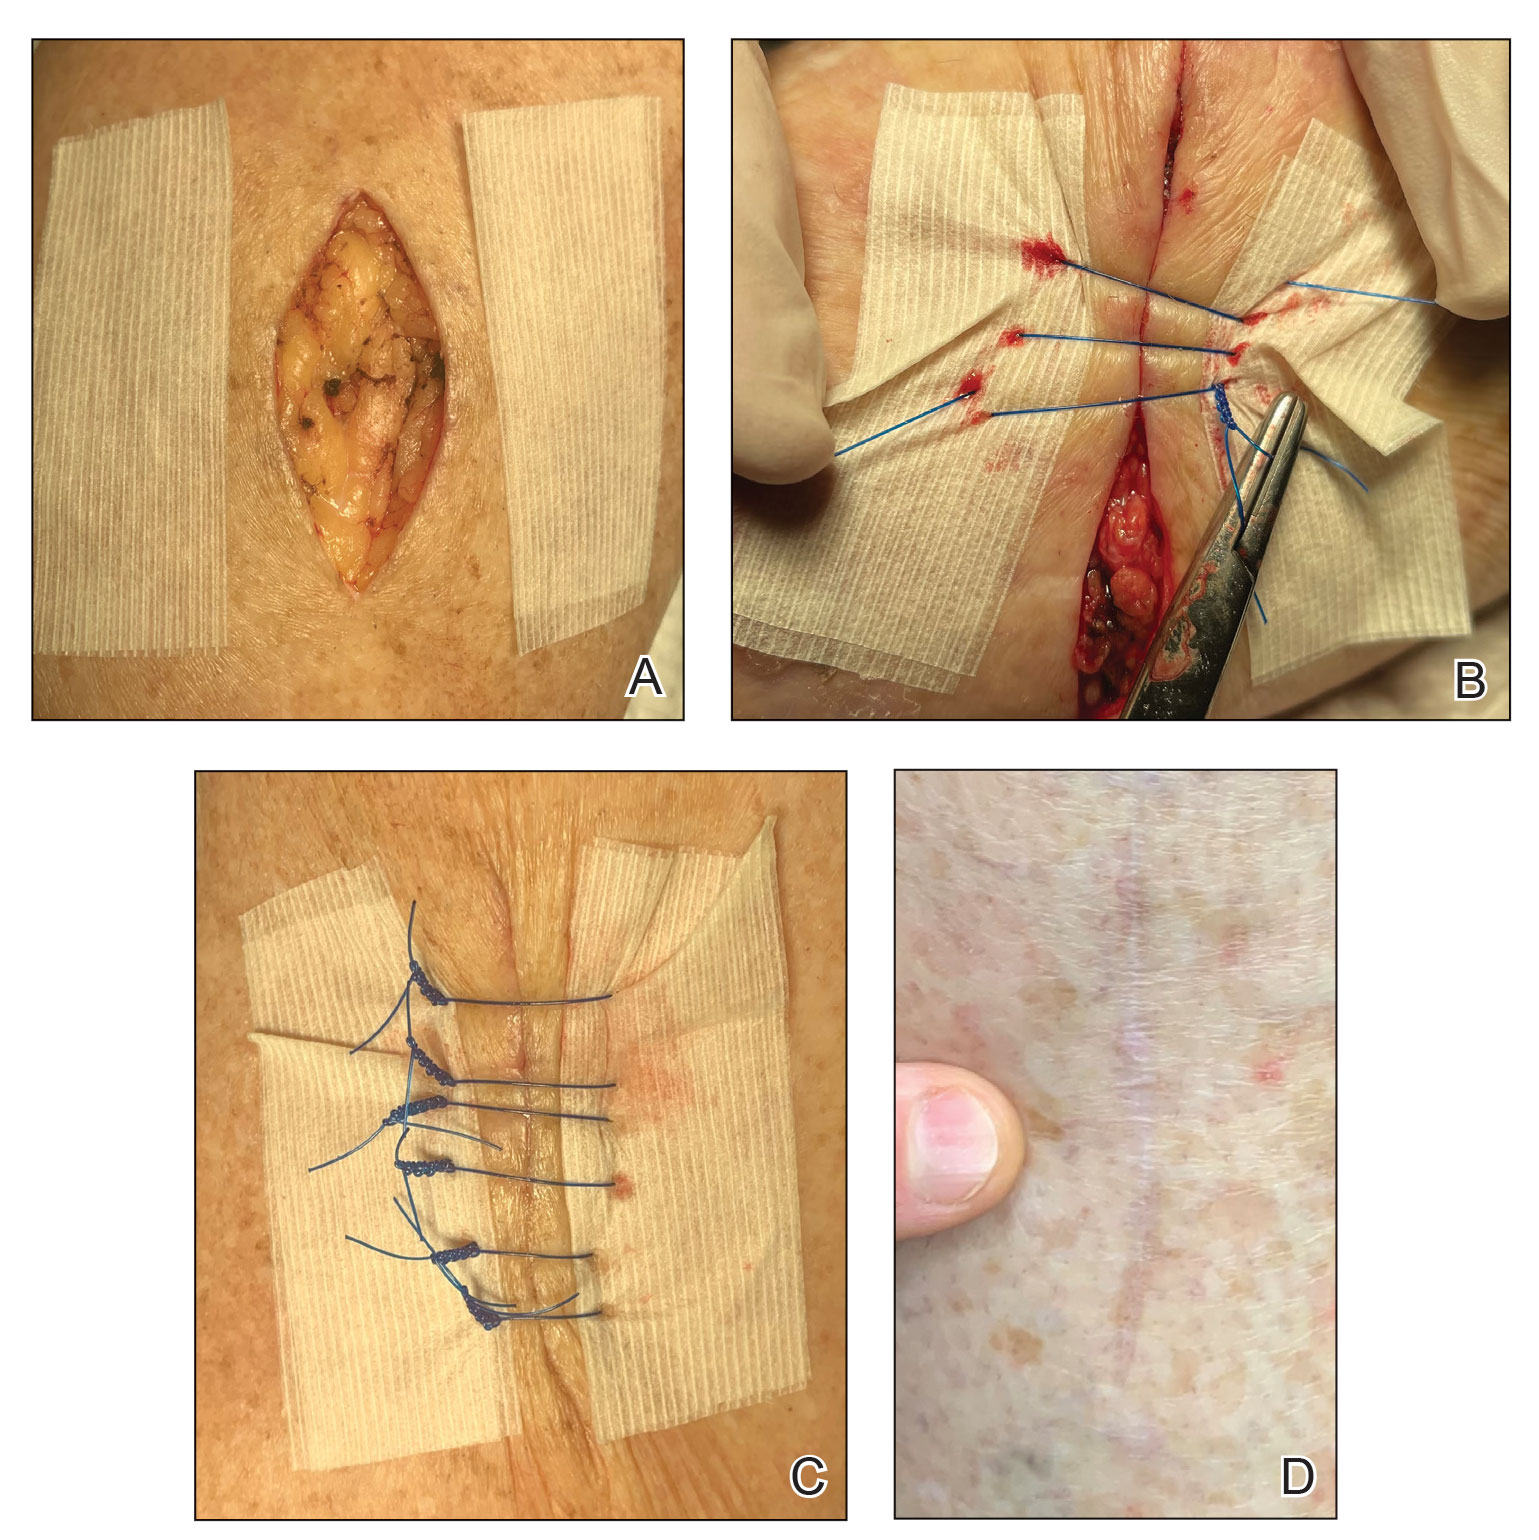
Practice Implications
Any experienced dermatologic surgeon can perfect this technique for closing a wound in thin skin. Because wound closure in areas of fragile skin frequently is encountered in cutaneous surgery, we hope that utilizing this technique results in an optimal outcome for many patients.
- Shuster S, Black MM, McVitie E. The influence of age and sex on skin thickness, skin collagen and density. Br J Dermatol. 1975;93:639-643. doi:10.1111/j.1365-2133.1975.tb05113.x
- Molina GE, Yu SH, Neel VA. Observations regarding infection risk in lower-extremity wound healing by second intention. Dermatol Surg. 2020;46:1342-1344. doi:10.1097/DSS.0000000000002094
- Davis M, Nakhdjevani A, Lidder S. Suture/Steri-Strip combination for the management of lacerations in thin-skinned individuals. J Emerg Med. 2011;40:322-323. doi:10.1016/j.jemermed.2010.05.077
Practice Gap
Cutaneous surgery involves many areas where skin is quite thin and fragile, which often is encountered in elderly patients; the forearms and lower legs are the most frequent locations for thin skin.1 Dermatologic surgeons frequently encounter these situations, making this a highly practical arena for technical improvements.
For many of these patients, there is little meaningful dermis for placement of subcutaneous sutures. Therefore, a common approach following surgery, particularly following Mohs micrographic surgery in which tumors and defects typically are larger, is healing by secondary intention.2 Although healing by secondary intention often is a reasonable option, we have found that maximizing the use of epidermal skin for primary closure can be an effective means of closing many such defects. Antimicrobial reinforced skin closure strips have been incorporated in wound closure for thin skin. However, earlier efforts involving reinforcement perpendicular to the wound lacked critical details or used a different technique.3
The Technique
We developed a novel effective closure technique that minimizes these problems. Our technique has been used on the wounds of hundreds of patients with satisfying results. Early on, we used multiple variations to optimize outcomes, including different sizes of sutures and reinforced skin closure strips, application of medical liquid adhesive, liquid adhesive, and varying postoperative dressings. For 3 years, we tracked outcomes in-house and gradually narrowed down our successes into a single, user-friendly paradigm.
Supplies—To perform this technique, required supplies include:
• 2-0 Polypropylene suture with a PS-2 needle, or the equivalent. Polyglactin or silk suture can be utilized if a less-rigid suture is desired; however, we primarily have used polypropylene for repairs with good results. Each repair requires at least 2 sutures.
• Reinforced skin closure strips (1×5 inches). This width affords increased strength.
• Conforming stretch bandage and elastic self-adherent wrap.
• Polysporin (bacitracin zinc, polymyxin B sulfate, and petrolatum)(Johnson & Johnson).
• All usual surgical instruments and supplies, including paper tape and nonadherent gauze (surgeon dependent).
Step-by-step Technique—Close the wound using the following steps:
1. Once the defect is finalized following Mohs micrographic surgery or excision, excise the ellipse to be utilized for the closure and perform complete hemostasis.
2. Place 2 layers of reinforced skin closure strips—one on top of the other—along each side of the defect, leaving approximately 1 cm of uncovered skin between the wound edges and the reinforced skin closure strips (Figure, A).
3. Take a big-bite pulley suture about one-third of the way from one end of the ellipse, with both punctures passing through the reinforced skin closure strips. Leave that in place or have the assistant hold it and wait. Place a second suture immediately adjacent to the pulley suture. Once that suture is placed but still untied, have the assistant carefully pull the pulley suture outward away from the wound edge while you carefully bring the suture together and tie it off gently (Figure, B). Doing this utilizes the pulley ability of the suture to protect the skin from tearing and releases sufficient pressure on the single suture so that it can be easily tightened without risk to the fragile skin.
4. Repeat step 3, this time placing a pulley suture near the midline of the ellipse and the subsequent single suture adjacent to it.
5. Take pulley sutures repeatedly as in steps 3 and 4 until multiple sutures are secured in place. Replace the pulley sutures with single sutures because the double-pulley sutures in areas of lower vascularity tend to have, in our experience, a slightly increased incidence of focal necrosis in comparison to single sutures.
6. Make a concerted attempt to keep as much blood as possible off the reinforced skin closure strips throughout the procedure; the less dried blood on the reinforced skin closure strips, the cleaner and better the final closure (Figure, C).
7. Most of these cases involve the forearms and the legs below the knees. Because any increase in pressure or swelling on the wound can result in skin breakdown, postoperative dressing is critical. We use a layered approach; the following sequence can be modified to the preference of the surgeon: Polysporin (bacitracin zinc, polymyxin B sulfate, and petrolatum), nonadherent gauze, paper tape, conforming stretch bandage, and elastic self-adherent wrap. Minimizing swelling and infection are the primary goals. The wrap is left on for 1 week and should be kept dry.
8. Have the patient return to the office in 1 week. Unwrap the entire wound; trim back the reinforced skin closure strips; and have the patient utilize typical wound care at home thereafter consisting of cleaning and application of Polysporin or plain petrolatum, nonadherent gauze, and a paper-tape bandage. Because liquid adhesive is not utilized in this technique, the reinforced skin closure strips can be carefully removed without tearing skin. Leave sutures in for 3 weeks for arm procedures and 4 weeks for leg procedures, unless irritation develops or rapid suture overgrowth occurs in either location.
Complications
Most outcomes after using this technique are typical of optimized linear surgeries, with reduced scarring and complete wound healing (Figure, D). We seldom see complications but the following are possible:
• Bleeding occurs but rarely; the weeklong wrap likely provides great benefit.
• Infection is rare but does occur occasionally, as in any surgical procedure.
• Breakdown of the entire wound is rare; however, we occasionally see focal necrosis near 1 stitch—or rarely 2 stitches—that does not require intervention, apart from longer use of topical Polysporin or petrolatum alone to maximize healing by secondary intention in those small areas.• Despite simple suture placement far from the edge of the wound, wound inversion is seldom a problem because these taut closures have a tendency to expand slightly due to postoperative swelling.

Practice Implications
Any experienced dermatologic surgeon can perfect this technique for closing a wound in thin skin. Because wound closure in areas of fragile skin frequently is encountered in cutaneous surgery, we hope that utilizing this technique results in an optimal outcome for many patients.
Practice Gap
Cutaneous surgery involves many areas where skin is quite thin and fragile, which often is encountered in elderly patients; the forearms and lower legs are the most frequent locations for thin skin.1 Dermatologic surgeons frequently encounter these situations, making this a highly practical arena for technical improvements.
For many of these patients, there is little meaningful dermis for placement of subcutaneous sutures. Therefore, a common approach following surgery, particularly following Mohs micrographic surgery in which tumors and defects typically are larger, is healing by secondary intention.2 Although healing by secondary intention often is a reasonable option, we have found that maximizing the use of epidermal skin for primary closure can be an effective means of closing many such defects. Antimicrobial reinforced skin closure strips have been incorporated in wound closure for thin skin. However, earlier efforts involving reinforcement perpendicular to the wound lacked critical details or used a different technique.3
The Technique
We developed a novel effective closure technique that minimizes these problems. Our technique has been used on the wounds of hundreds of patients with satisfying results. Early on, we used multiple variations to optimize outcomes, including different sizes of sutures and reinforced skin closure strips, application of medical liquid adhesive, liquid adhesive, and varying postoperative dressings. For 3 years, we tracked outcomes in-house and gradually narrowed down our successes into a single, user-friendly paradigm.
Supplies—To perform this technique, required supplies include:
• 2-0 Polypropylene suture with a PS-2 needle, or the equivalent. Polyglactin or silk suture can be utilized if a less-rigid suture is desired; however, we primarily have used polypropylene for repairs with good results. Each repair requires at least 2 sutures.
• Reinforced skin closure strips (1×5 inches). This width affords increased strength.
• Conforming stretch bandage and elastic self-adherent wrap.
• Polysporin (bacitracin zinc, polymyxin B sulfate, and petrolatum)(Johnson & Johnson).
• All usual surgical instruments and supplies, including paper tape and nonadherent gauze (surgeon dependent).
Step-by-step Technique—Close the wound using the following steps:
1. Once the defect is finalized following Mohs micrographic surgery or excision, excise the ellipse to be utilized for the closure and perform complete hemostasis.
2. Place 2 layers of reinforced skin closure strips—one on top of the other—along each side of the defect, leaving approximately 1 cm of uncovered skin between the wound edges and the reinforced skin closure strips (Figure, A).
3. Take a big-bite pulley suture about one-third of the way from one end of the ellipse, with both punctures passing through the reinforced skin closure strips. Leave that in place or have the assistant hold it and wait. Place a second suture immediately adjacent to the pulley suture. Once that suture is placed but still untied, have the assistant carefully pull the pulley suture outward away from the wound edge while you carefully bring the suture together and tie it off gently (Figure, B). Doing this utilizes the pulley ability of the suture to protect the skin from tearing and releases sufficient pressure on the single suture so that it can be easily tightened without risk to the fragile skin.
4. Repeat step 3, this time placing a pulley suture near the midline of the ellipse and the subsequent single suture adjacent to it.
5. Take pulley sutures repeatedly as in steps 3 and 4 until multiple sutures are secured in place. Replace the pulley sutures with single sutures because the double-pulley sutures in areas of lower vascularity tend to have, in our experience, a slightly increased incidence of focal necrosis in comparison to single sutures.
6. Make a concerted attempt to keep as much blood as possible off the reinforced skin closure strips throughout the procedure; the less dried blood on the reinforced skin closure strips, the cleaner and better the final closure (Figure, C).
7. Most of these cases involve the forearms and the legs below the knees. Because any increase in pressure or swelling on the wound can result in skin breakdown, postoperative dressing is critical. We use a layered approach; the following sequence can be modified to the preference of the surgeon: Polysporin (bacitracin zinc, polymyxin B sulfate, and petrolatum), nonadherent gauze, paper tape, conforming stretch bandage, and elastic self-adherent wrap. Minimizing swelling and infection are the primary goals. The wrap is left on for 1 week and should be kept dry.
8. Have the patient return to the office in 1 week. Unwrap the entire wound; trim back the reinforced skin closure strips; and have the patient utilize typical wound care at home thereafter consisting of cleaning and application of Polysporin or plain petrolatum, nonadherent gauze, and a paper-tape bandage. Because liquid adhesive is not utilized in this technique, the reinforced skin closure strips can be carefully removed without tearing skin. Leave sutures in for 3 weeks for arm procedures and 4 weeks for leg procedures, unless irritation develops or rapid suture overgrowth occurs in either location.
Complications
Most outcomes after using this technique are typical of optimized linear surgeries, with reduced scarring and complete wound healing (Figure, D). We seldom see complications but the following are possible:
• Bleeding occurs but rarely; the weeklong wrap likely provides great benefit.
• Infection is rare but does occur occasionally, as in any surgical procedure.
• Breakdown of the entire wound is rare; however, we occasionally see focal necrosis near 1 stitch—or rarely 2 stitches—that does not require intervention, apart from longer use of topical Polysporin or petrolatum alone to maximize healing by secondary intention in those small areas.• Despite simple suture placement far from the edge of the wound, wound inversion is seldom a problem because these taut closures have a tendency to expand slightly due to postoperative swelling.

Practice Implications
Any experienced dermatologic surgeon can perfect this technique for closing a wound in thin skin. Because wound closure in areas of fragile skin frequently is encountered in cutaneous surgery, we hope that utilizing this technique results in an optimal outcome for many patients.
- Shuster S, Black MM, McVitie E. The influence of age and sex on skin thickness, skin collagen and density. Br J Dermatol. 1975;93:639-643. doi:10.1111/j.1365-2133.1975.tb05113.x
- Molina GE, Yu SH, Neel VA. Observations regarding infection risk in lower-extremity wound healing by second intention. Dermatol Surg. 2020;46:1342-1344. doi:10.1097/DSS.0000000000002094
- Davis M, Nakhdjevani A, Lidder S. Suture/Steri-Strip combination for the management of lacerations in thin-skinned individuals. J Emerg Med. 2011;40:322-323. doi:10.1016/j.jemermed.2010.05.077
