User login
The Universal Dermatology Bandage Kit: A Succinct Collection of Supplies
Practice Gap
Biopsies, excisions, and other invasive cutaneous procedures are performed regularly in dermatology clinics and require placement of a bandage after the procedure. Postprocedural bandaging varies by the type of procedure performed, anatomic site, and the physician’s preference of materials. Dermatologists can be left with an overwhelming choice of supplies and little practical education, as bandaging methods are not routinely addressed in residency curricula. To address this concern, we provide a succinct list of basic materials that are versatile and easily adapted to encompass all bandaging needs for dermatology procedures (Table).

With these few components, one can create an array of distinct bandages to cover wounds as small as a shave biopsy to linear closures and basic flaps or grafts. Even traditionally difficult-to-bandage areas are easily addressed. Simple modifications of the basic materials are required for each bandage adaptation, as outlined below.
The Techniques
Shave and Punch Biopsy Sites—Layer (from bottom to top) the emollient of choice, a cut 4×4-inch gauze pad, and flexible polyester tape cut to the appropriate size (Figure 1). This simple bandage conforms well to any anatomic site and can replace an adhesive bandage, if desired.

Cutaneous Surgery Sites—Pressure bandages are recommended on cutaneous surgery sites. One of the most common closures performed in dermatology is the layered closure with dissolvable subcutaneous sutures and nondissolvable cutaneous sutures. When this closure is performed on the trunk and proximal extremities, undermining often is required to adequately approximate skin. This technique eliminates tension on the wound but can increase the risk for hematoma.1 A pressure bandage left in place and kept dry for 48 hours after surgery helps eliminate the risk for postoperative bleeding.
To make a pressure bandage, layer (from bottom to top) the emollient of choice, a nonstick pad cut to size, folded 4×4-inch gauze pads, and flexible polyester tape (Figure 2). Our practice routinely utilizes the tape fanning technique2 to impart equal and firm pressure over the wound.

Complex Sites—When making a pressure bandage for an anatomically complex site—the ear, nose, or lip—nonstick pads and 4×4-inch gauze pads can be cut and folded or rolled to match the size and shape of the wound. Flexible polyester tape then conforms to these custom bandage shapes, allowing maintenance of targeted wound pressure (Figure 3).

Dental rolls can be of assistance on these sites. For example, a dental roll placed in the postauricular sulcus prior to bandaging an ear maintains comfortable anatomic positioning. Rolls can be placed in the nose, maintaining its architecture while the wound heals and providing counterpressure for added hemostasis of wounds on the lateral nasal sidewall and ala. We recommend coating dental rolls in petrolatum prior to placement in the nares for ease of removal and patient comfort.
Distal Arms and Legs—Another layer of compression is added to pressure bandages on the distal upper and lower extremities using a fabric and elastic wrap (Figure 4). The extra layer keeps the bandage in place on the upper extremities while the patient continues their daily activities. It also helps prevent edema and pain in the lower extremities.

The degree of postoperative lower extremity swelling varies by patient and procedure performed but largely is inevitable with surgery on the leg, given the potential for superficial lymphatic disruption and the dependent position of the leg when standing. Elevation is always advised, but a well-wrapped, long-stretch elastic bandage provides extra support, especially if the patient has baseline venous insufficiency or needs to be on their feet during the day. The wrap is applied from the distal to the proximal leg with graded compression, overlapping by half with each rotation. The wrap is tightest near the ankle, with gradual and subtle easing of tension as it is placed superiorly.
Healing by Secondary Intention, Full-Thickness and Split-Thickness Skin Grafts, and Partial Wound Closure—These postoperative scenarios require bandages with appropriate pressure; however, dressings need to remain moist against the patient’s skin for comfortable removal, which can be accomplished with petrolatum-impregnated gauze with or without antibacterial properties. The gauze is folded to the appropriate size and placed directly on the wound or sutured in place (Figure 5). A pressure bandage is then applied on top of the gauze.

Practice Implications
The universal bandage kit and instructions for its adaptation to accommodate multiple clinical needs can serve as a helpful resource for dermatologists and their staff.
- Bunick CG, Aasi SZ. Hemorrhagic complications in dermatologic surgery. Dermatol Ther. 2011;24:537-550. doi:10.1111/j.1529-8019.2012.01454.x
- Ardilla C, Tarantino I, Goldberg LH, et al. Improved postoperative bleeding control using the fanning pressure dressing technique [published May 31, 2021]. J Am Acad Dermatol. 2021:S0190-9622(21)01040-9. doi:10.1016/j.jaad.2021.05.045
Practice Gap
Biopsies, excisions, and other invasive cutaneous procedures are performed regularly in dermatology clinics and require placement of a bandage after the procedure. Postprocedural bandaging varies by the type of procedure performed, anatomic site, and the physician’s preference of materials. Dermatologists can be left with an overwhelming choice of supplies and little practical education, as bandaging methods are not routinely addressed in residency curricula. To address this concern, we provide a succinct list of basic materials that are versatile and easily adapted to encompass all bandaging needs for dermatology procedures (Table).
With these few components, one can create an array of distinct bandages to cover wounds as small as a shave biopsy to linear closures and basic flaps or grafts. Even traditionally difficult-to-bandage areas are easily addressed. Simple modifications of the basic materials are required for each bandage adaptation, as outlined below.
The Techniques
Shave and Punch Biopsy Sites—Layer (from bottom to top) the emollient of choice, a cut 4×4-inch gauze pad, and flexible polyester tape cut to the appropriate size (Figure 1). This simple bandage conforms well to any anatomic site and can replace an adhesive bandage, if desired.
Cutaneous Surgery Sites—Pressure bandages are recommended on cutaneous surgery sites. One of the most common closures performed in dermatology is the layered closure with dissolvable subcutaneous sutures and nondissolvable cutaneous sutures. When this closure is performed on the trunk and proximal extremities, undermining often is required to adequately approximate skin. This technique eliminates tension on the wound but can increase the risk for hematoma.1 A pressure bandage left in place and kept dry for 48 hours after surgery helps eliminate the risk for postoperative bleeding.
To make a pressure bandage, layer (from bottom to top) the emollient of choice, a nonstick pad cut to size, folded 4×4-inch gauze pads, and flexible polyester tape (Figure 2). Our practice routinely utilizes the tape fanning technique2 to impart equal and firm pressure over the wound.
Complex Sites—When making a pressure bandage for an anatomically complex site—the ear, nose, or lip—nonstick pads and 4×4-inch gauze pads can be cut and folded or rolled to match the size and shape of the wound. Flexible polyester tape then conforms to these custom bandage shapes, allowing maintenance of targeted wound pressure (Figure 3).
Dental rolls can be of assistance on these sites. For example, a dental roll placed in the postauricular sulcus prior to bandaging an ear maintains comfortable anatomic positioning. Rolls can be placed in the nose, maintaining its architecture while the wound heals and providing counterpressure for added hemostasis of wounds on the lateral nasal sidewall and ala. We recommend coating dental rolls in petrolatum prior to placement in the nares for ease of removal and patient comfort.
Distal Arms and Legs—Another layer of compression is added to pressure bandages on the distal upper and lower extremities using a fabric and elastic wrap (Figure 4). The extra layer keeps the bandage in place on the upper extremities while the patient continues their daily activities. It also helps prevent edema and pain in the lower extremities.
The degree of postoperative lower extremity swelling varies by patient and procedure performed but largely is inevitable with surgery on the leg, given the potential for superficial lymphatic disruption and the dependent position of the leg when standing. Elevation is always advised, but a well-wrapped, long-stretch elastic bandage provides extra support, especially if the patient has baseline venous insufficiency or needs to be on their feet during the day. The wrap is applied from the distal to the proximal leg with graded compression, overlapping by half with each rotation. The wrap is tightest near the ankle, with gradual and subtle easing of tension as it is placed superiorly.
Healing by Secondary Intention, Full-Thickness and Split-Thickness Skin Grafts, and Partial Wound Closure—These postoperative scenarios require bandages with appropriate pressure; however, dressings need to remain moist against the patient’s skin for comfortable removal, which can be accomplished with petrolatum-impregnated gauze with or without antibacterial properties. The gauze is folded to the appropriate size and placed directly on the wound or sutured in place (Figure 5). A pressure bandage is then applied on top of the gauze.
Practice Implications
The universal bandage kit and instructions for its adaptation to accommodate multiple clinical needs can serve as a helpful resource for dermatologists and their staff.
- Bunick CG, Aasi SZ. Hemorrhagic complications in dermatologic surgery. Dermatol Ther. 2011;24:537-550. doi:10.1111/j.1529-8019.2012.01454.x
- Ardilla C, Tarantino I, Goldberg LH, et al. Improved postoperative bleeding control using the fanning pressure dressing technique [published May 31, 2021]. J Am Acad Dermatol. 2021:S0190-9622(21)01040-9. doi:10.1016/j.jaad.2021.05.045

Simplify Postoperative Self-removal of Bandages for Isolated Patients With Limited Range of Motion Using Pull Tabs
Practice Gap
A male patient presented with 2 concerning lesions, which histopathology revealed were invasive squamous cell carcinoma (SCC) on the right medial chest and SCC in situ on the right upper scapular region. Both were treated with wide local excision; margins were clear in our office the same day.
This case highlighted a practice gap in postoperative care. Two factors posed a challenge to proper postoperative wound care for our patient:
• Because of the high risk of transmission of SARS-CoV-2, the patient hoped to limit exposure by avoiding an office visit to remove the bandage.
• The patient did not have someone at home to serve as an immediate support system, which made it impossible for him to rely on others for postoperative wound care.
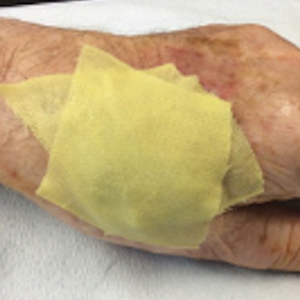
Previously, the patient had to ask a friend to remove a bandage for melanoma in situ on the inner aspect of the left upper arm. Therefore, after this procedure, the patient asked if the bandage could be fashioned in a manner that would allow him to remove it without assistance (Figure 1).

Technique
In constructing a bandage that is easier to remove, some necessary pressure that is provided by the bandage often is sacrificed by making it looser. Considering that our patient had moderate bleeding during the procedure—in part because he took low-dose aspirin (81 mg/d)—it was important to maintain firm pressure under the bandage postoperatively to help prevent untoward bleeding. Furthermore, because of the location of the treated site and the patient’s limited range of motion, it was not feasible for him to reach the area on the scapula and remove the bandage.1
For easy self-removal, we designed a bandage with a pull tab that was within the patient’s reach. Suitable materials for the pull tab bandage included surgical tape, bandaging tape with adequate stretch, sterile nonadhesive gauze, fenestrated surgical gauze, and a topical emollient such as petroleum jelly or antibacterial ointment.
To clean the site and decrease the amount of oil that would reduce the effectiveness of the adhesive, the wound was prepared with 70% alcohol. The site was then treated with petroleum jelly.
Next, we designed 2 pull tab bandage prototypes that allowed easy self-removal. For both prototypes, sterile nonadhesive gauze was applied to the wound along with folded and fenestrated gauze, which provided pressure. We used prototype #1 in our patient, and prototype #2 was demonstrated as an option.
Prototype #1—We created 2 tabs—each 2-feet long—using bandaging tape that was folded on itself once horizontally (Figure 2). The tabs were aligned on either side of the wound, the tops of which sat approximately 2 inches above the top of the first layer of adhesive bandage. An initial layer of adhesive surgical dressing was applied to cover the wound; 1 inch of the dressing was left exposed on the top of each tab. In addition, there were 2 “feet” running on the bottom.

The tops of the tabs were folded back over the adhesive tape, creating a type of “hook.” An additional final layer of adhesive tape was applied to ensure adequate pressure on the surgical site.
The patient was instructed to remove the bandage 2 days after the procedure. The outcome was qualified through a 3-day postoperative telephone call. The patient was asked about postoperative pain and his level of satisfaction with treatment. He was asked if he had any changes such as bleeding, swelling, signs of infection, or increased pain in the days after surgery or perceived postoperative complications, such as irritation. We asked the patient about the relative ease of removing the bandage and if removal was painful. He reported that the bandage was easy to remove, and that doing so was not painful; furthermore, he did not have problems with the bandage or healing and did not experience any medical changes. He found the bandage to be comfortable. The patient stated that the hanging feet of the prototype #1 bandage were not bothersome and were sturdy for the time that the bandage was on.
Prototype #2—We prepared a bandage using surgical packing as the tab (Figure 3). The packing was slowly placed around the site, which was already covered with nonadhesive gauze and fenestrated surgical gauze, with adequate spacing between each loop (for a total of 3 loops), 1 of which crossed over the third loop so that the adhesive bandaging tape could be removed easily. This allowed for a single tab that could be removed by a single pull. A final layer of adhesive tape was applied to ensure adequate pressure, similar to prototype #1. The same postoperative protocol was employed to provide a consistent standard of care. We recommend use of this prototype when surgical tape is not available, and surgical packing can be used as a substitute.

Practice Implications
Patients have a better appreciation for avoiding excess visits to medical offices due to the COVID-19 pandemic. The risk for exposure to SARS-CoV-2 infection is greater when patients who lack a support system must return to the office for aftercare or to have a bandage removed. Although protection offered by the COVID-19 vaccine alleviates concern, many patients have realized the benefits of only visiting medical offices in person when necessary.
The concept of pull tab bandages that can be removed by the patient at home has other applications. For example, patients who travel a long distance to see their physician will benefit from easier aftercare and avoid additional follow-up visits when provided with a self-removable bandage.
- Stathokostas, L, McDonald MW, Little RMD, et al. Flexibility of older adults aged 55-86 years and the influence of physical activity. J Aging Res. 2013;2013:1-8. doi:10.1155/2013/743843
Practice Gap
A male patient presented with 2 concerning lesions, which histopathology revealed were invasive squamous cell carcinoma (SCC) on the right medial chest and SCC in situ on the right upper scapular region. Both were treated with wide local excision; margins were clear in our office the same day.
This case highlighted a practice gap in postoperative care. Two factors posed a challenge to proper postoperative wound care for our patient:
• Because of the high risk of transmission of SARS-CoV-2, the patient hoped to limit exposure by avoiding an office visit to remove the bandage.
• The patient did not have someone at home to serve as an immediate support system, which made it impossible for him to rely on others for postoperative wound care.
Previously, the patient had to ask a friend to remove a bandage for melanoma in situ on the inner aspect of the left upper arm. Therefore, after this procedure, the patient asked if the bandage could be fashioned in a manner that would allow him to remove it without assistance (Figure 1).
Technique
In constructing a bandage that is easier to remove, some necessary pressure that is provided by the bandage often is sacrificed by making it looser. Considering that our patient had moderate bleeding during the procedure—in part because he took low-dose aspirin (81 mg/d)—it was important to maintain firm pressure under the bandage postoperatively to help prevent untoward bleeding. Furthermore, because of the location of the treated site and the patient’s limited range of motion, it was not feasible for him to reach the area on the scapula and remove the bandage.1
For easy self-removal, we designed a bandage with a pull tab that was within the patient’s reach. Suitable materials for the pull tab bandage included surgical tape, bandaging tape with adequate stretch, sterile nonadhesive gauze, fenestrated surgical gauze, and a topical emollient such as petroleum jelly or antibacterial ointment.
To clean the site and decrease the amount of oil that would reduce the effectiveness of the adhesive, the wound was prepared with 70% alcohol. The site was then treated with petroleum jelly.
Next, we designed 2 pull tab bandage prototypes that allowed easy self-removal. For both prototypes, sterile nonadhesive gauze was applied to the wound along with folded and fenestrated gauze, which provided pressure. We used prototype #1 in our patient, and prototype #2 was demonstrated as an option.
Prototype #1—We created 2 tabs—each 2-feet long—using bandaging tape that was folded on itself once horizontally (Figure 2). The tabs were aligned on either side of the wound, the tops of which sat approximately 2 inches above the top of the first layer of adhesive bandage. An initial layer of adhesive surgical dressing was applied to cover the wound; 1 inch of the dressing was left exposed on the top of each tab. In addition, there were 2 “feet” running on the bottom.
The tops of the tabs were folded back over the adhesive tape, creating a type of “hook.” An additional final layer of adhesive tape was applied to ensure adequate pressure on the surgical site.
The patient was instructed to remove the bandage 2 days after the procedure. The outcome was qualified through a 3-day postoperative telephone call. The patient was asked about postoperative pain and his level of satisfaction with treatment. He was asked if he had any changes such as bleeding, swelling, signs of infection, or increased pain in the days after surgery or perceived postoperative complications, such as irritation. We asked the patient about the relative ease of removing the bandage and if removal was painful. He reported that the bandage was easy to remove, and that doing so was not painful; furthermore, he did not have problems with the bandage or healing and did not experience any medical changes. He found the bandage to be comfortable. The patient stated that the hanging feet of the prototype #1 bandage were not bothersome and were sturdy for the time that the bandage was on.
Prototype #2—We prepared a bandage using surgical packing as the tab (Figure 3). The packing was slowly placed around the site, which was already covered with nonadhesive gauze and fenestrated surgical gauze, with adequate spacing between each loop (for a total of 3 loops), 1 of which crossed over the third loop so that the adhesive bandaging tape could be removed easily. This allowed for a single tab that could be removed by a single pull. A final layer of adhesive tape was applied to ensure adequate pressure, similar to prototype #1. The same postoperative protocol was employed to provide a consistent standard of care. We recommend use of this prototype when surgical tape is not available, and surgical packing can be used as a substitute.
Practice Implications
Patients have a better appreciation for avoiding excess visits to medical offices due to the COVID-19 pandemic. The risk for exposure to SARS-CoV-2 infection is greater when patients who lack a support system must return to the office for aftercare or to have a bandage removed. Although protection offered by the COVID-19 vaccine alleviates concern, many patients have realized the benefits of only visiting medical offices in person when necessary.
The concept of pull tab bandages that can be removed by the patient at home has other applications. For example, patients who travel a long distance to see their physician will benefit from easier aftercare and avoid additional follow-up visits when provided with a self-removable bandage.
- Stathokostas, L, McDonald MW, Little RMD, et al. Flexibility of older adults aged 55-86 years and the influence of physical activity. J Aging Res. 2013;2013:1-8. doi:10.1155/2013/743843
- Stathokostas, L, McDonald MW, Little RMD, et al. Flexibility of older adults aged 55-86 years and the influence of physical activity. J Aging Res. 2013;2013:1-8. doi:10.1155/2013/743843

Reverse-Grip Technique of Scissors in Dermatologic Surgery: Tips to Improve Undermining Efficiency
Practice Gap
One of the most important elements of successful reconstruction is effective undermining prior to placement of buried sutures. The main benefit of an evenly undermined plane is that tension is reduced, thus permitting seamless tissue mobilization and wound edge approximation.1
However, achieving a consistent and appropriate plane can present challenges in certain blind spots within one’s field of work. A right hand–dominant surgeon might find it difficult to undermine tissue between the 3-o’clock and 6-o’clock positions (Figure 1) and often must resort to unnatural positioning to obtain adequate reach.

We propose a technique of reversing the grip on undermining scissors that improves efficiency without sacrificing technique.
Technique
The surgeon simply grasps the ring handles with the ring finger and thumb with the tip pointing to the wrist (Figure 2). Most of the control comes from rotating the wrist while spreading with the thumb (Figure 3).

The main advantage of the reverse-grip technique is that it prevents abduction of the arm at the shoulder joint, which reduces shoulder fatigue and keeps the elbow close to the trunk and away from the sterile surgical field. Achieving optimal ergonomics during surgery has been shown to reduce pain and likely prolong the surgeon’s career.2

A limitation of the reverse-grip technique is that direct visualization of the undermining plane is not achieved; however, direct visualization also is not obtained when undermining in the standard fashion unless the instruments are passed to the surgical assistant or the surgeon moves to the other side of the table.
Undermining can be performed safely without direct visualization as long as several rules are followed:
• The undermining plane is first established under direct visualization on the far side of the wound—at the 6-o’clock to 12-o’clock positions—and then followed to the area where direct visualization is not obtained.
• A blunt-tipped scissor is used to prevent penetrating trauma to neurovascular bundles. Blunt-tipped instruments allow more “feel” through tactile feedback to the surgeon and prevent accidental injury to these critical structures.
• A curved scissor is used with “tips up,” such that the surgeon does not unintentionally make the undermining plane deeper than anticipated.
Practice Implications
With practice, one can perform circumferential undermining independently with few alterations in stance and while maintaining a natural position throughout. Use of skin hooks to elevate the skin can further aid in visualizing the correct depth of undermining. If executed correctly, the reverse-grip technique can expand the surgeon’s work field, thus providing ease of dissection in difficult-to-reach areas.
- Chen DL, Carlson EO, Fathi R, et al. Undermining and hemostasis. Dermatol Surg. 2015;41(suppl 10):S201-S215. doi:10.1097/DSS.0000000000000489
- Chan J, Kim DJ, Kassira-Carley S, et al. Ergonomics in dermatologic surgery: lessons learned across related specialties and opportunities for improvement. Dermatol Surg. 2020;46:763-772. doi:10.1097/DSS.0000000000002295
Practice Gap
One of the most important elements of successful reconstruction is effective undermining prior to placement of buried sutures. The main benefit of an evenly undermined plane is that tension is reduced, thus permitting seamless tissue mobilization and wound edge approximation.1
However, achieving a consistent and appropriate plane can present challenges in certain blind spots within one’s field of work. A right hand–dominant surgeon might find it difficult to undermine tissue between the 3-o’clock and 6-o’clock positions (Figure 1) and often must resort to unnatural positioning to obtain adequate reach.
We propose a technique of reversing the grip on undermining scissors that improves efficiency without sacrificing technique.
Technique
The surgeon simply grasps the ring handles with the ring finger and thumb with the tip pointing to the wrist (Figure 2). Most of the control comes from rotating the wrist while spreading with the thumb (Figure 3).
The main advantage of the reverse-grip technique is that it prevents abduction of the arm at the shoulder joint, which reduces shoulder fatigue and keeps the elbow close to the trunk and away from the sterile surgical field. Achieving optimal ergonomics during surgery has been shown to reduce pain and likely prolong the surgeon’s career.2
A limitation of the reverse-grip technique is that direct visualization of the undermining plane is not achieved; however, direct visualization also is not obtained when undermining in the standard fashion unless the instruments are passed to the surgical assistant or the surgeon moves to the other side of the table.
Undermining can be performed safely without direct visualization as long as several rules are followed:
• The undermining plane is first established under direct visualization on the far side of the wound—at the 6-o’clock to 12-o’clock positions—and then followed to the area where direct visualization is not obtained.
• A blunt-tipped scissor is used to prevent penetrating trauma to neurovascular bundles. Blunt-tipped instruments allow more “feel” through tactile feedback to the surgeon and prevent accidental injury to these critical structures.
• A curved scissor is used with “tips up,” such that the surgeon does not unintentionally make the undermining plane deeper than anticipated.
Practice Implications
With practice, one can perform circumferential undermining independently with few alterations in stance and while maintaining a natural position throughout. Use of skin hooks to elevate the skin can further aid in visualizing the correct depth of undermining. If executed correctly, the reverse-grip technique can expand the surgeon’s work field, thus providing ease of dissection in difficult-to-reach areas.
- Chen DL, Carlson EO, Fathi R, et al. Undermining and hemostasis. Dermatol Surg. 2015;41(suppl 10):S201-S215. doi:10.1097/DSS.0000000000000489
- Chan J, Kim DJ, Kassira-Carley S, et al. Ergonomics in dermatologic surgery: lessons learned across related specialties and opportunities for improvement. Dermatol Surg. 2020;46:763-772. doi:10.1097/DSS.0000000000002295

Surgical Deroofing for Hidradenitis Suppurativa
Practice Gap
Hidradenitis suppurativa (HS) is a chronic inflammatory skin condition characterized by inflammatory nodules, abscesses, sinus tracts, fistulae, and scarring, mainly in intertriginous areas. The extent of disease—classified using the Hurley staging system (stages I–III)—helps guide treatment, which includes medical management and surgical intervention in later stages.
First-line treatment of HS includes topical or systemic medications, or both. Surgical therapy typically is reserved for refractory HS in moderate to severe disease (Hurley stages II and III) and is combined with pharmacotherapy. Specifically, clinical management guidelines issued by an expert committee of the United States and Canadian Hidradenitis Suppurativa Foundations recommend excision or deroofing for recurrent nodules and tunnels.1
Surgical options for HS that are available to the outpatient dermatologist include incision and drainage, electrosurgery, CO2 laser evaporation, excision, and deroofing (also known as unroofing).2 Deroofing is a fairly novel therapy; many dermatologists are unfamiliar with the procedure. A PubMed search of articles indexed for MEDLINE related to HS prior to 2010 revealed only 1 article containing the word deroofing and only 4 articles containing unroofing.
The pathophysiology of HS has important implications for successful treatment. Inflammation of the follicular pilosebaceous unit along with follicular occlusion create challenges with treatment.3 It is postulated that a defect in the glassy membrane of the infra-infundibular wall predisposes the pilosebaceous follicle to lose its structural integrality as pressure builds from plugging of the duct,4 which can result in the clinical hallmarks of HS including tunneling tracts, bridging nodules, abscesses, and fistulae that form with lateral expansion of the plugged follicle.
Leaking of the contents of these plugged follicles into surrounding tissue produces an inflammatory response in characteristic HS lesions. Because debris within the lesions moves laterally instead of being able to burst to the surface, the lesions have difficulty fully healing. Unroofing the lesions and removing built-up debris allows them to heal more expediently and quiets the underlying immune response by removing the stimulus.4
Herein, we describe the benefits, risks, and surgical process of deroofing for HS.
Technique and Tools
Deroofing is performed under local anesthesia, stepwise as follows:
1. Identify sinus tracts and infiltrate the area with lidocaine (Figure, A).
2. Use a blunt probe to define the borders of the area to be unroofed and to evaluate for any communicating sinus tracts (Figure, B).
3. Remove the roof of underlying abscesses and tracts, using a probe as a guide (Figure, C).
4. Enter through the skin or sinus opening using electrocautery or with a scalpel or scissors; perform blunt dissection.
5. Reflect back the entirety of skin overlying the probed areas and remove the skin to expose the base of the lesion (Figure, D).
6. Explore the exposed base and walls of the lesion with the probe again to assess for hidden tracts; take care not to create false tracts.
7. Debride the surgical wound using curettage or rough gauze grattage to remove remaining inflammatory debris or biofilm. To achieve hemostasis, apply aluminum chloride or ferric chloride. Coat the wound with petroleum jelly and gauze and allow it to heal by secondary intention.
8. Educate the patient on wound care—once-daily gentle cleansing with soap and water, followed by application of a moist dressing—which is similar to wound healing by secondary intention from other causes.2,4

Practice Implications
A deroofing procedure has many benefits compared to other surgical modalities for the treatment of HS. Deroofing requires only a probe, curette, and electrocautery device, making the procedure more cost-effective than excision, which requires a full tray of equipment and sutures. Furthermore, margins do not need to be taken with deroofing, and no undermining or closure is needed, which saves time during the operation and minimizes the risk for complications, including dehiscence and formation of new sinus tracts.4 No specialized equipment, such as a CO2 laser, is required, which makes deroofing accessible to every clinical dermatologist in any demographic or geographic setting.
Evidence of Benefit—Saylor and colleagues5 found that deroofing carries a 12.5% complication rate, which includes postoperative bleeding, hypergranulation tissue, and rarely wound infection. This rate is significantly lower than the 26% complication rate associated with local excision, which includes wound dehiscence, infection, and contracture (P<.001). Deroofing also was found to have an HS recurrence rate of 14.5%, which is significantly less than the 30% recurrence rate seen with local excision (P=.015). Saylor et al5 also concluded that incision and drainage was recommended only for immediate relief of HS because of its 100% recurrence rate.
van der Zee2 reported on 88 lesions from 44 patients that were treated by surgical deroofing, resulting in an average defect of 3.0 cm in length and a mean healing time of 14 days. The typical outcome was cosmetically acceptable scarring; this finding was supported by a postoperative survey (>1 year), to which 37 of 44 patients responded and assigned an average satisfaction score of 8 (of a possible 10) and a recommendation rate of 90%.2
Procedural Coding—Specific Current Procedural Terminology codes (11450-11471) from the International Classification of Diseases, Tenth Revision, exist for HS deroofing procedures; the applicable code for a given case depends on the final length of the surgical defect. Documentation to support these codes is similar to the note for an excision procedure, taking care to include location, depth, and length of the excision; healing by secondary intention; and the diagnosis of HS.
Final Thoughts
Deroofing is a surgical option that can be beneficial to patients with HS. It is a relatively simple procedure available to any dermatologist, regardless of setting. We encourage dermatologists to consider deroofing, even in patients with Hurley stage II lesions, because it can yield cosmetically acceptable and definitive results, given the variety of therapies available for HS. Deroofing also can be superior to standard excision, especially because of the potential complications with standard excision and quicker operative time with deroofing. As more providers become familiar with the deroofing procedure for HS, further studies can be undertaken to add to the paucity of data about deroofing and how it compares to other surgical treatments.
- Alikhan A, Sayed C, Alavi A, et al. North American clinical management guidelines for hidradenitis suppurativa: a publication from the United States and Canadian Hidradenitis Suppurativa Foundations: part I: diagnosis, evaluation, and the use of complementary and procedural management. J Am Acad Dermatol. 2019;81:76-90. doi:10.1016/j.jaad.2019.02.067
- van der Zee HH, Prens EP, Boer J. Deroofing: a tissue-saving surgical technique for the treatment of mild to moderate hidradenitis suppurativa lesions. J Am Acad Dermatol. 2010;63:475-480. doi:10.1016/j.jaad.2009.12.018
- Napolitano M, Megna M, Timoshchuk EA, et al. Hidradenitis suppurativa: from pathogenesis to diagnosis and treatment. Clin Cosmet Investig Dermatol. 2017;10:105-115. doi:10.2147/CCID.S111019
- Danby FW. Commentary: unroofing for hidradenitis suppurativa, why and how. J Am Acad Dermatol. 2010;63:481.e1-481.e3. doi:10.1016/j.jaad.2010.01.033
- Saylor DK, Brownstone ND, Naik HB. Office-based surgical intervention for hidradenitis suppurativa (HS): a focused review for dermatologists. Dermatol Ther (Heidelb). 2020;10:529-549. doi:10.1007/s13555-020-00391-x
Practice Gap
Hidradenitis suppurativa (HS) is a chronic inflammatory skin condition characterized by inflammatory nodules, abscesses, sinus tracts, fistulae, and scarring, mainly in intertriginous areas. The extent of disease—classified using the Hurley staging system (stages I–III)—helps guide treatment, which includes medical management and surgical intervention in later stages.
First-line treatment of HS includes topical or systemic medications, or both. Surgical therapy typically is reserved for refractory HS in moderate to severe disease (Hurley stages II and III) and is combined with pharmacotherapy. Specifically, clinical management guidelines issued by an expert committee of the United States and Canadian Hidradenitis Suppurativa Foundations recommend excision or deroofing for recurrent nodules and tunnels.1
Surgical options for HS that are available to the outpatient dermatologist include incision and drainage, electrosurgery, CO2 laser evaporation, excision, and deroofing (also known as unroofing).2 Deroofing is a fairly novel therapy; many dermatologists are unfamiliar with the procedure. A PubMed search of articles indexed for MEDLINE related to HS prior to 2010 revealed only 1 article containing the word deroofing and only 4 articles containing unroofing.
The pathophysiology of HS has important implications for successful treatment. Inflammation of the follicular pilosebaceous unit along with follicular occlusion create challenges with treatment.3 It is postulated that a defect in the glassy membrane of the infra-infundibular wall predisposes the pilosebaceous follicle to lose its structural integrality as pressure builds from plugging of the duct,4 which can result in the clinical hallmarks of HS including tunneling tracts, bridging nodules, abscesses, and fistulae that form with lateral expansion of the plugged follicle.
Leaking of the contents of these plugged follicles into surrounding tissue produces an inflammatory response in characteristic HS lesions. Because debris within the lesions moves laterally instead of being able to burst to the surface, the lesions have difficulty fully healing. Unroofing the lesions and removing built-up debris allows them to heal more expediently and quiets the underlying immune response by removing the stimulus.4
Herein, we describe the benefits, risks, and surgical process of deroofing for HS.
Technique and Tools
Deroofing is performed under local anesthesia, stepwise as follows:
1. Identify sinus tracts and infiltrate the area with lidocaine (Figure, A).
2. Use a blunt probe to define the borders of the area to be unroofed and to evaluate for any communicating sinus tracts (Figure, B).
3. Remove the roof of underlying abscesses and tracts, using a probe as a guide (Figure, C).
4. Enter through the skin or sinus opening using electrocautery or with a scalpel or scissors; perform blunt dissection.
5. Reflect back the entirety of skin overlying the probed areas and remove the skin to expose the base of the lesion (Figure, D).
6. Explore the exposed base and walls of the lesion with the probe again to assess for hidden tracts; take care not to create false tracts.
7. Debride the surgical wound using curettage or rough gauze grattage to remove remaining inflammatory debris or biofilm. To achieve hemostasis, apply aluminum chloride or ferric chloride. Coat the wound with petroleum jelly and gauze and allow it to heal by secondary intention.
8. Educate the patient on wound care—once-daily gentle cleansing with soap and water, followed by application of a moist dressing—which is similar to wound healing by secondary intention from other causes.2,4
Practice Implications
A deroofing procedure has many benefits compared to other surgical modalities for the treatment of HS. Deroofing requires only a probe, curette, and electrocautery device, making the procedure more cost-effective than excision, which requires a full tray of equipment and sutures. Furthermore, margins do not need to be taken with deroofing, and no undermining or closure is needed, which saves time during the operation and minimizes the risk for complications, including dehiscence and formation of new sinus tracts.4 No specialized equipment, such as a CO2 laser, is required, which makes deroofing accessible to every clinical dermatologist in any demographic or geographic setting.
Evidence of Benefit—Saylor and colleagues5 found that deroofing carries a 12.5% complication rate, which includes postoperative bleeding, hypergranulation tissue, and rarely wound infection. This rate is significantly lower than the 26% complication rate associated with local excision, which includes wound dehiscence, infection, and contracture (P<.001). Deroofing also was found to have an HS recurrence rate of 14.5%, which is significantly less than the 30% recurrence rate seen with local excision (P=.015). Saylor et al5 also concluded that incision and drainage was recommended only for immediate relief of HS because of its 100% recurrence rate.
van der Zee2 reported on 88 lesions from 44 patients that were treated by surgical deroofing, resulting in an average defect of 3.0 cm in length and a mean healing time of 14 days. The typical outcome was cosmetically acceptable scarring; this finding was supported by a postoperative survey (>1 year), to which 37 of 44 patients responded and assigned an average satisfaction score of 8 (of a possible 10) and a recommendation rate of 90%.2
Procedural Coding—Specific Current Procedural Terminology codes (11450-11471) from the International Classification of Diseases, Tenth Revision, exist for HS deroofing procedures; the applicable code for a given case depends on the final length of the surgical defect. Documentation to support these codes is similar to the note for an excision procedure, taking care to include location, depth, and length of the excision; healing by secondary intention; and the diagnosis of HS.
Final Thoughts
Deroofing is a surgical option that can be beneficial to patients with HS. It is a relatively simple procedure available to any dermatologist, regardless of setting. We encourage dermatologists to consider deroofing, even in patients with Hurley stage II lesions, because it can yield cosmetically acceptable and definitive results, given the variety of therapies available for HS. Deroofing also can be superior to standard excision, especially because of the potential complications with standard excision and quicker operative time with deroofing. As more providers become familiar with the deroofing procedure for HS, further studies can be undertaken to add to the paucity of data about deroofing and how it compares to other surgical treatments.
- Alikhan A, Sayed C, Alavi A, et al. North American clinical management guidelines for hidradenitis suppurativa: a publication from the United States and Canadian Hidradenitis Suppurativa Foundations: part I: diagnosis, evaluation, and the use of complementary and procedural management. J Am Acad Dermatol. 2019;81:76-90. doi:10.1016/j.jaad.2019.02.067
- van der Zee HH, Prens EP, Boer J. Deroofing: a tissue-saving surgical technique for the treatment of mild to moderate hidradenitis suppurativa lesions. J Am Acad Dermatol. 2010;63:475-480. doi:10.1016/j.jaad.2009.12.018
- Napolitano M, Megna M, Timoshchuk EA, et al. Hidradenitis suppurativa: from pathogenesis to diagnosis and treatment. Clin Cosmet Investig Dermatol. 2017;10:105-115. doi:10.2147/CCID.S111019
- Danby FW. Commentary: unroofing for hidradenitis suppurativa, why and how. J Am Acad Dermatol. 2010;63:481.e1-481.e3. doi:10.1016/j.jaad.2010.01.033
- Saylor DK, Brownstone ND, Naik HB. Office-based surgical intervention for hidradenitis suppurativa (HS): a focused review for dermatologists. Dermatol Ther (Heidelb). 2020;10:529-549. doi:10.1007/s13555-020-00391-x

How to Address Scar Pincushioning and Webbing of the Nasal Dorsum Using Surgical Defatting and Z-plasty
Practice Gap
Nonmelanoma skin cancer is the most common cancer, typically growing in sun-exposed areas. As such, the nasal area is a common site of onset, constituting approximately 25% of cases. Surgical excision of these cancers generally has a high cure rate.1
Although complete excision of the tumor is the primary goal of the dermatologic surgeon, achieving a cosmetically satisfactory scar also is important. As a prominent feature of the face, any irregularities to the nose are easily noticeable.2 The subsequent scar may exhibit features that are less than ideal and cause notable stress to the patient.
When a scar presents with several complications, using a single surgical technique may not sufficiently address all defects. As a result, it can be challenging for the surgeon to decide which combination of methods among the myriad of nonsurgical and surgical options for scar revision will produce the best cosmetic outcome.
Case and Technique
A 76-year-old man presented 1 year after he underwent Mohs micrographic surgery for squamous cell carcinoma on the nasal dorsum. The tumor cleared after 1 stage and was repaired using a bilateral V-Y advancement flap. Postoperatively, the patient developed pincushioning of the flap, atrophic scarring inferior to the flap, and webbing of the pivotal restraint point at the nasal root (Figures 1A and 1B). We opted to address the pincushioning and nasal root webbing by defatting the flap and performing Z-plasty, respectively.

Pincushioning—Pincushioning of a flap arises due to contraction and lymphedema at the edge of the repair. It is seen more often in nasal repairs due to the limited availability of surrounding skin and changes in skin texture from rhinion to tip.3 To combat this in our patient, an incision was made around the site of the original flap, surrounding tissue was undermined, and the flap was reflected back. Subcutaneous tissue was removed with scissors. The flap was then laid back into the defect, and the subcutaneous tissue and dermis were closed with interrupted buried vertical mattress sutures. The epidermis was closed in a simple running fashion.
Webbing—Webbing of a scar also may develop from the contractile wound-healing process.4 Z-plasty commonly is used to camouflage a linear or contracted scar, increase skin availability in an area, or alter scar direction to better align with skin-tension lines.5,6 In our patient, we incised the webbing of the nasal root along the vertical scar. Two arms were drawn at each end of the scar at a 60° angle (Figure 2); the side arms were drawn equal in length and incised vertically. Full-thickness skin flaps were then undermined at the level of subcutaneous fat, creating 2 triangular flaps. Adequate undermining of the surrounding subcutaneous tissue was performed to achieve proper mobilization of the flaps, which allowed for flap transposition to occur without tension and therefore for proper redirection of the scar.6 The flaps were secured using buried vertical mattress sutures and simple running sutures. Using too many buried interrupted sutures can cause vascular compromise of the fragile tips of the Z and should be avoided.3

At 4-month postoperative follow-up, the cosmetic outcome was judged satisfactory (Figure 1C).
Practice Implications
In our patient, pincushioning of the flap was easily addressed by defatting the area. However, doing just this would not have sufficed and necessitated another surgical technique—the Z-plasty—which needed to be designed carefully. The larger the angle between the side arms and central limb, the greater directional change and scar length that is gained (Figure 3). As a result, longer limbs and a greater angle could advantageously break up the scar line but consequently would lengthen the scar considerably. Therefore, if the scar was longer or the skin was inelastic, multiple Z-plasty procedures may have been preferred.

Additionally, for each central limb, both mirror-image options for peripheral arms were considered, with the optimal choice being the one that allowed for final scar lines to mimic relaxed skin-tension lines. Accuracy of the incisions was critical and was assessed by drawing a line between the free ends of the lateral limbs of the Z; this line should pass perpendicularly through the midpoint of the central limb. Last, as with other transposition flap options, Z-plasty has the potential to create a trapdoor or pincushion effect; we reduced this risk by wide undermining to establish an even contraction plate.6
When planning the revision, we considered multiple approaches to achieve the best aesthetic outcome in 1 stage. Had there been notable depression in the scar, we may have used a full-thickness skin graft. If the skin surface was lumpy and uneven, dermabrasion or a laser may have been utilized. Another consideration was to avoid using intralesional steroids, which could have made the already atrophied portions of the scar worse.
Overall, the surgical plan that we chose took into consideration the patient’s nasal anatomic structure, the combination of scar defects, the patient’s desires, and the tools available.
Final Thoughts
The ideal scar is inconspicuous, does not impair the function of surrounding structures, and blends well with adjacent skin.5 Consequently, the combination of pincushioning and webbing of a scar, especially in the nasal area, can pose a surgical challenge to the surgeon and can cause severe anxiety in the patient. In those circumstances, a single surgical technique is not likely to produce the revision with the best cosmetic outcome. Therefore, the synergy of 2 or more surgical techniques with proper planning and meticulous selection may be necessary. A broad knowledge of various scar revision techniques increases the surgeon’s capability to create the ideal scar.
Acknowledgment—The authors thank the case patient for granting permission to publish this information.
- Arginelli F, Salgarelli AC, Ferrari B, et al. Crescentic flap for the reconstruction of the nose after skin cancer resection. J Craniomaxillofac Surg. 2016;44:703-707. doi:10.1016/j.jcms.2016.02.008
- Helml G, von Gregory HF, Amr A, et al. One-stage nasal soft tissue reconstruction with local flaps. Facial Plast Surg. 2014;30:260-267. doi:10.1055/s-0034-1376871
- Woodard CR. Complications in facial flap surgery. Facial Plast Surg Clin North Am. 2013;21:599-604. doi:10.1016/j.fsc.2013.07.009
- Brissett AE, Sherris DA. Scar contractures, hypertrophic scars, and keloids. Facial Plast Surg. 2001;17:263-272. doi:10.1055/s-2001-18827
- A, B, MA. Surgical principles for achieving a functional and cosmetically acceptable scar. Actas Dermosifiliogr. 2013;104:17-28. doi:10.1016/j.ad.2011.12.010
- Aasi SZ. Z-plasty made simple. Dermatol Res Pract. 2010;2010:982623. doi:10.1155/2010/982623
Practice Gap
Nonmelanoma skin cancer is the most common cancer, typically growing in sun-exposed areas. As such, the nasal area is a common site of onset, constituting approximately 25% of cases. Surgical excision of these cancers generally has a high cure rate.1
Although complete excision of the tumor is the primary goal of the dermatologic surgeon, achieving a cosmetically satisfactory scar also is important. As a prominent feature of the face, any irregularities to the nose are easily noticeable.2 The subsequent scar may exhibit features that are less than ideal and cause notable stress to the patient.
When a scar presents with several complications, using a single surgical technique may not sufficiently address all defects. As a result, it can be challenging for the surgeon to decide which combination of methods among the myriad of nonsurgical and surgical options for scar revision will produce the best cosmetic outcome.
Case and Technique
A 76-year-old man presented 1 year after he underwent Mohs micrographic surgery for squamous cell carcinoma on the nasal dorsum. The tumor cleared after 1 stage and was repaired using a bilateral V-Y advancement flap. Postoperatively, the patient developed pincushioning of the flap, atrophic scarring inferior to the flap, and webbing of the pivotal restraint point at the nasal root (Figures 1A and 1B). We opted to address the pincushioning and nasal root webbing by defatting the flap and performing Z-plasty, respectively.
Pincushioning—Pincushioning of a flap arises due to contraction and lymphedema at the edge of the repair. It is seen more often in nasal repairs due to the limited availability of surrounding skin and changes in skin texture from rhinion to tip.3 To combat this in our patient, an incision was made around the site of the original flap, surrounding tissue was undermined, and the flap was reflected back. Subcutaneous tissue was removed with scissors. The flap was then laid back into the defect, and the subcutaneous tissue and dermis were closed with interrupted buried vertical mattress sutures. The epidermis was closed in a simple running fashion.
Webbing—Webbing of a scar also may develop from the contractile wound-healing process.4 Z-plasty commonly is used to camouflage a linear or contracted scar, increase skin availability in an area, or alter scar direction to better align with skin-tension lines.5,6 In our patient, we incised the webbing of the nasal root along the vertical scar. Two arms were drawn at each end of the scar at a 60° angle (Figure 2); the side arms were drawn equal in length and incised vertically. Full-thickness skin flaps were then undermined at the level of subcutaneous fat, creating 2 triangular flaps. Adequate undermining of the surrounding subcutaneous tissue was performed to achieve proper mobilization of the flaps, which allowed for flap transposition to occur without tension and therefore for proper redirection of the scar.6 The flaps were secured using buried vertical mattress sutures and simple running sutures. Using too many buried interrupted sutures can cause vascular compromise of the fragile tips of the Z and should be avoided.3
At 4-month postoperative follow-up, the cosmetic outcome was judged satisfactory (Figure 1C).
Practice Implications
In our patient, pincushioning of the flap was easily addressed by defatting the area. However, doing just this would not have sufficed and necessitated another surgical technique—the Z-plasty—which needed to be designed carefully. The larger the angle between the side arms and central limb, the greater directional change and scar length that is gained (Figure 3). As a result, longer limbs and a greater angle could advantageously break up the scar line but consequently would lengthen the scar considerably. Therefore, if the scar was longer or the skin was inelastic, multiple Z-plasty procedures may have been preferred.
Additionally, for each central limb, both mirror-image options for peripheral arms were considered, with the optimal choice being the one that allowed for final scar lines to mimic relaxed skin-tension lines. Accuracy of the incisions was critical and was assessed by drawing a line between the free ends of the lateral limbs of the Z; this line should pass perpendicularly through the midpoint of the central limb. Last, as with other transposition flap options, Z-plasty has the potential to create a trapdoor or pincushion effect; we reduced this risk by wide undermining to establish an even contraction plate.6
When planning the revision, we considered multiple approaches to achieve the best aesthetic outcome in 1 stage. Had there been notable depression in the scar, we may have used a full-thickness skin graft. If the skin surface was lumpy and uneven, dermabrasion or a laser may have been utilized. Another consideration was to avoid using intralesional steroids, which could have made the already atrophied portions of the scar worse.
Overall, the surgical plan that we chose took into consideration the patient’s nasal anatomic structure, the combination of scar defects, the patient’s desires, and the tools available.
Final Thoughts
The ideal scar is inconspicuous, does not impair the function of surrounding structures, and blends well with adjacent skin.5 Consequently, the combination of pincushioning and webbing of a scar, especially in the nasal area, can pose a surgical challenge to the surgeon and can cause severe anxiety in the patient. In those circumstances, a single surgical technique is not likely to produce the revision with the best cosmetic outcome. Therefore, the synergy of 2 or more surgical techniques with proper planning and meticulous selection may be necessary. A broad knowledge of various scar revision techniques increases the surgeon’s capability to create the ideal scar.
Acknowledgment—The authors thank the case patient for granting permission to publish this information.
- Arginelli F, Salgarelli AC, Ferrari B, et al. Crescentic flap for the reconstruction of the nose after skin cancer resection. J Craniomaxillofac Surg. 2016;44:703-707. doi:10.1016/j.jcms.2016.02.008
- Helml G, von Gregory HF, Amr A, et al. One-stage nasal soft tissue reconstruction with local flaps. Facial Plast Surg. 2014;30:260-267. doi:10.1055/s-0034-1376871
- Woodard CR. Complications in facial flap surgery. Facial Plast Surg Clin North Am. 2013;21:599-604. doi:10.1016/j.fsc.2013.07.009
- Brissett AE, Sherris DA. Scar contractures, hypertrophic scars, and keloids. Facial Plast Surg. 2001;17:263-272. doi:10.1055/s-2001-18827
- A, B, MA. Surgical principles for achieving a functional and cosmetically acceptable scar. Actas Dermosifiliogr. 2013;104:17-28. doi:10.1016/j.ad.2011.12.010
- Aasi SZ. Z-plasty made simple. Dermatol Res Pract. 2010;2010:982623. doi:10.1155/2010/982623

Simple Intraoperative Technique to Improve Wound Edge Approximation for Residents
Practice Gap
Dermatology residents can struggle with surgical closure early in their training years. Although experienced dermatologic surgeons may intuitively be able to align edges for maximal cosmesis, doing so can prove challenging in the context of learning basic surgical techniques for early residents.
Furthermore, local anesthesia can distort cutaneous anatomy and surgical landmarks, requiring the surgeon to reexamine their closure technique. Patients may require position changes or may make involuntary movements, both of which require dynamic thinking and planning on the part of the dermatologic surgeon to achieve optimal outcomes.
The Technique
We propose the use of sutures to intraoperatively guide placement of the dermal needle. This technique can be used for various closure types; here, we demonstrate its use in a standard elliptical excision.
To begin, a standard length to width ellipse ratio of 3:1 is drawn with appropriate margins around a neoplasm.1 After excision and appropriate undermining of the ellipse, we typically use deep sutures to close the deep space. The first pass of the needle through tissue can be performed in a place of the surgeon’s preference but typically abides by the rule of halves or the zipper method (Figure 1A). To determine optimal placement of the second needle pass through tissue, we recommend applying gentle opposing traction forces to the wound apices to approximate the linear outcome of the wound edges. The surgeon can use a skin hook to guide placement of the needle to the contralateral wound edge in an unassisted method of this technique (Figure 1B). The surgeon’s assistant also can aid in applying cutaneous traction along the length of the excision if the surgeon wishes to free their hands (Figure 1C). Because the risk of needlestick injury at this step is small, it is prudent for the surgeon to advise the assistant to avoid needlestick injury by keeping their hands away from the needle path in the surgical site.
Although traction is being applied to the wound apices, the deep suture should extend across the wound with just enough pressure to leave a serosanguineous notched mark in the contralateral tissue edge (Figure 1D). After releasing traction on the wound edges, the surgeon can effortlessly visualize the target for needle placement and make a throw through the tissue accordingly.

This process can be continued until wound closure is complete (Figure 2). Top sutures or adhesive strips can be placed afterward for completing approximation of the wound edges superficially.

Practice Implications
By using this technique to align wound edges intraoperatively, the surgeon can have a functional guide for needle placement. The technique allows improvement of function and cosmesis of surgical wounds, while also accounting for topographical variations in the patient’s surgical site. Approximation of the wound edges is particularly important at the beginning of closure, as the wound edges align and approximate more with each subsequent stitch, with decreasing tension.2
In addition, when operating on a curvilinear or challenging topographical surface of the body, this technique can provide a clear template for guiding suture placement for approximating wound edges. Furthermore, local biodynamic anatomy might become distorted after excision of the tissue specimen due to release of centripetal tangential forces that were present in the pre-excised skin.1 Local change in biodynamic forces may be difficult to plan for preoperatively using other techniques.3
Although this technique can be utilized for all suture placements in closure, it is of greatest value when placing the first few sutures and when operating on nonplanar surfaces that might become distorted after excision. To ensure the best outcome, it is important to be certain that the area has been properly cleaned prior to surgery and a sterile technique is used.
- Paul SP. Biodynamic excisional skin tension lines for excisional surgery of the lower limb and the technique of using parallel relaxing incisions to further reduce wound tension. Plast Reconstr Surg Glob Open. 2017;5:E1614. doi:10.1097/GOX.0000000000001614
- Miller CJ, Antunes MB, Sobanko JF. Surgical technique for optimal outcomes: part II. repairing tissue: suturing. J Am Acad Dermatol. 2015;72:389-402. doi:10.1016/j.jaad.2014.08.006
- Parikh SA, Sloan B. Clinical pearl: a simple and effective technique for improving surgical closures for the early-learning resident. Cutis. 2017;100:338-339.
Practice Gap
Dermatology residents can struggle with surgical closure early in their training years. Although experienced dermatologic surgeons may intuitively be able to align edges for maximal cosmesis, doing so can prove challenging in the context of learning basic surgical techniques for early residents.
Furthermore, local anesthesia can distort cutaneous anatomy and surgical landmarks, requiring the surgeon to reexamine their closure technique. Patients may require position changes or may make involuntary movements, both of which require dynamic thinking and planning on the part of the dermatologic surgeon to achieve optimal outcomes.
The Technique
We propose the use of sutures to intraoperatively guide placement of the dermal needle. This technique can be used for various closure types; here, we demonstrate its use in a standard elliptical excision.
To begin, a standard length to width ellipse ratio of 3:1 is drawn with appropriate margins around a neoplasm.1 After excision and appropriate undermining of the ellipse, we typically use deep sutures to close the deep space. The first pass of the needle through tissue can be performed in a place of the surgeon’s preference but typically abides by the rule of halves or the zipper method (Figure 1A). To determine optimal placement of the second needle pass through tissue, we recommend applying gentle opposing traction forces to the wound apices to approximate the linear outcome of the wound edges. The surgeon can use a skin hook to guide placement of the needle to the contralateral wound edge in an unassisted method of this technique (Figure 1B). The surgeon’s assistant also can aid in applying cutaneous traction along the length of the excision if the surgeon wishes to free their hands (Figure 1C). Because the risk of needlestick injury at this step is small, it is prudent for the surgeon to advise the assistant to avoid needlestick injury by keeping their hands away from the needle path in the surgical site.
Although traction is being applied to the wound apices, the deep suture should extend across the wound with just enough pressure to leave a serosanguineous notched mark in the contralateral tissue edge (Figure 1D). After releasing traction on the wound edges, the surgeon can effortlessly visualize the target for needle placement and make a throw through the tissue accordingly.
This process can be continued until wound closure is complete (Figure 2). Top sutures or adhesive strips can be placed afterward for completing approximation of the wound edges superficially.
Practice Implications
By using this technique to align wound edges intraoperatively, the surgeon can have a functional guide for needle placement. The technique allows improvement of function and cosmesis of surgical wounds, while also accounting for topographical variations in the patient’s surgical site. Approximation of the wound edges is particularly important at the beginning of closure, as the wound edges align and approximate more with each subsequent stitch, with decreasing tension.2
In addition, when operating on a curvilinear or challenging topographical surface of the body, this technique can provide a clear template for guiding suture placement for approximating wound edges. Furthermore, local biodynamic anatomy might become distorted after excision of the tissue specimen due to release of centripetal tangential forces that were present in the pre-excised skin.1 Local change in biodynamic forces may be difficult to plan for preoperatively using other techniques.3
Although this technique can be utilized for all suture placements in closure, it is of greatest value when placing the first few sutures and when operating on nonplanar surfaces that might become distorted after excision. To ensure the best outcome, it is important to be certain that the area has been properly cleaned prior to surgery and a sterile technique is used.
- Paul SP. Biodynamic excisional skin tension lines for excisional surgery of the lower limb and the technique of using parallel relaxing incisions to further reduce wound tension. Plast Reconstr Surg Glob Open. 2017;5:E1614. doi:10.1097/GOX.0000000000001614
- Miller CJ, Antunes MB, Sobanko JF. Surgical technique for optimal outcomes: part II. repairing tissue: suturing. J Am Acad Dermatol. 2015;72:389-402. doi:10.1016/j.jaad.2014.08.006
- Parikh SA, Sloan B. Clinical pearl: a simple and effective technique for improving surgical closures for the early-learning resident. Cutis. 2017;100:338-339.

A Contrasting Dark Background for Nail Sampling
Practice Gap
Mycologic testing is necessary and cost-effective1 for appropriate diagnosis and treatment of onychomycosis. Empiric treatment of onychodystrophy for presumed onychomycosis can result in misdiagnosis, treatment failure, or potential adverse effects caused by medications.2 Collection of ample subungual debris facilitates the sensitivity and specificity of fungal culture and fungal polymerase chain reaction. However, the naturally pale hue of subungual debris makes specimen estimation challenging, particularly when using a similarly light-colored gauze or piece of paper for collection (Figure, A).
The Technique
A sheet from a black sticky notepad (widely available and cost-effective) can be adapted for making a diagnosis of onychomycosis (Figure, B).
Practical Implication
Use of a dark background that contrasts with light-hued nail debris is valuable to ensure an adequate specimen for fungal culture and polymerase chain reaction.
- Gupta AK, Versteeg SG, Shear NH. Confirmatory testing prior to initiating onychomycosis therapy is cost effective. J Cutan Med Surg. 2018;22:129-141. doi:10.1177/1203475417733461
- Lipner SR, Scher RK. Onychomycosis—a small step for quality of care. Curr Med Res Opin. 2016;32:865-867. doi:10.1185/03007995.2016.1147026
Practice Gap
Mycologic testing is necessary and cost-effective1 for appropriate diagnosis and treatment of onychomycosis. Empiric treatment of onychodystrophy for presumed onychomycosis can result in misdiagnosis, treatment failure, or potential adverse effects caused by medications.2 Collection of ample subungual debris facilitates the sensitivity and specificity of fungal culture and fungal polymerase chain reaction. However, the naturally pale hue of subungual debris makes specimen estimation challenging, particularly when using a similarly light-colored gauze or piece of paper for collection (Figure, A).
The Technique
A sheet from a black sticky notepad (widely available and cost-effective) can be adapted for making a diagnosis of onychomycosis (Figure, B).
Practical Implication
Use of a dark background that contrasts with light-hued nail debris is valuable to ensure an adequate specimen for fungal culture and polymerase chain reaction.
- Gupta AK, Versteeg SG, Shear NH. Confirmatory testing prior to initiating onychomycosis therapy is cost effective. J Cutan Med Surg. 2018;22:129-141. doi:10.1177/1203475417733461
- Lipner SR, Scher RK. Onychomycosis—a small step for quality of care. Curr Med Res Opin. 2016;32:865-867. doi:10.1185/03007995.2016.1147026
Utilizing a Sleep Mask to Reduce Patient Anxiety During Nail Surgery
Practice Gap
Perioperative anxiety is common in patients undergoing nail surgery. Patients might worry about seeing blood; about the procedure itself, including nail avulsion; and about associated pain and disfigurement. Nail surgery causes a high level of anxiety that correlates positively with postoperative pain1 and overall patient dissatisfaction. Furthermore, surgery-related anxiety is a predictor of increased postoperative analgesic use2 and delayed recovery.3
Therefore, implementing strategies that reduce perioperative anxiety may help minimize postoperative pain. Squeezing a stress ball, hand-holding, virtual reality, and music are tools that have been studied to reduce anxiety in the context of Mohs micrographic surgery; these strategies have not been studied for nail surgery.
The Technique
Using a sleep mask is a practical solution to reduce patient anxiety during nail surgery. A minority of patients will choose to watch their surgical procedure; most become unnerved observing their nail surgery. Using a sleep mask diverts visual attention from the surgical field without physically interfering with the nail surgeon. Utilizing a sleep mask is cost-effective, with disposable sleep masks available online for less than $0.30 each. Patients can bring their own mask, or a mask can be offered prior to surgery.
If desired, patients are instructed to wear the sleep mask during the entirety of the procedure, starting from anesthetic infiltration until wound closure and dressing application. Any adjustments can be made with the patient’s free hand. The sleep mask can be offered to patients of all ages undergoing nail surgery under local anesthesia, except babies and young children, who require general anesthesia.
Practical Implications
Distraction is an important strategy to reduce anxiety and pain in patients undergoing surgical procedures. In an observational study of 3087 surgical patients, 36% reported that self-distraction was the most helpful strategy for coping with preoperative anxiety.4 In a randomized, open-label clinical trial of 72 patients undergoing peripheral venous catheterization, asking the patients simple questions during the procedure was more effective than local anesthesia in reducing the perception of pain.5
It is crucial to implement strategies to reduce anxiety in patients undergoing nail surgery. Using a sleep mask impedes direct visualization of the surgical field, thus distracting the patient’s sight and attention from the procedure. Furthermore, this technique is safe and cost-effective.
Controlled clinical trials are necessary to assess the efficacy of this method in reducing nail surgery–related anxiety in comparison to other techniques.
- Navarro-Gastón D, Munuera-Martínez PV. Prevalence of preoperative anxiety and its relationship with postoperative pain in foot nail surgery: a cross-sectional study. Int J Environ Res Public Health. 2020;17:4481. doi:10.3390/ijerph17124481
- Ip HYV, Abrishami A, Peng PWH, et al. Predictors of postoperative pain and analgesic consumption: a qualitative systematic review. Anesthesiology. 2009;111:657-677. doi:10.1097/ALN.0b013e3181aae87a
- Mavros MN, Athanasiou S, Gkegkes ID, et al. Do psychological variables affect early surgical recovery? PLoS One. 2011;6:E20306. doi:10.1371/journal.pone.0020306
- Aust H, Rüsch D, Schuster M, et al. Coping strategies in anxious surgical patients. BMC Health Serv Res. 2016;16:250. doi:10.1186/s12913-016-1492-5
- Balanyuk I, Ledonne G, Provenzano M, et al. Distraction technique for pain reduction in peripheral venous catheterization: randomized, controlled trial. Acta Biomed. 2018;89(suppl 4):55-63. doi:10.23750/abmv89i4-S.7115
Practice Gap
Perioperative anxiety is common in patients undergoing nail surgery. Patients might worry about seeing blood; about the procedure itself, including nail avulsion; and about associated pain and disfigurement. Nail surgery causes a high level of anxiety that correlates positively with postoperative pain1 and overall patient dissatisfaction. Furthermore, surgery-related anxiety is a predictor of increased postoperative analgesic use2 and delayed recovery.3
Therefore, implementing strategies that reduce perioperative anxiety may help minimize postoperative pain. Squeezing a stress ball, hand-holding, virtual reality, and music are tools that have been studied to reduce anxiety in the context of Mohs micrographic surgery; these strategies have not been studied for nail surgery.
The Technique
Using a sleep mask is a practical solution to reduce patient anxiety during nail surgery. A minority of patients will choose to watch their surgical procedure; most become unnerved observing their nail surgery. Using a sleep mask diverts visual attention from the surgical field without physically interfering with the nail surgeon. Utilizing a sleep mask is cost-effective, with disposable sleep masks available online for less than $0.30 each. Patients can bring their own mask, or a mask can be offered prior to surgery.
If desired, patients are instructed to wear the sleep mask during the entirety of the procedure, starting from anesthetic infiltration until wound closure and dressing application. Any adjustments can be made with the patient’s free hand. The sleep mask can be offered to patients of all ages undergoing nail surgery under local anesthesia, except babies and young children, who require general anesthesia.
Practical Implications
Distraction is an important strategy to reduce anxiety and pain in patients undergoing surgical procedures. In an observational study of 3087 surgical patients, 36% reported that self-distraction was the most helpful strategy for coping with preoperative anxiety.4 In a randomized, open-label clinical trial of 72 patients undergoing peripheral venous catheterization, asking the patients simple questions during the procedure was more effective than local anesthesia in reducing the perception of pain.5
It is crucial to implement strategies to reduce anxiety in patients undergoing nail surgery. Using a sleep mask impedes direct visualization of the surgical field, thus distracting the patient’s sight and attention from the procedure. Furthermore, this technique is safe and cost-effective.
Controlled clinical trials are necessary to assess the efficacy of this method in reducing nail surgery–related anxiety in comparison to other techniques.
- Navarro-Gastón D, Munuera-Martínez PV. Prevalence of preoperative anxiety and its relationship with postoperative pain in foot nail surgery: a cross-sectional study. Int J Environ Res Public Health. 2020;17:4481. doi:10.3390/ijerph17124481
- Ip HYV, Abrishami A, Peng PWH, et al. Predictors of postoperative pain and analgesic consumption: a qualitative systematic review. Anesthesiology. 2009;111:657-677. doi:10.1097/ALN.0b013e3181aae87a
- Mavros MN, Athanasiou S, Gkegkes ID, et al. Do psychological variables affect early surgical recovery? PLoS One. 2011;6:E20306. doi:10.1371/journal.pone.0020306
- Aust H, Rüsch D, Schuster M, et al. Coping strategies in anxious surgical patients. BMC Health Serv Res. 2016;16:250. doi:10.1186/s12913-016-1492-5
- Balanyuk I, Ledonne G, Provenzano M, et al. Distraction technique for pain reduction in peripheral venous catheterization: randomized, controlled trial. Acta Biomed. 2018;89(suppl 4):55-63. doi:10.23750/abmv89i4-S.7115
24-7 Dressing Technique to Optimize Wound Healing After Mohs Micrographic Surgery
Practice Gap
Management of surgical wounds is a critical component of postsurgical care for patients during recovery at home.1 However, postoperative wound care can be troublesome, time consuming, and expensive. Common problems with current standard dressings include an increased risk for infection, pain, and wound damage with frequent dressing changes.2-4
Patients often are unable to take proper care of wounds themselves and may not have the financial means or social support to have others assist them.4-6 For these patients, the option of a hassle-free dressing that they can leave on until their follow-up appointment is preferred. In our experience, what we call a 24-7 bandage has been remarkably successful in patients who are vulnerable to wound complications.
We report a comfortable, effective, and simple technique for wound dressings after dermatologic surgery.
The Technique
In Figure 1, we demonstrate a simple dressing technique that can be used to optimize wound healing in patients unable to provide adequate wound care for themselves:
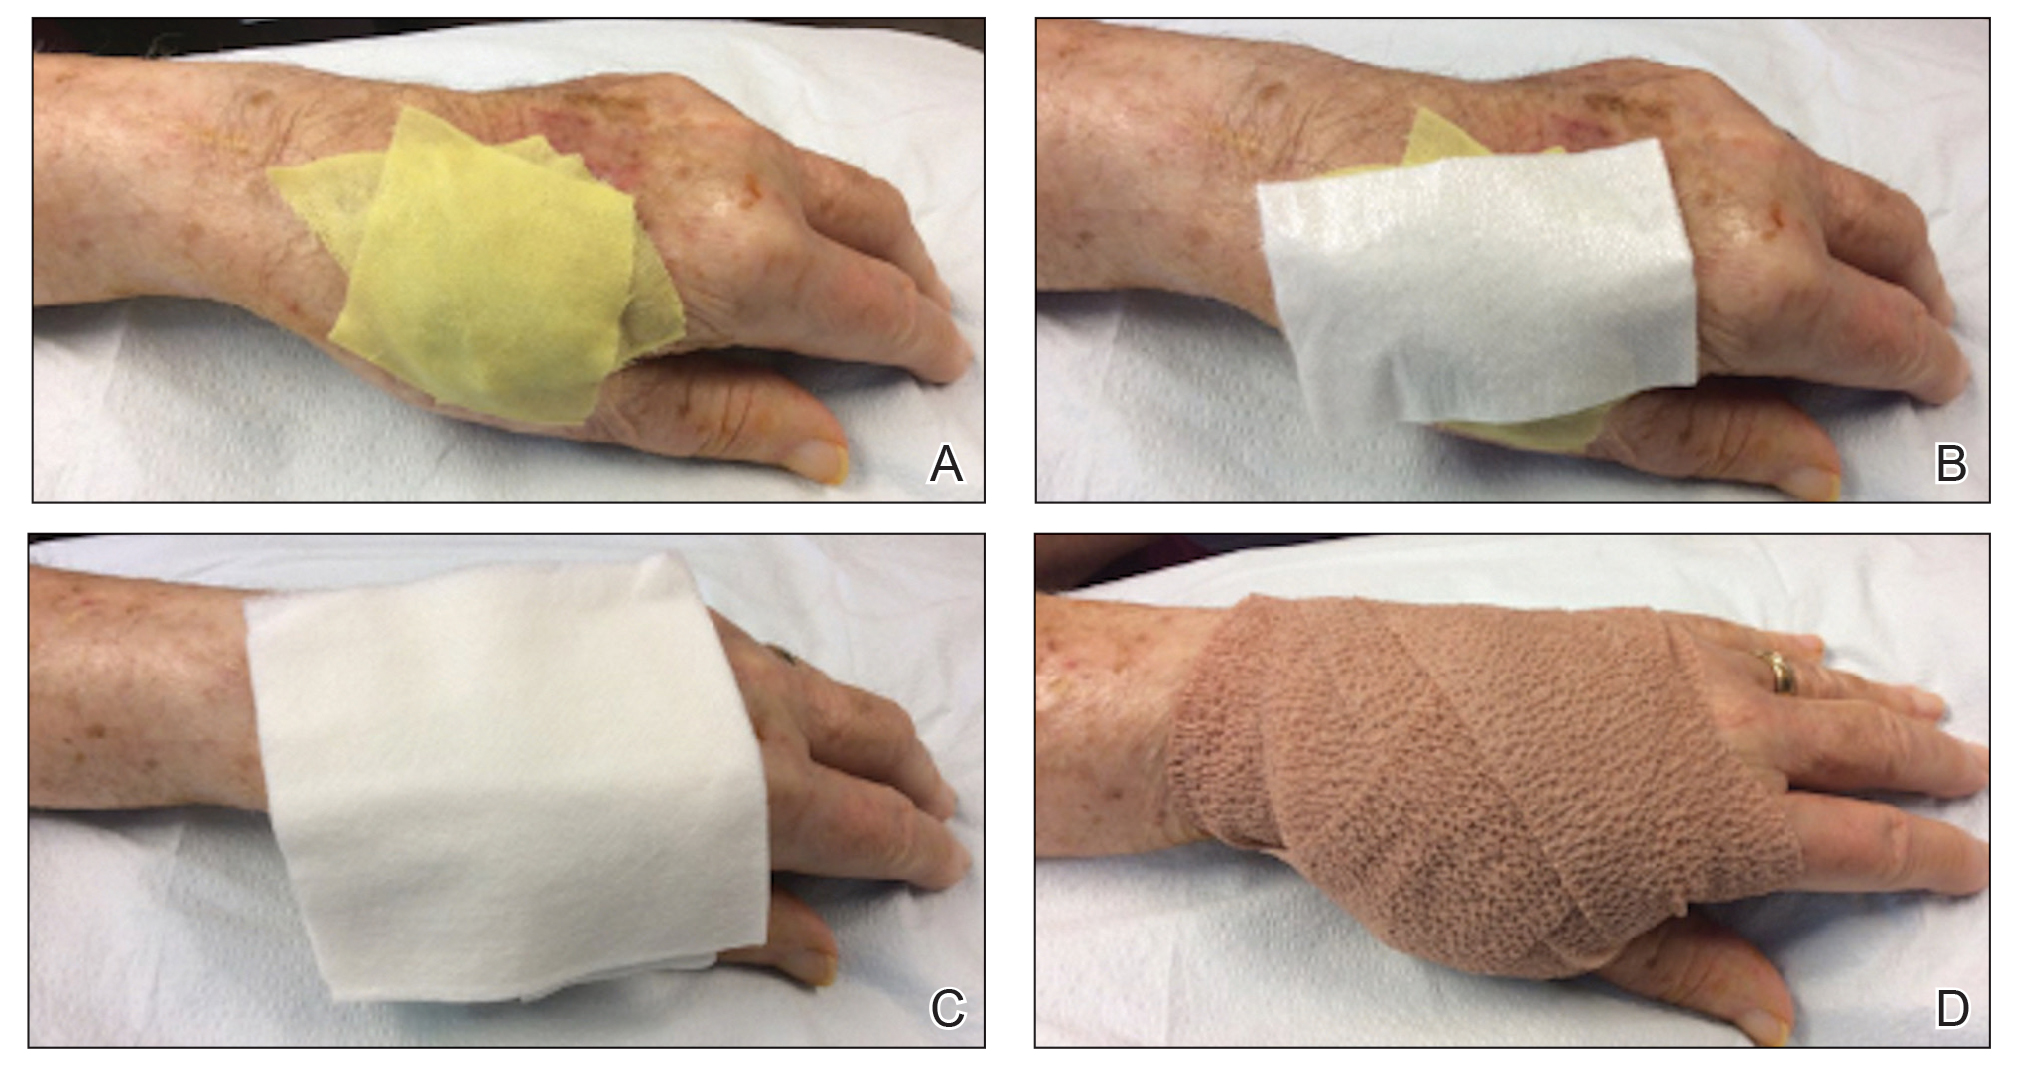
1. The surgical site is covered with mupirocin ointment, followed by bismuth tribromophenate gauze (Figure 1A). The bismuth-impregnated gauze helps make the dressing nonadherent and moderately occlusive. It also adds moisture to the wound bed.
2. The gauze is then covered with excess mupirocin. A nonadherent dressing is applied (Figure 1B).
3. The entire area is covered with gauze and cover-roll nonlatex bandaging tape to ensure maximum adhesion (Figures 1C and 1D).
4. When the surgical site is on an extremity, it is wrapped in a self-adherent wrap or bandage roll to prevent clothing from pulling the tape loose.
Once this dressing technique is performed in the office, the bandage requires no wound care at home other than ensuring that the bandage is kept dry. The 24-7 dressing can be left on the surgical site for 7 days until the follow-up appointment. If necessary, it also can be applied for a second week after bolster removal or for multiple weeks following advanced flap repair.
Our patients find this dressing comfortable and unobtrusive. It is easy for the staff to apply and inexpensive.
Practical Implications
We have treated approximately 200 patients with the 24-7 dressing technique. Our experience is that these patients demonstrated an excellent aesthetic outcome without complications (Figure 2). We have successfully utilized the dressing in several anatomic locations, including the arms, legs, neck, face, and scalp. We use mupirocin for its antimicrobial activity, but we have not performed a study at our clinic looking at the difference between rate of infection and wound healing using mupirocin vs petrolatum. We prefer adding bulk gauze under the tape and leaving the dressing on for 7 days. We seldom have issues with bleeding, and if there is an issue, the patient is told to come back to our clinic so we can change the bandage for them.
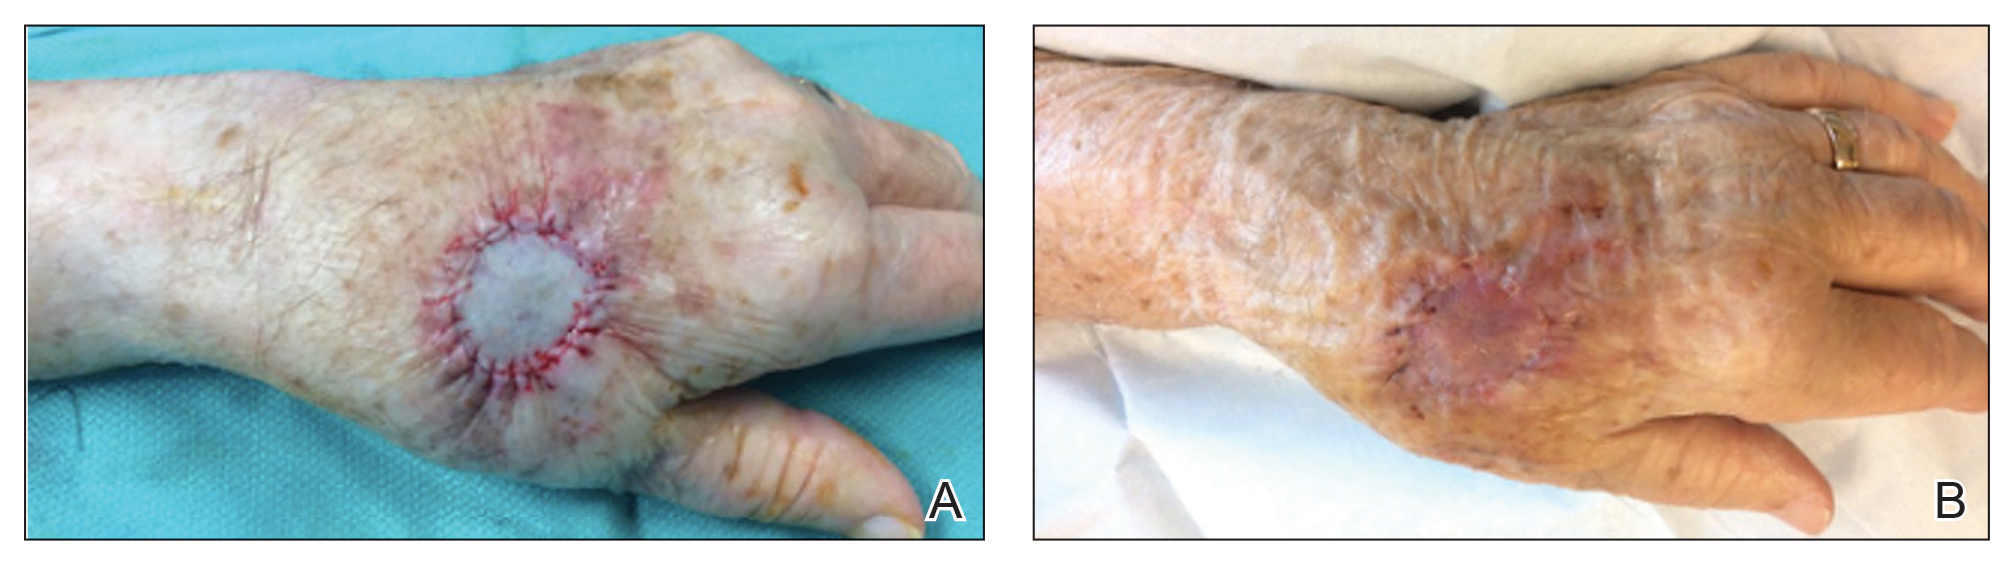
This dressing technique is cost-effective to the patient and clinical staff, provides protection from potential injury to the sutures, decreases the risk for infection, and removes the stress and burden on the patient and family of frequent dressing changes. Furthermore, by preventing patient manipulation and frequent removal of the dressing, the wound retains adequate moisture during healing. This technique also can be applied to a variety of outpatient procedures other than Mohs micrographic surgery.
We hope that our colleagues find this 24-7 dressing technique for dressing wounds after dermatologic surgery useful in patient populations vulnerable to wound complications.
- Winton GB, Salasche SJ. Wound dressings for dermatologic surgery. J Am Acad Dermatol. 1995;13:1026-1044.
- Broussard KC, Powers JG. Wound dressings: selecting the most appropriate type. Am J Clin Dermatol. 2013;14:449-459.
- Kannon GA, Garrett AB. Moist wound healing with occlusive dressings. a clinical review. Dermatol Surg. 1995;21:583-590.
- Jones AM, San Miguel L. Are modern wound dressings a clinical and cost-effective alternative to the use of gauze? J Wound Care. 2006;15:65-66.
- Ubbink DT, Vermeulen H, Goossens A. Occlusive vs gauze dressings for local wound care in surgical patients: a randomized clinical trial. Arch Surg. 2008;143:950-955.
- Sood A, Granick MS, Tomaselli NL. Wound dressings and comparative effectiveness data. Adv Wound Care (New Rochelle). 2014;3;511-529.
Practice Gap
Management of surgical wounds is a critical component of postsurgical care for patients during recovery at home.1 However, postoperative wound care can be troublesome, time consuming, and expensive. Common problems with current standard dressings include an increased risk for infection, pain, and wound damage with frequent dressing changes.2-4
Patients often are unable to take proper care of wounds themselves and may not have the financial means or social support to have others assist them.4-6 For these patients, the option of a hassle-free dressing that they can leave on until their follow-up appointment is preferred. In our experience, what we call a 24-7 bandage has been remarkably successful in patients who are vulnerable to wound complications.
We report a comfortable, effective, and simple technique for wound dressings after dermatologic surgery.
The Technique
In Figure 1, we demonstrate a simple dressing technique that can be used to optimize wound healing in patients unable to provide adequate wound care for themselves:
1. The surgical site is covered with mupirocin ointment, followed by bismuth tribromophenate gauze (Figure 1A). The bismuth-impregnated gauze helps make the dressing nonadherent and moderately occlusive. It also adds moisture to the wound bed.
2. The gauze is then covered with excess mupirocin. A nonadherent dressing is applied (Figure 1B).
3. The entire area is covered with gauze and cover-roll nonlatex bandaging tape to ensure maximum adhesion (Figures 1C and 1D).
4. When the surgical site is on an extremity, it is wrapped in a self-adherent wrap or bandage roll to prevent clothing from pulling the tape loose.
Once this dressing technique is performed in the office, the bandage requires no wound care at home other than ensuring that the bandage is kept dry. The 24-7 dressing can be left on the surgical site for 7 days until the follow-up appointment. If necessary, it also can be applied for a second week after bolster removal or for multiple weeks following advanced flap repair.
Our patients find this dressing comfortable and unobtrusive. It is easy for the staff to apply and inexpensive.
Practical Implications
We have treated approximately 200 patients with the 24-7 dressing technique. Our experience is that these patients demonstrated an excellent aesthetic outcome without complications (Figure 2). We have successfully utilized the dressing in several anatomic locations, including the arms, legs, neck, face, and scalp. We use mupirocin for its antimicrobial activity, but we have not performed a study at our clinic looking at the difference between rate of infection and wound healing using mupirocin vs petrolatum. We prefer adding bulk gauze under the tape and leaving the dressing on for 7 days. We seldom have issues with bleeding, and if there is an issue, the patient is told to come back to our clinic so we can change the bandage for them.
This dressing technique is cost-effective to the patient and clinical staff, provides protection from potential injury to the sutures, decreases the risk for infection, and removes the stress and burden on the patient and family of frequent dressing changes. Furthermore, by preventing patient manipulation and frequent removal of the dressing, the wound retains adequate moisture during healing. This technique also can be applied to a variety of outpatient procedures other than Mohs micrographic surgery.
We hope that our colleagues find this 24-7 dressing technique for dressing wounds after dermatologic surgery useful in patient populations vulnerable to wound complications.
- Winton GB, Salasche SJ. Wound dressings for dermatologic surgery. J Am Acad Dermatol. 1995;13:1026-1044.
- Broussard KC, Powers JG. Wound dressings: selecting the most appropriate type. Am J Clin Dermatol. 2013;14:449-459.
- Kannon GA, Garrett AB. Moist wound healing with occlusive dressings. a clinical review. Dermatol Surg. 1995;21:583-590.
- Jones AM, San Miguel L. Are modern wound dressings a clinical and cost-effective alternative to the use of gauze? J Wound Care. 2006;15:65-66.
- Ubbink DT, Vermeulen H, Goossens A. Occlusive vs gauze dressings for local wound care in surgical patients: a randomized clinical trial. Arch Surg. 2008;143:950-955.
- Sood A, Granick MS, Tomaselli NL. Wound dressings and comparative effectiveness data. Adv Wound Care (New Rochelle). 2014;3;511-529.