User login
Simple Intraoperative Technique to Improve Wound Edge Approximation for Residents
Practice Gap
Dermatology residents can struggle with surgical closure early in their training years. Although experienced dermatologic surgeons may intuitively be able to align edges for maximal cosmesis, doing so can prove challenging in the context of learning basic surgical techniques for early residents.
Furthermore, local anesthesia can distort cutaneous anatomy and surgical landmarks, requiring the surgeon to reexamine their closure technique. Patients may require position changes or may make involuntary movements, both of which require dynamic thinking and planning on the part of the dermatologic surgeon to achieve optimal outcomes.
The Technique
We propose the use of sutures to intraoperatively guide placement of the dermal needle. This technique can be used for various closure types; here, we demonstrate its use in a standard elliptical excision.
To begin, a standard length to width ellipse ratio of 3:1 is drawn with appropriate margins around a neoplasm.1 After excision and appropriate undermining of the ellipse, we typically use deep sutures to close the deep space. The first pass of the needle through tissue can be performed in a place of the surgeon’s preference but typically abides by the rule of halves or the zipper method (Figure 1A). To determine optimal placement of the second needle pass through tissue, we recommend applying gentle opposing traction forces to the wound apices to approximate the linear outcome of the wound edges. The surgeon can use a skin hook to guide placement of the needle to the contralateral wound edge in an unassisted method of this technique (Figure 1B). The surgeon’s assistant also can aid in applying cutaneous traction along the length of the excision if the surgeon wishes to free their hands (Figure 1C). Because the risk of needlestick injury at this step is small, it is prudent for the surgeon to advise the assistant to avoid needlestick injury by keeping their hands away from the needle path in the surgical site.
Although traction is being applied to the wound apices, the deep suture should extend across the wound with just enough pressure to leave a serosanguineous notched mark in the contralateral tissue edge (Figure 1D). After releasing traction on the wound edges, the surgeon can effortlessly visualize the target for needle placement and make a throw through the tissue accordingly.

This process can be continued until wound closure is complete (Figure 2). Top sutures or adhesive strips can be placed afterward for completing approximation of the wound edges superficially.

Practice Implications
By using this technique to align wound edges intraoperatively, the surgeon can have a functional guide for needle placement. The technique allows improvement of function and cosmesis of surgical wounds, while also accounting for topographical variations in the patient’s surgical site. Approximation of the wound edges is particularly important at the beginning of closure, as the wound edges align and approximate more with each subsequent stitch, with decreasing tension.2
In addition, when operating on a curvilinear or challenging topographical surface of the body, this technique can provide a clear template for guiding suture placement for approximating wound edges. Furthermore, local biodynamic anatomy might become distorted after excision of the tissue specimen due to release of centripetal tangential forces that were present in the pre-excised skin.1 Local change in biodynamic forces may be difficult to plan for preoperatively using other techniques.3
Although this technique can be utilized for all suture placements in closure, it is of greatest value when placing the first few sutures and when operating on nonplanar surfaces that might become distorted after excision. To ensure the best outcome, it is important to be certain that the area has been properly cleaned prior to surgery and a sterile technique is used.
- Paul SP. Biodynamic excisional skin tension lines for excisional surgery of the lower limb and the technique of using parallel relaxing incisions to further reduce wound tension. Plast Reconstr Surg Glob Open. 2017;5:E1614. doi:10.1097/GOX.0000000000001614
- Miller CJ, Antunes MB, Sobanko JF. Surgical technique for optimal outcomes: part II. repairing tissue: suturing. J Am Acad Dermatol. 2015;72:389-402. doi:10.1016/j.jaad.2014.08.006
- Parikh SA, Sloan B. Clinical pearl: a simple and effective technique for improving surgical closures for the early-learning resident. Cutis. 2017;100:338-339.
Practice Gap
Dermatology residents can struggle with surgical closure early in their training years. Although experienced dermatologic surgeons may intuitively be able to align edges for maximal cosmesis, doing so can prove challenging in the context of learning basic surgical techniques for early residents.
Furthermore, local anesthesia can distort cutaneous anatomy and surgical landmarks, requiring the surgeon to reexamine their closure technique. Patients may require position changes or may make involuntary movements, both of which require dynamic thinking and planning on the part of the dermatologic surgeon to achieve optimal outcomes.
The Technique
We propose the use of sutures to intraoperatively guide placement of the dermal needle. This technique can be used for various closure types; here, we demonstrate its use in a standard elliptical excision.
To begin, a standard length to width ellipse ratio of 3:1 is drawn with appropriate margins around a neoplasm.1 After excision and appropriate undermining of the ellipse, we typically use deep sutures to close the deep space. The first pass of the needle through tissue can be performed in a place of the surgeon’s preference but typically abides by the rule of halves or the zipper method (Figure 1A). To determine optimal placement of the second needle pass through tissue, we recommend applying gentle opposing traction forces to the wound apices to approximate the linear outcome of the wound edges. The surgeon can use a skin hook to guide placement of the needle to the contralateral wound edge in an unassisted method of this technique (Figure 1B). The surgeon’s assistant also can aid in applying cutaneous traction along the length of the excision if the surgeon wishes to free their hands (Figure 1C). Because the risk of needlestick injury at this step is small, it is prudent for the surgeon to advise the assistant to avoid needlestick injury by keeping their hands away from the needle path in the surgical site.
Although traction is being applied to the wound apices, the deep suture should extend across the wound with just enough pressure to leave a serosanguineous notched mark in the contralateral tissue edge (Figure 1D). After releasing traction on the wound edges, the surgeon can effortlessly visualize the target for needle placement and make a throw through the tissue accordingly.
This process can be continued until wound closure is complete (Figure 2). Top sutures or adhesive strips can be placed afterward for completing approximation of the wound edges superficially.
Practice Implications
By using this technique to align wound edges intraoperatively, the surgeon can have a functional guide for needle placement. The technique allows improvement of function and cosmesis of surgical wounds, while also accounting for topographical variations in the patient’s surgical site. Approximation of the wound edges is particularly important at the beginning of closure, as the wound edges align and approximate more with each subsequent stitch, with decreasing tension.2
In addition, when operating on a curvilinear or challenging topographical surface of the body, this technique can provide a clear template for guiding suture placement for approximating wound edges. Furthermore, local biodynamic anatomy might become distorted after excision of the tissue specimen due to release of centripetal tangential forces that were present in the pre-excised skin.1 Local change in biodynamic forces may be difficult to plan for preoperatively using other techniques.3
Although this technique can be utilized for all suture placements in closure, it is of greatest value when placing the first few sutures and when operating on nonplanar surfaces that might become distorted after excision. To ensure the best outcome, it is important to be certain that the area has been properly cleaned prior to surgery and a sterile technique is used.
- Paul SP. Biodynamic excisional skin tension lines for excisional surgery of the lower limb and the technique of using parallel relaxing incisions to further reduce wound tension. Plast Reconstr Surg Glob Open. 2017;5:E1614. doi:10.1097/GOX.0000000000001614
- Miller CJ, Antunes MB, Sobanko JF. Surgical technique for optimal outcomes: part II. repairing tissue: suturing. J Am Acad Dermatol. 2015;72:389-402. doi:10.1016/j.jaad.2014.08.006
- Parikh SA, Sloan B. Clinical pearl: a simple and effective technique for improving surgical closures for the early-learning resident. Cutis. 2017;100:338-339.

Don’t Get Hung Up on Fishhooks: A Guide to Fishhook Removal
Fishing is one of the world’s most beloved activities, enjoyed as a sport or a leisure activity. However, a common injury from fishing is embedment of the fishhook in the cutaneous tissue. Barbed fishhooks are used for their effectiveness in maintaining the fish on the hook once it is caught, but when implanted in the hand of a fisherman or fisherwoman, barbs can pose problems for removal without exacerbating internal tissue injury. Nevertheless, dermatologists should not shy away from removal of barbed fishhooks, as there are several simple methods that can be easily utilized in the outpatient setting.
Case Report
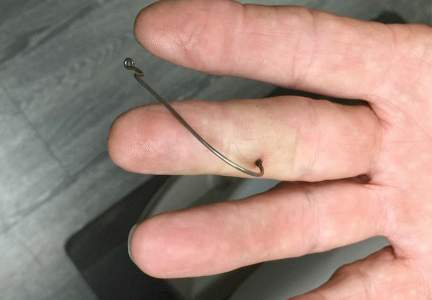
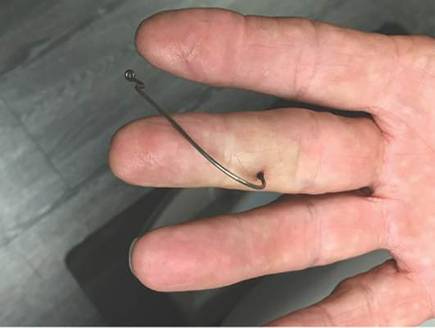
A 68-year-old man presented to an outpatient dermatology clinic after sustaining a barbed fishhook injury while fishing. The fishhook was firmly inserted into the ventral side of the third digit of the right hand (Figure 1).
Prior to presenting to dermatology, the patient went to 2 urgent care clinics the same day seeking treatment. He reported that practitioners at the first clinic were not able to remove the fishhook because they did not have pliers in stock. At the second clinic he was told the fishhook might be embedded in deeper tissues and was advised to go to the emergency department at the local hospital. When he arrived at the emergency department, a 6-hour wait time prompted him to see a local dermatologist instead.
To remove the fishhook, the area was cleaned and prepared first; lidocaine 2% was administered for local anesthesia. An 18-gauge needle was then advanced through the puncture site parallel to the fishhook’s inner shaft on the same side as the barb, which could be successfully palpated using the tip of the 18-gauge needle. The tip of the needle was then used to cap the barb beneath the skin. This technique allowed for the hook to be easily extracted in a retrograde manner without causing further destruction to the surrounding tissue. The patient then was started on prophylaxis cephalexin 500 mg 3 times daily for 3 days.
Comment
The hand is the most common site of fishhook injury, followed closely by the head and eyes.1 Barbless fishhooks usually can be removed by pushing the hook in a retrograde manner along the path of insertion. This method is simple and rarely results in complications. However, there are no guidelines for removal of barbed fishhooks. Furthermore, removing a barbed fishhook in the same retrograde manner would result in extensive internal tissue destruction and increased complications. Due to the popularity of the sport of fishing, fishhook injuries, depending on geographical location, are not uncommon.2 For this reason, trauma and emergency practitioners have become well versed in safe methods for barbed fishhook removal. However, patients are not always able or willing to seek medical care in emergency departments and may opt to seek treatment in outpatient settings, such as in our case. As a result, dermatologists should familiarize themselves with safe and effective fishhook removal methods, as they are not time consuming and do not require complex equipment. Failure to treat the patient may lead to further patient discomfort and increased risk for complications. Additionally, many of the techniques for removal may be useful with other foreign bodies embedded in cutaneous tissue (eg, splinters).
There are a number of safe and effective techniques for removing barbed fishhooks from cutaneous tissue, including the advance-and-cut method, the cut-it-out technique, the string-pull method, and the needle cover technique.1-3 The method chosen to remove the fishhook is dependent on a variety of factors, such as anatomic location, tissue depth, and provider comfort.
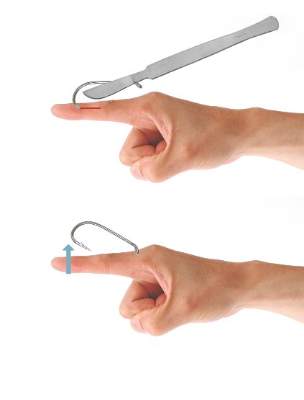
With the advance-and-cut method (Figure 2), the affected area is anesthetized and a small incision in the skin is created to expose the barb. The fishhook is then advanced through the incision, providing visibility of the barb and thus allowing the practitioner to cut the barbed tip without creating further damage to the surrounding tissue. The shaft of the fishhook can subsequently be removed in a retrograde fashion. The advantages of this technique include that it may be successfully used in all types of barbed fishhooks and it provides the practitioner with direct visibility of the barb, thus minimizing risk for neurovascular injury during removal.1 However, the primary disadvantage is that a second cutaneous wound is created in exposing the barb.
 |  | |
| Figure 2. The advance-and-cut method for fishhook removal. | Figure 3. The cut-it-out method for fishhook removal. |
|
The cut-it-out technique (Figure 3) is similar to the advance-and-cut method in that they both require anesthesia along with creating an incision. With this method, a scalpel is used to create a small linear incision originating at the fishhook entrance site and ending at the approximated location of the fishhook’s tip. The fishhook then is simply lifted superiorly in a retrograde fashion.
|
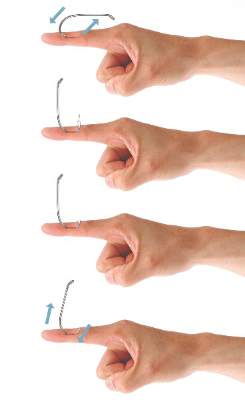
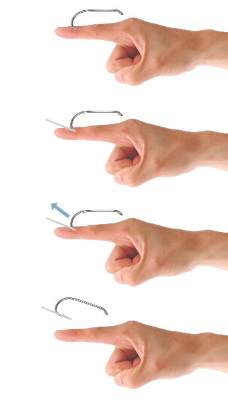
The string-pull method (Figure 4) has been credited to fishermen in South Australia and was first described by Cooke2 in 1961. This method is relatively painless, does not require anesthesia, and has a high success rate when properly administered. However, it does require rapid and confident motions (ie, without hesitation) by the practitioner and should not be performed on free-moving areas of the body (eg, earlobe).3 With this technique, a sturdy piece of suture (eg, 2/0 or 3/0 strength silk) is looped around the hook and is extended away from the practitioner at a 30° angle. The free end of the suture is then securely fastened around the index finger of the practitioner’s dominant hand. The index finger of the nondominant hand should apply a downward pressure to the hook shaft to disengage the barb from the tissue. Simultaneously and rather quickly and forcefully the practitioner must pull the dominant index finger with the string attached in a superior and lateral direction, as depicted by the long arrow in Figure 4. If successful, the barbed hook will pull out of the entrance site. The use of string in pulling the fishhook parallel to the site of injury is helpful for smaller fishhooks that may be difficult to grab with fingers alone. However, with larger fishhooks, the string may not be required so long as the practitioner is able to obtain a secure grasp on the fishhook shaft. The string-pull method becomes particularly useful when anesthesia is unavailable or when the barb of the hook is embedded too deeply for safe advancement through tissue to visualize and cut the barb.
|
Lastly, the needle cover technique (Figure 5) is another simple method that does not require the creation of a secondary wound. An 18-gauge needle is simply inserted parallel to the fishhook curvature into the site of entry. By using the needle to slide along the fishhook’s curve, the practitioner is able to follow its pathway while in the tissue. The tip of the 18-gauge needle is then used to cap or cover the barb, thus allowing the fishhook to be removed in a retrograde fashion from the wound. In an outpatient setting, this technique does not require the creation of additional tissue damage and practitioners who are inexperienced with fishhook removal may proceed through the motions more slowly and methodically than the string-pull method permits.
Wound care following fishhook removal should involve adequate flushing of the wound with normal saline along with the application of topical antibiotics and a simple dressing and adhesive bandage. Oral prophylactic antibiotics typically are not required for shallow cutaneous injuries unless the fishhook is dirty, the patient is immunocompromised, or the patient has a condition lending to poor wound healing (eg, diabetes mellitus, peripheral vascular disease).3 When deciding on antibiotics, it is important to note that fishhook injuries while saltwater fishing are associated with Vibrio infection, while injuries sustained during freshwater fishing are associated with gram-negative bacteria (eg, Pseudomonas and Aeromonas species).3 Lastly, it is essential to find out the immunization status of the patient, and tetanus immune globulin should be provided if necessary.
 |  | |
| Figure 4. The string-pull method for fishhook removal. | Figure 5. The needle cover technique for fishhook removal. |
Conclusion
Although guidelines for barbed fishhook removal are not available, outpatient physicians, including dermatologists, should not fear removal procedures. There are many safe and effective fishhook removal methods that are not time consuming and do not require complex equipment. Furthermore, familiarization with these same techniques may be useful for removal of other foreign bodies embedded in cutaneous tissue.
1. Khan HA, Kamal Y, Lone AU. Fish hook injury: removal by “push through and cut off” technique: a case report and brief literature review [published online March 24, 2014]. Trauma Mon. 2014;19:e17728.
2. Cooke T. How to remove fish-hooks with a bit of string. Med J Aust. 1961;48:815-816.
3. Thommasen HV, Thommasen A. The occasional removal of an embedded fish hook. Can J Rural Med. 2005;10:255-259.
Fishing is one of the world’s most beloved activities, enjoyed as a sport or a leisure activity. However, a common injury from fishing is embedment of the fishhook in the cutaneous tissue. Barbed fishhooks are used for their effectiveness in maintaining the fish on the hook once it is caught, but when implanted in the hand of a fisherman or fisherwoman, barbs can pose problems for removal without exacerbating internal tissue injury. Nevertheless, dermatologists should not shy away from removal of barbed fishhooks, as there are several simple methods that can be easily utilized in the outpatient setting.
Case Report
A 68-year-old man presented to an outpatient dermatology clinic after sustaining a barbed fishhook injury while fishing. The fishhook was firmly inserted into the ventral side of the third digit of the right hand (Figure 1).
Prior to presenting to dermatology, the patient went to 2 urgent care clinics the same day seeking treatment. He reported that practitioners at the first clinic were not able to remove the fishhook because they did not have pliers in stock. At the second clinic he was told the fishhook might be embedded in deeper tissues and was advised to go to the emergency department at the local hospital. When he arrived at the emergency department, a 6-hour wait time prompted him to see a local dermatologist instead.
To remove the fishhook, the area was cleaned and prepared first; lidocaine 2% was administered for local anesthesia. An 18-gauge needle was then advanced through the puncture site parallel to the fishhook’s inner shaft on the same side as the barb, which could be successfully palpated using the tip of the 18-gauge needle. The tip of the needle was then used to cap the barb beneath the skin. This technique allowed for the hook to be easily extracted in a retrograde manner without causing further destruction to the surrounding tissue. The patient then was started on prophylaxis cephalexin 500 mg 3 times daily for 3 days.
Comment
The hand is the most common site of fishhook injury, followed closely by the head and eyes.1 Barbless fishhooks usually can be removed by pushing the hook in a retrograde manner along the path of insertion. This method is simple and rarely results in complications. However, there are no guidelines for removal of barbed fishhooks. Furthermore, removing a barbed fishhook in the same retrograde manner would result in extensive internal tissue destruction and increased complications. Due to the popularity of the sport of fishing, fishhook injuries, depending on geographical location, are not uncommon.2 For this reason, trauma and emergency practitioners have become well versed in safe methods for barbed fishhook removal. However, patients are not always able or willing to seek medical care in emergency departments and may opt to seek treatment in outpatient settings, such as in our case. As a result, dermatologists should familiarize themselves with safe and effective fishhook removal methods, as they are not time consuming and do not require complex equipment. Failure to treat the patient may lead to further patient discomfort and increased risk for complications. Additionally, many of the techniques for removal may be useful with other foreign bodies embedded in cutaneous tissue (eg, splinters).
There are a number of safe and effective techniques for removing barbed fishhooks from cutaneous tissue, including the advance-and-cut method, the cut-it-out technique, the string-pull method, and the needle cover technique.1-3 The method chosen to remove the fishhook is dependent on a variety of factors, such as anatomic location, tissue depth, and provider comfort.
With the advance-and-cut method (Figure 2), the affected area is anesthetized and a small incision in the skin is created to expose the barb. The fishhook is then advanced through the incision, providing visibility of the barb and thus allowing the practitioner to cut the barbed tip without creating further damage to the surrounding tissue. The shaft of the fishhook can subsequently be removed in a retrograde fashion. The advantages of this technique include that it may be successfully used in all types of barbed fishhooks and it provides the practitioner with direct visibility of the barb, thus minimizing risk for neurovascular injury during removal.1 However, the primary disadvantage is that a second cutaneous wound is created in exposing the barb.
| | |
| Figure 2. The advance-and-cut method for fishhook removal. | Figure 3. The cut-it-out method for fishhook removal. |
|
The cut-it-out technique (Figure 3) is similar to the advance-and-cut method in that they both require anesthesia along with creating an incision. With this method, a scalpel is used to create a small linear incision originating at the fishhook entrance site and ending at the approximated location of the fishhook’s tip. The fishhook then is simply lifted superiorly in a retrograde fashion.
|
The string-pull method (Figure 4) has been credited to fishermen in South Australia and was first described by Cooke2 in 1961. This method is relatively painless, does not require anesthesia, and has a high success rate when properly administered. However, it does require rapid and confident motions (ie, without hesitation) by the practitioner and should not be performed on free-moving areas of the body (eg, earlobe).3 With this technique, a sturdy piece of suture (eg, 2/0 or 3/0 strength silk) is looped around the hook and is extended away from the practitioner at a 30° angle. The free end of the suture is then securely fastened around the index finger of the practitioner’s dominant hand. The index finger of the nondominant hand should apply a downward pressure to the hook shaft to disengage the barb from the tissue. Simultaneously and rather quickly and forcefully the practitioner must pull the dominant index finger with the string attached in a superior and lateral direction, as depicted by the long arrow in Figure 4. If successful, the barbed hook will pull out of the entrance site. The use of string in pulling the fishhook parallel to the site of injury is helpful for smaller fishhooks that may be difficult to grab with fingers alone. However, with larger fishhooks, the string may not be required so long as the practitioner is able to obtain a secure grasp on the fishhook shaft. The string-pull method becomes particularly useful when anesthesia is unavailable or when the barb of the hook is embedded too deeply for safe advancement through tissue to visualize and cut the barb.
|
Lastly, the needle cover technique (Figure 5) is another simple method that does not require the creation of a secondary wound. An 18-gauge needle is simply inserted parallel to the fishhook curvature into the site of entry. By using the needle to slide along the fishhook’s curve, the practitioner is able to follow its pathway while in the tissue. The tip of the 18-gauge needle is then used to cap or cover the barb, thus allowing the fishhook to be removed in a retrograde fashion from the wound. In an outpatient setting, this technique does not require the creation of additional tissue damage and practitioners who are inexperienced with fishhook removal may proceed through the motions more slowly and methodically than the string-pull method permits.
Wound care following fishhook removal should involve adequate flushing of the wound with normal saline along with the application of topical antibiotics and a simple dressing and adhesive bandage. Oral prophylactic antibiotics typically are not required for shallow cutaneous injuries unless the fishhook is dirty, the patient is immunocompromised, or the patient has a condition lending to poor wound healing (eg, diabetes mellitus, peripheral vascular disease).3 When deciding on antibiotics, it is important to note that fishhook injuries while saltwater fishing are associated with Vibrio infection, while injuries sustained during freshwater fishing are associated with gram-negative bacteria (eg, Pseudomonas and Aeromonas species).3 Lastly, it is essential to find out the immunization status of the patient, and tetanus immune globulin should be provided if necessary.
| | |
| Figure 4. The string-pull method for fishhook removal. | Figure 5. The needle cover technique for fishhook removal. |
Conclusion
Although guidelines for barbed fishhook removal are not available, outpatient physicians, including dermatologists, should not fear removal procedures. There are many safe and effective fishhook removal methods that are not time consuming and do not require complex equipment. Furthermore, familiarization with these same techniques may be useful for removal of other foreign bodies embedded in cutaneous tissue.
1. Khan HA, Kamal Y, Lone AU. Fish hook injury: removal by “push through and cut off” technique: a case report and brief literature review [published online March 24, 2014]. Trauma Mon. 2014;19:e17728.
2. Cooke T. How to remove fish-hooks with a bit of string. Med J Aust. 1961;48:815-816.
3. Thommasen HV, Thommasen A. The occasional removal of an embedded fish hook. Can J Rural Med. 2005;10:255-259.
Practice Points
- Barbed fishhooks should never be removed by pushing the hook in a retrograde manner along the path of insertion, as this method may result in extensive internal tissue destruction and increased complications.
- There are a number of safe and effective techniques for removing barbed fishhooks from cutaneous tissue that also may be applicable in removing other foreign bodies embedded in cutaneous tissue (eg, splinters).