User login
Exploring options for POP treatment: Patient selection, surgical approaches, and ways to manage risks
A number of presentations at the 2019 Pelvic Anatomy and Gynecologic Surgery (PAGS) Symposium (Las Vegas, Nevada, December 12-14, 2019) focused on pelvic organ prolapse (POP) repair, including anatomic considerations, the evolution of surgical procedures, and transvaginal repair. OBG M
Nonsurgical approaches for POP: A good option for the right patient
John B. Gebhart, MD, MS: What are the nonsurgical options for POP?
Mark D. Walters, MD: Women who have prolapse could, of course, choose to continue to live with the prolapse. If they desire treatment, however, the main nonsurgical option is a combination of pessary use, possibly with some estrogen, and possibly with pelvic muscle exercises. Women who have a well-fitting pessary can be managed satisfactorily for years. If possible, women should be taught to take the pessary in and out on a regular basis to minimize their long-term complications.
Dr. Gebhart: How can nonsurgical treatment options be maximized?
Beri M. Ridgeway, MD: It depends on patient commitment. This is important to assess at the first visit when you are making management decisions, because if someone is not going to attend physical therapy or not going to continue to do the exercises, the expectation for the outcome is not going to be great.
Also, if a patient feels very uncomfortable using a pessary and really does not want it, I am fine proceeding with surgery as a first-line treatment. If the patient is committed, the ideal is to educate her and connect her with the right people, either a pelvic floor physical therapist or someone in your office who will encourage her and manage pessary use.
Dr. Gebhart: It goes back to assessing patient goals and expectations.
Mickey M. Karram, MD: If you have a patient who is a good candidate for a pessary—say she has a well-supported distal vagina and maybe a cervical prolapse or an apical prolapse—and you can fit a small pessary that will sit in the upper vagina in a comfortable fashion, it is worthwhile to explain to the patient that she is a really good candidate for this option. By contrast, someone who has a wide genital hiatus and a large rectocele will not have good success with a pessary.
Dr. Gebhart: That is important: Choose your nonsurgical patients well, those who will respond to therapy and maybe not get frustrated with it.
Dr. Walters: A problem I see is that some people are good at fitting a pessary, but they do not teach how to use it very well. When I see the patient back, she says, “What’s my long term on the pessary?” I say, “If we teach you to take it in and out, you are less likely to have any problems with it, and then you can manage it for years that way. Otherwise, you have to keep visiting a practitioner to change it and that is not necessarily a good long-term option.” At the very first visit, I teach them what a pessary is, its purpose, and how to maintain it themselves. I think that gives patients the best chance for long-term satisfaction.
Dr. Gebhart: Surgery is always an option if pessary management is not satisfactory.
Dr. Ridgeway: I also tell patients, especially those uncertain about using a pessary, “Worst case, you spend a little time to figure this out, but if it works, you can avoid surgery. If it doesn’t—the risks are very low and you perhaps wasted some time—but at least you’ll know you tried the conservative management.”
Dr. Gebhart: Mickey made an excellent point earlier that it can be a diagnostic treatment strategy as well.
Dr. Karram: If you are concerned about the prolapse worsening or negatively impacting a functional problem related to the bladder or bowel, it is good to place a pessary for a short period of time. This can potentially give you an idea of how your surgery will impact a patient’s bladder or bowel function.
Continue to: Decisions to make before choosing a surgical approach...
Decisions to make before choosing a surgical approach
Dr. Gebhart: Would you elaborate on the surgical options for managing POP?
Dr. Walters: For women with prolapse who decide they want to have surgery, the woman and the surgeon need to make a number of decisions. Some of these include whether the uterus, if present, needs to be removed; whether the woman would like to maintain sexual function or not; whether the repair would best be done vaginally only with native tissue suturing, vaginally with some augmentation (although that is not likely in the United States at this time), or through the abdomen, usually laparoscopically or robotically with a mesh-augmented sacrocolpopexy repair.
Also, we must decide whether to do additional cystocele and rectocele repairs and whether to add slings for stress incontinence, which can coexist or could develop after the prolapse repair. A lot of different decisions need to be made when choosing a prolapse repair for different women.
Dr. Ridgeway: It is shared decision-making with the patient. You need to understand her goals, the degree of prolapse, whether she has contraindications to uterine preservation, and how much risk she is willing to take.

Fundamentals of the clinical evaluation
Dr. Gebhart: For a woman who wants to manage her prolapse surgically, let us consider some fundamentals of clinical diagnosis. Take me through your office evaluation of the patient reporting prolapse symptoms—her history, yes, but from a physical exam standpoint, what is important?
Dr. Karram: You want to know if this is a primary prolapse or recurrent prolapse. You want to distinguish the various segments of the pelvic floor that are prolapsing and try to quantitate that in whatever way you would like. A standardized quantification system is useful, but you should have a system within your practice that you can standardize. Then, determine if there are coexisting functional derangements and how those are being impacted by the prolapse, because that is very important.
Take a good history, and identify how badly the prolapse bothers the patient and affects her quality of life. Understand how much she is willing to do about it. Does she just want to know what it is and has no interest in a surgical intervention, versus something she definitely wants to get corrected? Then do whatever potential testing around the bladder, and bowel, based on any functional derangements and finally determine interest in maintaining sexual function. Once all this information is obtained, a detailed discussion of surgical options can be undertaken.
Dr. Gebhart: What are your clinical pearls for a patient who has prolapse and does not describe any incontinence, voiding dysfunction, or defecatory symptoms? Do we need imaging testing of any sort or is the physical exam adequate for assessing prolapse?
Dr. Walters: When you do the standardized examination of the prolapse, it is important to measure how much prolapse affects the anterior wall of the apex and/or cervix and the posterior wall. Then note that in your notes and plan your surgery accordingly.
It is useful to have the patient fully bear down and then make your measurements; then, especially if she has a full bladder, have her cough while you hold up the prolapse with a speculum or your hand to see if she has stress urinary incontinence.
Continue to: I agree that to diagnose prolapse...
Dr. Ridgeway: I agree that to diagnose prolapse, it is physical exam alone. I would not recommend any significant testing other than testing for the potential for stress incontinence.
Dr. Gebhart: Is it necessary to use the POP-Q (Pelvic Organ Prolapse Quantification system) in a nonacademic private practice setting? Or are other systems, like a Baden-Walker scoring system, adequate in the everyday practice of the experienced generalist?
Dr. Walters: The Baden-Walker system actually is adequate for use in everyday practice. However, Baden-Walker is an outdated measurement system that really is not taught anymore. I think that as older physicians finish and newer doctors come in, no one will even know what Baden-Walker is.
It is better to go ahead and start learning the POP-Q system. Everyone has electronic charts now and if you learn to use the POP-Q, you can do it very quickly and get a grading system for your chart that is reproducible for everyone.
Dr. Ridgeway: The most important thing is to assess all 3 compartments and document the amount of prolapse of each compartment. A modified POP-Q is often adequate. To do this, perform a split speculum exam and use the hymen as the reference. Zero is at the hymen, +1 is 1 cm beyond the hyman. Covering the rectum, how much does the anterior compartment prolapse in reference to the hymen? Covering the anterior compartment, get an idea of what is happening posteriorly. And the crux of any decision in my mind is what is happening at the apex or to the uterus/cervix if it is still present. It is really important to document at least those 3 compartments.
Dr. Karram: I agree. The POP-Q is the ideal, but I don’t think generalists are motivated to use it. It is very important, though, to have some anatomic landmarks, as already mentioned by Dr. Ridgeway.
Choose a surgical approach based on the clinical situation
Dr. Gebhart: How do you choose the surgical approach for someone with prolapse?
Dr. Karram: Most surgeons do what they think they do best. I have spent the majority of my career operating through the vagina, and most of that involves native tissue repairs. I almost always will do a primary prolapse through the vagina and not consider augmentation except in rare circumstances. A recurrent prolapse, a prolapsed shortened vagina, scarring, or a situation that is not straightforward has to be individualized. My basic intervention initially is almost always vaginally with native tissue.
Dr. Ridgeway: For a primary prolapse repair, I also will almost always use native tissue repair as firstline. Whether that is with hysterectomy or without, most people in the long term do very well with that. At least 70% of my repairs are done with a native tissue approach.
For a woman who has a significant prolapse posthysterectomy, especially of the anterior wall or with recurrent prolapse, I offer a laparoscopic sacrocolpopexy. The only other time I offer that as a primary approach would be for a younger woman with very significant prolapse. In that case, I will review risks and benefits with the patient and, using shared decision-making, offer either a native tissue repair or a sacrocolpopexy. For that patient, no matter what you do, given that she has many years to live, the chances are that she will likely need a second intervention.
Dr. Gebhart: Mark, how do you choose an approach for prolapse?
Dr. Walters: I do things pretty much the way Dr. Karram and Dr. Ridgeway do. For women who have a primary prolapse, I usually take a vaginal approach, and for recurrences I frequently do sacrocolpopexy with mesh or I refer to one of my partners who does more laparoscopic or robotic sacrocolpopexy.
Whether the patient needs a hysterectomy or not is evolving. Traditionally, hysterectomy is almost always done at the first prolapse repair. That is being reassessed in the United States to match what is happening in some other countries. It is possible to do nice primary prolapse repair vaginally or laparoscopically and leave the uterus in, in selected women who desire that.
Continue to: Transvaginal prolapse repair: Mesh is no longer an option...
Transvaginal prolapse repair: Mesh is no longer an option
Dr. Gebhart: What led up to the US Food and Drug Administration’s (FDA) market removal of mesh for transvaginal repair of POP?
Dr. Ridgeway: To clarify, it was not a recall—a word that many people use—it was an order to stop producing and distributing surgical mesh intended for transvaginal repair of POP.1 There is a very long history. Transvaginal mesh was introduced with the goal of improving prolapse anatomic and subjective outcomes. Over the last 13 years or so, there were adverse events that led to FDA public health notifications. Consequently, these devices were reclassified, and now require additional testing prior to approval. The newest transvaginal mesh kits were studied.
These 522 studies were completed recently and needed to show superior outcomes because, historically, the risks associated with transvaginal mesh compared to those associated with native tissue repairs are higher: higher reoperation rates, higher rates of other complications, and very minimal improvements in subjective and objective outcomes. Data were presented to the FDA, and it was deemed that these mesh kits did not improve outcomes significantly compared with native tissue repairs.
Dr. Karram: Beri, you stated that very accurately. The pro-mesh advocates were taken back by the idea that the FDA made this recommendation without allowing the outcomes to be followed longer.
Dr. Gebhart: My understanding is that the FDA had a timeline where they had to do a report and the studies had not matured to that end point; thus, they had to go with the data they had even though the studies were not completed. I think they are requesting that they be completed.
Dr. Ridgeway: Additional data will be available, some through the 522 studies, others through randomized controlled trials in which patients were already enrolled and had surgery. As far as I know, I do not think that the decision will be reversed.
Continue to: Native tissue repair and failure risk...
Native tissue repair and failure risk
Dr. Gebhart: I hear a lot that native tissue repairs fail. Mickey, as you do a lot of vaginal surgery, what are your thoughts? Should you use augmentation of some sort because native tissue fails?
Dr. Karram: There is going to be a failure rate with whatever surgery you do. I think that the failure rate with native tissue is somewhat overstated. I think a lot of that dates back to some of the things that were being promoted by mesh advocates. Initially, there was a lot of cherry-picking of native tissue data in some of those studies to promote the idea that the recurrent prolapse rates were 40% to 80%. We certainly do not see that in our patient population.
Based on our 5-year data, we have a recurrence rate of about 15% and a reoperation rate of less than 10%. That is the best I can quote based on our data. We have not followed patients longer than 5 years.
I can’t do much better than that with an augmentation; even if I get another 5% or 10% better anatomic outcome, that will be at the expense of some erosions and other complications specific to the mesh. I do think that the native tissue failure rate being promoted by a lot of individuals is a higher failure rate than what we are seeing.
Dr. Gebhart: What do you think, Mark?
Dr. Walters: Large cohort studies both at your institution, Mayo Clinic, and ours at the Cleveland Clinic mirror what Dr. Karram said, in that we have a reoperation rate somewhere between 8% and 15%. Of course, we have some failures that are stage 2 failures where patients choose not to have another operation. In general, a 10% or 12% reoperation rate at 5 to 7 years is acceptable.
Native tissue repairs probably fail at the apex a little more than mesh sacrocolpopexy. Mesh sacrocolpopexy, depending on what else you do with that operation, may have more distal vaginal failures, rates like distal rectoceles and more de novo stress urinary incontinence than we probably get with native tissue. I get some failures of the apex with native tissue repairs, but I am okay with using sacrocolpopexy as the second-line therapy in those patients.
Hysteropexy technique and pros and cons
Dr. Gebhart: Is hysteropexy a fad, or is there something to this?
Dr. Ridgeway: I do not think it is a fad. Women do feel strongly about this, and we now have data supporting this choice: randomized controlled trials of hysterectomy and prolapse repair versus hysteropexy with comparable outcomes at the short and medium term.2
The outcomes are similar, but as we said, outcomes for all prolapse repair types are not perfect. We have recurrences with sacrocolpopexy, native tissue repair, and hysteropexy. We need more data on types of hysteropexy and long-term outcomes for uterine preservation.
Dr. Walters: We have been discussing what patients think of their uterus, and some patients have very strong opinions. Some prefer to have a hysterectomy because then they don’t need to worry about cancer or do screening for cancer, and they are very happy with that. Other women with the same kind of prolapse prefer not to have a hysterectomy because philosophically they think they are better off keeping their organs. Since satisfaction is an outcome, it is useful to know what the patient wants and what she thinks about the surgical procedure.
Dr. Gebhart: For hysteropexy, do the data show that suture or a mesh augment provide an advantage one way or the other? Do we know that yet?
Dr. Walters: No, there are not enough studies with suture. There are only a few very good studies with suture hysteropexy, and they are mostly sacrospinous suture hysteropexies. Only a few studies look at mesh hysteropexy (with the Uphold device that was put on hold), or with variations of uterosacral support using strips of mesh, mostly done in other countries.
A point I want to add, if native tissue repairs fail at the apex more, why don’t you just always do sacrocolpopexy? One reason is because it might have a little higher complication rate due to the abdominal access and the fact that you are putting mesh in. If you have, for example, a 4% complication rate with the mesh but you get a better cure rate, those things balance out, and the woman may not be that much better off because of the extra complications. You have to assess the pro and con with each patient to pick what is best for her—either a more durable repair with a mesh or a little safer repair with native tissue.
Continue to: Women feel very strongly about risk...
Dr. Ridgeway: Women feel very strongly about risk. Within the same clinic I will have similar patients, and I say, “Probably in the long term this one may last a little longer but the surgery takes longer and it has a little higher complication rate.” One patient will say, “I’m not worried about the risk, I want what’s going to last the longest,” whereas a very similar patient will say, “Why would anyone pick the higher-risk operation? I want the lower risk that probably will last a long time.”
Dr. Gebhart: Beri, who should not have a hysteropexy?
Dr. Ridgeway: The biggest factor would be someone who has ever had postmenopausal bleeding. From our data, we know that if they have even had a work-up with benign results, the risk of unanticipated pathology is high. I do not recommend hysteropexy for anyone who has had postmenopausal bleeding.
For a premenopausal woman who has irregular bleeding, I also do not recommend it, because you just do not know what that future will hold. If a patient has anatomic abnormalities like large fibroids, I would not recommend it either. I would like patients to have had standard cervical cancer screening without any abnormalities for about 10 years or so.
Dr. Gebhart: What about prior cervical dysplasia?
Dr. Ridgeway: If a patient had ASCUS or low-grade dysplasia decades ago, has been normal for at least 10 years, and is currently negative for human papillomavirus, I have no problem.
Dr. Gebhart: How about women at high genetic risk for cancer?
Dr. Ridgeway: If they are at high risk for endometrial cancer, I would not recommend hysteropexy. If they are going to need an oophorectomy and/or salpingectomy for risk reduction during prolapse treatment, I usually perform a hysterectomy.
Plan surgical steps and prepare for “what if’s”
Dr. Gebhart: What tips can you provide, either regarding the evaluation or something you do surgically, that are important in a transvaginal native tissue repair?
Dr. Karram: If you have a case of posthysterectomy apical prolapse, that you think is an indication for sacrocolpopexy, in reality these are very good candidates for either sacrospinous or uterosacral suspensions. I prefer a uterosacral suspension as I feel there is less distortion of the vaginal apex compared to a sacrospinous suspension.
Dr. Ridgeway: The most critical step is setting up the OR and positioning the patient. That sets up the case for success, preventing struggles during the case. I use a high lithotomy, with careful positioning of course, but I use candy cane stirrups so that I can have an instrument stand in front of me and not struggle during the case.
Dr. Walters: My tip for everyone who is doing native tissue surgery, whether it is high McCall colpopexy or uterosacral ligament suspension or sacrocolpopexy, would be to really learn well the anatomy of each operation, including how close the ureter is, where the risk for bleeding is, and where the risk for nerve damage is.
The complications for each of these surgeries are slightly different, but there is a small risk of kinking the ureter with both uterosacral ligament suspension and the McCall, so you should do a cystoscopy as part of that operation. If you do a sacrospinous ligament suspension, use an instrument that can get a stitch into a ligament—not too close to the ischial spine and not too close to the sacrum—to avoid the risk of damage to major nerves and blood vessels and to minimize buttock and leg pain.
Continue to: Another tip is to understand...
Dr. Karram: Another tip is to understand that you are going to have potential complications intraoperatively. Think through those presurgically. You do not want to start thinking about these things and making decisions as they are happening. For example, what if I do a uterosacral suspension and I don’t see efflux of urine from the ureter? What am I going to do, and how long am I going to wait before I intervene? If I do a sacrospinous and I start to see a lot of bleeding from that area, what am I going to do? My plan would be, “I will pack the area, get extra suction, etc.” Thinking these ideas through before they occur is very helpful.
Dr. Gebhart: That is critical, to have an algorithm or a scheme in your mind. You want to think through it before it occurs because you are not always thinking as clearly when things are not going well.
I would say get good at physical examination skills in the office, then have a plan for the OR based on what you see in the office. If what is going on with the prolapse is not completely investigated and other issues are not addressed, then failure results because you did not make the diagnosis. Certainly, modify the procedure according to what you find intraoperatively, but follow through.
Indications and tips for sacrocolpopexy
Dr. Gebhart: What are the indications for sacrocolpopexy?
Dr. Ridgeway: Indications include recurrent apical prolapse, posthysterectomy prolapse, or severe prolapse in someone quite young. It is a fantastic operation with overall low risks, but this needs to be discussed with the patient.
Dr. Walters: There are some unusual circumstances—for example, the woman has a short prolapsed vagina, usually after a prior surgery—in which the best repair is a bridging piece of mesh, usually done laparoscopically, because those operations cannot be done very well vaginally to obtain a durable result.
Dr. Karram: I agree. I do not think that all recurrent prolapses mandate a sacrocolpopexy. You need to individualize, but in general the short prolapsed vagina and patients who are very young are at high risk for a recurrence.
Dr. Gebhart: An older patient might be a very good candidate, even if she had recurrence from another vaginal repair.
Beri, does the patient with a high body mass index need augmentation?
Dr. Ridgeway: That is a great question, and this has to be individualized because, while heavier patients can benefit from augmentation, in a very heavy patient, getting into that abdomen has its own set of challenges. Anatomically they get a better repair with a mesh-augmented repair like a sacrocolpopexy, but they do have increased risks. That is important to acknowledge and clarify with the patient.
Dr. Gebhart: Any surgical tip you might offer on sacrocolpopexy?
Dr. Ridgeway: Perform the operation in the same way you would an open procedure. Meaning, use the same materials, the same sutures, the same placement, and the same type of dissection in order to obtain results similar to those with an open operation. Using your assistants to manipulate the vagina and rectum is important, as well as exposure and typical careful surgical technique.
Dr. Gebhart: What is important about the placement of sutures on the anterior longitudinal ligament, and what do you need to be cognizant of?
Dr. Ridgeway: Be careful of that left common iliac vein that is a little more medial than you would expect and of the middle sacral artery, and try to differentiate between L5 and S1. In an ideal circumstance, place the suture at S1 or L5 but not the inner disc space, which is the area to avoid placement.
Historically, the recommendation is S1. Some people do L5 because of some pull out strength studies, but also because it is easier, and sometimes in that area of the anterior longitudinal ligament is much better. The key is to do enough dissection and use haptic feedback, especially with conventional laparoscopy or an open approach, to avoid placing sutures through the disc space, as there is some concern that it increases the risk for discitis or osteomyelitis in that area.
Continue to: We also have found...
Dr. Gebhart: We also have found that if you have a combined surgery with colorectal colleagues, like a rectal prolapse repair, there is a little higher risk of discitis.
Dr. Ridgeway: In my own practice I saw a combined case with a rectopexy in someone who had a biologic mesh erosion. When we reviewed the literature, a number of reported cases of discitis had either an early post-op or concurrent urinary tract infection or vaginal infection that likely predisposed them to an infection that traveled up the material.
Dr. Karram: My final comment is that a sacrocolpopexy is not a few stitches or a little mesh right at the apex. If the patient has an isolated enterocele, okay, but it is a wide mesh for a reason and it should connect to the endopelvic fascia anteriorly, posteriorly. It is a mistake to suture just a little bit of the cuff and grab it and think, “I’ve done a colpopexy” when the procedure has not been executed as it should be.
Dr. Gebhart: I want to thank our expert panel and OBG M
Continue to: Some procedures call for cystoscopy...
Dr. Gebhart: Is cystoscopy necessary in patients undergoing native tissue repair or abdominal approaches to prolapse, and should the experienced generalist have this skill?
Dr. Walters: If you are going to do prolapse surgery or surgery for stress urinary incontinence, you need to learn to do cystoscopy. Almost all specialists in urogynecology and urology would do a cystoscopy at the time of a native tissue prolapse repair, a mesh-augmented prolapse repair, or a sling procedure. Whether a generalist doing simple hysterectomies needs to do cystoscopy is controversial, and it is probably based on risk assessment of the kind of hysterectomy being done. Definitely, if you are doing prolapse repair, you probably should be doing cystoscopy at the same time.
Dr. Karram: I would take it further. For certain procedures, cystoscopy is standard of care. For example, if you are doing anything around the uterosacral ligaments, whether a McCall culdoplasty or uterosacral suspension, it is standard of care. It would be a difficult medical-legal defense issue if it was not done in those cases.
To Mark’s point, it is controversial whether universal cystoscopy should be performed on every hysterectomy or every anterior to posterior repair. We are not there yet, but certainly it is in your best interest to have a very low threshold, so if you think about doing cystoscopy, you should probably do it.
Dr. Gebhart: Is cystoscopy needed in sacrocolpopexy?
Dr. Ridgeway: We know from our own data that the risk of lower urinary tract injury is very low with sacrocolpopexy. Having said that, I agree with the position statement of the American Urogynecologic Society that says, “Universal cystoscopy should be performed at the time of all pelvic reconstruction surgeries, with the exception of operations solely for posterior compartment defects.”1
Dr. Gebhart: The reality is that we just want to identify if there is a problem or not at the time of the surgery. It does not mean you have to manage it. You could get your partner, your urologist, or another person with expertise to come in to help you.
Dr. Ridgeway: Absolutely, because intraoperative identification and treatment will prevent many unfavorable outcomes in the postoperative period.
Reference
1. Cohen SA, Carberry CL, Smilen SW. American Urogynecologic Society Consensus Statement: cystoscopy at the time of prolapse repair. Female Pelvic Med Reconstr Surg. 2018;24:258-259.
Dr. Gebhart: If a patient is a smoker and/or utilizes tobacco and you think she is a candidate for a sacrocolpopexy, are there any special considerations? How would you counsel that patient?
Dr. Walters: The risk of mesh erosion is high enough that I would try to not do any mesh prolapse repair in a woman who was a smoker, especially a heavy smoker. A more common situation is, would I put a polypropylene midurethral sling in that patient? I usually am willing to do that because it is still the best option compared with the no-mesh options. In a patient who would be a good candidate for sacrocolpopexy, I can usually do a no-mesh surgery and keep the risk low. I could always give the woman an option to quit smoking, but that tends not to be successful.
Dr. Gebhart: What is the risk of using mesh in a smoker?
Dr. Walters: An increased risk of erosion through the vaginal walls. I am not sure of the magnitude of risk, maybe 2 or 3 times higher. That is high enough that I probably would not take the risk except in unusual circumstances.
Dr. Ridgeway: A good amount of data show increased risk of mesh exposure for smokers. Those patients also tend to have a higher risk of prolapse recurrence because of coughing. Sacrocolpopexy is not my favorite operation to do in a smoker. I will work with the patient to quit, but often if it is the right operation, I will do it, with preoperative estrogen and appropriate conseling.
Dr. Gebhart: Is there still a role for vaginal mesh? While it is no longer being sold in the United States, could you fashion your own mesh for a prolapse procedure?
Dr. Walters: I can do pretty much everything I need to do without adding transvaginal mesh, and if I need a meshaugmented repair, then I would go with the sacrocolpopexy route. Having said that, data for hysteropexy do show that a mesh-augmented hysteropexy could have some advantages, whether you do it with a kit or some fashioned pieces of mesh. Most of the experiences with this are outside of the United States, so we need much more standardization of technique and tracking to answer that question.
Dr. Gebhart: Mickey, what are your thoughts regarding someone who thinks, “Mesh has been good for me, I want to stay with that. I’m going to cut my own mesh”? Are they assuming some liability now that companies are no longer marketing mesh for vaginal repair?
Dr. Karram: Unfortunately, I really think they are. It would be easy to be put in a legal corner and asked, the FDA felt that this should be pulled off the market, why are you still utilizing it? At the end of the day, what the FDA said was not inaccurate.
The studies have not shown a significant better outcome with mesh, and it is an extra intervention that, again, in the best of hands is going to have some issues. That is a dilemma many surgeons faced because they felt that that was their main way of treating prolapse—”they took away my way of successfully treating patients for years.” I do think it increases their medical-legal liability.
Dr. Ridgeway: I agree that it does increase medical-legal liability, and I can’t imagine a situation in which I would offer that. Dr. Gebhart: There are risks with all procedures, including slings for stress incontinence, but sling use is appropriate in appropriately counseled patients.
Dr. Ridgeway: Correct. I feel very strongly that the risk profile for the midurethral sling is very different from that for transvaginal mesh. Very large data sets in large groups of people support that the outcomes are favorable and the risk profile is low. Having said that, slings are not risk free, but living with severe incontinence is not risk free either.
- US Food and Drug Administration. FDA takes action to protect women's health, orders manufacturers of surgical mesh intended for transvaginal repair of pelvic organ prolapse to stop selling all devices. https://www.fda.gov/news-events/press-announcements/fda-takes-action-protect-womens-health-orders-manufacturers-surgical-mesh-intended-transvaginal. April 16, 2019. Accessed January 14, 2020.
- Detollenaere RJ, den Boon J, Stekelenburg J, et al. Sacrospinous hysteropexy versus vaginal hysterectomy with suspension of the uterosacral ligaments in women with uterine prolapse stage 2 or higher: multicentre randomised non-inferiority trial. BMJ. 2015;351:h3717.

John B. Gebhart, MD, MS
Professor
Obstetrics and Gynecology
Mayo Clinic
Rochester, Minnesota

Mickey M. Karram, MD
Director of Urogynecology
The Christ Hospital
Volunteer Professor of Ob/Gyn
University of Cincinnati
Cincinnati, Ohio

Beri M. Ridgeway, MD
Department Chair, Regional Ob/Gyn
Cleveland Clinic
Associate Professor
Cleveland Clinic Lerner College of Medicine
Cleveland, Ohio

Mark D. Walters, MD
Professor
Department of Obstetrics and Gynecology
Cleveland Clinic
Dr. Walters reports receiving honoraria from UpToDate and Elsevier and being the website editor for IAPS and the Foundation for Female Health Awareness (FFHA). The other authors report no financial relationships relevant to this article.
John B. Gebhart, MD, MS
Professor
Obstetrics and Gynecology
Mayo Clinic
Rochester, Minnesota
Mickey M. Karram, MD
Director of Urogynecology
The Christ Hospital
Volunteer Professor of Ob/Gyn
University of Cincinnati
Cincinnati, Ohio
Beri M. Ridgeway, MD
Department Chair, Regional Ob/Gyn
Cleveland Clinic
Associate Professor
Cleveland Clinic Lerner College of Medicine
Cleveland, Ohio
Mark D. Walters, MD
Professor
Department of Obstetrics and Gynecology
Cleveland Clinic
Dr. Walters reports receiving honoraria from UpToDate and Elsevier and being the website editor for IAPS and the Foundation for Female Health Awareness (FFHA). The other authors report no financial relationships relevant to this article.
A number of presentations at the 2019 Pelvic Anatomy and Gynecologic Surgery (PAGS) Symposium (Las Vegas, Nevada, December 12-14, 2019) focused on pelvic organ prolapse (POP) repair, including anatomic considerations, the evolution of surgical procedures, and transvaginal repair. OBG M
Nonsurgical approaches for POP: A good option for the right patient
John B. Gebhart, MD, MS: What are the nonsurgical options for POP?
Mark D. Walters, MD: Women who have prolapse could, of course, choose to continue to live with the prolapse. If they desire treatment, however, the main nonsurgical option is a combination of pessary use, possibly with some estrogen, and possibly with pelvic muscle exercises. Women who have a well-fitting pessary can be managed satisfactorily for years. If possible, women should be taught to take the pessary in and out on a regular basis to minimize their long-term complications.
Dr. Gebhart: How can nonsurgical treatment options be maximized?
Beri M. Ridgeway, MD: It depends on patient commitment. This is important to assess at the first visit when you are making management decisions, because if someone is not going to attend physical therapy or not going to continue to do the exercises, the expectation for the outcome is not going to be great.
Also, if a patient feels very uncomfortable using a pessary and really does not want it, I am fine proceeding with surgery as a first-line treatment. If the patient is committed, the ideal is to educate her and connect her with the right people, either a pelvic floor physical therapist or someone in your office who will encourage her and manage pessary use.
Dr. Gebhart: It goes back to assessing patient goals and expectations.
Mickey M. Karram, MD: If you have a patient who is a good candidate for a pessary—say she has a well-supported distal vagina and maybe a cervical prolapse or an apical prolapse—and you can fit a small pessary that will sit in the upper vagina in a comfortable fashion, it is worthwhile to explain to the patient that she is a really good candidate for this option. By contrast, someone who has a wide genital hiatus and a large rectocele will not have good success with a pessary.
Dr. Gebhart: That is important: Choose your nonsurgical patients well, those who will respond to therapy and maybe not get frustrated with it.
Dr. Walters: A problem I see is that some people are good at fitting a pessary, but they do not teach how to use it very well. When I see the patient back, she says, “What’s my long term on the pessary?” I say, “If we teach you to take it in and out, you are less likely to have any problems with it, and then you can manage it for years that way. Otherwise, you have to keep visiting a practitioner to change it and that is not necessarily a good long-term option.” At the very first visit, I teach them what a pessary is, its purpose, and how to maintain it themselves. I think that gives patients the best chance for long-term satisfaction.
Dr. Gebhart: Surgery is always an option if pessary management is not satisfactory.
Dr. Ridgeway: I also tell patients, especially those uncertain about using a pessary, “Worst case, you spend a little time to figure this out, but if it works, you can avoid surgery. If it doesn’t—the risks are very low and you perhaps wasted some time—but at least you’ll know you tried the conservative management.”
Dr. Gebhart: Mickey made an excellent point earlier that it can be a diagnostic treatment strategy as well.
Dr. Karram: If you are concerned about the prolapse worsening or negatively impacting a functional problem related to the bladder or bowel, it is good to place a pessary for a short period of time. This can potentially give you an idea of how your surgery will impact a patient’s bladder or bowel function.
Continue to: Decisions to make before choosing a surgical approach...
Decisions to make before choosing a surgical approach
Dr. Gebhart: Would you elaborate on the surgical options for managing POP?
Dr. Walters: For women with prolapse who decide they want to have surgery, the woman and the surgeon need to make a number of decisions. Some of these include whether the uterus, if present, needs to be removed; whether the woman would like to maintain sexual function or not; whether the repair would best be done vaginally only with native tissue suturing, vaginally with some augmentation (although that is not likely in the United States at this time), or through the abdomen, usually laparoscopically or robotically with a mesh-augmented sacrocolpopexy repair.
Also, we must decide whether to do additional cystocele and rectocele repairs and whether to add slings for stress incontinence, which can coexist or could develop after the prolapse repair. A lot of different decisions need to be made when choosing a prolapse repair for different women.
Dr. Ridgeway: It is shared decision-making with the patient. You need to understand her goals, the degree of prolapse, whether she has contraindications to uterine preservation, and how much risk she is willing to take.
Fundamentals of the clinical evaluation
Dr. Gebhart: For a woman who wants to manage her prolapse surgically, let us consider some fundamentals of clinical diagnosis. Take me through your office evaluation of the patient reporting prolapse symptoms—her history, yes, but from a physical exam standpoint, what is important?
Dr. Karram: You want to know if this is a primary prolapse or recurrent prolapse. You want to distinguish the various segments of the pelvic floor that are prolapsing and try to quantitate that in whatever way you would like. A standardized quantification system is useful, but you should have a system within your practice that you can standardize. Then, determine if there are coexisting functional derangements and how those are being impacted by the prolapse, because that is very important.
Take a good history, and identify how badly the prolapse bothers the patient and affects her quality of life. Understand how much she is willing to do about it. Does she just want to know what it is and has no interest in a surgical intervention, versus something she definitely wants to get corrected? Then do whatever potential testing around the bladder, and bowel, based on any functional derangements and finally determine interest in maintaining sexual function. Once all this information is obtained, a detailed discussion of surgical options can be undertaken.
Dr. Gebhart: What are your clinical pearls for a patient who has prolapse and does not describe any incontinence, voiding dysfunction, or defecatory symptoms? Do we need imaging testing of any sort or is the physical exam adequate for assessing prolapse?
Dr. Walters: When you do the standardized examination of the prolapse, it is important to measure how much prolapse affects the anterior wall of the apex and/or cervix and the posterior wall. Then note that in your notes and plan your surgery accordingly.
It is useful to have the patient fully bear down and then make your measurements; then, especially if she has a full bladder, have her cough while you hold up the prolapse with a speculum or your hand to see if she has stress urinary incontinence.
Continue to: I agree that to diagnose prolapse...
Dr. Ridgeway: I agree that to diagnose prolapse, it is physical exam alone. I would not recommend any significant testing other than testing for the potential for stress incontinence.
Dr. Gebhart: Is it necessary to use the POP-Q (Pelvic Organ Prolapse Quantification system) in a nonacademic private practice setting? Or are other systems, like a Baden-Walker scoring system, adequate in the everyday practice of the experienced generalist?
Dr. Walters: The Baden-Walker system actually is adequate for use in everyday practice. However, Baden-Walker is an outdated measurement system that really is not taught anymore. I think that as older physicians finish and newer doctors come in, no one will even know what Baden-Walker is.
It is better to go ahead and start learning the POP-Q system. Everyone has electronic charts now and if you learn to use the POP-Q, you can do it very quickly and get a grading system for your chart that is reproducible for everyone.
Dr. Ridgeway: The most important thing is to assess all 3 compartments and document the amount of prolapse of each compartment. A modified POP-Q is often adequate. To do this, perform a split speculum exam and use the hymen as the reference. Zero is at the hymen, +1 is 1 cm beyond the hyman. Covering the rectum, how much does the anterior compartment prolapse in reference to the hymen? Covering the anterior compartment, get an idea of what is happening posteriorly. And the crux of any decision in my mind is what is happening at the apex or to the uterus/cervix if it is still present. It is really important to document at least those 3 compartments.
Dr. Karram: I agree. The POP-Q is the ideal, but I don’t think generalists are motivated to use it. It is very important, though, to have some anatomic landmarks, as already mentioned by Dr. Ridgeway.
Choose a surgical approach based on the clinical situation
Dr. Gebhart: How do you choose the surgical approach for someone with prolapse?
Dr. Karram: Most surgeons do what they think they do best. I have spent the majority of my career operating through the vagina, and most of that involves native tissue repairs. I almost always will do a primary prolapse through the vagina and not consider augmentation except in rare circumstances. A recurrent prolapse, a prolapsed shortened vagina, scarring, or a situation that is not straightforward has to be individualized. My basic intervention initially is almost always vaginally with native tissue.
Dr. Ridgeway: For a primary prolapse repair, I also will almost always use native tissue repair as firstline. Whether that is with hysterectomy or without, most people in the long term do very well with that. At least 70% of my repairs are done with a native tissue approach.
For a woman who has a significant prolapse posthysterectomy, especially of the anterior wall or with recurrent prolapse, I offer a laparoscopic sacrocolpopexy. The only other time I offer that as a primary approach would be for a younger woman with very significant prolapse. In that case, I will review risks and benefits with the patient and, using shared decision-making, offer either a native tissue repair or a sacrocolpopexy. For that patient, no matter what you do, given that she has many years to live, the chances are that she will likely need a second intervention.
Dr. Gebhart: Mark, how do you choose an approach for prolapse?
Dr. Walters: I do things pretty much the way Dr. Karram and Dr. Ridgeway do. For women who have a primary prolapse, I usually take a vaginal approach, and for recurrences I frequently do sacrocolpopexy with mesh or I refer to one of my partners who does more laparoscopic or robotic sacrocolpopexy.
Whether the patient needs a hysterectomy or not is evolving. Traditionally, hysterectomy is almost always done at the first prolapse repair. That is being reassessed in the United States to match what is happening in some other countries. It is possible to do nice primary prolapse repair vaginally or laparoscopically and leave the uterus in, in selected women who desire that.
Continue to: Transvaginal prolapse repair: Mesh is no longer an option...
Transvaginal prolapse repair: Mesh is no longer an option
Dr. Gebhart: What led up to the US Food and Drug Administration’s (FDA) market removal of mesh for transvaginal repair of POP?
Dr. Ridgeway: To clarify, it was not a recall—a word that many people use—it was an order to stop producing and distributing surgical mesh intended for transvaginal repair of POP.1 There is a very long history. Transvaginal mesh was introduced with the goal of improving prolapse anatomic and subjective outcomes. Over the last 13 years or so, there were adverse events that led to FDA public health notifications. Consequently, these devices were reclassified, and now require additional testing prior to approval. The newest transvaginal mesh kits were studied.
These 522 studies were completed recently and needed to show superior outcomes because, historically, the risks associated with transvaginal mesh compared to those associated with native tissue repairs are higher: higher reoperation rates, higher rates of other complications, and very minimal improvements in subjective and objective outcomes. Data were presented to the FDA, and it was deemed that these mesh kits did not improve outcomes significantly compared with native tissue repairs.
Dr. Karram: Beri, you stated that very accurately. The pro-mesh advocates were taken back by the idea that the FDA made this recommendation without allowing the outcomes to be followed longer.
Dr. Gebhart: My understanding is that the FDA had a timeline where they had to do a report and the studies had not matured to that end point; thus, they had to go with the data they had even though the studies were not completed. I think they are requesting that they be completed.
Dr. Ridgeway: Additional data will be available, some through the 522 studies, others through randomized controlled trials in which patients were already enrolled and had surgery. As far as I know, I do not think that the decision will be reversed.
Continue to: Native tissue repair and failure risk...
Native tissue repair and failure risk
Dr. Gebhart: I hear a lot that native tissue repairs fail. Mickey, as you do a lot of vaginal surgery, what are your thoughts? Should you use augmentation of some sort because native tissue fails?
Dr. Karram: There is going to be a failure rate with whatever surgery you do. I think that the failure rate with native tissue is somewhat overstated. I think a lot of that dates back to some of the things that were being promoted by mesh advocates. Initially, there was a lot of cherry-picking of native tissue data in some of those studies to promote the idea that the recurrent prolapse rates were 40% to 80%. We certainly do not see that in our patient population.
Based on our 5-year data, we have a recurrence rate of about 15% and a reoperation rate of less than 10%. That is the best I can quote based on our data. We have not followed patients longer than 5 years.
I can’t do much better than that with an augmentation; even if I get another 5% or 10% better anatomic outcome, that will be at the expense of some erosions and other complications specific to the mesh. I do think that the native tissue failure rate being promoted by a lot of individuals is a higher failure rate than what we are seeing.
Dr. Gebhart: What do you think, Mark?
Dr. Walters: Large cohort studies both at your institution, Mayo Clinic, and ours at the Cleveland Clinic mirror what Dr. Karram said, in that we have a reoperation rate somewhere between 8% and 15%. Of course, we have some failures that are stage 2 failures where patients choose not to have another operation. In general, a 10% or 12% reoperation rate at 5 to 7 years is acceptable.
Native tissue repairs probably fail at the apex a little more than mesh sacrocolpopexy. Mesh sacrocolpopexy, depending on what else you do with that operation, may have more distal vaginal failures, rates like distal rectoceles and more de novo stress urinary incontinence than we probably get with native tissue. I get some failures of the apex with native tissue repairs, but I am okay with using sacrocolpopexy as the second-line therapy in those patients.
Hysteropexy technique and pros and cons
Dr. Gebhart: Is hysteropexy a fad, or is there something to this?
Dr. Ridgeway: I do not think it is a fad. Women do feel strongly about this, and we now have data supporting this choice: randomized controlled trials of hysterectomy and prolapse repair versus hysteropexy with comparable outcomes at the short and medium term.2
The outcomes are similar, but as we said, outcomes for all prolapse repair types are not perfect. We have recurrences with sacrocolpopexy, native tissue repair, and hysteropexy. We need more data on types of hysteropexy and long-term outcomes for uterine preservation.
Dr. Walters: We have been discussing what patients think of their uterus, and some patients have very strong opinions. Some prefer to have a hysterectomy because then they don’t need to worry about cancer or do screening for cancer, and they are very happy with that. Other women with the same kind of prolapse prefer not to have a hysterectomy because philosophically they think they are better off keeping their organs. Since satisfaction is an outcome, it is useful to know what the patient wants and what she thinks about the surgical procedure.
Dr. Gebhart: For hysteropexy, do the data show that suture or a mesh augment provide an advantage one way or the other? Do we know that yet?
Dr. Walters: No, there are not enough studies with suture. There are only a few very good studies with suture hysteropexy, and they are mostly sacrospinous suture hysteropexies. Only a few studies look at mesh hysteropexy (with the Uphold device that was put on hold), or with variations of uterosacral support using strips of mesh, mostly done in other countries.
A point I want to add, if native tissue repairs fail at the apex more, why don’t you just always do sacrocolpopexy? One reason is because it might have a little higher complication rate due to the abdominal access and the fact that you are putting mesh in. If you have, for example, a 4% complication rate with the mesh but you get a better cure rate, those things balance out, and the woman may not be that much better off because of the extra complications. You have to assess the pro and con with each patient to pick what is best for her—either a more durable repair with a mesh or a little safer repair with native tissue.
Continue to: Women feel very strongly about risk...
Dr. Ridgeway: Women feel very strongly about risk. Within the same clinic I will have similar patients, and I say, “Probably in the long term this one may last a little longer but the surgery takes longer and it has a little higher complication rate.” One patient will say, “I’m not worried about the risk, I want what’s going to last the longest,” whereas a very similar patient will say, “Why would anyone pick the higher-risk operation? I want the lower risk that probably will last a long time.”
Dr. Gebhart: Beri, who should not have a hysteropexy?
Dr. Ridgeway: The biggest factor would be someone who has ever had postmenopausal bleeding. From our data, we know that if they have even had a work-up with benign results, the risk of unanticipated pathology is high. I do not recommend hysteropexy for anyone who has had postmenopausal bleeding.
For a premenopausal woman who has irregular bleeding, I also do not recommend it, because you just do not know what that future will hold. If a patient has anatomic abnormalities like large fibroids, I would not recommend it either. I would like patients to have had standard cervical cancer screening without any abnormalities for about 10 years or so.
Dr. Gebhart: What about prior cervical dysplasia?
Dr. Ridgeway: If a patient had ASCUS or low-grade dysplasia decades ago, has been normal for at least 10 years, and is currently negative for human papillomavirus, I have no problem.
Dr. Gebhart: How about women at high genetic risk for cancer?
Dr. Ridgeway: If they are at high risk for endometrial cancer, I would not recommend hysteropexy. If they are going to need an oophorectomy and/or salpingectomy for risk reduction during prolapse treatment, I usually perform a hysterectomy.
Plan surgical steps and prepare for “what if’s”
Dr. Gebhart: What tips can you provide, either regarding the evaluation or something you do surgically, that are important in a transvaginal native tissue repair?
Dr. Karram: If you have a case of posthysterectomy apical prolapse, that you think is an indication for sacrocolpopexy, in reality these are very good candidates for either sacrospinous or uterosacral suspensions. I prefer a uterosacral suspension as I feel there is less distortion of the vaginal apex compared to a sacrospinous suspension.
Dr. Ridgeway: The most critical step is setting up the OR and positioning the patient. That sets up the case for success, preventing struggles during the case. I use a high lithotomy, with careful positioning of course, but I use candy cane stirrups so that I can have an instrument stand in front of me and not struggle during the case.
Dr. Walters: My tip for everyone who is doing native tissue surgery, whether it is high McCall colpopexy or uterosacral ligament suspension or sacrocolpopexy, would be to really learn well the anatomy of each operation, including how close the ureter is, where the risk for bleeding is, and where the risk for nerve damage is.
The complications for each of these surgeries are slightly different, but there is a small risk of kinking the ureter with both uterosacral ligament suspension and the McCall, so you should do a cystoscopy as part of that operation. If you do a sacrospinous ligament suspension, use an instrument that can get a stitch into a ligament—not too close to the ischial spine and not too close to the sacrum—to avoid the risk of damage to major nerves and blood vessels and to minimize buttock and leg pain.
Continue to: Another tip is to understand...
Dr. Karram: Another tip is to understand that you are going to have potential complications intraoperatively. Think through those presurgically. You do not want to start thinking about these things and making decisions as they are happening. For example, what if I do a uterosacral suspension and I don’t see efflux of urine from the ureter? What am I going to do, and how long am I going to wait before I intervene? If I do a sacrospinous and I start to see a lot of bleeding from that area, what am I going to do? My plan would be, “I will pack the area, get extra suction, etc.” Thinking these ideas through before they occur is very helpful.
Dr. Gebhart: That is critical, to have an algorithm or a scheme in your mind. You want to think through it before it occurs because you are not always thinking as clearly when things are not going well.
I would say get good at physical examination skills in the office, then have a plan for the OR based on what you see in the office. If what is going on with the prolapse is not completely investigated and other issues are not addressed, then failure results because you did not make the diagnosis. Certainly, modify the procedure according to what you find intraoperatively, but follow through.
Indications and tips for sacrocolpopexy
Dr. Gebhart: What are the indications for sacrocolpopexy?
Dr. Ridgeway: Indications include recurrent apical prolapse, posthysterectomy prolapse, or severe prolapse in someone quite young. It is a fantastic operation with overall low risks, but this needs to be discussed with the patient.
Dr. Walters: There are some unusual circumstances—for example, the woman has a short prolapsed vagina, usually after a prior surgery—in which the best repair is a bridging piece of mesh, usually done laparoscopically, because those operations cannot be done very well vaginally to obtain a durable result.
Dr. Karram: I agree. I do not think that all recurrent prolapses mandate a sacrocolpopexy. You need to individualize, but in general the short prolapsed vagina and patients who are very young are at high risk for a recurrence.
Dr. Gebhart: An older patient might be a very good candidate, even if she had recurrence from another vaginal repair.
Beri, does the patient with a high body mass index need augmentation?
Dr. Ridgeway: That is a great question, and this has to be individualized because, while heavier patients can benefit from augmentation, in a very heavy patient, getting into that abdomen has its own set of challenges. Anatomically they get a better repair with a mesh-augmented repair like a sacrocolpopexy, but they do have increased risks. That is important to acknowledge and clarify with the patient.
Dr. Gebhart: Any surgical tip you might offer on sacrocolpopexy?
Dr. Ridgeway: Perform the operation in the same way you would an open procedure. Meaning, use the same materials, the same sutures, the same placement, and the same type of dissection in order to obtain results similar to those with an open operation. Using your assistants to manipulate the vagina and rectum is important, as well as exposure and typical careful surgical technique.
Dr. Gebhart: What is important about the placement of sutures on the anterior longitudinal ligament, and what do you need to be cognizant of?
Dr. Ridgeway: Be careful of that left common iliac vein that is a little more medial than you would expect and of the middle sacral artery, and try to differentiate between L5 and S1. In an ideal circumstance, place the suture at S1 or L5 but not the inner disc space, which is the area to avoid placement.
Historically, the recommendation is S1. Some people do L5 because of some pull out strength studies, but also because it is easier, and sometimes in that area of the anterior longitudinal ligament is much better. The key is to do enough dissection and use haptic feedback, especially with conventional laparoscopy or an open approach, to avoid placing sutures through the disc space, as there is some concern that it increases the risk for discitis or osteomyelitis in that area.
Continue to: We also have found...
Dr. Gebhart: We also have found that if you have a combined surgery with colorectal colleagues, like a rectal prolapse repair, there is a little higher risk of discitis.
Dr. Ridgeway: In my own practice I saw a combined case with a rectopexy in someone who had a biologic mesh erosion. When we reviewed the literature, a number of reported cases of discitis had either an early post-op or concurrent urinary tract infection or vaginal infection that likely predisposed them to an infection that traveled up the material.
Dr. Karram: My final comment is that a sacrocolpopexy is not a few stitches or a little mesh right at the apex. If the patient has an isolated enterocele, okay, but it is a wide mesh for a reason and it should connect to the endopelvic fascia anteriorly, posteriorly. It is a mistake to suture just a little bit of the cuff and grab it and think, “I’ve done a colpopexy” when the procedure has not been executed as it should be.
Dr. Gebhart: I want to thank our expert panel and OBG M
Continue to: Some procedures call for cystoscopy...
Dr. Gebhart: Is cystoscopy necessary in patients undergoing native tissue repair or abdominal approaches to prolapse, and should the experienced generalist have this skill?
Dr. Walters: If you are going to do prolapse surgery or surgery for stress urinary incontinence, you need to learn to do cystoscopy. Almost all specialists in urogynecology and urology would do a cystoscopy at the time of a native tissue prolapse repair, a mesh-augmented prolapse repair, or a sling procedure. Whether a generalist doing simple hysterectomies needs to do cystoscopy is controversial, and it is probably based on risk assessment of the kind of hysterectomy being done. Definitely, if you are doing prolapse repair, you probably should be doing cystoscopy at the same time.
Dr. Karram: I would take it further. For certain procedures, cystoscopy is standard of care. For example, if you are doing anything around the uterosacral ligaments, whether a McCall culdoplasty or uterosacral suspension, it is standard of care. It would be a difficult medical-legal defense issue if it was not done in those cases.
To Mark’s point, it is controversial whether universal cystoscopy should be performed on every hysterectomy or every anterior to posterior repair. We are not there yet, but certainly it is in your best interest to have a very low threshold, so if you think about doing cystoscopy, you should probably do it.
Dr. Gebhart: Is cystoscopy needed in sacrocolpopexy?
Dr. Ridgeway: We know from our own data that the risk of lower urinary tract injury is very low with sacrocolpopexy. Having said that, I agree with the position statement of the American Urogynecologic Society that says, “Universal cystoscopy should be performed at the time of all pelvic reconstruction surgeries, with the exception of operations solely for posterior compartment defects.”1
Dr. Gebhart: The reality is that we just want to identify if there is a problem or not at the time of the surgery. It does not mean you have to manage it. You could get your partner, your urologist, or another person with expertise to come in to help you.
Dr. Ridgeway: Absolutely, because intraoperative identification and treatment will prevent many unfavorable outcomes in the postoperative period.
Reference
1. Cohen SA, Carberry CL, Smilen SW. American Urogynecologic Society Consensus Statement: cystoscopy at the time of prolapse repair. Female Pelvic Med Reconstr Surg. 2018;24:258-259.
Dr. Gebhart: If a patient is a smoker and/or utilizes tobacco and you think she is a candidate for a sacrocolpopexy, are there any special considerations? How would you counsel that patient?
Dr. Walters: The risk of mesh erosion is high enough that I would try to not do any mesh prolapse repair in a woman who was a smoker, especially a heavy smoker. A more common situation is, would I put a polypropylene midurethral sling in that patient? I usually am willing to do that because it is still the best option compared with the no-mesh options. In a patient who would be a good candidate for sacrocolpopexy, I can usually do a no-mesh surgery and keep the risk low. I could always give the woman an option to quit smoking, but that tends not to be successful.
Dr. Gebhart: What is the risk of using mesh in a smoker?
Dr. Walters: An increased risk of erosion through the vaginal walls. I am not sure of the magnitude of risk, maybe 2 or 3 times higher. That is high enough that I probably would not take the risk except in unusual circumstances.
Dr. Ridgeway: A good amount of data show increased risk of mesh exposure for smokers. Those patients also tend to have a higher risk of prolapse recurrence because of coughing. Sacrocolpopexy is not my favorite operation to do in a smoker. I will work with the patient to quit, but often if it is the right operation, I will do it, with preoperative estrogen and appropriate conseling.
Dr. Gebhart: Is there still a role for vaginal mesh? While it is no longer being sold in the United States, could you fashion your own mesh for a prolapse procedure?
Dr. Walters: I can do pretty much everything I need to do without adding transvaginal mesh, and if I need a meshaugmented repair, then I would go with the sacrocolpopexy route. Having said that, data for hysteropexy do show that a mesh-augmented hysteropexy could have some advantages, whether you do it with a kit or some fashioned pieces of mesh. Most of the experiences with this are outside of the United States, so we need much more standardization of technique and tracking to answer that question.
Dr. Gebhart: Mickey, what are your thoughts regarding someone who thinks, “Mesh has been good for me, I want to stay with that. I’m going to cut my own mesh”? Are they assuming some liability now that companies are no longer marketing mesh for vaginal repair?
Dr. Karram: Unfortunately, I really think they are. It would be easy to be put in a legal corner and asked, the FDA felt that this should be pulled off the market, why are you still utilizing it? At the end of the day, what the FDA said was not inaccurate.
The studies have not shown a significant better outcome with mesh, and it is an extra intervention that, again, in the best of hands is going to have some issues. That is a dilemma many surgeons faced because they felt that that was their main way of treating prolapse—”they took away my way of successfully treating patients for years.” I do think it increases their medical-legal liability.
Dr. Ridgeway: I agree that it does increase medical-legal liability, and I can’t imagine a situation in which I would offer that. Dr. Gebhart: There are risks with all procedures, including slings for stress incontinence, but sling use is appropriate in appropriately counseled patients.
Dr. Ridgeway: Correct. I feel very strongly that the risk profile for the midurethral sling is very different from that for transvaginal mesh. Very large data sets in large groups of people support that the outcomes are favorable and the risk profile is low. Having said that, slings are not risk free, but living with severe incontinence is not risk free either.
- US Food and Drug Administration. FDA takes action to protect women's health, orders manufacturers of surgical mesh intended for transvaginal repair of pelvic organ prolapse to stop selling all devices. https://www.fda.gov/news-events/press-announcements/fda-takes-action-protect-womens-health-orders-manufacturers-surgical-mesh-intended-transvaginal. April 16, 2019. Accessed January 14, 2020.
- Detollenaere RJ, den Boon J, Stekelenburg J, et al. Sacrospinous hysteropexy versus vaginal hysterectomy with suspension of the uterosacral ligaments in women with uterine prolapse stage 2 or higher: multicentre randomised non-inferiority trial. BMJ. 2015;351:h3717.
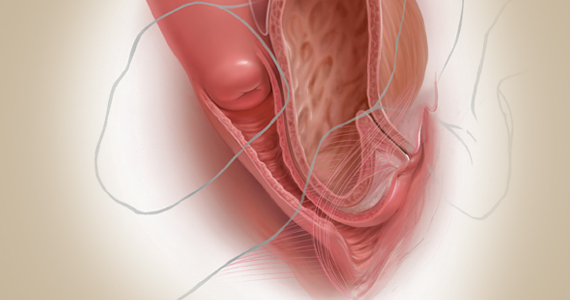
Native tissue repair of POP: Apical suspension, anterior repair, and posterior repair


Videos courtesy of Mayo Clinic
Read the related article: Native tissue repair of POP: Surgical techniques to improve outcomes
Videos courtesy of Mayo Clinic
Read the related article: Native tissue repair of POP: Surgical techniques to improve outcomes
Videos courtesy of Mayo Clinic
Read the related article: Native tissue repair of POP: Surgical techniques to improve outcomes
Native tissue repair of POP: Surgical techniques to improve outcomes
“Take pride in your surgical work. Do it in such a way that you would be willing to sign your name to it…the operation was performed by me.”
—Raymond A. Lee, MD
The US Food and Drug Administration (FDA) recently ordered companies to cease selling transvaginal mesh intended for pelvic organ prolapse (POP) repair (but not for the treatment of stress urinary incontinence [SUI] or for abdominal sacrocolpopexy).1,2 The FDA is also requiring companies preparing premarket approval applications for mesh products for the treatment of transvaginal POP to continue safety and efficacy follow-up in existing section 522 postmarket surveillance studies.3
It is, therefore, incumbent upon gynecologic surgeons to understand the surgical options that remain and perfect their surgical approach to POP to optimize patient outcomes. POP may be performed transvaginally or transabdominally, with each approach offering its own set of risks and benefits. The ability to perform both effectively allows the surgeon to tailor the approach to the condition and circumstances encountered. It is also important to realize that “cures” are elusive in POP surgery. While we can frequently alleviate patient symptoms and improve quality of life, a lifelong “cure” is an unrealistic goal for most prolapse procedures.
This article focuses on transvaginal native tissue repair,4 specifically the Mayo approach.
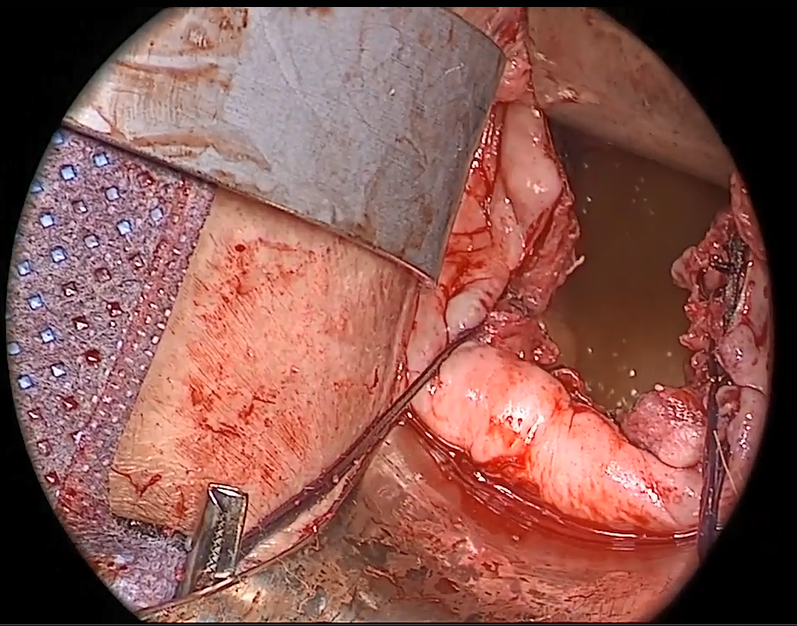
Watch video here
Vaginal surgery fundamentals
Before we explore the details of the Mayo technique, let’s review some basic principles of vaginal surgery. First, it is important to make a good clinical diagnosis so that you know which compartments (apex, anterior, or posterior) are involved. Although single compartment defects exist, multicompartment defects are far more common. Failing to recognize all compartment defects often results in incomplete repair, which can mean recurrent prolapse and additional interventions.
Second, exposure is critical when performing surgery by any route. You must be able to see your surgical field completely in order to properly execute your surgical approach. Table height, lighting, and retraction are all important to surgical success.
Lastly, it is important to know how to effectively execute your intended procedure. Native tissue repair is often criticized for having a high failure rate. It makes sense that mesh augmentation offers greater durability of a repair, but an effective native tissue repair will also effectively treat the majority of patients. An ineffective repair does not benefit the patient and contributes to high failure rates.
- Mesh slings for urinary incontinence and mesh use in sacrocolpopexy have not been banned by the FDA.
- Apical support is helpful to all other compartment support.
- Fixing the fascial defect between the base of the bladder and the apex will improve your anterior compartment outcomes.
- Monitor vaginal caliber throughout your posterior compartment repair.
Vaginal apex repairs
Data from the OPTIMAL trial suggest that uterosacral ligament suspension and sacrospinous ligament fixation are equally effective in treating apical prolapse.5 Our preference is a McCall culdoplasty (uterosacral ligament plication). It allows direct visualization (internally or externally) to place apical support stitches and plicates the ligaments in the midline of the vaginal cuff to help prevent enterocele protrusion. DeLancey has described the levels of support in the female pelvis and places importance on apical support.6 Keep in mind that anterior and posterior compartment prolapse is often accompanied by apical prolapse. Therefore, treating the apex is critical for overall success.
External vs internal McCall sutures: My technique. Envision the open vaginal cuff after completing a vaginal hysterectomy or after opening the vaginal cuff for a posthysterectomy vaginal vault prolapse (FIGURE 1). External (suture placed through the vaginal cuff epithelium into the peritoneal cavity, incorporating the uterosacral ligaments and intervening peritoneum, and ultimately brought back out through the posterior cuff and tied) or internal (suture placed in the intraperitoneal space, incorporating the uterosacral ligaments and intervening peritoneum, and tied internally) McCall sutures can be utilized (FIGURE 2). I prefer a combination of both. I use 0-polyglactin for external sutures, as the sutures will ultimately dissolve and not remain in the vaginal cavity. I usually place at least 2 external sutures with the lowest suture on the vaginal cuff being the deepest uterosacral stitch. Each subsequent suture is placed closer to the vaginal cuff and closer to the ends of the ligamentous stumps, starting deepest and working back toward the cuff with each stitch. I place 1 or 2 internal sutures (delayed absorbable or permanent) between my 2 external sutures. Because these sutures will be tied internally and located in the intraperitoneal space, permanent sutures may be used.
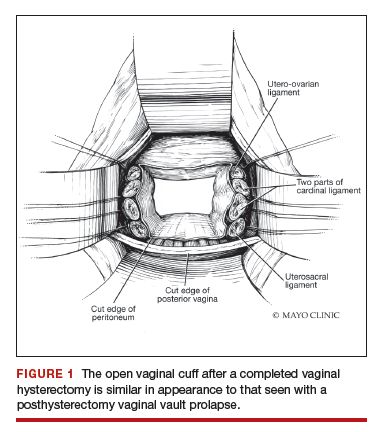
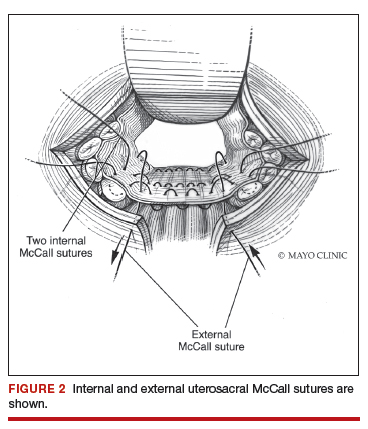
Avoiding ureteral injury: Tips for cystoscopy. A known risk of performing uterosacral ligament stitches is kinking or injury to the ureter. Therefore, cystoscopy is mandatory when performing this procedure. I tie one suture at a time starting with the internal sutures. I then perform cystoscopy after each suture tying. If I do not get ureteral spill after tying the suture, I remove and replace the suture and repeat cystoscopy until normal bilateral ureteral spill is achieved.
Key points for uterosacral ligament suspension. Achieving apical support at this point gives me the ability to build my anterior and posterior repair procedures off of this support. It is critical when performing uterosacral ligament suspension that you define the space between the ureter and rectum on each side. (Elevation of the cardinal pedicle and medial retraction of the rectum facilitate this.) The ligament runs down toward the sacrum when the patient is supine. You must follow that trajectory to be successful and avoid injury. One must also be careful not to be too deep on the ligament, as plication at that level may cause defecatory dysfunction.
Continue to: Anterior compartment repairs...
Anterior compartment repairs
The anterior compartment seems the most susceptible to forces within the pelvis and is a common site of prolapse. Many theories exist as to what causes a cystocele—distension, displacement, detachment, etc. While paravaginal defects exist, I believe that most cystoceles arise horizontally at the base of the bladder as the anterior endopelvic fascia detaches from the apex or cervix. The tissue then attenuates as the hernia progresses.
For surgical success: Make certain your repair addresses re-establishing continuity of the anterior endopelvic fascia with the fascia and ligaments at the vaginal apex; it will increase your success in treating anterior compartment prolapse.
We prefer to mobilize the epithelium in the midline from the vaginal apex to the mid‑urethra (if performing a midurethral sling, we stop short of the bladder neck and perform a separate suburethral incision). When incising the epithelium in the midline, the underlying fascia is also split in the midline, creating a midline defect. Once the epithelium is split and mobilized laterally off the underlying fascia, we can begin reconstruction.
The midline fascial defect that was just created is closed with a running 2-0 polyglactin from just beneath the bladder neck down to and including the fascia and uterosacral ligaments at the apex. This is accomplished in an upside down ‘T’ orientation (FIGURE 3). It is critical that the fascia is reunited at the base or you will leave the patient with a hernia.
For surgical success: To check intraoperatively that the fascia is reunited at the base, try to place an index finger between the base of the cystocele repair and the apex. If you can insert your finger, that is where the hernia still exists. If you meet resistance with your finger, you are palpating reunification of the anterior and apical fascia.
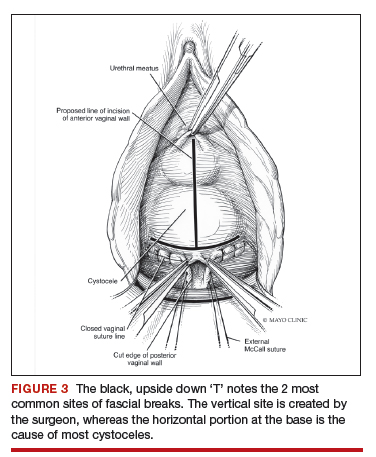
Technique for Kelly-Kennedy bladder neck plication. If the patient has mild incontinence that does not require a sling procedure, we now complete the second portion of the anterior repair starting with a Kelly-Kennedy bladder neck plication. Utilizing interrupted 1-0 polyglactin suture, vertical bites are taken periurethrally, starting at the midurethra and then the bladder neck. This nicely supports the urethra and proximal bladder neck and is very helpful for mild incontinence or for prophylactic benefit. Then starting beneath the bladder neck, the fascia is plicated again in the midline, reinforcing the suture line of the inverse ‘T’ with 2-0 polyglactin. The redundant epithelium is trimmed and reapproximated with interrupted 2-0 polyglactin (FIGURE 4). We tend to be more aggressive by adding the Kelly-Kennedy plication, which can lead to temporary voiding delay. We offer placement of a suprapubic catheter at the time of surgery or self-intermittent catherization.
Lastly, given that we have just dissected and then plicated the tissues beneath the bladder, I like to perform cystoscopy to be certain the bladder has not been violated. It is also important not to over-plicate the anterior fascia so that the sutures shear through the fascia and weaken the support or narrow the vaginal lumen.

Continue to: Posterior compartment repairs...
Posterior compartment repairs
Like with the anterior compartment, opinions differ as to the site of posterior compartment prolapse. Midline, lateral, distal, and site-specific defects and surgical approaches have been described. Research suggests that there is no benefit to the use of mesh in the posterior compartment.7 It is very important to recognize that over-plication of the posterior compartment can lead to narrowing/stricture and dyspareunia. Therefore, monitor vaginal caliber throughout repair of the posterior compartment.
Although we believe that a midline defect in the endopelvic fascia is primarily responsible for rectoceles, we also appreciate that the fascia must be reconstructed all the way to the perineal body and that narrowing the genital hiatus is very important and often underappreciated (FIGURE 5). Thus, perineal reconstruction is universally performed. I will emphasize again that reconstruction must be performed while also monitoring vaginal caliber. If it is too tight with the patient under anesthesia, it will be too tight when the patient recovers. Avoidance is the best option. If the patient does not desire a functional vagina (eg, an elderly patient), then narrowing is a desired goal.

Perineal reconstruction technique and tips for success
A retractor at 12 o’clock to support the apex and anterior wall can be helpful for visualization in the posterior compartment. We start with a v-shaped incision on the perineum. The width is determined by how much you want to build up the perineum and narrow the vagina (the wider the incision, the more building up of the perineal body and vaginal narrowing). A strip of epithelium is then mobilized in the midline (be careful not to excise too much). This dissection is carried all the way up the midline to just short of the tied apical suspension sutures at the posterior vaginal apex. The posterior dissection tends to be the most vascular in my experience.
Utilize cautery to obtain hemostasis along your dissection margins while protecting the underlying rectum. We have not found it necessary to dissect the posterior epithelium off the underlying fascia (that is an option at this point, however, if you feel more comfortable doing this). With an index finger in the vagina, compressing the rectum posteriorly, interrupted 1-0 polyglactin suture is placed through the epithelium and underlying fascia (avoiding the rectum) on one side, then the other, and then tied. The next sutures are placed utilizing the same technique, and the caliber of the vagina is noted with the placement of each suture (if it is too tight, then remove and replace the suture and recheck). It is important to realize you want to plicate the fascia in the midline and not perform an aggressive levatorplasty that could lead to muscle pain. Additionally, each suture should get the same purchase of tissue on each side, and the spacing of each suture should be uniform, like rungs on a ladder. Ultimately, the repair is carried down to the hymenal ring. At this point, the perineal reconstruction is performed, plicating the perineal body in the midline with deeper horizontal sutures and then closing the perineal skin with interrupted or subcuticular sutures (FIGURE 6). Completion of these repairs should orient the vagina toward the hollow of the sacrum (FIGURE 7), allowing downward forces to compress the vaginal supports posteriorly onto the pelvic floor instead of forcing it out the vaginal lumen (FIGURE 8).
Our patients generally stay in the hospital overnight, and we place a vaginal pack to provide topical pressure throughout the vagina overnight. We tell patients no lifting more than 15 lb and no intercourse for 6 weeks. While we do not tend to use hydrodissection in our repairs, it is a perfectly acceptable option.
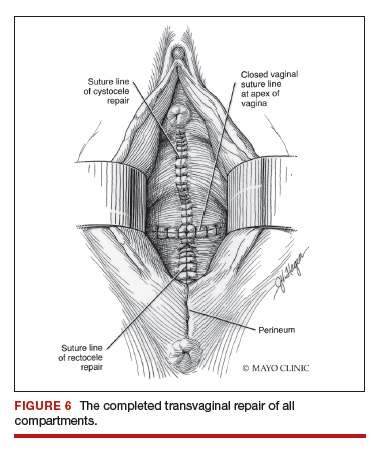
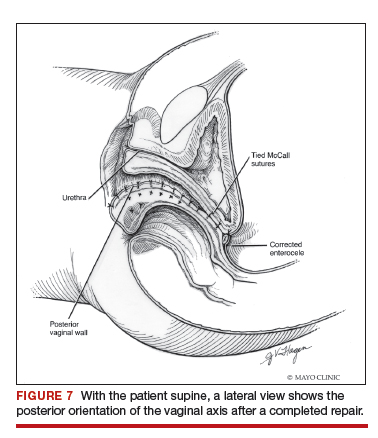
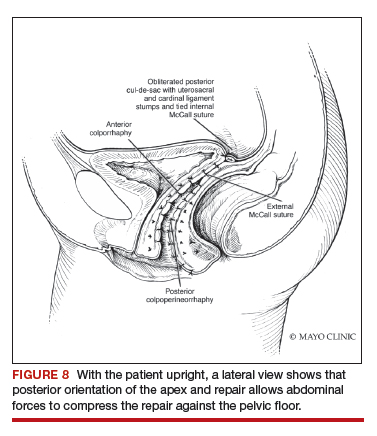
Continue to: Commit to knowledge of native tissue techniques...
Commit to knowledge of native tissue techniques
Given the recent FDA ban on the sale of transvaginal mesh for POP and the public’s negative perception of mesh (based often on misleading information in the media), it is incumbent upon gynecologic surgeons to invest in learning or relearning effective native tissue techniques for the transvaginal treatment of POP. While not perfect, they offer an effective nonmesh treatment option for many of our patients.
- US Food and Drug Administration. FDA takes action to protect women’s health, orders manufacturers of surgical mesh intended for transvaginal repair of pelvic organ prolapse to stop selling all devices. . Published April 16, 2019. Accessed August 6, 2019.
- US Food and Drug Administration. Urogynecological surgical mesh implants. . Published July 10, 2019. Accessed August 5, 2019.
- US Food and Drug Administration. Effective date of requirement for premarket approval for surgical mesh for transvaginal pelvic organ prolapse repair. https://www.federalregister.gov/documents/2016/01/05/2015-33163/effective-date-of-requirement-for-premarket-approval-for-surgical-mesh-for-transvaginal-pelvic-organ. Published January 5, 2016. Accessed August 5, 2019.
- Lee RA. Atlas of Gynecologic Surgery. W.B. Saunders: Philadelphia, PA; 1992.
- Jelovsek JE, Barber MD, Brubaker L, et al. Effect of uterosacral ligament suspension vs sacrospinous ligament fixation with or without perioperative behavioral therapy for pelvic organ vaginal prolapse on surgical outcomes and prolapse symptoms at 5 years in the OPTIMAL randomized clinical trial. JAMA. 2018;319:1554-1565.
- DeLancey JO. Anatomic aspects of vaginal eversion after hysterectomy. Am J Obstet Gynecol. 1992;166(6 part 1):1717-1728.
- Paraiso MF, Barber MD, Muir TW, et al. Rectocele repair: a randomized trial of three surgical techniques including graft augmentation. Am J Obstet Gynecol. 2006;195:1762- 1771.

Dr. Gebhart is Professor, Obstetrics and Gynecology and Surgery, Mayo Clinic, Rochester, Minnesota.
The author reports no financial relationships relevant to this article.
Dr. Gebhart is Professor, Obstetrics and Gynecology and Surgery, Mayo Clinic, Rochester, Minnesota.
The author reports no financial relationships relevant to this article.
Dr. Gebhart is Professor, Obstetrics and Gynecology and Surgery, Mayo Clinic, Rochester, Minnesota.
The author reports no financial relationships relevant to this article.
“Take pride in your surgical work. Do it in such a way that you would be willing to sign your name to it…the operation was performed by me.”
—Raymond A. Lee, MD
The US Food and Drug Administration (FDA) recently ordered companies to cease selling transvaginal mesh intended for pelvic organ prolapse (POP) repair (but not for the treatment of stress urinary incontinence [SUI] or for abdominal sacrocolpopexy).1,2 The FDA is also requiring companies preparing premarket approval applications for mesh products for the treatment of transvaginal POP to continue safety and efficacy follow-up in existing section 522 postmarket surveillance studies.3
It is, therefore, incumbent upon gynecologic surgeons to understand the surgical options that remain and perfect their surgical approach to POP to optimize patient outcomes. POP may be performed transvaginally or transabdominally, with each approach offering its own set of risks and benefits. The ability to perform both effectively allows the surgeon to tailor the approach to the condition and circumstances encountered. It is also important to realize that “cures” are elusive in POP surgery. While we can frequently alleviate patient symptoms and improve quality of life, a lifelong “cure” is an unrealistic goal for most prolapse procedures.
This article focuses on transvaginal native tissue repair,4 specifically the Mayo approach.
Watch video here
Vaginal surgery fundamentals
Before we explore the details of the Mayo technique, let’s review some basic principles of vaginal surgery. First, it is important to make a good clinical diagnosis so that you know which compartments (apex, anterior, or posterior) are involved. Although single compartment defects exist, multicompartment defects are far more common. Failing to recognize all compartment defects often results in incomplete repair, which can mean recurrent prolapse and additional interventions.
Second, exposure is critical when performing surgery by any route. You must be able to see your surgical field completely in order to properly execute your surgical approach. Table height, lighting, and retraction are all important to surgical success.
Lastly, it is important to know how to effectively execute your intended procedure. Native tissue repair is often criticized for having a high failure rate. It makes sense that mesh augmentation offers greater durability of a repair, but an effective native tissue repair will also effectively treat the majority of patients. An ineffective repair does not benefit the patient and contributes to high failure rates.
- Mesh slings for urinary incontinence and mesh use in sacrocolpopexy have not been banned by the FDA.
- Apical support is helpful to all other compartment support.
- Fixing the fascial defect between the base of the bladder and the apex will improve your anterior compartment outcomes.
- Monitor vaginal caliber throughout your posterior compartment repair.
Vaginal apex repairs
Data from the OPTIMAL trial suggest that uterosacral ligament suspension and sacrospinous ligament fixation are equally effective in treating apical prolapse.5 Our preference is a McCall culdoplasty (uterosacral ligament plication). It allows direct visualization (internally or externally) to place apical support stitches and plicates the ligaments in the midline of the vaginal cuff to help prevent enterocele protrusion. DeLancey has described the levels of support in the female pelvis and places importance on apical support.6 Keep in mind that anterior and posterior compartment prolapse is often accompanied by apical prolapse. Therefore, treating the apex is critical for overall success.
External vs internal McCall sutures: My technique. Envision the open vaginal cuff after completing a vaginal hysterectomy or after opening the vaginal cuff for a posthysterectomy vaginal vault prolapse (FIGURE 1). External (suture placed through the vaginal cuff epithelium into the peritoneal cavity, incorporating the uterosacral ligaments and intervening peritoneum, and ultimately brought back out through the posterior cuff and tied) or internal (suture placed in the intraperitoneal space, incorporating the uterosacral ligaments and intervening peritoneum, and tied internally) McCall sutures can be utilized (FIGURE 2). I prefer a combination of both. I use 0-polyglactin for external sutures, as the sutures will ultimately dissolve and not remain in the vaginal cavity. I usually place at least 2 external sutures with the lowest suture on the vaginal cuff being the deepest uterosacral stitch. Each subsequent suture is placed closer to the vaginal cuff and closer to the ends of the ligamentous stumps, starting deepest and working back toward the cuff with each stitch. I place 1 or 2 internal sutures (delayed absorbable or permanent) between my 2 external sutures. Because these sutures will be tied internally and located in the intraperitoneal space, permanent sutures may be used.
Avoiding ureteral injury: Tips for cystoscopy. A known risk of performing uterosacral ligament stitches is kinking or injury to the ureter. Therefore, cystoscopy is mandatory when performing this procedure. I tie one suture at a time starting with the internal sutures. I then perform cystoscopy after each suture tying. If I do not get ureteral spill after tying the suture, I remove and replace the suture and repeat cystoscopy until normal bilateral ureteral spill is achieved.
Key points for uterosacral ligament suspension. Achieving apical support at this point gives me the ability to build my anterior and posterior repair procedures off of this support. It is critical when performing uterosacral ligament suspension that you define the space between the ureter and rectum on each side. (Elevation of the cardinal pedicle and medial retraction of the rectum facilitate this.) The ligament runs down toward the sacrum when the patient is supine. You must follow that trajectory to be successful and avoid injury. One must also be careful not to be too deep on the ligament, as plication at that level may cause defecatory dysfunction.
Continue to: Anterior compartment repairs...
Anterior compartment repairs
The anterior compartment seems the most susceptible to forces within the pelvis and is a common site of prolapse. Many theories exist as to what causes a cystocele—distension, displacement, detachment, etc. While paravaginal defects exist, I believe that most cystoceles arise horizontally at the base of the bladder as the anterior endopelvic fascia detaches from the apex or cervix. The tissue then attenuates as the hernia progresses.
For surgical success: Make certain your repair addresses re-establishing continuity of the anterior endopelvic fascia with the fascia and ligaments at the vaginal apex; it will increase your success in treating anterior compartment prolapse.
We prefer to mobilize the epithelium in the midline from the vaginal apex to the mid‑urethra (if performing a midurethral sling, we stop short of the bladder neck and perform a separate suburethral incision). When incising the epithelium in the midline, the underlying fascia is also split in the midline, creating a midline defect. Once the epithelium is split and mobilized laterally off the underlying fascia, we can begin reconstruction.
The midline fascial defect that was just created is closed with a running 2-0 polyglactin from just beneath the bladder neck down to and including the fascia and uterosacral ligaments at the apex. This is accomplished in an upside down ‘T’ orientation (FIGURE 3). It is critical that the fascia is reunited at the base or you will leave the patient with a hernia.
For surgical success: To check intraoperatively that the fascia is reunited at the base, try to place an index finger between the base of the cystocele repair and the apex. If you can insert your finger, that is where the hernia still exists. If you meet resistance with your finger, you are palpating reunification of the anterior and apical fascia.
Technique for Kelly-Kennedy bladder neck plication. If the patient has mild incontinence that does not require a sling procedure, we now complete the second portion of the anterior repair starting with a Kelly-Kennedy bladder neck plication. Utilizing interrupted 1-0 polyglactin suture, vertical bites are taken periurethrally, starting at the midurethra and then the bladder neck. This nicely supports the urethra and proximal bladder neck and is very helpful for mild incontinence or for prophylactic benefit. Then starting beneath the bladder neck, the fascia is plicated again in the midline, reinforcing the suture line of the inverse ‘T’ with 2-0 polyglactin. The redundant epithelium is trimmed and reapproximated with interrupted 2-0 polyglactin (FIGURE 4). We tend to be more aggressive by adding the Kelly-Kennedy plication, which can lead to temporary voiding delay. We offer placement of a suprapubic catheter at the time of surgery or self-intermittent catherization.
Lastly, given that we have just dissected and then plicated the tissues beneath the bladder, I like to perform cystoscopy to be certain the bladder has not been violated. It is also important not to over-plicate the anterior fascia so that the sutures shear through the fascia and weaken the support or narrow the vaginal lumen.
Continue to: Posterior compartment repairs...
Posterior compartment repairs
Like with the anterior compartment, opinions differ as to the site of posterior compartment prolapse. Midline, lateral, distal, and site-specific defects and surgical approaches have been described. Research suggests that there is no benefit to the use of mesh in the posterior compartment.7 It is very important to recognize that over-plication of the posterior compartment can lead to narrowing/stricture and dyspareunia. Therefore, monitor vaginal caliber throughout repair of the posterior compartment.
Although we believe that a midline defect in the endopelvic fascia is primarily responsible for rectoceles, we also appreciate that the fascia must be reconstructed all the way to the perineal body and that narrowing the genital hiatus is very important and often underappreciated (FIGURE 5). Thus, perineal reconstruction is universally performed. I will emphasize again that reconstruction must be performed while also monitoring vaginal caliber. If it is too tight with the patient under anesthesia, it will be too tight when the patient recovers. Avoidance is the best option. If the patient does not desire a functional vagina (eg, an elderly patient), then narrowing is a desired goal.
Perineal reconstruction technique and tips for success
A retractor at 12 o’clock to support the apex and anterior wall can be helpful for visualization in the posterior compartment. We start with a v-shaped incision on the perineum. The width is determined by how much you want to build up the perineum and narrow the vagina (the wider the incision, the more building up of the perineal body and vaginal narrowing). A strip of epithelium is then mobilized in the midline (be careful not to excise too much). This dissection is carried all the way up the midline to just short of the tied apical suspension sutures at the posterior vaginal apex. The posterior dissection tends to be the most vascular in my experience.
Utilize cautery to obtain hemostasis along your dissection margins while protecting the underlying rectum. We have not found it necessary to dissect the posterior epithelium off the underlying fascia (that is an option at this point, however, if you feel more comfortable doing this). With an index finger in the vagina, compressing the rectum posteriorly, interrupted 1-0 polyglactin suture is placed through the epithelium and underlying fascia (avoiding the rectum) on one side, then the other, and then tied. The next sutures are placed utilizing the same technique, and the caliber of the vagina is noted with the placement of each suture (if it is too tight, then remove and replace the suture and recheck). It is important to realize you want to plicate the fascia in the midline and not perform an aggressive levatorplasty that could lead to muscle pain. Additionally, each suture should get the same purchase of tissue on each side, and the spacing of each suture should be uniform, like rungs on a ladder. Ultimately, the repair is carried down to the hymenal ring. At this point, the perineal reconstruction is performed, plicating the perineal body in the midline with deeper horizontal sutures and then closing the perineal skin with interrupted or subcuticular sutures (FIGURE 6). Completion of these repairs should orient the vagina toward the hollow of the sacrum (FIGURE 7), allowing downward forces to compress the vaginal supports posteriorly onto the pelvic floor instead of forcing it out the vaginal lumen (FIGURE 8).
Our patients generally stay in the hospital overnight, and we place a vaginal pack to provide topical pressure throughout the vagina overnight. We tell patients no lifting more than 15 lb and no intercourse for 6 weeks. While we do not tend to use hydrodissection in our repairs, it is a perfectly acceptable option.
Continue to: Commit to knowledge of native tissue techniques...
Commit to knowledge of native tissue techniques
Given the recent FDA ban on the sale of transvaginal mesh for POP and the public’s negative perception of mesh (based often on misleading information in the media), it is incumbent upon gynecologic surgeons to invest in learning or relearning effective native tissue techniques for the transvaginal treatment of POP. While not perfect, they offer an effective nonmesh treatment option for many of our patients.
- US Food and Drug Administration. FDA takes action to protect women’s health, orders manufacturers of surgical mesh intended for transvaginal repair of pelvic organ prolapse to stop selling all devices. . Published April 16, 2019. Accessed August 6, 2019.
- US Food and Drug Administration. Urogynecological surgical mesh implants. . Published July 10, 2019. Accessed August 5, 2019.
- US Food and Drug Administration. Effective date of requirement for premarket approval for surgical mesh for transvaginal pelvic organ prolapse repair. https://www.federalregister.gov/documents/2016/01/05/2015-33163/effective-date-of-requirement-for-premarket-approval-for-surgical-mesh-for-transvaginal-pelvic-organ. Published January 5, 2016. Accessed August 5, 2019.
- Lee RA. Atlas of Gynecologic Surgery. W.B. Saunders: Philadelphia, PA; 1992.
- Jelovsek JE, Barber MD, Brubaker L, et al. Effect of uterosacral ligament suspension vs sacrospinous ligament fixation with or without perioperative behavioral therapy for pelvic organ vaginal prolapse on surgical outcomes and prolapse symptoms at 5 years in the OPTIMAL randomized clinical trial. JAMA. 2018;319:1554-1565.
- DeLancey JO. Anatomic aspects of vaginal eversion after hysterectomy. Am J Obstet Gynecol. 1992;166(6 part 1):1717-1728.
- Paraiso MF, Barber MD, Muir TW, et al. Rectocele repair: a randomized trial of three surgical techniques including graft augmentation. Am J Obstet Gynecol. 2006;195:1762- 1771.

Vaginal salpingo-oophorectomy: Tips and tricks

Visit the Society of Gynecologic Surgeons online: sgsonline.org
Additional videos from SGS are available here, including these recent offerings:
Visit the Society of Gynecologic Surgeons online: sgsonline.org
Additional videos from SGS are available here, including these recent offerings:
Visit the Society of Gynecologic Surgeons online: sgsonline.org
Additional videos from SGS are available here, including these recent offerings:
This video is brought to you by![]()
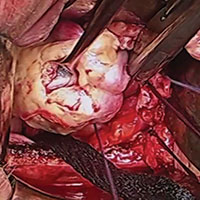
Managing complications at the time of vaginal hysterectomy
Careful attention to technique at the time of vaginal hysterectomy is vital. Equally important is prior consideration of potential complications and the best ways to address them. Four trouble spots include:
- uterine tissue extraction (Although this is not a complication of vaginal hysterectomy, tissue extraction aids in debulking and removal of a large uterus.)
- protection of the ureters (It is important to palpate these structures before placing cardinal pedicle clamps, to protect ureteral integrity.)
- repair of inadvertent cystotomy
- control of bleeding in the setting of adnexectomy.
I focus on optimal approaches to these 4 scenarios in this article.
For a review of vaginal hysterectomy technique, see “Vaginal hysterectomy with basic instrumentation,” by Barbara S. Levy, MD, which appeared in the October 2015 issue of OBG Management. For salpingectomy and salpingo-oophorectomy technique, see my article entitled “Salpingectomy after vaginal hysterectomy: Technique, tips, and pearls,” which appeared in the November issue of this journal.
Both articles are available in the archive at obgmanagement.com and, like this one, are based on the AAGL-produced Online Master Class on Vaginal Hysterectomy, a Web-based program cosponsored by the American College of Obstetricians and Gynecologists and the Society of Gynecologic Surgeons. That program is available at https://www.aagl.org/vaghystwebinar/.
A step toward success: Begin morcellation by splitting the uterus
Manual morcellation to reduce uterine size and ease transvaginal removal is a useful technique to know. Five aspects of manual morcellation warrant emphasis:
1. Anterior and posterior entry into the cul-de-sacs is essential before attempting morcellation.
2. The blood supply on both sides of the uterus must be controlled.
3. During resection, take care to cut only tissue that can be visualized. Avoid resection beyond what you can easily see.
4. Once morcellation is completed, always go back and check the pedicles for hemostasis. During morcellation, these pedicles tend to get stretched, and bleeding may arise that wasn’t present originally.
5. Morcellation should be performed only after malignancy has been ruled out—it is a technique intended for benign uteri only.
By bivalving the uterus it is possible to follow the endocervical canal up into the uterine cavity (FIGURE 1). Our technique at the Mayo Clinic is to place tenacula at the 3 and 9 o’clock positions prior to bivalving. A small amount of bleeding may occur because of collateral blood supply from the gonadal pedicles, but it should be minimal, as the uterine vessels have been secured.
FIGURE 1 Bivalve the uterus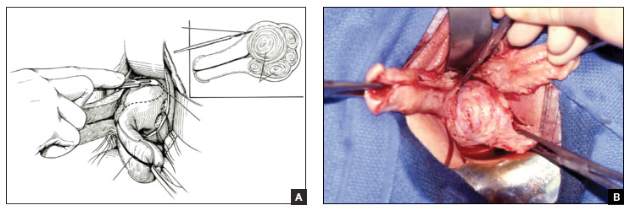 |
To begin morcellation, split the uterus down the midline, with tenacula placed at the 3- and 9-o’clock positions, then follow the endocervical canal into the uterine cavity (A). Use a knife blade to take portions of myomas and other tissue to debulk the uterus (B). |
Proceed with morcellation once the uterus is bivalved. Use a Jacobs tenaculum to grasp the serosal portion of the uterus. Apply downward traction with your nondominant hand, and use the knife blade to resect portions of the uterus so that it can be debulked.
When a large myoma is encountered during morcellation, it often is possible to “finger-fracture” some of the filmy adhesions holding it in place, or to follow the pseudo-capsule of the fibroid in order to shell it out. In many cases, fibroids can be removed intact using these methods. If intact removal is not possible, debulk the fibroid by taking individual “bites.”
Tip. When the uterus is greatly enlarged, grasp it with a tenaculum so that it does not retract when you incise it. When large myomas are anticipated, keep an extra tenaculum on hand, as well as extra knife blades, as blades dull quickly when used to cut through calcified tissue. Continue to apply traction with your nondominant hand to allow each piece of tissue to be more readily developed (FIGURE 2).

Tip. When managing the round-ligament complex on each side, stay between the round ligaments (your “goal posts”) to avoid getting too lateral. Keep the cervix intact for orientation purposes. Focus on diminishing the bulk of the uterus so that you can get around the utero-ovarian pedicles.
To control the utero-ovarian pedicle on the patient’s right side, place a finger underneath it, with traction applied. Place a Heaney clamp from the top down. Repeat this action on the patient’s left side, but place the Heaney clamp from the bottom up.
Manual morcellation of tissue is useful in small uteri that are tough to access, but the procedure is very helpful in large uteri in order to remove them transvaginally.
Protect the ureters: Palpate them before clamping the pedicles
Palpating the ureters at the time of hysterectomy can protect their integrity during the procedure. The following technique has been used at the Mayo Clinic for many years and allows for location of the ureter so a cardinal pedicle clamp can be placed without injury.
Enter the anterior cul-de-sac so that you can insert a finger and palpate the ureter before you place the cardinal pedicle clamp on each side. Place Deaver retractors at the 12 o’clock and 2- to 3-o’clock positions. Insert your nondominant index finger into the anterior cul-de-sac and palpate the ureter against the Deaver clamp in the 2- to 3-o’clock position (FIGURE 3). (The ureter can be felt between your index finger and the Deaver retractor.) The ureter will have the most descent in a uterus that has some prolapse, compared with a nonprolapsed uterus.
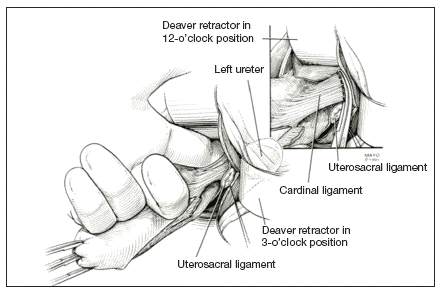
Tip. One common error is mistaking the edge of the vaginal cuff for the ureter. Be certain that you insert your finger deeply into the cul-de-sac so that it is the ureter you feel and not the cuff edge.
Successful cystotomy repair technique
Inadvertent cystotomy is a common fear for surgeons at the time of vaginal hysterectomy. I prefer to empty the bladder before beginning the hysterectomy because it reduces the target zone that a distended bladder presents. Some surgeons prefer to maintain a bit of fluid in the bladder so that, if they cut into the bladder, a small urine stream results. The approach is a matter of preference.
Cystotomy is most common during anterior dissection. If it occurs, recognize it and mark the defect with suture. Do not attempt to repair the hole at this point, but opt to finish the hysterectomy.
Cystoscopy is an important element of cystotomy repair. Once the hysterectomy is completed, look inside the bladder and determine where the defect is in relationship to the ureteral orifices. Typically, it will be beyond the interureteric ridge, along the posterior portion of the bladder, usually in the midline.
As critical as the repair itself is management of bladder drainage afterward. If you repair the hole thoroughly and drain the bladder adequately for 14 days, the defect should heal fully.
Technique for entry into anterior cul-de-sac
One way to avert bladder injury is to enter the anterior cul-de-sac very carefully. Begin by ensuring that the bladder is empty and placing a Deaver retractor at the 12 o’clock position. Also place tenacula anteriorly and posteriorly to help direct traction. This will allow good visualization of the bladder reflection.
Tip. One common mistake is making the incision too low or too near the cervix, which makes dissection more difficult and increases the likelihood that you will enter the wrong plane. Be sure you know where the bladder is, and make an adequate incision that is not too distal. Otherwise, dissection will be harder to carry out.
I prefer to make one clean incision with the knife, rather than multiple incisions, because multiple cuts increase the likelihood that you will inadvertently injure the wrong tissue. Use good traction and countertraction, and hug the uterus. Work low on the uterus, but not in the uterus. If you cut into muscle, you will get more bleeding and may end up digging a hole.
After you make the incision, put your finger through it to help develop that space further. You can confirm entry into the peritoneum by noting the characteristic slippery feel of the peritoneal lining. After you insert a Deaver retractor anteriorly, reinsert your finger and mobilize the area further. Then you can easily reach in and tent the peritoneum to cut it.
Technique for cystotomy repair
Two-layer closure is a minimum. On occasion, a third layer may be beneficial. Begin with running closure of the first layer using 2-0 chromic suture—a good suture choice in the urinary tract. This suture is inflammatory, which will help seal the wound, but it also dissolves quickly, preventing stone formation.
Use through-and-through closure on the first layer, followed by a second imbricating layer. If desired, use the peritoneum as a third layer.
Horizontal repair is typical, although vertical closure may be necessary if the defect is near a ureteral orifice and horizontal closure might compromise that side. That decision must be made intraoperatively.
When vertical repair is necessary, begin your repair just above the defect, placing the suture through and through. The hole should be visible. There is no need to be extramucosal in needle placement. Simply get a good bite of the tissue and run the repair down the bladder wall.
Next, stop and apply traction to the repair to check for any small defects that may have been overlooked. By placing a little traction on that first suture tag, any such defects will become apparent. Then go back and close them in a secondary imbricating layer.
After 2-layer closure, fill the bladder retrograde. I prefer to use a couple of drops of methylene blue in normal saline and place a clean white piece of packing material beneath the wound. If the packing material remains unstained by blue, the repair is watertight.
Incorporate the peritoneum as another layer of repair of the defect. I imbricate 2 layers in the bladder. Then, if necessary, I use that peritoneum as an additional layer (FIGURE 4).

Strategies to control bleeding at adnexectomy
Be vigilant for bleeding when removing the tubes and/or ovaries. At salpingectomy, be extremely gentle with the mesosalpinx because it can be avulsed easily off of surrounding tissue. If bleeding occurs, oversewing, or even ovary removal, could end up being the only options.
Good visualization is essential during vaginal procedures. Retractors, lighted suction irrigators, a headlamp, good overhead lighting, and appropriate instrumentation are critical for success.
Heaney clamp technique for vaginal oophorectomy
Begin by placing an Allis clamp on the utero-ovarian pedicle. Then clamp the ovary and tube with a second Allis clamp. Next, insert a Heaney clamp through the small window between the cardinal pedicle and the utero-ovarian pedicle (FIGURE 5). Clamp the tissue and place a free tie around it.
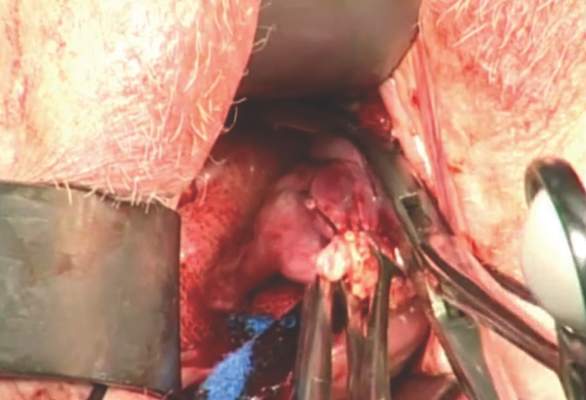
Because this is a major vascular pedicle, doubly ligate it. As you tie the first suture, have an assistant flash the clamp open and closed, then excise the specimen. There is no need to worry about losing the pedicle because it already has been ligated once. Next, stick-tie it, placing the needle distal to the free tie to avoid piercing the gonadal vessels beyond.
The technique is standard. Be gentle, and ensure good hemostasis when finished.
Tip. In my experience, any bleeding runs down from the pedicle rather than out toward me. So be sure to look down and below the pedicle to ensure hemostasis.
Additional pearls
- When performing vaginal hysterectomy, the ovaries are almost always removable transvaginally. There is no need to begin the case laparoscopically to remove the tubes and/or ovaries and then perform the hysterectomy vaginally.
- Deaver retractors offer good exposure; visualization is critical.
- Make sure the tissue is dry before you cut the last suture.
- If you prefer to use a laparoscopic stapler to secure the pedicles, proceed as before: Place an Allis clamp on the pedicle. Place a second clamp on the ovary and tube. Now you can insert the stapler into the created window, as with the Heaney clamp (FIGURE 6).
- Use a 60-mm stapler to cut the pedicle in one try. If using a 45-mm device, the stapler may need to be fired twice. This makes the procedure more expensive and risks more bleeding.
- When closing the stapler jaws, avoid clamping small bowel or packing material. Ensure stapler tip visibility well before firing.
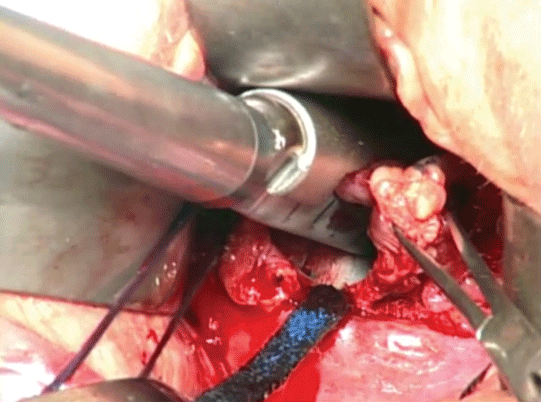
The round ligament technique
When transecting the round ligament, it is critical to stay just beneath it to avoid bleeding and venturing into the mesosalpinx. Gently hug the tissue inferior to the round ligament and let it retract (FIGURE 7). This will allow isolation of the gonadal vessels nicely, especially if an adnexal mass is present. Then isolate the specimen and remove it, stick-tying the pedicle afterward to secure it.
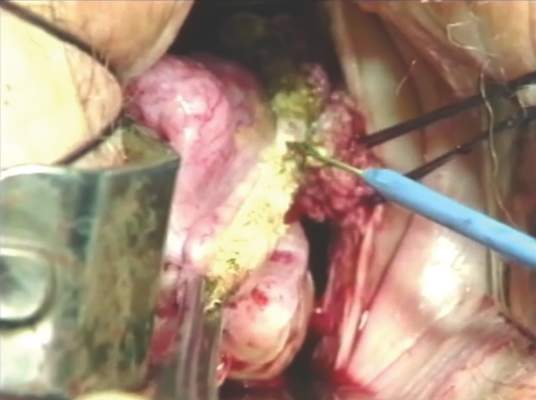
When tying the pedicle, place the suture around the distal aspect to ensure that the back of the pedicle is enclosed, and do not lose it when you release the clamp. A slightly different technique is to use an endoloop to cross the gonadal vessels and control them. Use a suction irrigator and good lighting to get good exposure.
Next, place the clamp, making sure you don’t inadvertently grasp the packing material. Visualize both tips of the clamp before incising. Trim the specimen flush with the clamp. Then you can thread an endoloop over the top of the clamp. This is an inexpensive technique that allows a higher reach into the pelvic cavity. Finally, cinch down the endoloop to control the vessels.
When performing bilateral salpingo-oophorectomy, a long, fine clamp, such as the M.D. Anderson clamp, can help you reach up to control the gonadal vessels in the event that you lose your initial grip on those vessels (FIGURE 8).
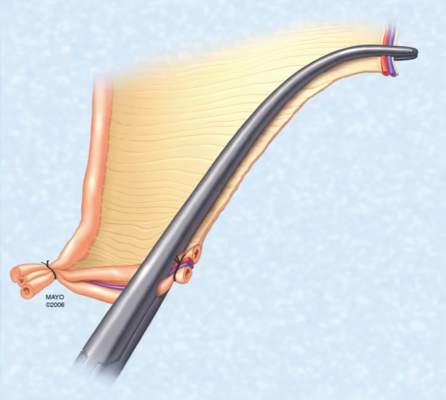
Be prepared
Have a plan in place to manage any complications that arise during surgery. Just as obstetricians plan ahead to prepare for shoulder dystocia and other emergencies, gynecologic surgeons must prepare for surgical complications. Tissue extraction strategies can aid in the debulking and removal of large uteri, and the proper tools, lighting, and assistance are critical to success.
Share your thoughts on this article! Send your Letter to the Editor to rbarbieri@frontlinemedcom.com. Please include your name and the city and state in which you practice.

John B. Gebhart, MD, MS
Dr. Gebhart is Professor of Obstetrics and Gynecology and Surgery and Director of the Fellowship Program in Female Pelvic Medicine and Reconstructive Surgery at the Mayo Clinic in Rochester, Minnesota.
Dr. Gebhart reports that he is a consultant to Allergan and AMS.
John B. Gebhart, MD, MS
Dr. Gebhart is Professor of Obstetrics and Gynecology and Surgery and Director of the Fellowship Program in Female Pelvic Medicine and Reconstructive Surgery at the Mayo Clinic in Rochester, Minnesota.
Dr. Gebhart reports that he is a consultant to Allergan and AMS.
John B. Gebhart, MD, MS
Dr. Gebhart is Professor of Obstetrics and Gynecology and Surgery and Director of the Fellowship Program in Female Pelvic Medicine and Reconstructive Surgery at the Mayo Clinic in Rochester, Minnesota.
Dr. Gebhart reports that he is a consultant to Allergan and AMS.
Careful attention to technique at the time of vaginal hysterectomy is vital. Equally important is prior consideration of potential complications and the best ways to address them. Four trouble spots include:
- uterine tissue extraction (Although this is not a complication of vaginal hysterectomy, tissue extraction aids in debulking and removal of a large uterus.)
- protection of the ureters (It is important to palpate these structures before placing cardinal pedicle clamps, to protect ureteral integrity.)
- repair of inadvertent cystotomy
- control of bleeding in the setting of adnexectomy.
I focus on optimal approaches to these 4 scenarios in this article.
For a review of vaginal hysterectomy technique, see “Vaginal hysterectomy with basic instrumentation,” by Barbara S. Levy, MD, which appeared in the October 2015 issue of OBG Management. For salpingectomy and salpingo-oophorectomy technique, see my article entitled “Salpingectomy after vaginal hysterectomy: Technique, tips, and pearls,” which appeared in the November issue of this journal.
Both articles are available in the archive at obgmanagement.com and, like this one, are based on the AAGL-produced Online Master Class on Vaginal Hysterectomy, a Web-based program cosponsored by the American College of Obstetricians and Gynecologists and the Society of Gynecologic Surgeons. That program is available at https://www.aagl.org/vaghystwebinar/.
A step toward success: Begin morcellation by splitting the uterus
Manual morcellation to reduce uterine size and ease transvaginal removal is a useful technique to know. Five aspects of manual morcellation warrant emphasis:
1. Anterior and posterior entry into the cul-de-sacs is essential before attempting morcellation.
2. The blood supply on both sides of the uterus must be controlled.
3. During resection, take care to cut only tissue that can be visualized. Avoid resection beyond what you can easily see.
4. Once morcellation is completed, always go back and check the pedicles for hemostasis. During morcellation, these pedicles tend to get stretched, and bleeding may arise that wasn’t present originally.
5. Morcellation should be performed only after malignancy has been ruled out—it is a technique intended for benign uteri only.
By bivalving the uterus it is possible to follow the endocervical canal up into the uterine cavity (FIGURE 1). Our technique at the Mayo Clinic is to place tenacula at the 3 and 9 o’clock positions prior to bivalving. A small amount of bleeding may occur because of collateral blood supply from the gonadal pedicles, but it should be minimal, as the uterine vessels have been secured.
| FIGURE 1 Bivalve the uterus |
To begin morcellation, split the uterus down the midline, with tenacula placed at the 3- and 9-o’clock positions, then follow the endocervical canal into the uterine cavity (A). Use a knife blade to take portions of myomas and other tissue to debulk the uterus (B). |
Proceed with morcellation once the uterus is bivalved. Use a Jacobs tenaculum to grasp the serosal portion of the uterus. Apply downward traction with your nondominant hand, and use the knife blade to resect portions of the uterus so that it can be debulked.
When a large myoma is encountered during morcellation, it often is possible to “finger-fracture” some of the filmy adhesions holding it in place, or to follow the pseudo-capsule of the fibroid in order to shell it out. In many cases, fibroids can be removed intact using these methods. If intact removal is not possible, debulk the fibroid by taking individual “bites.”
Tip. When the uterus is greatly enlarged, grasp it with a tenaculum so that it does not retract when you incise it. When large myomas are anticipated, keep an extra tenaculum on hand, as well as extra knife blades, as blades dull quickly when used to cut through calcified tissue. Continue to apply traction with your nondominant hand to allow each piece of tissue to be more readily developed (FIGURE 2).
Tip. When managing the round-ligament complex on each side, stay between the round ligaments (your “goal posts”) to avoid getting too lateral. Keep the cervix intact for orientation purposes. Focus on diminishing the bulk of the uterus so that you can get around the utero-ovarian pedicles.
To control the utero-ovarian pedicle on the patient’s right side, place a finger underneath it, with traction applied. Place a Heaney clamp from the top down. Repeat this action on the patient’s left side, but place the Heaney clamp from the bottom up.
Manual morcellation of tissue is useful in small uteri that are tough to access, but the procedure is very helpful in large uteri in order to remove them transvaginally.
Protect the ureters: Palpate them before clamping the pedicles
Palpating the ureters at the time of hysterectomy can protect their integrity during the procedure. The following technique has been used at the Mayo Clinic for many years and allows for location of the ureter so a cardinal pedicle clamp can be placed without injury.
Enter the anterior cul-de-sac so that you can insert a finger and palpate the ureter before you place the cardinal pedicle clamp on each side. Place Deaver retractors at the 12 o’clock and 2- to 3-o’clock positions. Insert your nondominant index finger into the anterior cul-de-sac and palpate the ureter against the Deaver clamp in the 2- to 3-o’clock position (FIGURE 3). (The ureter can be felt between your index finger and the Deaver retractor.) The ureter will have the most descent in a uterus that has some prolapse, compared with a nonprolapsed uterus.
Tip. One common error is mistaking the edge of the vaginal cuff for the ureter. Be certain that you insert your finger deeply into the cul-de-sac so that it is the ureter you feel and not the cuff edge.
Successful cystotomy repair technique
Inadvertent cystotomy is a common fear for surgeons at the time of vaginal hysterectomy. I prefer to empty the bladder before beginning the hysterectomy because it reduces the target zone that a distended bladder presents. Some surgeons prefer to maintain a bit of fluid in the bladder so that, if they cut into the bladder, a small urine stream results. The approach is a matter of preference.
Cystotomy is most common during anterior dissection. If it occurs, recognize it and mark the defect with suture. Do not attempt to repair the hole at this point, but opt to finish the hysterectomy.
Cystoscopy is an important element of cystotomy repair. Once the hysterectomy is completed, look inside the bladder and determine where the defect is in relationship to the ureteral orifices. Typically, it will be beyond the interureteric ridge, along the posterior portion of the bladder, usually in the midline.
As critical as the repair itself is management of bladder drainage afterward. If you repair the hole thoroughly and drain the bladder adequately for 14 days, the defect should heal fully.
Technique for entry into anterior cul-de-sac
One way to avert bladder injury is to enter the anterior cul-de-sac very carefully. Begin by ensuring that the bladder is empty and placing a Deaver retractor at the 12 o’clock position. Also place tenacula anteriorly and posteriorly to help direct traction. This will allow good visualization of the bladder reflection.
Tip. One common mistake is making the incision too low or too near the cervix, which makes dissection more difficult and increases the likelihood that you will enter the wrong plane. Be sure you know where the bladder is, and make an adequate incision that is not too distal. Otherwise, dissection will be harder to carry out.
I prefer to make one clean incision with the knife, rather than multiple incisions, because multiple cuts increase the likelihood that you will inadvertently injure the wrong tissue. Use good traction and countertraction, and hug the uterus. Work low on the uterus, but not in the uterus. If you cut into muscle, you will get more bleeding and may end up digging a hole.
After you make the incision, put your finger through it to help develop that space further. You can confirm entry into the peritoneum by noting the characteristic slippery feel of the peritoneal lining. After you insert a Deaver retractor anteriorly, reinsert your finger and mobilize the area further. Then you can easily reach in and tent the peritoneum to cut it.
Technique for cystotomy repair
Two-layer closure is a minimum. On occasion, a third layer may be beneficial. Begin with running closure of the first layer using 2-0 chromic suture—a good suture choice in the urinary tract. This suture is inflammatory, which will help seal the wound, but it also dissolves quickly, preventing stone formation.
Use through-and-through closure on the first layer, followed by a second imbricating layer. If desired, use the peritoneum as a third layer.
Horizontal repair is typical, although vertical closure may be necessary if the defect is near a ureteral orifice and horizontal closure might compromise that side. That decision must be made intraoperatively.
When vertical repair is necessary, begin your repair just above the defect, placing the suture through and through. The hole should be visible. There is no need to be extramucosal in needle placement. Simply get a good bite of the tissue and run the repair down the bladder wall.
Next, stop and apply traction to the repair to check for any small defects that may have been overlooked. By placing a little traction on that first suture tag, any such defects will become apparent. Then go back and close them in a secondary imbricating layer.
After 2-layer closure, fill the bladder retrograde. I prefer to use a couple of drops of methylene blue in normal saline and place a clean white piece of packing material beneath the wound. If the packing material remains unstained by blue, the repair is watertight.
Incorporate the peritoneum as another layer of repair of the defect. I imbricate 2 layers in the bladder. Then, if necessary, I use that peritoneum as an additional layer (FIGURE 4).
Strategies to control bleeding at adnexectomy
Be vigilant for bleeding when removing the tubes and/or ovaries. At salpingectomy, be extremely gentle with the mesosalpinx because it can be avulsed easily off of surrounding tissue. If bleeding occurs, oversewing, or even ovary removal, could end up being the only options.
Good visualization is essential during vaginal procedures. Retractors, lighted suction irrigators, a headlamp, good overhead lighting, and appropriate instrumentation are critical for success.
Heaney clamp technique for vaginal oophorectomy
Begin by placing an Allis clamp on the utero-ovarian pedicle. Then clamp the ovary and tube with a second Allis clamp. Next, insert a Heaney clamp through the small window between the cardinal pedicle and the utero-ovarian pedicle (FIGURE 5). Clamp the tissue and place a free tie around it.
Because this is a major vascular pedicle, doubly ligate it. As you tie the first suture, have an assistant flash the clamp open and closed, then excise the specimen. There is no need to worry about losing the pedicle because it already has been ligated once. Next, stick-tie it, placing the needle distal to the free tie to avoid piercing the gonadal vessels beyond.
The technique is standard. Be gentle, and ensure good hemostasis when finished.
Tip. In my experience, any bleeding runs down from the pedicle rather than out toward me. So be sure to look down and below the pedicle to ensure hemostasis.
Additional pearls
- When performing vaginal hysterectomy, the ovaries are almost always removable transvaginally. There is no need to begin the case laparoscopically to remove the tubes and/or ovaries and then perform the hysterectomy vaginally.
- Deaver retractors offer good exposure; visualization is critical.
- Make sure the tissue is dry before you cut the last suture.
- If you prefer to use a laparoscopic stapler to secure the pedicles, proceed as before: Place an Allis clamp on the pedicle. Place a second clamp on the ovary and tube. Now you can insert the stapler into the created window, as with the Heaney clamp (FIGURE 6).
- Use a 60-mm stapler to cut the pedicle in one try. If using a 45-mm device, the stapler may need to be fired twice. This makes the procedure more expensive and risks more bleeding.
- When closing the stapler jaws, avoid clamping small bowel or packing material. Ensure stapler tip visibility well before firing.
The round ligament technique
When transecting the round ligament, it is critical to stay just beneath it to avoid bleeding and venturing into the mesosalpinx. Gently hug the tissue inferior to the round ligament and let it retract (FIGURE 7). This will allow isolation of the gonadal vessels nicely, especially if an adnexal mass is present. Then isolate the specimen and remove it, stick-tying the pedicle afterward to secure it.
When tying the pedicle, place the suture around the distal aspect to ensure that the back of the pedicle is enclosed, and do not lose it when you release the clamp. A slightly different technique is to use an endoloop to cross the gonadal vessels and control them. Use a suction irrigator and good lighting to get good exposure.
Next, place the clamp, making sure you don’t inadvertently grasp the packing material. Visualize both tips of the clamp before incising. Trim the specimen flush with the clamp. Then you can thread an endoloop over the top of the clamp. This is an inexpensive technique that allows a higher reach into the pelvic cavity. Finally, cinch down the endoloop to control the vessels.
When performing bilateral salpingo-oophorectomy, a long, fine clamp, such as the M.D. Anderson clamp, can help you reach up to control the gonadal vessels in the event that you lose your initial grip on those vessels (FIGURE 8).
Be prepared
Have a plan in place to manage any complications that arise during surgery. Just as obstetricians plan ahead to prepare for shoulder dystocia and other emergencies, gynecologic surgeons must prepare for surgical complications. Tissue extraction strategies can aid in the debulking and removal of large uteri, and the proper tools, lighting, and assistance are critical to success.
Share your thoughts on this article! Send your Letter to the Editor to rbarbieri@frontlinemedcom.com. Please include your name and the city and state in which you practice.
In this Article
- Ensuring ureter protection
- Cystotomy repair
- Bleeding control strategies
This article is based on the AAGL-produced and ACOG/SGS cosponsored Online Master Class on Vaginal Hysterectomy
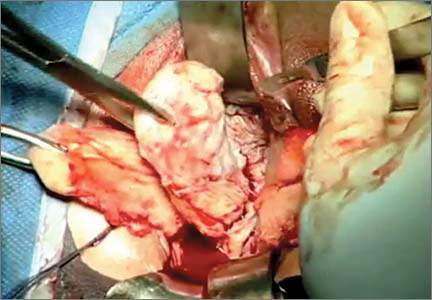
Total abdominal hysterectomy the Mayo Clinic way
The abdominal approach to hysterectomy remains the most common route to hysterectomy in the United States. Its greatest advantage: It allows the uterus to be removed intact.1–3
The recent US Food and Drug Administration (FDA) warning against the use of power morcellation in women with known or suspected uterine malignancy has left many gynecologic surgeons wondering what might be the optimal approach to the removal of a large uterus.4
Although most hysterectomies are performed for benign conditions—namely, uterine fibroids—malignancy should be considered in the differential diagnosis. When hysterectomy is performed laparoscopically, a large uterus must be morcellated intraperitoneally. Since the FDA safety communication was issued, some hospitals have imposed a moratorium on the use of power morcellators for removal of uterine tissue until more definitive evidence is put forth regarding safety and best practices. This chain of events allows us an opportunity to review the basics of abdominal hysterectomy.
For the sake of this discussion, I will assume that the hysterectomy is being performed for a benign indication as I highlight the Mayo Clinic approach to total abdominal hysterectomy (TAH).5
Preoperative considerations
The patient should be medically able to undergo operative intervention. If she has preexisting medical conditions, preoperative clearance should be obtained from her primary care provider, and her medical conditions should be optimized prior to surgical intervention.
Baseline laboratory studies include a complete blood count, electrolyte panel, glucose assessment, and an electrocardiogram (EKG). Bowel prep typically is not required. Provisions should be made to prevent deep venous thrombosis (DVT), usually by utilizing sequential compression devices, based on the individual patient’s risk factors.6,7
A prophylactic antibiotic to prevent surgical site infection (often a first-generation cephalosporin) should be given as a single intravenous (IV) dose prior to the incision.8 If bacterial vaginosis is present, treatment prior to surgery can reduce the frequency of vaginal cuff infection.9
Again, for the sake of this discussion, I will assume that malignancy has been ruled out.
Positioning and preparation
After induction of anesthesia, position the patient either in a dorsal supine (traditional) or lithotomy (yellow-fin stirrups) position and reexamine her to confirm the findings of the pelvic exam. If the patient is positioned in the supine position, use ankle straps to prevent her from moving as the Trendelenburg position advances during the procedure.
Prep the abdominal skin with a bactericidal agent (most often a povidone-iodine solution). Also prep the vagina with a povidone-iodine solution because the vaginal cuff will be opened during the TAH. Place a transurethral catheter to drain urine throughout the case. Use of a three-way catheter allows the bladder to be easily backfilled during the procedure for identification of its borders or assessment of its integrity.
Last, incorporate a surgical pause prior to the incision to confirm that you have the right patient, know the procedure and incision planned, and are aware of any allergies. Also confirm that antibiotics have been given.
Operative technique
Intraoperative principles
A planned approach avoids wasteful time and motion, and an adequate incision allows for sufficient exposure, which is critical but often underappreciated by the novice surgeon. We prefer a midline incision because it allows the most flexibility to adapt to intraoperative findings, but a Pfannenstiel incision also is an option.
Fixed retraction is paramount to “set up” exposure for the remainder of the case. We prefer a Balfour fixed retractor but, with smaller uteri, a self-retaining Alexis retractor (Applied Medical, Rancho Santa Margarita, California) affords decent exposure and may cause less postoperative abdominal wall discomfort; it also avoids the possibility of retractor-related neuropathy.
Moistened abdominal packing allows the bowel to be packed into the upper abdomen for the remainder of the case, which facilitates consistent exposure of the operative field. Adequate lighting is essential, as is one or more knowledgeable assistants.
Use sharp dissection throughout the procedure. Clean, sharp dissection averts injury to adjacent structures, such as the ureter, bladder, and rectum, and promotes recognition of any injuries, permitting immediate repair.
The application of proper traction and counter-traction on tissues allows accurate definition of the correct tissue planes and facilitates identification of important anatomic structures. Vital structures should be identified and, if necessary, mobilized before any clamps are placed or pedicles transected. Adhesions should be sharply lysed to facilitate exposure.
Freeing the bladder anteriorly and the rectum posteriorly prevents their inadvertent inclusion in closure of the vagina and minimizes the risk of fistula formation. The bladder and rectum should be sharply mobilized at least 1 cm beyond the site of planned vaginal transection.
Last, excellent support of the vaginal wall can be provided by securing the uterosacral-cardinal ligaments to the corners of the vaginal vault.
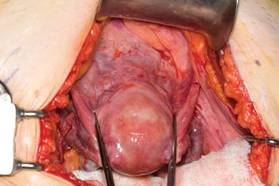 |
| FIGURE 1: Place straight Kocher clamps to facilitate traction during the operation. |
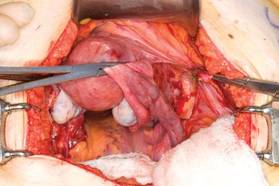 |
| FIGURE 2: Clamp and divide the right round ligament, opening the broad ligament. |
 |
| FIGURE 3: Identify the right ureter along the medial leaf of the broad ligament. |
Identifying the ureter
Once good exposure and adequate Trendelenburg position are achieved, place Kocher clamps across the cornual portion of the uterus (incorporating the round ligament, tube, and utero-ovarian pedicle) (FIGURE 1). This facilitates continuous traction and prevents back bleeding throughout the case.
With traction applied to the left, identify the right round ligament, clamp it with a Kocher clamp, and transect it. Incise the peritoneum parallel to the uterus and gonadal vessels (FIGURE 2). This opens the broad ligament and allows identification of the critical underlying structures (ureter, external and internal iliac vessels). Following the medial leaf of the broad ligament downward, identify the ureter by both visualization and palpation (FIGURE 3).
Although I do not discuss salpingo-oophorectomy in this article, be aware that the ureter is at risk when clamping the gonadal vessels near the pelvic brim.
Once the ureter is identified, create a window in the broad ligament above the ureter. In a medial to lateral fashion, place your index finger through that peritoneal window, making certain the ureter is below and out of the way. Place a Kocher clamp across the tube and utero-ovarian pedicle, and transect and suture-ligate the pedicle (preserving the tube and ovary). Repeat this procedure on the patient’s left side, using traction and counter-traction to facilitate exposure (FIGURE 4).
Mobilizing the bladder
With the assistant providing upward traction on the uterus, use Russian forceps to elevate the peritoneum overlying the bladder. Undermine and incise the peritoneum from the patient’s left to the right (FIGURE 5). Begin sharp dissection of the loose areolar tissue. By gently spreading the tissue using the tips of the scissors, and snipping the tissue in the midline, you allow the dissection to proceed down the lower uterine segment (FIGURE 6).
Any bleeding usually means you are too close to the bladder or have ventured too far laterally. If the patient has had a previous cesarean delivery, this area may be densely scarred. Often, it is easiest to dissect laterally around the scar on each side, where there is less dense scarring, and mobilize the tissue until the denser central scarring can be dissected. Note that the bladder attachment curves upward on each side and lateral to the cervix, over the lateral vagina and the uterine vessels.

It is absolutely critical to dissect and expose 1 or 2 cm of the entire anterior vaginal wall below the level of the cervix to be certain that the bladder has been fully mobilized and to prevent later incorporation into the vaginal cuff closure. The exact location of the cervix is best detected by placing a finger behind the uterus and using the thumb to compress the area of the anterior portion of the cervix under the bladder.
Fibroids can cause distortion of the anatomic planes we utilize. Be aware of the distortion and adjust your dissection accordingly. The structures of the urinary tract are most often affected; sharp dissection is necessary to mobilize the ureter and bladder in these cases. (See the case discussions)
 | 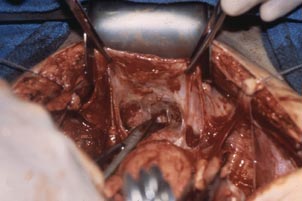 |
FIGURE 5: Upward traction on the peritoneum overlying the bladder facilitates development of the bladder flap off of the lower uterus. | FIGURE 6: Dissect the bladder off the lower uterus |
Large intramural or pedunculated myomas can be difficult surgical challenges. Broad-ligament myomas, however, are unique. Significant anatomic distortion can occur. Always consider the possibility of some degree of ureteral obstruction and be on the lookout for unrecognized bladder injury.
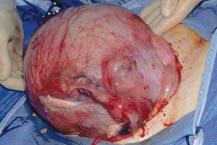
Case 1
This very large myoma essentially filled the pelvis but seems to arise from the left side of the uterus, distorting the anatomy. Note the attenuation of the round ligaments and the normal appearance of the tubes and ovaries (the left tube has a distal paratubal cyst.) Note also the bladder, particularly how sharp dissection will be required to mobilize it off the underlying mass.
To manage removal, at case outset, we placed bilateral external ureteral stents and used a lucite vaginal dilator to aid in respective ureter and vaginal apex identification. The bladder was attenuated over this large mass and was rather easily dissected, given the defined mass around it. The ureters were well lateral and inferior and readily identified with stent palpation. The cervix was certainly elongated and, after the uterine vessels were removed, the hysterectomy was completed without incident.
Surgical pearl: To extract very large masses during total abdominal hysterectomy, sometimes you have more “room” if the fixed retractor is removed. You can then use a series of handheld retractors (Deavor, Harrington, etc) on the side you are operating until the mass has been mobilized enough to place a fixed retractor.
CASE 2
 |  |
 |  |
This large cervical myoma is creating urinary urgency, frequency, and moderate obstruction of the right ureter. Sharp dissection is critical to mobilize the bladder well free of the myoma. We placed bilateral ureteral stents to start the case to aid in identification of the ureter.
The first illustration at right (top left) shows the operative appearance before the bladder flap was taken down. The second photo (top right) reveals the extent of this large myoma after the bladder has been sharply dissected free of the mass. The third photo (bottom left) displays the specimen sent to pathology (be sure to minimize the amount of vaginal tissue taken with the specimen). Note the distortion of the endocervical canal and cervix. The last photo (bottom right) reveals the sectioned specimen.
Surgical pearl: Use a three-way catheter and backfill the bladder for identification during the procedure and at the conclusion of the case to rule out bladder injury. A few drops of methylene blue added to the solution makes recognition easier.
Ligation of the uterine arteries
Apply cephalad traction to the uterus and place a Harrington retractor anteriorly to retract the bladder away from the cervix on the upper portion of the vagina. With the uterus pulled first to the left, palpate the right ureter between the thumb and index finger at the level of the uterine artery (FIGURE 7). Once you have determined the course of the ureter, place a Kocher clamp well down on the right side of the lower cervix at about a 45° angle, sliding off the side of the cervix (FIGURE 8). The clamp should now include the superior portion of the cardinal ligament with the uterine vessels and paracolpium immediately above the lateral vaginal fornix.
Transect the cardinal pedicle. Repeat the procedure on the left side after adjusting the Harrington retractor slightly to the left and identifying the course of the ureter where the Kocher clamp will be placed. Thus, a single Kocher clamp is placed on each side to control the blood supply.
It is paramount that you know the location of the ureter prior to placement and transection of the uterine vessels to prevent inadvertent injury or obstruction of the ureters.
Divide the uterine vessel–cardinal ligament complex close to the cervix (medial to the Kocher clamp), slightly undercutting the tip (FIGURE 9). This creates a fascial window, the anterior edge of which is the pubocervical fascia. This is subsequently developed and managed as a separate layer during the vaginal vault closure.
Repeat this procedure on the left side.
 |  | 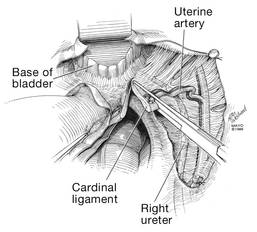 |
| FIGURE 7: After mobilizing the bladder, palpate the right ureter prior to placement of a Kocher clamp on the cardinal vascular pedicle. | FIGURE 8: Place a single Kocher clamp on the right uterine vessels. See the right ureter well lateral of the clamp. | FIGURE 9: The right uterine vessels have been clamped and transected. The clamp is slightly undercut to allow access to the vaginal fornix. |
Preparing and opening the vaginal cuff
Develop the anterior pubocervical fascia by cutting with a scissors horizontally across the anterior vaginal wall at the level of the cervix (FIGURE 10). This layer of tissue will be utilized to close the vaginal cuff in a secondary layer later on. This technique will serve to close the pubocervical fascial ring at the vaginal vault and, with support of the uterosacral ligaments, provide support to the vaginal apex. At this point, the vagina has not yet been entered. The remaining tissue beneath the mobilized layer and the anterior cervix is the anterior vaginal wall.
Pull the uterus up and anterior toward the pubic symphysis to make the uterosacral ligaments prominent. Then transect the uterosacral ligaments close to the uterus (FIGURE 11). You may encounter minor bleeding, but there is no need to ligate the stumps at this point. Cut the tissue between the ligaments horizontally, similarly to the anterior dissection. With gentle finger dissection, as necessary, this should free the rectosigmoid colon from the posterior vaginal wall.
If this is a new technique for you, it may serve you well to place a stitch in each uterosacral ligament, below the spot where you will transect it, prior to cutting. When you have the uterus on tension, the ligaments are most recognizable, and these sutures can then be incorporated into the vaginal angles.
At this point there should be a circular area just beneath the cervix that is the vaginal wall at the apex of the vagina. Retract the uterus anteriorly and to the left, and enter the vagina posteriorly and laterally, just above the stump of the right uterosacral ligament (FIGURE 12). The uterus now can be removed by circumcising the vagina as close to the cervix as possible to avoid vaginal shortening. As the uterus is being removed, place four vulsellum tenacula successively at the 3, 12, 9, and 6 o’clock positions of the vaginal cuff as it is developed (FIGURE 13). Then swab povidone-iodine on the vaginal cuff and canal.
 | 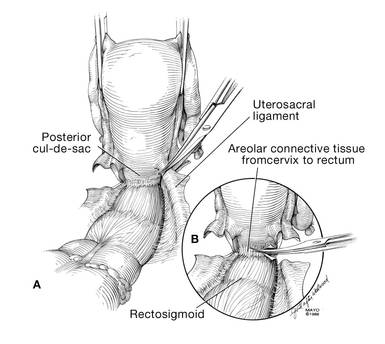 |
| FIGURE 10: After mobilizing the bladder and securing the vascular pedicles, develop the anterior endopelvic fascia. It will be used as a second layer to close the vaginal cuff. | FIGURE 11: A. Transect the uterosacral ligaments. B. Mobilize the rectum posteriorly. |
 | 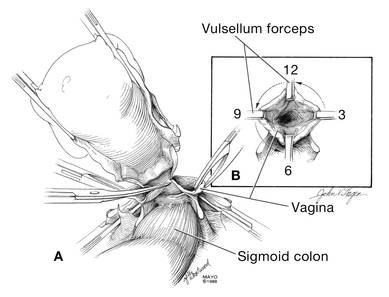 |
| FIGURE 12: Enter the right vaginal fornix and grasp it with a vulsellum tenaculum. | FIGURE 13: A. After entering the right vaginal fornix, extend the incision in a counter-clockwise fashion, preserving vaginal length. B. Placement of the tenaculum as the incision proceeds. |
Cuff closure
Place a lap salt sponge over the Kocher clamps to prevent suture entanglement. Use a 36-inch continuous 0-polyglactin suture to close the vaginal vault and achieve hemostasis. Begin suturing with a right vaginal angle stitch, placed so that the small vessels are ligated and the lateral supporting tissues from the base of the cardinal ligament are attached to the right vaginal angle. This closes the “window” that was created with slight undercutting of the cardinal ligament earlier. Continue suturing toward the left, with each bite placed submucosally so that the epithelial edges are approximated and inverted into the vagina. The suture does not enter the vagina (FIGURE 14). As you reach the left vaginal angle, obtain a healthy purchase of the left uterosacral ligament and then pass the needle laterally to the vaginal fornix angle, through the lateral supporting tissues at the base of the cardinal ligament, as was done on the right vaginal angle. Then lock the suture and return across the vaginal vault. This will plicate together the anterior and posterior pubocervical fascia layers developed earlier, creating a second layer, before closing the fascial ring at the vaginal apex. Incorporate the right uterosacral ligament into the right vaginal angle and tie the suture (FIGURES 15 AND 16).
Close the cuff and verify hemostasis. Use the lap salt sponge covering the Kocher clamps on the cardinal ligament pedicles to wipe the surgical field clean. Then use light cautery along the cuff and the base and back of the bladder. If there is some bleeding at the very corners of the vagina, it can usually be managed during suturing of the cardinal ligament pedicles into the corners of the vault.
Elevate the Kocher clamp containing the cardinal ligament and uterine vessels toward the midline. Then palpate the ureter between your index finger and thumb as it courses through the cardinal ligament toward the bladder. This step provides a second check on the location of the ureter (the first was when the clamp was originally placed) before the cardinal ligament is tied to the corner of the vault (FIGURE 17). The needle should enter the peritoneum, right uterosacral ligament, and full thickness of the right angle of the vagina just lateral to the suture used to close the vaginal apex. Bring the pedicle over the corner of the vagina and tie it close to the lateral aspect of the Kocher clamp, leaving an adequate stump. Then free-tie the stump of the cardinal ligament to add a double ligation of this vascular pedicle. Repeat this procedure on the opposite side (FIGURE 18). Then verify hemostasis throughout the operative field.
Take the patient out of Trendelenburg position and place her flat, and copiously irrigate the pelvis. Once needle and sponge counts are completed, close the abdomen in a layered fashion. Place a wound dressing and a Foley catheter, leaving the latter in place overnight.
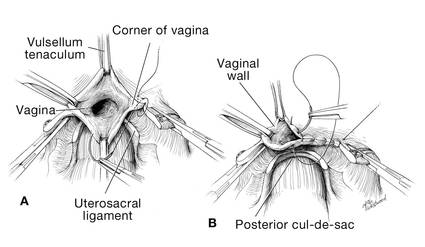 | 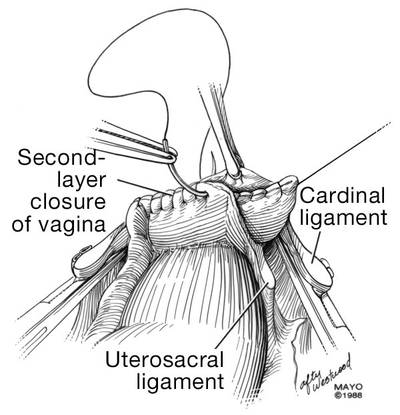 |
| FIGURE 14: A. Begin in the right vaginal corner, closing the area that was “undercut” (see FIGURE 10). B. Close the first layer in in a subcuticular manner. | FIGURE 15: The second layer of cuff closure utilizes the anterior and posterior endopelvic fascia and imbricates the first layer. |
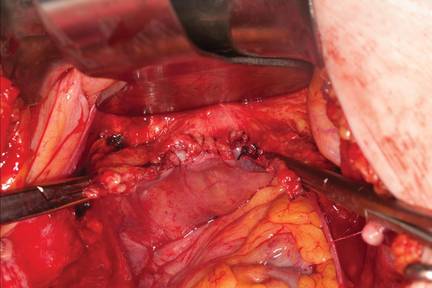 | |
FIGURE 16: Two-layer closure of the vaginal cuff. | |
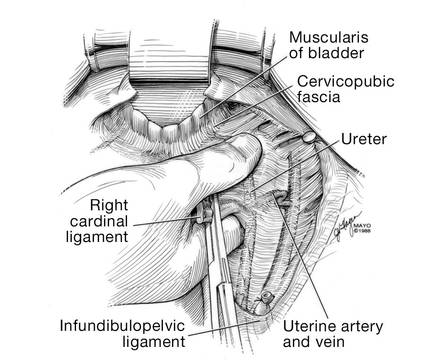 |  |
| FIGURE 17: Prior to suture ligation of the right uterine vessels, palpate the ureter again to identify its location. | FIGURE 18: Suture-ligate the uterine pedicles into the corners of the vaginal cuff. |
Share your thoughts on this article! Send your Letter to the Editor to rbarbieri@frontlinemedcom.com. Please include your name and the city and state in which you practice.
1. Wu JM, Wechter ME, Geller EJ, et al. Hysterectomy rates in the United States, 2003. Obstet Gynecol. 2007;110(5):1091–1095.
2. Falcone T, Walters MD. Hysterectomy for benign disease. Obstet Gynecol. 2008;111(3):753–767.
3. Unger JB, Paul R, Caldito G. Hysterectomy for the massive leiomyomatous uterus. Obstet Gynecol. 2002;100(6):1271–1275.
4. US Food and Drug Administration. Laparoscopic Uterine Power Morcellation in Hysterectomy and Myomectomy: FDA Safety Communication. http://www.fda.gov/MedicalDevices/Safety/AlertsandNotices/ucm393576.htm. Published April 17, 2014. Accessed September 15, 2014.
5. Webb MJ. Mayo Clinic Manual of Pelvic Surgery. 2nd ed. Philadelphia, PA: Lippincott Williams & Wilkins; 2000:55–72.
6. Committee on Practice Bulletins–Gynecology, American College of Obstetricians and Gynecologists. ACOG Practice Bulletin No. 84. Prevention of deep vein thrombosis and pulmonary embolism. Obstet Gynecol. 2007;110(2 pt 1):429–440.
7. Gould MK, Garcia DA, Wren SM, et al. Prevention of VTE in nonorthopedic surgical patients: antithrombotic therapy and prevention of thrombosis. 9th ed. American College of Chest Physicians Evidence-Based Clinical Practice Guidelines. Chest. 2012;141(2 suppl):e227S–e277S.
8. Committee on Practice Bulletins, American College of Obstetricians and Gynecologists. ACOG Practice Bulletin No. 74. Antibiotic prophylaxis for gynecologic procedures. Obstet Gynecol. 2006;108(1):225–234.
9. Larsson PG, Carlsson B. Does pre- and postoperative metronidazole treatment lower vaginal cuff infection rate after abdominal hysterectomy among women with bacterial vaginosis? Infect Dis Obstet Gynecol. 2002;10(3):133–140.
John B. Gebhart, MD, MS

Dr. Gebhart is Associate Professor of Obstetrics and Gynecology at the Mayo Clinic in Rochester, Minnesota.
The author reports no financial relationships relevant to this article.
John B. Gebhart, MD, MS
Dr. Gebhart is Associate Professor of Obstetrics and Gynecology at the Mayo Clinic in Rochester, Minnesota.
The author reports no financial relationships relevant to this article.
John B. Gebhart, MD, MS
Dr. Gebhart is Associate Professor of Obstetrics and Gynecology at the Mayo Clinic in Rochester, Minnesota.
The author reports no financial relationships relevant to this article.
The abdominal approach to hysterectomy remains the most common route to hysterectomy in the United States. Its greatest advantage: It allows the uterus to be removed intact.1–3
The recent US Food and Drug Administration (FDA) warning against the use of power morcellation in women with known or suspected uterine malignancy has left many gynecologic surgeons wondering what might be the optimal approach to the removal of a large uterus.4
Although most hysterectomies are performed for benign conditions—namely, uterine fibroids—malignancy should be considered in the differential diagnosis. When hysterectomy is performed laparoscopically, a large uterus must be morcellated intraperitoneally. Since the FDA safety communication was issued, some hospitals have imposed a moratorium on the use of power morcellators for removal of uterine tissue until more definitive evidence is put forth regarding safety and best practices. This chain of events allows us an opportunity to review the basics of abdominal hysterectomy.
For the sake of this discussion, I will assume that the hysterectomy is being performed for a benign indication as I highlight the Mayo Clinic approach to total abdominal hysterectomy (TAH).5
Preoperative considerations
The patient should be medically able to undergo operative intervention. If she has preexisting medical conditions, preoperative clearance should be obtained from her primary care provider, and her medical conditions should be optimized prior to surgical intervention.
Baseline laboratory studies include a complete blood count, electrolyte panel, glucose assessment, and an electrocardiogram (EKG). Bowel prep typically is not required. Provisions should be made to prevent deep venous thrombosis (DVT), usually by utilizing sequential compression devices, based on the individual patient’s risk factors.6,7
A prophylactic antibiotic to prevent surgical site infection (often a first-generation cephalosporin) should be given as a single intravenous (IV) dose prior to the incision.8 If bacterial vaginosis is present, treatment prior to surgery can reduce the frequency of vaginal cuff infection.9
Again, for the sake of this discussion, I will assume that malignancy has been ruled out.
Positioning and preparation
After induction of anesthesia, position the patient either in a dorsal supine (traditional) or lithotomy (yellow-fin stirrups) position and reexamine her to confirm the findings of the pelvic exam. If the patient is positioned in the supine position, use ankle straps to prevent her from moving as the Trendelenburg position advances during the procedure.
Prep the abdominal skin with a bactericidal agent (most often a povidone-iodine solution). Also prep the vagina with a povidone-iodine solution because the vaginal cuff will be opened during the TAH. Place a transurethral catheter to drain urine throughout the case. Use of a three-way catheter allows the bladder to be easily backfilled during the procedure for identification of its borders or assessment of its integrity.
Last, incorporate a surgical pause prior to the incision to confirm that you have the right patient, know the procedure and incision planned, and are aware of any allergies. Also confirm that antibiotics have been given.
Operative technique
Intraoperative principles
A planned approach avoids wasteful time and motion, and an adequate incision allows for sufficient exposure, which is critical but often underappreciated by the novice surgeon. We prefer a midline incision because it allows the most flexibility to adapt to intraoperative findings, but a Pfannenstiel incision also is an option.
Fixed retraction is paramount to “set up” exposure for the remainder of the case. We prefer a Balfour fixed retractor but, with smaller uteri, a self-retaining Alexis retractor (Applied Medical, Rancho Santa Margarita, California) affords decent exposure and may cause less postoperative abdominal wall discomfort; it also avoids the possibility of retractor-related neuropathy.
Moistened abdominal packing allows the bowel to be packed into the upper abdomen for the remainder of the case, which facilitates consistent exposure of the operative field. Adequate lighting is essential, as is one or more knowledgeable assistants.
Use sharp dissection throughout the procedure. Clean, sharp dissection averts injury to adjacent structures, such as the ureter, bladder, and rectum, and promotes recognition of any injuries, permitting immediate repair.
The application of proper traction and counter-traction on tissues allows accurate definition of the correct tissue planes and facilitates identification of important anatomic structures. Vital structures should be identified and, if necessary, mobilized before any clamps are placed or pedicles transected. Adhesions should be sharply lysed to facilitate exposure.
Freeing the bladder anteriorly and the rectum posteriorly prevents their inadvertent inclusion in closure of the vagina and minimizes the risk of fistula formation. The bladder and rectum should be sharply mobilized at least 1 cm beyond the site of planned vaginal transection.
Last, excellent support of the vaginal wall can be provided by securing the uterosacral-cardinal ligaments to the corners of the vaginal vault.
|
| FIGURE 1: Place straight Kocher clamps to facilitate traction during the operation. |
|
| FIGURE 2: Clamp and divide the right round ligament, opening the broad ligament. |
|
| FIGURE 3: Identify the right ureter along the medial leaf of the broad ligament. |
Identifying the ureter
Once good exposure and adequate Trendelenburg position are achieved, place Kocher clamps across the cornual portion of the uterus (incorporating the round ligament, tube, and utero-ovarian pedicle) (FIGURE 1). This facilitates continuous traction and prevents back bleeding throughout the case.
With traction applied to the left, identify the right round ligament, clamp it with a Kocher clamp, and transect it. Incise the peritoneum parallel to the uterus and gonadal vessels (FIGURE 2). This opens the broad ligament and allows identification of the critical underlying structures (ureter, external and internal iliac vessels). Following the medial leaf of the broad ligament downward, identify the ureter by both visualization and palpation (FIGURE 3).
Although I do not discuss salpingo-oophorectomy in this article, be aware that the ureter is at risk when clamping the gonadal vessels near the pelvic brim.
Once the ureter is identified, create a window in the broad ligament above the ureter. In a medial to lateral fashion, place your index finger through that peritoneal window, making certain the ureter is below and out of the way. Place a Kocher clamp across the tube and utero-ovarian pedicle, and transect and suture-ligate the pedicle (preserving the tube and ovary). Repeat this procedure on the patient’s left side, using traction and counter-traction to facilitate exposure (FIGURE 4).
Mobilizing the bladder
With the assistant providing upward traction on the uterus, use Russian forceps to elevate the peritoneum overlying the bladder. Undermine and incise the peritoneum from the patient’s left to the right (FIGURE 5). Begin sharp dissection of the loose areolar tissue. By gently spreading the tissue using the tips of the scissors, and snipping the tissue in the midline, you allow the dissection to proceed down the lower uterine segment (FIGURE 6).
Any bleeding usually means you are too close to the bladder or have ventured too far laterally. If the patient has had a previous cesarean delivery, this area may be densely scarred. Often, it is easiest to dissect laterally around the scar on each side, where there is less dense scarring, and mobilize the tissue until the denser central scarring can be dissected. Note that the bladder attachment curves upward on each side and lateral to the cervix, over the lateral vagina and the uterine vessels.
It is absolutely critical to dissect and expose 1 or 2 cm of the entire anterior vaginal wall below the level of the cervix to be certain that the bladder has been fully mobilized and to prevent later incorporation into the vaginal cuff closure. The exact location of the cervix is best detected by placing a finger behind the uterus and using the thumb to compress the area of the anterior portion of the cervix under the bladder.
Fibroids can cause distortion of the anatomic planes we utilize. Be aware of the distortion and adjust your dissection accordingly. The structures of the urinary tract are most often affected; sharp dissection is necessary to mobilize the ureter and bladder in these cases. (See the case discussions)
| |
FIGURE 5: Upward traction on the peritoneum overlying the bladder facilitates development of the bladder flap off of the lower uterus. | FIGURE 6: Dissect the bladder off the lower uterus |
Large intramural or pedunculated myomas can be difficult surgical challenges. Broad-ligament myomas, however, are unique. Significant anatomic distortion can occur. Always consider the possibility of some degree of ureteral obstruction and be on the lookout for unrecognized bladder injury.
Case 1
This very large myoma essentially filled the pelvis but seems to arise from the left side of the uterus, distorting the anatomy. Note the attenuation of the round ligaments and the normal appearance of the tubes and ovaries (the left tube has a distal paratubal cyst.) Note also the bladder, particularly how sharp dissection will be required to mobilize it off the underlying mass.
To manage removal, at case outset, we placed bilateral external ureteral stents and used a lucite vaginal dilator to aid in respective ureter and vaginal apex identification. The bladder was attenuated over this large mass and was rather easily dissected, given the defined mass around it. The ureters were well lateral and inferior and readily identified with stent palpation. The cervix was certainly elongated and, after the uterine vessels were removed, the hysterectomy was completed without incident.
Surgical pearl: To extract very large masses during total abdominal hysterectomy, sometimes you have more “room” if the fixed retractor is removed. You can then use a series of handheld retractors (Deavor, Harrington, etc) on the side you are operating until the mass has been mobilized enough to place a fixed retractor.
CASE 2
| |
| |
This large cervical myoma is creating urinary urgency, frequency, and moderate obstruction of the right ureter. Sharp dissection is critical to mobilize the bladder well free of the myoma. We placed bilateral ureteral stents to start the case to aid in identification of the ureter.
The first illustration at right (top left) shows the operative appearance before the bladder flap was taken down. The second photo (top right) reveals the extent of this large myoma after the bladder has been sharply dissected free of the mass. The third photo (bottom left) displays the specimen sent to pathology (be sure to minimize the amount of vaginal tissue taken with the specimen). Note the distortion of the endocervical canal and cervix. The last photo (bottom right) reveals the sectioned specimen.
Surgical pearl: Use a three-way catheter and backfill the bladder for identification during the procedure and at the conclusion of the case to rule out bladder injury. A few drops of methylene blue added to the solution makes recognition easier.
Ligation of the uterine arteries
Apply cephalad traction to the uterus and place a Harrington retractor anteriorly to retract the bladder away from the cervix on the upper portion of the vagina. With the uterus pulled first to the left, palpate the right ureter between the thumb and index finger at the level of the uterine artery (FIGURE 7). Once you have determined the course of the ureter, place a Kocher clamp well down on the right side of the lower cervix at about a 45° angle, sliding off the side of the cervix (FIGURE 8). The clamp should now include the superior portion of the cardinal ligament with the uterine vessels and paracolpium immediately above the lateral vaginal fornix.
Transect the cardinal pedicle. Repeat the procedure on the left side after adjusting the Harrington retractor slightly to the left and identifying the course of the ureter where the Kocher clamp will be placed. Thus, a single Kocher clamp is placed on each side to control the blood supply.
It is paramount that you know the location of the ureter prior to placement and transection of the uterine vessels to prevent inadvertent injury or obstruction of the ureters.
Divide the uterine vessel–cardinal ligament complex close to the cervix (medial to the Kocher clamp), slightly undercutting the tip (FIGURE 9). This creates a fascial window, the anterior edge of which is the pubocervical fascia. This is subsequently developed and managed as a separate layer during the vaginal vault closure.
Repeat this procedure on the left side.
| | |
| FIGURE 7: After mobilizing the bladder, palpate the right ureter prior to placement of a Kocher clamp on the cardinal vascular pedicle. | FIGURE 8: Place a single Kocher clamp on the right uterine vessels. See the right ureter well lateral of the clamp. | FIGURE 9: The right uterine vessels have been clamped and transected. The clamp is slightly undercut to allow access to the vaginal fornix. |
Preparing and opening the vaginal cuff
Develop the anterior pubocervical fascia by cutting with a scissors horizontally across the anterior vaginal wall at the level of the cervix (FIGURE 10). This layer of tissue will be utilized to close the vaginal cuff in a secondary layer later on. This technique will serve to close the pubocervical fascial ring at the vaginal vault and, with support of the uterosacral ligaments, provide support to the vaginal apex. At this point, the vagina has not yet been entered. The remaining tissue beneath the mobilized layer and the anterior cervix is the anterior vaginal wall.
Pull the uterus up and anterior toward the pubic symphysis to make the uterosacral ligaments prominent. Then transect the uterosacral ligaments close to the uterus (FIGURE 11). You may encounter minor bleeding, but there is no need to ligate the stumps at this point. Cut the tissue between the ligaments horizontally, similarly to the anterior dissection. With gentle finger dissection, as necessary, this should free the rectosigmoid colon from the posterior vaginal wall.
If this is a new technique for you, it may serve you well to place a stitch in each uterosacral ligament, below the spot where you will transect it, prior to cutting. When you have the uterus on tension, the ligaments are most recognizable, and these sutures can then be incorporated into the vaginal angles.
At this point there should be a circular area just beneath the cervix that is the vaginal wall at the apex of the vagina. Retract the uterus anteriorly and to the left, and enter the vagina posteriorly and laterally, just above the stump of the right uterosacral ligament (FIGURE 12). The uterus now can be removed by circumcising the vagina as close to the cervix as possible to avoid vaginal shortening. As the uterus is being removed, place four vulsellum tenacula successively at the 3, 12, 9, and 6 o’clock positions of the vaginal cuff as it is developed (FIGURE 13). Then swab povidone-iodine on the vaginal cuff and canal.
| |
| FIGURE 10: After mobilizing the bladder and securing the vascular pedicles, develop the anterior endopelvic fascia. It will be used as a second layer to close the vaginal cuff. | FIGURE 11: A. Transect the uterosacral ligaments. B. Mobilize the rectum posteriorly. |
| |
| FIGURE 12: Enter the right vaginal fornix and grasp it with a vulsellum tenaculum. | FIGURE 13: A. After entering the right vaginal fornix, extend the incision in a counter-clockwise fashion, preserving vaginal length. B. Placement of the tenaculum as the incision proceeds. |
Cuff closure
Place a lap salt sponge over the Kocher clamps to prevent suture entanglement. Use a 36-inch continuous 0-polyglactin suture to close the vaginal vault and achieve hemostasis. Begin suturing with a right vaginal angle stitch, placed so that the small vessels are ligated and the lateral supporting tissues from the base of the cardinal ligament are attached to the right vaginal angle. This closes the “window” that was created with slight undercutting of the cardinal ligament earlier. Continue suturing toward the left, with each bite placed submucosally so that the epithelial edges are approximated and inverted into the vagina. The suture does not enter the vagina (FIGURE 14). As you reach the left vaginal angle, obtain a healthy purchase of the left uterosacral ligament and then pass the needle laterally to the vaginal fornix angle, through the lateral supporting tissues at the base of the cardinal ligament, as was done on the right vaginal angle. Then lock the suture and return across the vaginal vault. This will plicate together the anterior and posterior pubocervical fascia layers developed earlier, creating a second layer, before closing the fascial ring at the vaginal apex. Incorporate the right uterosacral ligament into the right vaginal angle and tie the suture (FIGURES 15 AND 16).
Close the cuff and verify hemostasis. Use the lap salt sponge covering the Kocher clamps on the cardinal ligament pedicles to wipe the surgical field clean. Then use light cautery along the cuff and the base and back of the bladder. If there is some bleeding at the very corners of the vagina, it can usually be managed during suturing of the cardinal ligament pedicles into the corners of the vault.
Elevate the Kocher clamp containing the cardinal ligament and uterine vessels toward the midline. Then palpate the ureter between your index finger and thumb as it courses through the cardinal ligament toward the bladder. This step provides a second check on the location of the ureter (the first was when the clamp was originally placed) before the cardinal ligament is tied to the corner of the vault (FIGURE 17). The needle should enter the peritoneum, right uterosacral ligament, and full thickness of the right angle of the vagina just lateral to the suture used to close the vaginal apex. Bring the pedicle over the corner of the vagina and tie it close to the lateral aspect of the Kocher clamp, leaving an adequate stump. Then free-tie the stump of the cardinal ligament to add a double ligation of this vascular pedicle. Repeat this procedure on the opposite side (FIGURE 18). Then verify hemostasis throughout the operative field.
Take the patient out of Trendelenburg position and place her flat, and copiously irrigate the pelvis. Once needle and sponge counts are completed, close the abdomen in a layered fashion. Place a wound dressing and a Foley catheter, leaving the latter in place overnight.
| |
| FIGURE 14: A. Begin in the right vaginal corner, closing the area that was “undercut” (see FIGURE 10). B. Close the first layer in in a subcuticular manner. | FIGURE 15: The second layer of cuff closure utilizes the anterior and posterior endopelvic fascia and imbricates the first layer. |
| |
FIGURE 16: Two-layer closure of the vaginal cuff. | |
| |
| FIGURE 17: Prior to suture ligation of the right uterine vessels, palpate the ureter again to identify its location. | FIGURE 18: Suture-ligate the uterine pedicles into the corners of the vaginal cuff. |
Share your thoughts on this article! Send your Letter to the Editor to rbarbieri@frontlinemedcom.com. Please include your name and the city and state in which you practice.
1. Wu JM, Wechter ME, Geller EJ, et al. Hysterectomy rates in the United States, 2003. Obstet Gynecol. 2007;110(5):1091–1095.
2. Falcone T, Walters MD. Hysterectomy for benign disease. Obstet Gynecol. 2008;111(3):753–767.
3. Unger JB, Paul R, Caldito G. Hysterectomy for the massive leiomyomatous uterus. Obstet Gynecol. 2002;100(6):1271–1275.
4. US Food and Drug Administration. Laparoscopic Uterine Power Morcellation in Hysterectomy and Myomectomy: FDA Safety Communication. http://www.fda.gov/MedicalDevices/Safety/AlertsandNotices/ucm393576.htm. Published April 17, 2014. Accessed September 15, 2014.
5. Webb MJ. Mayo Clinic Manual of Pelvic Surgery. 2nd ed. Philadelphia, PA: Lippincott Williams & Wilkins; 2000:55–72.
6. Committee on Practice Bulletins–Gynecology, American College of Obstetricians and Gynecologists. ACOG Practice Bulletin No. 84. Prevention of deep vein thrombosis and pulmonary embolism. Obstet Gynecol. 2007;110(2 pt 1):429–440.
7. Gould MK, Garcia DA, Wren SM, et al. Prevention of VTE in nonorthopedic surgical patients: antithrombotic therapy and prevention of thrombosis. 9th ed. American College of Chest Physicians Evidence-Based Clinical Practice Guidelines. Chest. 2012;141(2 suppl):e227S–e277S.
8. Committee on Practice Bulletins, American College of Obstetricians and Gynecologists. ACOG Practice Bulletin No. 74. Antibiotic prophylaxis for gynecologic procedures. Obstet Gynecol. 2006;108(1):225–234.
9. Larsson PG, Carlsson B. Does pre- and postoperative metronidazole treatment lower vaginal cuff infection rate after abdominal hysterectomy among women with bacterial vaginosis? Infect Dis Obstet Gynecol. 2002;10(3):133–140.
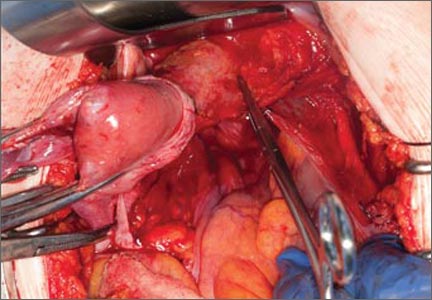
What's the appropriate lens to use in rigid cystoscopy to evaluate the bladder?
Dr. Gebhart says an angled lens is critical to viewing the bladder, but which angle is ideal?
When Dr. Gebhart surveyed attendees of the Pelvic Anatomy and Gynecology Symposium in Las Vegas, Nevada, in December 2013, as to which lens angle was the best option, the majority chose the 30-degree lens. Listen to why Dr. Gebhart recommends the 70-degree lens.

John B. Gebhart, MD, MS
Dr. Gebhart is Associate Professor and Fellowship Program Director at the Mayo Clinic in Rochester, Minnesota.
John B. Gebhart, MD, MS
Dr. Gebhart is Associate Professor and Fellowship Program Director at the Mayo Clinic in Rochester, Minnesota.
John B. Gebhart, MD, MS
Dr. Gebhart is Associate Professor and Fellowship Program Director at the Mayo Clinic in Rochester, Minnesota.
Dr. Gebhart says an angled lens is critical to viewing the bladder, but which angle is ideal?
When Dr. Gebhart surveyed attendees of the Pelvic Anatomy and Gynecology Symposium in Las Vegas, Nevada, in December 2013, as to which lens angle was the best option, the majority chose the 30-degree lens. Listen to why Dr. Gebhart recommends the 70-degree lens.

Identify your learning curve for robotic hysterectomy
To read 9 recent articles from OBG Management on the pros and cons of robotic surgery, click here.
In 2007, we and our colleagues began assessing the experience necessary to gain proficiency with robotic hysterectomy, and we published our findings early this year.1 We concluded that the number of cases needed to reach this threshold is about 91—many more than the 20 to 50 cases previously reported.2-4 Earlier studies defined proficiency in relation to the stabilization of operative times, which is subjective, somewhat arbitrary, and ignores patient outcomes.
To better elucidate the learning curve of robotic hysterectomy, we focused on a more objective, patient-centered analysis that utilized cumulative summation, or CUSUM, analysis and operative complications. This approach mitigates many of the problems encountered in earlier studies and reveals broader implications for the adoption of new surgical techniques and surgical quality control.
How CUSUM analysis works
E. S. Page introduced CUSUM analysis in 1954 for use in industrial quality control.5 This approach has been applied more recently to the construction of learning curves in cardiac surgery, general surgery, and anesthesiology.6-9 Standard CUSUM methodology defines each event—in our study, each robotic hysterectomy case—as a success or failure and tracks the sequence of events between two predefined parameters—the acceptable control limit and the unacceptable control limit. For each success, the CUSUM score decreases toward the acceptable control limit; for each failure, it increases toward the unacceptable limit.
In our study, a procedure was considered a success if no complication occurred; it was a failure if a complication did occur. The acceptable control limit was based on published complication rates of abdominal hysterectomy, and the unacceptable limit was set at twice that rate. A surgeon would be considered proficient when his or her CUSUM chart crosses the lower control limit, signifying that the surgeon’s complication rate is lower than the rate associated with abdominal hysterectomy. We used abdominal complication rates rather than those of laparoscopic hysterectomy because only abdominal and vaginal hysterectomy were performed at our institution, and the robotic system was introduced as a minimally invasive alternative to the abdominal approach.
We also conducted a risk-adjusted CUSUM analysis that was weighted for identified risk factors for complications. As in the standard CUSUM analysis, each score decreases for a successful attempt and increases for an unsuccessful attempt, but the scores are variable, depending on patient risk factors. That is, the score increases more for a complication in a low-risk patient than in a high-risk patient, and vice versa.
Instead of tracking between acceptable and unacceptable limits, the CUSUM scores were plotted around a line representing a predicted complication rate to determine whether complications for a particular surgeon were occurring more often, less often, or as predicted, based on patient risk factors.
Results based on intraoperative complications. With the score based only on intraoperative complications, we observed one surgeon to cross the acceptable control limit after 96 cases and a second surgeon to be trending toward a similar crossing point, although this surgeon had completed only 76 procedures. We calculated the average number of cases needed to develop proficiency to be 91 to cross the acceptable control limit.
Results based on intraoperative and postoperative complications. We also conducted a second analysis that was based on intraoperative and postoperative complications within 6 weeks of surgery. Our two surgeons crossed the acceptable control limit after 21 and 14 cases, respectively, using these parameters. We calculated the average number of cases needed to cross the acceptable control limit to be 44. We considered intraoperative complications to be most indicative of surgical skill; therefore, we concluded that 91 cases are needed to become proficient.
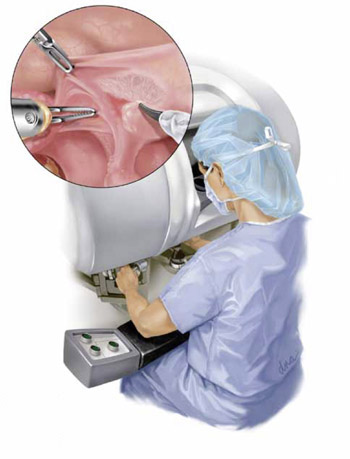
Any learning curve is an individual process
Our findings should not be used as a blanket mark of proficiency. Our conclusion is at first striking, but must be viewed within the context of CUSUM methodology. Ninety-one hysterectomy cases is an average number based on acceptable and unacceptable complication rates; we found it to be consistent with our observations of two active robotic surgeons.
However, any learning curve—not just in robotic hysterectomy—is an individual process dependent on many variables. An experienced, high-volume laparoscopic surgeon may reach proficiency with robotic hysterectomy in many fewer cases than our ballpark number of 91, just as an inexperienced, low-volume surgeon may take many more than 91 procedures to become proficient. Some surgeons may never become proficient. For these reasons, it is inappropriate to assign any single number as a mark of proficiency. Because of its original intent, CUSUM analysis assesses each surgeon on an individual basis and compares that surgeon to an objective benchmark, enabling it to take individual variances in surgeon attributes into account.
CUSUM analysis is a useful tool for surgical quality monitoring
Because it was designed for quality control, this methodology is most suitable when it is applied to assess a surgeon’s progress toward (or away from) proficiency, rather than to assign a representative number to classify a surgeon as proficient. By tracking a surgeon’s particular successes or failures with a procedure, CUSUM analysis can identify problems in an individual’s surgical quality.
If complication rates are tracking near, or cross, the unacceptable control limit using the standard method, or if they trend upward, away from the predicted complication rate with the risk-adjusted method, this fact should arouse concern so that the problem can be identified before patient safety is compromised.
Potential problems contributing to increased complications
Identifiable contributors to an increased complication rate could be intrinsic to the surgeon, such as:
- inadequate training
- low surgical volume
- sleep deprivation
- other personal issues.
Problems extrinsic to the surgeon also could be identified, such as:
- new policy changes in the surgical suite
- new staff assistance during cases
- excessive trainee involvement in surgery.
Ideally, both the standard and risk-adjusted CUSUM methods would be based on institution-specific complication rates and patient risk factors to make them internally valid. In this scenario, CUSUM analysis provides an opportunity for intervention to improve surgical quality and patient outcomes not only in robotic hysterectomy but also in any surgical procedure.
A surgeon’s proficiency waxes and wanes
At its most fundamental level, a learning curve for robotic surgery should be considered an individual continuum. A surgeon’s proficiency will wax and wane throughout his or her career, depending on any number of variables, including surgical volume, case complexity, practice setting, and personal attributes.
Although our findings suggest that a gynecologist, on average, will require 91 cases to become proficient in robotic hysterectomy, an overall benefit of robotic hysterectomy over abdominal hysterectomy was observed after completion of 21 and 14 cases by our two surgeons. We do not believe that credentialing bodies should mandate that 91 robotic hysterectomies be required of a surgeon. That approach would be too simplistic and obfuscates many of the true implications of our study—most importantly, that learning a new procedure is an individual process that must be compared with an acceptable outcome to determine proficiency and maintain patient safety.
After reading the Editorial on proficiency in robotic hysterectomy, tell us:
- How do you and/or your institution measure surgical proficiency?
- Do you agree that a surgeon’s proficiency with the robot should be considered an individual continuum? Why? Why not?
Write to us at rbarbieri@frontlinemedcom.com, or click here. Include your name and city and state, and we’ll consider publishing your comments in an upcoming issue of OBG Management.
1. Woelk JL, Casiano ER, Weaver AL, Gostout BS, Trabuco EC, Gebhart JB. The learning curve of robotic hysterectomy. Obstet Gynecol. 2013;121(1):87-95.
2. Lenihan JP, Jr, Kovanda C, Seshadri-Kreaden U. What is the learning curve for robotic assisted gynecologic surgery? J Minim Invasive Gynecol. 2008;15(5):589-594.
3. Pitter MC, Anderson P, Blissett A, Pemberton N. Robotic-assisted gynaecological surgery—establishing training criteria; minimizing operative time and blood loss. Int J Med Robot. 2008;4(2):114-120.
4. Bell MC, Torgerson JL, Kreaden U. The first 100 da Vinci hysterectomies: an analysis of the learning curve for a single surgeon. S D Med. 2009;62(3):91, 93-95.
5. Page ES. Continuous inspection schemes. Biometrika. 1954;41:100-115.
6. Komatsu R, Kasuya Y, Yogo H, et al. Learning curves for bag-and-mask ventilation and orotracheal intubation: an application of the cumulative sum method. Anesthesiology. 2010;112(6):1525-1531.
7. Novick RJ, Fox SA, Kiaii BB, et al. Analysis of the learning curve in telerobotic, beating heart coronary artery bypass grafting: a 90-patient experience. Ann Thorac Surg. 2003;76(3):749-753.
8. Novick RJ, Stitt LW. The learning curve of an academic cardiac surgeon: use of the CUSUM method. J Card Surg. 1999;14(5):312-322.
9. Okrainec A, Ferri LE, Feldman LS, Fried GM. Defining the learning curve in laparoscopic paraesophageal hernia repair: a CUSUM analysis. Surg Endosc. 2011;25(4):1083-1087.

Joshua L. Woelk, MD, MS
Dr. Woelk is a Urogynecologist and Pelvic Reconstructive Surgeon at the Urogynecology and Continence Center at Methodist Physicians Clinic in Omaha, Nebraska.

John B. Gebhart, MD, MS
Dr. Gebhart is Associate Professor and Fellowship Program Director at the Mayo Clinic in Rochester, Minnesota.
The authors report no financial relationships relevant to this article.
Joshua L. Woelk, MD, MS
Dr. Woelk is a Urogynecologist and Pelvic Reconstructive Surgeon at the Urogynecology and Continence Center at Methodist Physicians Clinic in Omaha, Nebraska.
John B. Gebhart, MD, MS
Dr. Gebhart is Associate Professor and Fellowship Program Director at the Mayo Clinic in Rochester, Minnesota.
The authors report no financial relationships relevant to this article.
To read 9 recent articles from OBG Management on the pros and cons of robotic surgery, click here.
In 2007, we and our colleagues began assessing the experience necessary to gain proficiency with robotic hysterectomy, and we published our findings early this year.1 We concluded that the number of cases needed to reach this threshold is about 91—many more than the 20 to 50 cases previously reported.2-4 Earlier studies defined proficiency in relation to the stabilization of operative times, which is subjective, somewhat arbitrary, and ignores patient outcomes.
To better elucidate the learning curve of robotic hysterectomy, we focused on a more objective, patient-centered analysis that utilized cumulative summation, or CUSUM, analysis and operative complications. This approach mitigates many of the problems encountered in earlier studies and reveals broader implications for the adoption of new surgical techniques and surgical quality control.
How CUSUM analysis works
E. S. Page introduced CUSUM analysis in 1954 for use in industrial quality control.5 This approach has been applied more recently to the construction of learning curves in cardiac surgery, general surgery, and anesthesiology.6-9 Standard CUSUM methodology defines each event—in our study, each robotic hysterectomy case—as a success or failure and tracks the sequence of events between two predefined parameters—the acceptable control limit and the unacceptable control limit. For each success, the CUSUM score decreases toward the acceptable control limit; for each failure, it increases toward the unacceptable limit.
In our study, a procedure was considered a success if no complication occurred; it was a failure if a complication did occur. The acceptable control limit was based on published complication rates of abdominal hysterectomy, and the unacceptable limit was set at twice that rate. A surgeon would be considered proficient when his or her CUSUM chart crosses the lower control limit, signifying that the surgeon’s complication rate is lower than the rate associated with abdominal hysterectomy. We used abdominal complication rates rather than those of laparoscopic hysterectomy because only abdominal and vaginal hysterectomy were performed at our institution, and the robotic system was introduced as a minimally invasive alternative to the abdominal approach.
We also conducted a risk-adjusted CUSUM analysis that was weighted for identified risk factors for complications. As in the standard CUSUM analysis, each score decreases for a successful attempt and increases for an unsuccessful attempt, but the scores are variable, depending on patient risk factors. That is, the score increases more for a complication in a low-risk patient than in a high-risk patient, and vice versa.
Instead of tracking between acceptable and unacceptable limits, the CUSUM scores were plotted around a line representing a predicted complication rate to determine whether complications for a particular surgeon were occurring more often, less often, or as predicted, based on patient risk factors.
Results based on intraoperative complications. With the score based only on intraoperative complications, we observed one surgeon to cross the acceptable control limit after 96 cases and a second surgeon to be trending toward a similar crossing point, although this surgeon had completed only 76 procedures. We calculated the average number of cases needed to develop proficiency to be 91 to cross the acceptable control limit.
Results based on intraoperative and postoperative complications. We also conducted a second analysis that was based on intraoperative and postoperative complications within 6 weeks of surgery. Our two surgeons crossed the acceptable control limit after 21 and 14 cases, respectively, using these parameters. We calculated the average number of cases needed to cross the acceptable control limit to be 44. We considered intraoperative complications to be most indicative of surgical skill; therefore, we concluded that 91 cases are needed to become proficient.
Any learning curve is an individual process
Our findings should not be used as a blanket mark of proficiency. Our conclusion is at first striking, but must be viewed within the context of CUSUM methodology. Ninety-one hysterectomy cases is an average number based on acceptable and unacceptable complication rates; we found it to be consistent with our observations of two active robotic surgeons.
However, any learning curve—not just in robotic hysterectomy—is an individual process dependent on many variables. An experienced, high-volume laparoscopic surgeon may reach proficiency with robotic hysterectomy in many fewer cases than our ballpark number of 91, just as an inexperienced, low-volume surgeon may take many more than 91 procedures to become proficient. Some surgeons may never become proficient. For these reasons, it is inappropriate to assign any single number as a mark of proficiency. Because of its original intent, CUSUM analysis assesses each surgeon on an individual basis and compares that surgeon to an objective benchmark, enabling it to take individual variances in surgeon attributes into account.
CUSUM analysis is a useful tool for surgical quality monitoring
Because it was designed for quality control, this methodology is most suitable when it is applied to assess a surgeon’s progress toward (or away from) proficiency, rather than to assign a representative number to classify a surgeon as proficient. By tracking a surgeon’s particular successes or failures with a procedure, CUSUM analysis can identify problems in an individual’s surgical quality.
If complication rates are tracking near, or cross, the unacceptable control limit using the standard method, or if they trend upward, away from the predicted complication rate with the risk-adjusted method, this fact should arouse concern so that the problem can be identified before patient safety is compromised.
Potential problems contributing to increased complications
Identifiable contributors to an increased complication rate could be intrinsic to the surgeon, such as:
- inadequate training
- low surgical volume
- sleep deprivation
- other personal issues.
Problems extrinsic to the surgeon also could be identified, such as:
- new policy changes in the surgical suite
- new staff assistance during cases
- excessive trainee involvement in surgery.
Ideally, both the standard and risk-adjusted CUSUM methods would be based on institution-specific complication rates and patient risk factors to make them internally valid. In this scenario, CUSUM analysis provides an opportunity for intervention to improve surgical quality and patient outcomes not only in robotic hysterectomy but also in any surgical procedure.
A surgeon’s proficiency waxes and wanes
At its most fundamental level, a learning curve for robotic surgery should be considered an individual continuum. A surgeon’s proficiency will wax and wane throughout his or her career, depending on any number of variables, including surgical volume, case complexity, practice setting, and personal attributes.
Although our findings suggest that a gynecologist, on average, will require 91 cases to become proficient in robotic hysterectomy, an overall benefit of robotic hysterectomy over abdominal hysterectomy was observed after completion of 21 and 14 cases by our two surgeons. We do not believe that credentialing bodies should mandate that 91 robotic hysterectomies be required of a surgeon. That approach would be too simplistic and obfuscates many of the true implications of our study—most importantly, that learning a new procedure is an individual process that must be compared with an acceptable outcome to determine proficiency and maintain patient safety.
After reading the Editorial on proficiency in robotic hysterectomy, tell us:
- How do you and/or your institution measure surgical proficiency?
- Do you agree that a surgeon’s proficiency with the robot should be considered an individual continuum? Why? Why not?
Write to us at rbarbieri@frontlinemedcom.com, or click here. Include your name and city and state, and we’ll consider publishing your comments in an upcoming issue of OBG Management.
1. Woelk JL, Casiano ER, Weaver AL, Gostout BS, Trabuco EC, Gebhart JB. The learning curve of robotic hysterectomy. Obstet Gynecol. 2013;121(1):87-95.
2. Lenihan JP, Jr, Kovanda C, Seshadri-Kreaden U. What is the learning curve for robotic assisted gynecologic surgery? J Minim Invasive Gynecol. 2008;15(5):589-594.
3. Pitter MC, Anderson P, Blissett A, Pemberton N. Robotic-assisted gynaecological surgery—establishing training criteria; minimizing operative time and blood loss. Int J Med Robot. 2008;4(2):114-120.
4. Bell MC, Torgerson JL, Kreaden U. The first 100 da Vinci hysterectomies: an analysis of the learning curve for a single surgeon. S D Med. 2009;62(3):91, 93-95.
5. Page ES. Continuous inspection schemes. Biometrika. 1954;41:100-115.
6. Komatsu R, Kasuya Y, Yogo H, et al. Learning curves for bag-and-mask ventilation and orotracheal intubation: an application of the cumulative sum method. Anesthesiology. 2010;112(6):1525-1531.
7. Novick RJ, Fox SA, Kiaii BB, et al. Analysis of the learning curve in telerobotic, beating heart coronary artery bypass grafting: a 90-patient experience. Ann Thorac Surg. 2003;76(3):749-753.
8. Novick RJ, Stitt LW. The learning curve of an academic cardiac surgeon: use of the CUSUM method. J Card Surg. 1999;14(5):312-322.
9. Okrainec A, Ferri LE, Feldman LS, Fried GM. Defining the learning curve in laparoscopic paraesophageal hernia repair: a CUSUM analysis. Surg Endosc. 2011;25(4):1083-1087.
The difficult vaginal hysterectomy: 5 keys to success
CASE: Is the vaginal route appropriate?
A 46-year-old woman (para 2 with 1 cesarean delivery) who has a history of benign menorrhagia comes to your office seeking definitive treatment after medical therapy fails to alleviate her bleeding. pelvic examination reveals a uterus of 14-weeks’ size that descends to the distal vagina, with good vaginal access. What options for hysterectomy do you offer to the patient?
There are few absolute contraindications to a vaginal approach to hysterectomy. Among them are advanced pelvic malignancy, severe endometriosis, and a suspicious adnexal mass. Contraindications do not include a history of pelvic surgery, cesarean delivery, or an enlarged uterus. Such circumstances may increase the challenges involved in performing vaginal hysterectomy, but data suggest that it is achievable in these settings.1-7
Vaginal hysterectomy offers substantial benefits, making the challenges worthwhile in most cases. It is the original minimally invasive approach to hysterectomy. It yields outcomes, postoperative discomfort levels, and recovery times similar to those of laparoscopic-assisted vaginal hysterectomy, total laparoscopic hysterectomy, and robotic- assisted hysterectomy—but the vaginal approach is more cost-effective.3,8-11
This article focuses on strategies and techniques for accomplishing the difficult vaginal hysterectomy, describing five keys to success:
- surgical experience
- adequate exposure
- entry into the anterior cul-de-sac
- uterine mobility (or the ability to create it)
- good morcellation technique.
For clarity throughout this article, we assume that hysterectomy is being performed for benign indications.
1. Surgical experience
Vaginal hysterectomy can be performed successfully in the setting of nulliparity, uterine enlargement, and a history of cesarean delivery, provided the surgeon has the appropriate skill set, assistance, and patience. Little is lost if the operation is attempted vaginally but needs to be converted to a laparoscopic or open approach. If the surgeon persists in attempting to complete each hysterectomy vaginally, he or she will gradually improve in skill and eventually gain the ability to complete tougher cases without the need to convert.
Chen and colleagues developed and validated the Vaginal Surgical Skills Index (VSSI), identifying 13 aspects of successful vaginal surgery:
- inspection
- incision
- maintenance of visibility
- use of assistance
- knowledge of instruments
- tissue and instrument handling
- electrosurgery
- knot-tying and ligation
- hemostasis
- procedure completion
- time and motion
- flow and forward planning
- knowledge of the procedure.12
Thirty-seven trainees from two institutions were evaluated during 76 surgical procedures. The trainees were supervised by five surgeons, who completed the evaluations immediately after each procedure. A sixth surgeon from a different institution watched videos of each procedure and acted as a blinded external reviewer.
Chen and colleagues found good inter-rater and intra-rater reliability and high internal consistency for the VSSI, one of the first tools to objectively assess vaginal surgery skills.
2. Obtaining adequate exposure
Good anesthesia, proper lighting, and fixed retraction are invaluable when operating vaginally. A weighted speculum with Deaver retractors at 3, 9, and 12 o’clock provide good visualization if assistants are available. Self- retaining retractors are also useful (FIGURE 1).
FIGURE 1 Fixed retraction
A Magrina-Bookwalter fixed vaginal retractor in place at the time of surgery.We prefer to empty the bladder before making the vaginal incision, although no data suggest that doing so helps to avoid inadvertent bladder injury.
3. Entry into the anterior cul-de-sac
We prefer to enter the anterior cul-de-sac first. The pertinent risk in vaginal hysterectomy is injury to the bladder. Because anatomic planes are undisturbed at this point, we feel entry into the anterior cul-de-sac gives the surgeon the best opportunity to avoid injury. If it is a struggle or lack of uterine descent makes it difficult, then start with entry into the posterior cul-de-sac (see “gaining mobility”).
FIGURE 2 Palpate the bladder reflection
A. Use the index finger to palpate the bladder reflection. B. Note it with a marking.In a patient who does not have a history of surgery, palpation of the bladder reflection on the anterior uterus can help determine the appropriate site for the initial incision (FIGURE 2). Place a Deaver retractor anteriorly to assist with retraction. It is important to make the first incision deep enough to set up entry into the anterior cul-de-sac (FIGURE 3).
FIGURE 3 Incise the vaginal epithelium
A sharp and deep incision aids in identification of the appropriate plane.With traction on the uterus, grasp the anterior vaginal epithelium and elevate it to allow sharp dissection and mobilization of the bladder (FIGURE 4). We prefer sharp dissection rather than blunt dissection because it maintains surgical planes and is more precise.
FIGURE 4 Dissect the bladder free of the uterus
We recommend sharp dissection to free the bladder from the uterus.Once the peritoneum is identified, grasp, elevate, and incise it (FIGURE 5). Insert scissors through the peritoneal defect, spread the tips widely, and place the anterior Deaver retractor intraperitoneally (FIGURE 6) so that bowel can be visualized (FIGURE 7).
FIGURE 5 Use traction and counter-traction
Sharp entry into the peritoneal cavity is enhanced through the use of traction and counter-traction.
FIGURE 6 Open the peritoneal defect
Place scissors into the peritoneal defect and spread the blades wide.
FIGURE 7 Visualize the bowel
Visualization of the bowel confirms an intraperitoneal location.
WATCH THE VIDEO: Vaginal hysterectomy with entry into the anterior cul-de-sac
If the patient has a history of cesarean delivery, entry into the anterior cul-de-sac can be more challenging. Several maneuvers can help avert bladder injury:
- Stay on the uterus during dissection into the vesicovaginal space. It is better to stay deep and cut into the uterus than to dissect superficially and end up with a cystotomy.
- Retrograde fill the bladder to identify the plane between the bladder and the uterus.
- Postpone entry into the anterior cul-desac until after posterior entry, ligation of the uterosacral ligaments, and the first “bite” of the cardinal ligaments.
- Use a uterine sound, bent into a “U” shape, passing it through the urethra into the bladder and allowing the point to come back toward the surgeon (while it is in the bladder). Manipulation of this sound through external palpation should make it possible to identify the bladder reflection.
- In the setting of a small uterus, after entering the posterior cul-de-sac, pass a finger along the back of the uterus, around the fundus, and back toward the surgeon. This maneuver identifies the optimal spot for dissection between the bladder and the uterus.
When cervical elongation is encountered during entry into the cul-de-sac, the peritoneal reflection will be higher (both anteriorly and posteriorly), and additional bites on the pedicles, as well as additional dissection, may be required before entry is accomplished (FIGURE 8).
FIGURE 8 When the cervix is elongated
When the cervix is elongated, the peritoneal reflection, both anteriorly and posteriorly, is much higher on the uterus (near the small myoma).
If cystotomy occurs during an attempt to enter the anterior cul-de-sac, a number of steps can lead to successful repair. Rather than repair the defect immediately, mark it with a suture for later identification. Once the uterus is removed, inspect the bladder carefully to identify any additional injuries, then repair the cystotomy using absorbable 2-0 suture on a tapered needle (we prefer chromic suture).
Begin by taking a full-thickness bite of tissue, just lateral to the edge of the cystotomy. Then run the suture, incorporating the bladder epithelium into the closure. Place a second, imbricating layer of the same suture. Last, if possible, sew the peritoneum beneath the bladder over the repair for an additional layer of reinforcement.
WATCH THE VIDEO: Transvaginal cystotomy repair
Cystoscopy helps to visualize the repair and test for water-tightness, and assess ureteral patency.
Keep the bladder on catheter drainage for 10 to 14 days.
In the setting of nulliparity or a small, well-supported uterus, it may be necessary to create mobility to accomplish the hysterectomy vaginally. Begin by entering the posterior cul-de-sac and cutting and suture ligating the uterosacral ligaments. Then take the first bite of the cardinal pedicles bilaterally. This typically facilitates uterine descent, making it possible to enter the anterior culde-sac and accomplish the hysterectomy.
On occasion, once the uterine arteries have been secured, you can split (bi-valve) the uterus to gain access to the utero-ovarian pedicles and complete the hysterectomy.
It is important to understand the individual patient’s anatomy and underlying disease process before deciding on an appropriate surgical route. For this reason, a general medical and surgical history and a focused physical exam should precede any decision to operate. During the pelvic examination, note the size and mobility of the uterus, any associated uterovaginal prolapse, the presence of any adnexal mass or tenderness, vaginal capacity, and the adequacy of the pubic arch.
If you are unable to determine the size of the uterus on examination, owing to the patients’ body habitus or discomfort, pelvic ultrasonography may be helpful.
When office examination is difficult, or when it is impossible to gather substantial information about uterine characteristics, an examination under anesthesia is an excellent way to help determine the optimal route of hysterectomy. Provided the patient is properly apprised about this examination beforehand, the surgeon can then proceed to the appropriate surgical route once the exam is completed.
Ensure consent for all aspects of the procedure
As for any surgery, the informed consent discussion is important. Regardless of the hysterectomy approach, this discussion should include a mention of risks, benefits, and alternatives to surgery; the possible need for additional procedures (in the setting of unexpected pathology); and consent or decline of blood products, if needed. if photography or videotaping of the procedure is desired, this option needs to be discussed as well.
When a vaginal approach is planned, there is always a small chance that it will have to be converted to a laparoscopic or open approach. This possibility should be relayed to the patient during the preoperative discussion.
Inevitably, some cases fall on the border between the vaginal approach and another route. When this happens, we prefer to ask the patient to consent to the aforementioned examination under anesthesia, with the understanding that we may proceed as indicated to hysterectomy, based on the findings of that exam.
For example, in the opening case, the informed consent discussion would likely go something like this:
Mrs. Smith, because of fibroids, your uterus is enlarged to about the size of a small cantaloupe. Because you have had a vaginal delivery and your uterus is mobile, I think I will be able to remove it through the vagina. If vaginal removal is possible, you are likely to have a shorter recovery and a lower risk of complications than if a different approach is required. However, if I am unable to do a vaginal hysterectomy, an abdominal operation may need to be performed and would involve either a laparoscopy or an incision in the lower abdomen. I would like to evaluate things after you are asleep in the operating room. At that time, I will make the final decision about the best route for your hysterectomy.
For the exam, the anesthetized patient should be placed in the dorsal lithotomy position with her legs in stirrups. Often, there is greater vaginal access and uterine mobility at this time.
5. Good morcellation technique
Morcellation facilitates removal of the large uterus. As experience with morcellation increases, the surgeon will be able to remove larger and larger uteri vaginally. However, it is critical to secure the uterine vessels before morcellation begins, and it is preferable to have entered both cul-de-sacs as well. Once those steps have been accomplished, bi-valve the cervix in the midline, following the endocervical canal to stay in the midline (FIGURES 9,10). Use a tenaculum to grasp bites of the uterus in an anterior and posterior fashion (FIGURE 11). This step reduces uterine size until the fundus can be inverted and the utero-ovarian pedicles secured. Be sure to excise uterine tissue under direct visualization to avoid inadvertent injury to the bowel and bladder.
FIGURE 9 Begin morcellation
Once the uterine vessels have been controlled, morcellation may begin.
FIGURE 10 Bi-valve the cervix
Bi-valve the cervix in the midline, following the endocervical canal.
FIGURE 11 Excise the fibroid
Fibroids may be excised sharply with the aid of a scalpel and traction supplied by a tenaculum.
WATCH THE VIDEO: Vaginal hysterectomy with morcellation for the enlarged uterus
We need to do more vaginal procedures
Of the roughly 600,000 hysterectomies performed each year in the United States, roughly 60% are performed abdominally.13,14 More and more hysterectomies are being done laparoscopically or with robotic assistance, and fewer straight vaginal hysterectomies are performed.15 Recent graduates are less likely than their predecessors to be up-to-date on this important skill set—a fact that may lead to further decreases in the number of hysterectomies performed vaginally each year.16
We need to make every effort to increase the rate of vaginal hysterectomy. Not only is it better for the patient; it saves precious health-care dollars.
CASE: resolved
The vaginal approach was chosen for this patient. After ligation of the uterine vessels, morcellation allowed for a successful hysterectomy without complication.
1. Vaginal hysterectomy with entry into the anterior cul-de-sac
2. Transvaginal cystotomy repair
3. Vaginal hysterectomy with morcellation for the enlarged uterus
We want to hear from you! Tell us what you think.
1. Figueiredo O, Figueiredo EG, Figueiredo PG, Pelosi MA, 3rd, Pelosi MA. Vaginal removal of the benign nonprolapsed uterus: experience with 300 consecutive operations. Obstet Gynecol. 1999;94(3):348-351.
2. Rooney CM, Crawford AT, Vassallo BJ, Kleeman SD, Karram MM. Is previous cesarean section a risk for incidental cystotomy at the time of hysterectomy? A case-controlled study. Am J Obstet Gynecol. 2005;193(6):2041-2044.
3. Sesti F, Calonzi F, Ruggeri V, Pietropolli A, Piccione E. A comparison of vaginal, laparoscopic-assisted vaginal, and minilaparotomy hysterectomies for enlarged myomatous uteri. Int J Gynaecol Obstet. 2008;103(3):227-231.
4. Sheth SS, Malpani AN. Vaginal hysterectomy following previous cesarean section. Int J Gynaecol Obstet. 1995;50(2):165-169.
5. Kovac SR. Guidelines to determine the route of hysterectomy. Obstet Gynecol. 1995;85(1):18-23.
6. Unger JB, Meeks GR. Vaginal hysterectomy in women with history of previous cesarean delivery. Am J Obstet Gynecol. 1998;179(6 Pt 1):1473-1478.
7. Paparella P, Sizzi O, Rossetti A, De Benedittis F, Paparella R. Vaginal hysterectomy in generally considered contraindications to vaginal surgery. Arch Gynecol Obstet. 2004;270(2):104-109.
8. Schindlbeck C, Klauser K, Dian D, Janni W, Friese K. Comparison of total laparoscopic, vaginal and abdominal hysterectomy. Arch Gynecol Obstet. 2008;277(4):331-337.
9. Nazah I, Robin F, Jais JP, et al. Comparison between bisection/ morcellation and myometrial coring for reducing large uteri during vaginal hysterectomy or laparoscopically assisted vaginal hysterectomy: results of a randomized prospective study. Acta Obstet Gynecol Scand. 2003;82(11):1037-1042.
10. Wexner SD, Bergamaschi R, Lacy A, et al. The current status of robotic pelvic surgery: results of a multinational interdisciplinary consensus conference. Surg Endosc. 2009;23(2):438-442.
11. Johnson N, Barlow D, Lethaby A, Tavender E, Curr E, Garry R. Surgical approach to hysterectomy for benign gynaecological disease. Cochrane Database Syst Rev. 2006;(2):CD003677.-
12. Chen CC, Korn A, Klingele C, et al. Objective assessment of vaginal surgical skills. Am J Obstet Gynecol. 2010;203(1):79.e1-8.
13. Keshavarz H, Hillis SD, Kieke BA, Marchbanks PA. Hysterectomy surveillance—United States, 1994-1999. MMWR CDC Surveill Summ. 2002;51(SS05):1-8.http://www.cdc.gov/mmwr/preview/mmwrhtml/ss5105a1.htm. Published July 12, 2002. Accessed October 3, 2010.
14. Whiteman MK, Hillis SD, Jamieson DJ, et al. Inpatient hysterectomy surveillance in the United States, 2000-2004. Am J Obstet Gynecol. 2008;198(1):34.e1-7.
15. Merrill RM. Hysterectomy surveillance in the United States, 1997 through 2005. Medical Science Monitor. 2008;14(1):CR24-31.
16. Julian TM. Vaginal hysterectomy: an apparent exception to evidence-based decision making. Obstet Gynecol. 2008;111(4):812-813.
CASE: Is the vaginal route appropriate?
A 46-year-old woman (para 2 with 1 cesarean delivery) who has a history of benign menorrhagia comes to your office seeking definitive treatment after medical therapy fails to alleviate her bleeding. pelvic examination reveals a uterus of 14-weeks’ size that descends to the distal vagina, with good vaginal access. What options for hysterectomy do you offer to the patient?
There are few absolute contraindications to a vaginal approach to hysterectomy. Among them are advanced pelvic malignancy, severe endometriosis, and a suspicious adnexal mass. Contraindications do not include a history of pelvic surgery, cesarean delivery, or an enlarged uterus. Such circumstances may increase the challenges involved in performing vaginal hysterectomy, but data suggest that it is achievable in these settings.1-7
Vaginal hysterectomy offers substantial benefits, making the challenges worthwhile in most cases. It is the original minimally invasive approach to hysterectomy. It yields outcomes, postoperative discomfort levels, and recovery times similar to those of laparoscopic-assisted vaginal hysterectomy, total laparoscopic hysterectomy, and robotic- assisted hysterectomy—but the vaginal approach is more cost-effective.3,8-11
This article focuses on strategies and techniques for accomplishing the difficult vaginal hysterectomy, describing five keys to success:
- surgical experience
- adequate exposure
- entry into the anterior cul-de-sac
- uterine mobility (or the ability to create it)
- good morcellation technique.
For clarity throughout this article, we assume that hysterectomy is being performed for benign indications.
1. Surgical experience
Vaginal hysterectomy can be performed successfully in the setting of nulliparity, uterine enlargement, and a history of cesarean delivery, provided the surgeon has the appropriate skill set, assistance, and patience. Little is lost if the operation is attempted vaginally but needs to be converted to a laparoscopic or open approach. If the surgeon persists in attempting to complete each hysterectomy vaginally, he or she will gradually improve in skill and eventually gain the ability to complete tougher cases without the need to convert.
Chen and colleagues developed and validated the Vaginal Surgical Skills Index (VSSI), identifying 13 aspects of successful vaginal surgery:
- inspection
- incision
- maintenance of visibility
- use of assistance
- knowledge of instruments
- tissue and instrument handling
- electrosurgery
- knot-tying and ligation
- hemostasis
- procedure completion
- time and motion
- flow and forward planning
- knowledge of the procedure.12
Thirty-seven trainees from two institutions were evaluated during 76 surgical procedures. The trainees were supervised by five surgeons, who completed the evaluations immediately after each procedure. A sixth surgeon from a different institution watched videos of each procedure and acted as a blinded external reviewer.
Chen and colleagues found good inter-rater and intra-rater reliability and high internal consistency for the VSSI, one of the first tools to objectively assess vaginal surgery skills.
2. Obtaining adequate exposure
Good anesthesia, proper lighting, and fixed retraction are invaluable when operating vaginally. A weighted speculum with Deaver retractors at 3, 9, and 12 o’clock provide good visualization if assistants are available. Self- retaining retractors are also useful (FIGURE 1).
FIGURE 1 Fixed retraction
A Magrina-Bookwalter fixed vaginal retractor in place at the time of surgery.We prefer to empty the bladder before making the vaginal incision, although no data suggest that doing so helps to avoid inadvertent bladder injury.
3. Entry into the anterior cul-de-sac
We prefer to enter the anterior cul-de-sac first. The pertinent risk in vaginal hysterectomy is injury to the bladder. Because anatomic planes are undisturbed at this point, we feel entry into the anterior cul-de-sac gives the surgeon the best opportunity to avoid injury. If it is a struggle or lack of uterine descent makes it difficult, then start with entry into the posterior cul-de-sac (see “gaining mobility”).
FIGURE 2 Palpate the bladder reflection
A. Use the index finger to palpate the bladder reflection. B. Note it with a marking.In a patient who does not have a history of surgery, palpation of the bladder reflection on the anterior uterus can help determine the appropriate site for the initial incision (FIGURE 2). Place a Deaver retractor anteriorly to assist with retraction. It is important to make the first incision deep enough to set up entry into the anterior cul-de-sac (FIGURE 3).
FIGURE 3 Incise the vaginal epithelium
A sharp and deep incision aids in identification of the appropriate plane.With traction on the uterus, grasp the anterior vaginal epithelium and elevate it to allow sharp dissection and mobilization of the bladder (FIGURE 4). We prefer sharp dissection rather than blunt dissection because it maintains surgical planes and is more precise.
FIGURE 4 Dissect the bladder free of the uterus
We recommend sharp dissection to free the bladder from the uterus.Once the peritoneum is identified, grasp, elevate, and incise it (FIGURE 5). Insert scissors through the peritoneal defect, spread the tips widely, and place the anterior Deaver retractor intraperitoneally (FIGURE 6) so that bowel can be visualized (FIGURE 7).
FIGURE 5 Use traction and counter-traction
Sharp entry into the peritoneal cavity is enhanced through the use of traction and counter-traction.
FIGURE 6 Open the peritoneal defect
Place scissors into the peritoneal defect and spread the blades wide.
FIGURE 7 Visualize the bowel
Visualization of the bowel confirms an intraperitoneal location.
WATCH THE VIDEO: Vaginal hysterectomy with entry into the anterior cul-de-sac
If the patient has a history of cesarean delivery, entry into the anterior cul-de-sac can be more challenging. Several maneuvers can help avert bladder injury:
- Stay on the uterus during dissection into the vesicovaginal space. It is better to stay deep and cut into the uterus than to dissect superficially and end up with a cystotomy.
- Retrograde fill the bladder to identify the plane between the bladder and the uterus.
- Postpone entry into the anterior cul-desac until after posterior entry, ligation of the uterosacral ligaments, and the first “bite” of the cardinal ligaments.
- Use a uterine sound, bent into a “U” shape, passing it through the urethra into the bladder and allowing the point to come back toward the surgeon (while it is in the bladder). Manipulation of this sound through external palpation should make it possible to identify the bladder reflection.
- In the setting of a small uterus, after entering the posterior cul-de-sac, pass a finger along the back of the uterus, around the fundus, and back toward the surgeon. This maneuver identifies the optimal spot for dissection between the bladder and the uterus.
When cervical elongation is encountered during entry into the cul-de-sac, the peritoneal reflection will be higher (both anteriorly and posteriorly), and additional bites on the pedicles, as well as additional dissection, may be required before entry is accomplished (FIGURE 8).
FIGURE 8 When the cervix is elongated
When the cervix is elongated, the peritoneal reflection, both anteriorly and posteriorly, is much higher on the uterus (near the small myoma).
If cystotomy occurs during an attempt to enter the anterior cul-de-sac, a number of steps can lead to successful repair. Rather than repair the defect immediately, mark it with a suture for later identification. Once the uterus is removed, inspect the bladder carefully to identify any additional injuries, then repair the cystotomy using absorbable 2-0 suture on a tapered needle (we prefer chromic suture).
Begin by taking a full-thickness bite of tissue, just lateral to the edge of the cystotomy. Then run the suture, incorporating the bladder epithelium into the closure. Place a second, imbricating layer of the same suture. Last, if possible, sew the peritoneum beneath the bladder over the repair for an additional layer of reinforcement.
WATCH THE VIDEO: Transvaginal cystotomy repair
Cystoscopy helps to visualize the repair and test for water-tightness, and assess ureteral patency.
Keep the bladder on catheter drainage for 10 to 14 days.
In the setting of nulliparity or a small, well-supported uterus, it may be necessary to create mobility to accomplish the hysterectomy vaginally. Begin by entering the posterior cul-de-sac and cutting and suture ligating the uterosacral ligaments. Then take the first bite of the cardinal pedicles bilaterally. This typically facilitates uterine descent, making it possible to enter the anterior culde-sac and accomplish the hysterectomy.
On occasion, once the uterine arteries have been secured, you can split (bi-valve) the uterus to gain access to the utero-ovarian pedicles and complete the hysterectomy.
It is important to understand the individual patient’s anatomy and underlying disease process before deciding on an appropriate surgical route. For this reason, a general medical and surgical history and a focused physical exam should precede any decision to operate. During the pelvic examination, note the size and mobility of the uterus, any associated uterovaginal prolapse, the presence of any adnexal mass or tenderness, vaginal capacity, and the adequacy of the pubic arch.
If you are unable to determine the size of the uterus on examination, owing to the patients’ body habitus or discomfort, pelvic ultrasonography may be helpful.
When office examination is difficult, or when it is impossible to gather substantial information about uterine characteristics, an examination under anesthesia is an excellent way to help determine the optimal route of hysterectomy. Provided the patient is properly apprised about this examination beforehand, the surgeon can then proceed to the appropriate surgical route once the exam is completed.
Ensure consent for all aspects of the procedure
As for any surgery, the informed consent discussion is important. Regardless of the hysterectomy approach, this discussion should include a mention of risks, benefits, and alternatives to surgery; the possible need for additional procedures (in the setting of unexpected pathology); and consent or decline of blood products, if needed. if photography or videotaping of the procedure is desired, this option needs to be discussed as well.
When a vaginal approach is planned, there is always a small chance that it will have to be converted to a laparoscopic or open approach. This possibility should be relayed to the patient during the preoperative discussion.
Inevitably, some cases fall on the border between the vaginal approach and another route. When this happens, we prefer to ask the patient to consent to the aforementioned examination under anesthesia, with the understanding that we may proceed as indicated to hysterectomy, based on the findings of that exam.
For example, in the opening case, the informed consent discussion would likely go something like this:
Mrs. Smith, because of fibroids, your uterus is enlarged to about the size of a small cantaloupe. Because you have had a vaginal delivery and your uterus is mobile, I think I will be able to remove it through the vagina. If vaginal removal is possible, you are likely to have a shorter recovery and a lower risk of complications than if a different approach is required. However, if I am unable to do a vaginal hysterectomy, an abdominal operation may need to be performed and would involve either a laparoscopy or an incision in the lower abdomen. I would like to evaluate things after you are asleep in the operating room. At that time, I will make the final decision about the best route for your hysterectomy.
For the exam, the anesthetized patient should be placed in the dorsal lithotomy position with her legs in stirrups. Often, there is greater vaginal access and uterine mobility at this time.
5. Good morcellation technique
Morcellation facilitates removal of the large uterus. As experience with morcellation increases, the surgeon will be able to remove larger and larger uteri vaginally. However, it is critical to secure the uterine vessels before morcellation begins, and it is preferable to have entered both cul-de-sacs as well. Once those steps have been accomplished, bi-valve the cervix in the midline, following the endocervical canal to stay in the midline (FIGURES 9,10). Use a tenaculum to grasp bites of the uterus in an anterior and posterior fashion (FIGURE 11). This step reduces uterine size until the fundus can be inverted and the utero-ovarian pedicles secured. Be sure to excise uterine tissue under direct visualization to avoid inadvertent injury to the bowel and bladder.
FIGURE 9 Begin morcellation
Once the uterine vessels have been controlled, morcellation may begin.
FIGURE 10 Bi-valve the cervix
Bi-valve the cervix in the midline, following the endocervical canal.
FIGURE 11 Excise the fibroid
Fibroids may be excised sharply with the aid of a scalpel and traction supplied by a tenaculum.
WATCH THE VIDEO: Vaginal hysterectomy with morcellation for the enlarged uterus
We need to do more vaginal procedures
Of the roughly 600,000 hysterectomies performed each year in the United States, roughly 60% are performed abdominally.13,14 More and more hysterectomies are being done laparoscopically or with robotic assistance, and fewer straight vaginal hysterectomies are performed.15 Recent graduates are less likely than their predecessors to be up-to-date on this important skill set—a fact that may lead to further decreases in the number of hysterectomies performed vaginally each year.16
We need to make every effort to increase the rate of vaginal hysterectomy. Not only is it better for the patient; it saves precious health-care dollars.
CASE: resolved
The vaginal approach was chosen for this patient. After ligation of the uterine vessels, morcellation allowed for a successful hysterectomy without complication.
1. Vaginal hysterectomy with entry into the anterior cul-de-sac
2. Transvaginal cystotomy repair
3. Vaginal hysterectomy with morcellation for the enlarged uterus
We want to hear from you! Tell us what you think.
1. Figueiredo O, Figueiredo EG, Figueiredo PG, Pelosi MA, 3rd, Pelosi MA. Vaginal removal of the benign nonprolapsed uterus: experience with 300 consecutive operations. Obstet Gynecol. 1999;94(3):348-351.
2. Rooney CM, Crawford AT, Vassallo BJ, Kleeman SD, Karram MM. Is previous cesarean section a risk for incidental cystotomy at the time of hysterectomy? A case-controlled study. Am J Obstet Gynecol. 2005;193(6):2041-2044.
3. Sesti F, Calonzi F, Ruggeri V, Pietropolli A, Piccione E. A comparison of vaginal, laparoscopic-assisted vaginal, and minilaparotomy hysterectomies for enlarged myomatous uteri. Int J Gynaecol Obstet. 2008;103(3):227-231.
4. Sheth SS, Malpani AN. Vaginal hysterectomy following previous cesarean section. Int J Gynaecol Obstet. 1995;50(2):165-169.
5. Kovac SR. Guidelines to determine the route of hysterectomy. Obstet Gynecol. 1995;85(1):18-23.
6. Unger JB, Meeks GR. Vaginal hysterectomy in women with history of previous cesarean delivery. Am J Obstet Gynecol. 1998;179(6 Pt 1):1473-1478.
7. Paparella P, Sizzi O, Rossetti A, De Benedittis F, Paparella R. Vaginal hysterectomy in generally considered contraindications to vaginal surgery. Arch Gynecol Obstet. 2004;270(2):104-109.
8. Schindlbeck C, Klauser K, Dian D, Janni W, Friese K. Comparison of total laparoscopic, vaginal and abdominal hysterectomy. Arch Gynecol Obstet. 2008;277(4):331-337.
9. Nazah I, Robin F, Jais JP, et al. Comparison between bisection/ morcellation and myometrial coring for reducing large uteri during vaginal hysterectomy or laparoscopically assisted vaginal hysterectomy: results of a randomized prospective study. Acta Obstet Gynecol Scand. 2003;82(11):1037-1042.
10. Wexner SD, Bergamaschi R, Lacy A, et al. The current status of robotic pelvic surgery: results of a multinational interdisciplinary consensus conference. Surg Endosc. 2009;23(2):438-442.
11. Johnson N, Barlow D, Lethaby A, Tavender E, Curr E, Garry R. Surgical approach to hysterectomy for benign gynaecological disease. Cochrane Database Syst Rev. 2006;(2):CD003677.-
12. Chen CC, Korn A, Klingele C, et al. Objective assessment of vaginal surgical skills. Am J Obstet Gynecol. 2010;203(1):79.e1-8.
13. Keshavarz H, Hillis SD, Kieke BA, Marchbanks PA. Hysterectomy surveillance—United States, 1994-1999. MMWR CDC Surveill Summ. 2002;51(SS05):1-8.http://www.cdc.gov/mmwr/preview/mmwrhtml/ss5105a1.htm. Published July 12, 2002. Accessed October 3, 2010.
14. Whiteman MK, Hillis SD, Jamieson DJ, et al. Inpatient hysterectomy surveillance in the United States, 2000-2004. Am J Obstet Gynecol. 2008;198(1):34.e1-7.
15. Merrill RM. Hysterectomy surveillance in the United States, 1997 through 2005. Medical Science Monitor. 2008;14(1):CR24-31.
16. Julian TM. Vaginal hysterectomy: an apparent exception to evidence-based decision making. Obstet Gynecol. 2008;111(4):812-813.
Repair of a constricted or shortened vagina: What works?
To watch a demonstration of the surgical treatment of vaginal stenosis using bilateral groin flaps and a demonstration of the takedown of iatrogenic vaginal constriction, visit the Video Library.
Patients who want to be sexually active but suffer iatrogenic vaginal constriction or shortening, or both, are a surgical challenge. Their condition may require any of a variety of nonsurgical and surgical procedures to restore the ability to have gratifying sexual intercourse, and they may need considerable preoperative and postoperative counseling and management.
What is the basis of this problem?
The cause of vaginal shortening or constriction is most often surgical. Rarely is systemic disease or a localized condition, such as urogenital atrophy, responsible.
Prolapse procedures. Most procedures that result in vaginal shortening or constriction are ones performed to correct pelvic organ prolapse (POP), notably:
- posterior colpoperineorrhaphy with levatorplasty
- hysterectomy, whether abdominal or vaginal, during which too much of the upper vagina is taken with the cervix
- anterior and posterior colporrhaphy in which vaginal plication and trimming are performed overzealously.
Radiation therapy to the pelvis can result in vaginal shortening, constriction, and obliteration.
How do you avoid creating these problems?
Techniques to avoid vaginal shortening and constriction during vaginal reconstructive surgery include appropriate use of levatorplasty during posterior colpoperineorrhaphy. Although levatorplasty is, at times, the only way to decrease the size of a large vaginal hiatus, it should be used only in the distal third of the vagina. Levatorplasty above this area often creates vaginal constriction that results in postoperative dyspareunia.
Also, avoid 1) overzealous trimming during anterior and posterior colporrhaphy and 2) removing too much vagina at vaginal or abdominal hysterectomy.
Last, it is important that a patient who has undergone vaginal reconstructive surgery have a vaginal exam within 2 weeks after surgery. This will ensure that the vaginal incisions do not fuse, thus creating vaginal scarring, closure, and constriction.
How is correction approached?
Various modifications of a McIndoe procedure have been described for vaginal agenesis, but surgical correction of iatrogenic vaginal shortening or constriction is not well described; few case series exist in the literature. Consensus is lacking on what the minimal length of a vagina must be to preserve normal sexual function, and no standard exists in regards to either normal vaginal caliber or the relationship of the perineum and perineal body to the distal posterior vagina.
That being said, we have recognized the following correlates of a successful return to sexual function after surgery for vaginal constriction or shortening:
- The vagina should, at minimum, be 7 cm long to have the potential for normal function
- The vaginal opening should easily admit two fingers during examination
- The relationship of the posterior vagina and the perineum should be a perpendicular one, in which a built-up perineum attaches to the posterior vagina at the posterior fourchette at a 90° angle
- There should be no buildup of perineal skin above and beyond the posterior fourchette.
Is surgery the first intervention?
No. The patient should first undergo an attempt at nonsurgical management. This usually involves:
- vaginal estrogen cream in a postmenopausal patient
- appropriate utilization of a vaginal dilator.
What are options for surgery?
If nonsurgical management of vaginal constriction or shortening is unsuccessful or unsatisfactory, next choose an operation based on the needs of the individual patient. Some procedures involve placement of a skin graft or, possibly, other biologic material in the vagina to close over defects after constriction has been taken down or the vagina has been appropriately opened up. (It is fortunate that the vagina heals well by secondary intention; often, simply taking down the constriction and allowing the vagina to heal by secondary intention is successful.)
It is important to cut through the constriction and completely separate the tissue during the takedown of vaginal constriction. At this point, you need to decide whether to allow the separated vagina to heal by secondary intention or to cover the defect with a skin graft or other biologic material.
Whichever course you choose, keep the vagina open during the immediate postoperative period. Doing so may require placement of a vaginal stent, numerous postoperative exams, use of a vaginal dilator, or a combination of these measures.
When constriction rings are present in the face of ample vaginal length, you can perform a Z-plasty, in which the lines of a letter Z are incised transversely or longitudinally across the constricted region and the two flaps that have been created from the Z are transposed. This maneuver releases constriction well.
When constriction extends distally, the procedure used is, basically, a reverse perineoplasty: Cut the constriction band longitudinally, undermine the vagina, and then sew it back transversely. This relieves the distal band.
In a severe case of vaginal constriction, thigh flaps that are left on their vascular pedicle can be brought into the vagina to fill the gap created by cutting through the constriction. Initial incisions are made laterally in the vagina (unilaterally or bilaterally, depending on the degree of constriction) and extended to the perineum/vulva. Measurements are made to determine the length and width of flap(s) needed. The flaps are then mobilized, rotated into the defect(s), and sutured into place. This technique significantly increases the diameter of the vagina and can add length, if needed.
What about correcting shortening?
An iatrogenically shortened vagina presents the most challenging of cases. The vagina must be opened up at the cuff; ideally, this produces adequate length without having to enter the peritoneum.
Dr. Karram is a course director and Dr. Gebhart is on the faculty of the 10th Annual Pelvic Anatomy and Gynecologic Surgery Symposium (PAGS), to be held December 6-8, 2007, in Las Vegas (www.pags-cme.org).
To watch a demonstration of the surgical treatment of vaginal stenosis using bilateral groin flaps and a demonstration of the takedown of iatrogenic vaginal constriction, visit the Video Library.
Patients who want to be sexually active but suffer iatrogenic vaginal constriction or shortening, or both, are a surgical challenge. Their condition may require any of a variety of nonsurgical and surgical procedures to restore the ability to have gratifying sexual intercourse, and they may need considerable preoperative and postoperative counseling and management.
What is the basis of this problem?
The cause of vaginal shortening or constriction is most often surgical. Rarely is systemic disease or a localized condition, such as urogenital atrophy, responsible.
Prolapse procedures. Most procedures that result in vaginal shortening or constriction are ones performed to correct pelvic organ prolapse (POP), notably:
- posterior colpoperineorrhaphy with levatorplasty
- hysterectomy, whether abdominal or vaginal, during which too much of the upper vagina is taken with the cervix
- anterior and posterior colporrhaphy in which vaginal plication and trimming are performed overzealously.
Radiation therapy to the pelvis can result in vaginal shortening, constriction, and obliteration.
How do you avoid creating these problems?
Techniques to avoid vaginal shortening and constriction during vaginal reconstructive surgery include appropriate use of levatorplasty during posterior colpoperineorrhaphy. Although levatorplasty is, at times, the only way to decrease the size of a large vaginal hiatus, it should be used only in the distal third of the vagina. Levatorplasty above this area often creates vaginal constriction that results in postoperative dyspareunia.
Also, avoid 1) overzealous trimming during anterior and posterior colporrhaphy and 2) removing too much vagina at vaginal or abdominal hysterectomy.
Last, it is important that a patient who has undergone vaginal reconstructive surgery have a vaginal exam within 2 weeks after surgery. This will ensure that the vaginal incisions do not fuse, thus creating vaginal scarring, closure, and constriction.
How is correction approached?
Various modifications of a McIndoe procedure have been described for vaginal agenesis, but surgical correction of iatrogenic vaginal shortening or constriction is not well described; few case series exist in the literature. Consensus is lacking on what the minimal length of a vagina must be to preserve normal sexual function, and no standard exists in regards to either normal vaginal caliber or the relationship of the perineum and perineal body to the distal posterior vagina.
That being said, we have recognized the following correlates of a successful return to sexual function after surgery for vaginal constriction or shortening:
- The vagina should, at minimum, be 7 cm long to have the potential for normal function
- The vaginal opening should easily admit two fingers during examination
- The relationship of the posterior vagina and the perineum should be a perpendicular one, in which a built-up perineum attaches to the posterior vagina at the posterior fourchette at a 90° angle
- There should be no buildup of perineal skin above and beyond the posterior fourchette.
Is surgery the first intervention?
No. The patient should first undergo an attempt at nonsurgical management. This usually involves:
- vaginal estrogen cream in a postmenopausal patient
- appropriate utilization of a vaginal dilator.
What are options for surgery?
If nonsurgical management of vaginal constriction or shortening is unsuccessful or unsatisfactory, next choose an operation based on the needs of the individual patient. Some procedures involve placement of a skin graft or, possibly, other biologic material in the vagina to close over defects after constriction has been taken down or the vagina has been appropriately opened up. (It is fortunate that the vagina heals well by secondary intention; often, simply taking down the constriction and allowing the vagina to heal by secondary intention is successful.)
It is important to cut through the constriction and completely separate the tissue during the takedown of vaginal constriction. At this point, you need to decide whether to allow the separated vagina to heal by secondary intention or to cover the defect with a skin graft or other biologic material.
Whichever course you choose, keep the vagina open during the immediate postoperative period. Doing so may require placement of a vaginal stent, numerous postoperative exams, use of a vaginal dilator, or a combination of these measures.
When constriction rings are present in the face of ample vaginal length, you can perform a Z-plasty, in which the lines of a letter Z are incised transversely or longitudinally across the constricted region and the two flaps that have been created from the Z are transposed. This maneuver releases constriction well.
When constriction extends distally, the procedure used is, basically, a reverse perineoplasty: Cut the constriction band longitudinally, undermine the vagina, and then sew it back transversely. This relieves the distal band.
In a severe case of vaginal constriction, thigh flaps that are left on their vascular pedicle can be brought into the vagina to fill the gap created by cutting through the constriction. Initial incisions are made laterally in the vagina (unilaterally or bilaterally, depending on the degree of constriction) and extended to the perineum/vulva. Measurements are made to determine the length and width of flap(s) needed. The flaps are then mobilized, rotated into the defect(s), and sutured into place. This technique significantly increases the diameter of the vagina and can add length, if needed.
What about correcting shortening?
An iatrogenically shortened vagina presents the most challenging of cases. The vagina must be opened up at the cuff; ideally, this produces adequate length without having to enter the peritoneum.
Dr. Karram is a course director and Dr. Gebhart is on the faculty of the 10th Annual Pelvic Anatomy and Gynecologic Surgery Symposium (PAGS), to be held December 6-8, 2007, in Las Vegas (www.pags-cme.org).
Dr. Karram is a course director and Dr. Gebhart is on the faculty of the 10th Annual Pelvic Anatomy and Gynecologic Surgery Symposium (PAGS), to be held December 6-8, 2007, in Las Vegas (www.pags-cme.org).