User login
“Take pride in your surgical work. Do it in such a way that you would be willing to sign your name to it…the operation was performed by me.”
—Raymond A. Lee, MD
The US Food and Drug Administration (FDA) recently ordered companies to cease selling transvaginal mesh intended for pelvic organ prolapse (POP) repair (but not for the treatment of stress urinary incontinence [SUI] or for abdominal sacrocolpopexy).1,2 The FDA is also requiring companies preparing premarket approval applications for mesh products for the treatment of transvaginal POP to continue safety and efficacy follow-up in existing section 522 postmarket surveillance studies.3
It is, therefore, incumbent upon gynecologic surgeons to understand the surgical options that remain and perfect their surgical approach to POP to optimize patient outcomes. POP may be performed transvaginally or transabdominally, with each approach offering its own set of risks and benefits. The ability to perform both effectively allows the surgeon to tailor the approach to the condition and circumstances encountered. It is also important to realize that “cures” are elusive in POP surgery. While we can frequently alleviate patient symptoms and improve quality of life, a lifelong “cure” is an unrealistic goal for most prolapse procedures.
This article focuses on transvaginal native tissue repair,4 specifically the Mayo approach.
Watch video here
Vaginal surgery fundamentals
Before we explore the details of the Mayo technique, let’s review some basic principles of vaginal surgery. First, it is important to make a good clinical diagnosis so that you know which compartments (apex, anterior, or posterior) are involved. Although single compartment defects exist, multicompartment defects are far more common. Failing to recognize all compartment defects often results in incomplete repair, which can mean recurrent prolapse and additional interventions.
Second, exposure is critical when performing surgery by any route. You must be able to see your surgical field completely in order to properly execute your surgical approach. Table height, lighting, and retraction are all important to surgical success.
Lastly, it is important to know how to effectively execute your intended procedure. Native tissue repair is often criticized for having a high failure rate. It makes sense that mesh augmentation offers greater durability of a repair, but an effective native tissue repair will also effectively treat the majority of patients. An ineffective repair does not benefit the patient and contributes to high failure rates.
- Mesh slings for urinary incontinence and mesh use in sacrocolpopexy have not been banned by the FDA.
- Apical support is helpful to all other compartment support.
- Fixing the fascial defect between the base of the bladder and the apex will improve your anterior compartment outcomes.
- Monitor vaginal caliber throughout your posterior compartment repair.
Vaginal apex repairs
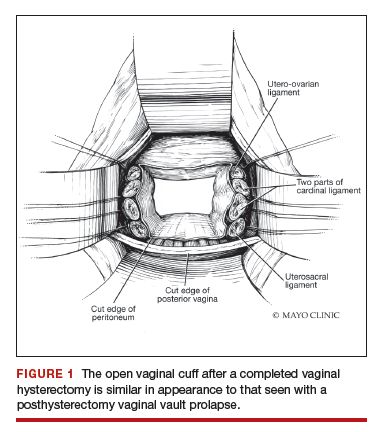
Data from the OPTIMAL trial suggest that uterosacral ligament suspension and sacrospinous ligament fixation are equally effective in treating apical prolapse.5 Our preference is a McCall culdoplasty (uterosacral ligament plication). It allows direct visualization (internally or externally) to place apical support stitches and plicates the ligaments in the midline of the vaginal cuff to help prevent enterocele protrusion. DeLancey has described the levels of support in the female pelvis and places importance on apical support.6 Keep in mind that anterior and posterior compartment prolapse is often accompanied by apical prolapse. Therefore, treating the apex is critical for overall success.
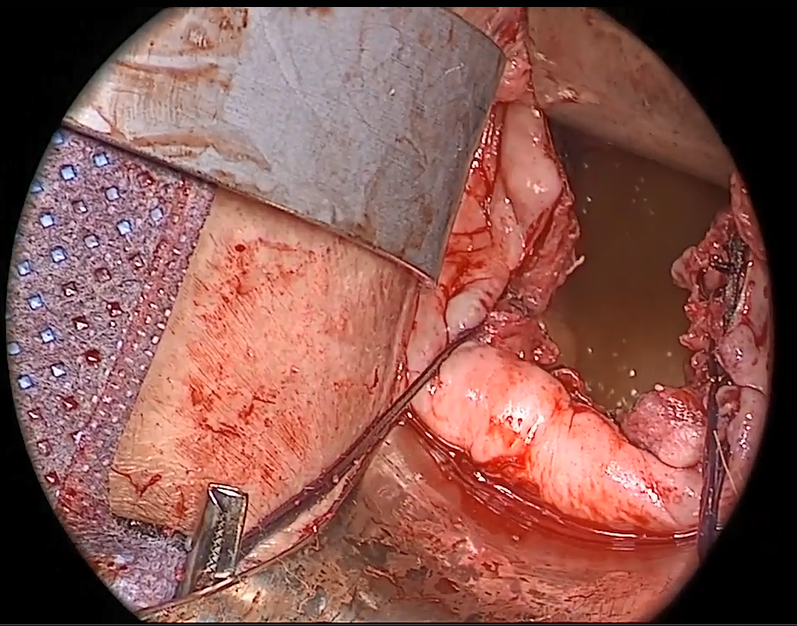
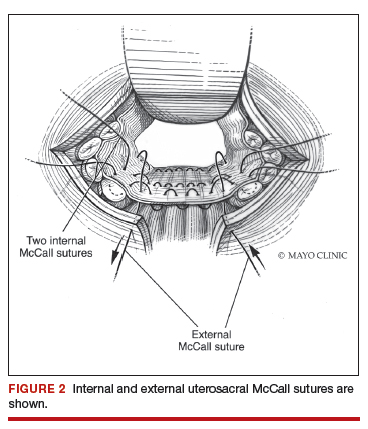
External vs internal McCall sutures: My technique. Envision the open vaginal cuff after completing a vaginal hysterectomy or after opening the vaginal cuff for a posthysterectomy vaginal vault prolapse (FIGURE 1). External (suture placed through the vaginal cuff epithelium into the peritoneal cavity, incorporating the uterosacral ligaments and intervening peritoneum, and ultimately brought back out through the posterior cuff and tied) or internal (suture placed in the intraperitoneal space, incorporating the uterosacral ligaments and intervening peritoneum, and tied internally) McCall sutures can be utilized (FIGURE 2). I prefer a combination of both. I use 0-polyglactin for external sutures, as the sutures will ultimately dissolve and not remain in the vaginal cavity. I usually place at least 2 external sutures with the lowest suture on the vaginal cuff being the deepest uterosacral stitch. Each subsequent suture is placed closer to the vaginal cuff and closer to the ends of the ligamentous stumps, starting deepest and working back toward the cuff with each stitch. I place 1 or 2 internal sutures (delayed absorbable or permanent) between my 2 external sutures. Because these sutures will be tied internally and located in the intraperitoneal space, permanent sutures may be used.
Avoiding ureteral injury: Tips for cystoscopy. A known risk of performing uterosacral ligament stitches is kinking or injury to the ureter. Therefore, cystoscopy is mandatory when performing this procedure. I tie one suture at a time starting with the internal sutures. I then perform cystoscopy after each suture tying. If I do not get ureteral spill after tying the suture, I remove and replace the suture and repeat cystoscopy until normal bilateral ureteral spill is achieved.
Key points for uterosacral ligament suspension. Achieving apical support at this point gives me the ability to build my anterior and posterior repair procedures off of this support. It is critical when performing uterosacral ligament suspension that you define the space between the ureter and rectum on each side. (Elevation of the cardinal pedicle and medial retraction of the rectum facilitate this.) The ligament runs down toward the sacrum when the patient is supine. You must follow that trajectory to be successful and avoid injury. One must also be careful not to be too deep on the ligament, as plication at that level may cause defecatory dysfunction.
Continue to: Anterior compartment repairs...
Anterior compartment repairs
The anterior compartment seems the most susceptible to forces within the pelvis and is a common site of prolapse. Many theories exist as to what causes a cystocele—distension, displacement, detachment, etc. While paravaginal defects exist, I believe that most cystoceles arise horizontally at the base of the bladder as the anterior endopelvic fascia detaches from the apex or cervix. The tissue then attenuates as the hernia progresses.
For surgical success: Make certain your repair addresses re-establishing continuity of the anterior endopelvic fascia with the fascia and ligaments at the vaginal apex; it will increase your success in treating anterior compartment prolapse.
We prefer to mobilize the epithelium in the midline from the vaginal apex to the mid‑urethra (if performing a midurethral sling, we stop short of the bladder neck and perform a separate suburethral incision). When incising the epithelium in the midline, the underlying fascia is also split in the midline, creating a midline defect. Once the epithelium is split and mobilized laterally off the underlying fascia, we can begin reconstruction.
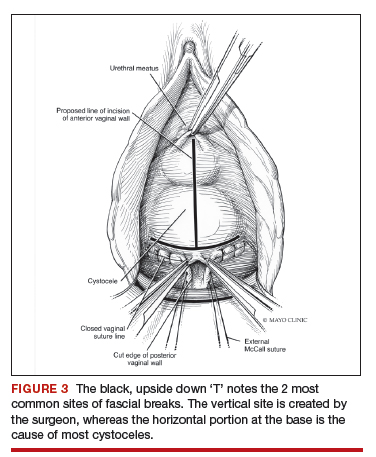
The midline fascial defect that was just created is closed with a running 2-0 polyglactin from just beneath the bladder neck down to and including the fascia and uterosacral ligaments at the apex. This is accomplished in an upside down ‘T’ orientation (FIGURE 3). It is critical that the fascia is reunited at the base or you will leave the patient with a hernia.
For surgical success: To check intraoperatively that the fascia is reunited at the base, try to place an index finger between the base of the cystocele repair and the apex. If you can insert your finger, that is where the hernia still exists. If you meet resistance with your finger, you are palpating reunification of the anterior and apical fascia.
Technique for Kelly-Kennedy bladder neck plication. If the patient has mild incontinence that does not require a sling procedure, we now complete the second portion of the anterior repair starting with a Kelly-Kennedy bladder neck plication. Utilizing interrupted 1-0 polyglactin suture, vertical bites are taken periurethrally, starting at the midurethra and then the bladder neck. This nicely supports the urethra and proximal bladder neck and is very helpful for mild incontinence or for prophylactic benefit. Then starting beneath the bladder neck, the fascia is plicated again in the midline, reinforcing the suture line of the inverse ‘T’ with 2-0 polyglactin. The redundant epithelium is trimmed and reapproximated with interrupted 2-0 polyglactin (FIGURE 4). We tend to be more aggressive by adding the Kelly-Kennedy plication, which can lead to temporary voiding delay. We offer placement of a suprapubic catheter at the time of surgery or self-intermittent catherization.
Lastly, given that we have just dissected and then plicated the tissues beneath the bladder, I like to perform cystoscopy to be certain the bladder has not been violated. It is also important not to over-plicate the anterior fascia so that the sutures shear through the fascia and weaken the support or narrow the vaginal lumen.

Continue to: Posterior compartment repairs...
Posterior compartment repairs
Like with the anterior compartment, opinions differ as to the site of posterior compartment prolapse. Midline, lateral, distal, and site-specific defects and surgical approaches have been described. Research suggests that there is no benefit to the use of mesh in the posterior compartment.7 It is very important to recognize that over-plication of the posterior compartment can lead to narrowing/stricture and dyspareunia. Therefore, monitor vaginal caliber throughout repair of the posterior compartment.
Although we believe that a midline defect in the endopelvic fascia is primarily responsible for rectoceles, we also appreciate that the fascia must be reconstructed all the way to the perineal body and that narrowing the genital hiatus is very important and often underappreciated (FIGURE 5). Thus, perineal reconstruction is universally performed. I will emphasize again that reconstruction must be performed while also monitoring vaginal caliber. If it is too tight with the patient under anesthesia, it will be too tight when the patient recovers. Avoidance is the best option. If the patient does not desire a functional vagina (eg, an elderly patient), then narrowing is a desired goal.

Perineal reconstruction technique and tips for success
A retractor at 12 o’clock to support the apex and anterior wall can be helpful for visualization in the posterior compartment. We start with a v-shaped incision on the perineum. The width is determined by how much you want to build up the perineum and narrow the vagina (the wider the incision, the more building up of the perineal body and vaginal narrowing). A strip of epithelium is then mobilized in the midline (be careful not to excise too much). This dissection is carried all the way up the midline to just short of the tied apical suspension sutures at the posterior vaginal apex. The posterior dissection tends to be the most vascular in my experience.
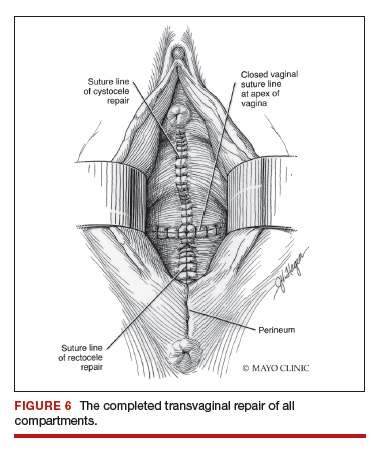
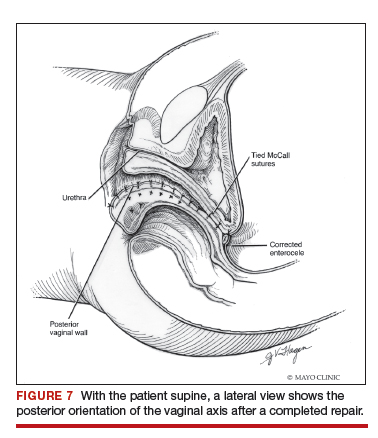
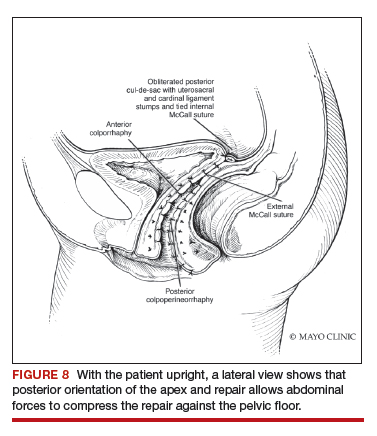
Utilize cautery to obtain hemostasis along your dissection margins while protecting the underlying rectum. We have not found it necessary to dissect the posterior epithelium off the underlying fascia (that is an option at this point, however, if you feel more comfortable doing this). With an index finger in the vagina, compressing the rectum posteriorly, interrupted 1-0 polyglactin suture is placed through the epithelium and underlying fascia (avoiding the rectum) on one side, then the other, and then tied. The next sutures are placed utilizing the same technique, and the caliber of the vagina is noted with the placement of each suture (if it is too tight, then remove and replace the suture and recheck). It is important to realize you want to plicate the fascia in the midline and not perform an aggressive levatorplasty that could lead to muscle pain. Additionally, each suture should get the same purchase of tissue on each side, and the spacing of each suture should be uniform, like rungs on a ladder. Ultimately, the repair is carried down to the hymenal ring. At this point, the perineal reconstruction is performed, plicating the perineal body in the midline with deeper horizontal sutures and then closing the perineal skin with interrupted or subcuticular sutures (FIGURE 6). Completion of these repairs should orient the vagina toward the hollow of the sacrum (FIGURE 7), allowing downward forces to compress the vaginal supports posteriorly onto the pelvic floor instead of forcing it out the vaginal lumen (FIGURE 8).
Our patients generally stay in the hospital overnight, and we place a vaginal pack to provide topical pressure throughout the vagina overnight. We tell patients no lifting more than 15 lb and no intercourse for 6 weeks. While we do not tend to use hydrodissection in our repairs, it is a perfectly acceptable option.
Continue to: Commit to knowledge of native tissue techniques...
Commit to knowledge of native tissue techniques
Given the recent FDA ban on the sale of transvaginal mesh for POP and the public’s negative perception of mesh (based often on misleading information in the media), it is incumbent upon gynecologic surgeons to invest in learning or relearning effective native tissue techniques for the transvaginal treatment of POP. While not perfect, they offer an effective nonmesh treatment option for many of our patients.
- US Food and Drug Administration. FDA takes action to protect women’s health, orders manufacturers of surgical mesh intended for transvaginal repair of pelvic organ prolapse to stop selling all devices. . Published April 16, 2019. Accessed August 6, 2019.
- US Food and Drug Administration. Urogynecological surgical mesh implants. . Published July 10, 2019. Accessed August 5, 2019.
- US Food and Drug Administration. Effective date of requirement for premarket approval for surgical mesh for transvaginal pelvic organ prolapse repair. https://www.federalregister.gov/documents/2016/01/05/2015-33163/effective-date-of-requirement-for-premarket-approval-for-surgical-mesh-for-transvaginal-pelvic-organ. Published January 5, 2016. Accessed August 5, 2019.
- Lee RA. Atlas of Gynecologic Surgery. W.B. Saunders: Philadelphia, PA; 1992.
- Jelovsek JE, Barber MD, Brubaker L, et al. Effect of uterosacral ligament suspension vs sacrospinous ligament fixation with or without perioperative behavioral therapy for pelvic organ vaginal prolapse on surgical outcomes and prolapse symptoms at 5 years in the OPTIMAL randomized clinical trial. JAMA. 2018;319:1554-1565.
- DeLancey JO. Anatomic aspects of vaginal eversion after hysterectomy. Am J Obstet Gynecol. 1992;166(6 part 1):1717-1728.
- Paraiso MF, Barber MD, Muir TW, et al. Rectocele repair: a randomized trial of three surgical techniques including graft augmentation. Am J Obstet Gynecol. 2006;195:1762- 1771.

Dr. Gebhart is Professor, Obstetrics and Gynecology and Surgery, Mayo Clinic, Rochester, Minnesota.
The author reports no financial relationships relevant to this article.
Dr. Gebhart is Professor, Obstetrics and Gynecology and Surgery, Mayo Clinic, Rochester, Minnesota.
The author reports no financial relationships relevant to this article.
Dr. Gebhart is Professor, Obstetrics and Gynecology and Surgery, Mayo Clinic, Rochester, Minnesota.
The author reports no financial relationships relevant to this article.
“Take pride in your surgical work. Do it in such a way that you would be willing to sign your name to it…the operation was performed by me.”
—Raymond A. Lee, MD
The US Food and Drug Administration (FDA) recently ordered companies to cease selling transvaginal mesh intended for pelvic organ prolapse (POP) repair (but not for the treatment of stress urinary incontinence [SUI] or for abdominal sacrocolpopexy).1,2 The FDA is also requiring companies preparing premarket approval applications for mesh products for the treatment of transvaginal POP to continue safety and efficacy follow-up in existing section 522 postmarket surveillance studies.3
It is, therefore, incumbent upon gynecologic surgeons to understand the surgical options that remain and perfect their surgical approach to POP to optimize patient outcomes. POP may be performed transvaginally or transabdominally, with each approach offering its own set of risks and benefits. The ability to perform both effectively allows the surgeon to tailor the approach to the condition and circumstances encountered. It is also important to realize that “cures” are elusive in POP surgery. While we can frequently alleviate patient symptoms and improve quality of life, a lifelong “cure” is an unrealistic goal for most prolapse procedures.
This article focuses on transvaginal native tissue repair,4 specifically the Mayo approach.
Watch video here
Vaginal surgery fundamentals
Before we explore the details of the Mayo technique, let’s review some basic principles of vaginal surgery. First, it is important to make a good clinical diagnosis so that you know which compartments (apex, anterior, or posterior) are involved. Although single compartment defects exist, multicompartment defects are far more common. Failing to recognize all compartment defects often results in incomplete repair, which can mean recurrent prolapse and additional interventions.
Second, exposure is critical when performing surgery by any route. You must be able to see your surgical field completely in order to properly execute your surgical approach. Table height, lighting, and retraction are all important to surgical success.
Lastly, it is important to know how to effectively execute your intended procedure. Native tissue repair is often criticized for having a high failure rate. It makes sense that mesh augmentation offers greater durability of a repair, but an effective native tissue repair will also effectively treat the majority of patients. An ineffective repair does not benefit the patient and contributes to high failure rates.
- Mesh slings for urinary incontinence and mesh use in sacrocolpopexy have not been banned by the FDA.
- Apical support is helpful to all other compartment support.
- Fixing the fascial defect between the base of the bladder and the apex will improve your anterior compartment outcomes.
- Monitor vaginal caliber throughout your posterior compartment repair.
Vaginal apex repairs
Data from the OPTIMAL trial suggest that uterosacral ligament suspension and sacrospinous ligament fixation are equally effective in treating apical prolapse.5 Our preference is a McCall culdoplasty (uterosacral ligament plication). It allows direct visualization (internally or externally) to place apical support stitches and plicates the ligaments in the midline of the vaginal cuff to help prevent enterocele protrusion. DeLancey has described the levels of support in the female pelvis and places importance on apical support.6 Keep in mind that anterior and posterior compartment prolapse is often accompanied by apical prolapse. Therefore, treating the apex is critical for overall success.
External vs internal McCall sutures: My technique. Envision the open vaginal cuff after completing a vaginal hysterectomy or after opening the vaginal cuff for a posthysterectomy vaginal vault prolapse (FIGURE 1). External (suture placed through the vaginal cuff epithelium into the peritoneal cavity, incorporating the uterosacral ligaments and intervening peritoneum, and ultimately brought back out through the posterior cuff and tied) or internal (suture placed in the intraperitoneal space, incorporating the uterosacral ligaments and intervening peritoneum, and tied internally) McCall sutures can be utilized (FIGURE 2). I prefer a combination of both. I use 0-polyglactin for external sutures, as the sutures will ultimately dissolve and not remain in the vaginal cavity. I usually place at least 2 external sutures with the lowest suture on the vaginal cuff being the deepest uterosacral stitch. Each subsequent suture is placed closer to the vaginal cuff and closer to the ends of the ligamentous stumps, starting deepest and working back toward the cuff with each stitch. I place 1 or 2 internal sutures (delayed absorbable or permanent) between my 2 external sutures. Because these sutures will be tied internally and located in the intraperitoneal space, permanent sutures may be used.
Avoiding ureteral injury: Tips for cystoscopy. A known risk of performing uterosacral ligament stitches is kinking or injury to the ureter. Therefore, cystoscopy is mandatory when performing this procedure. I tie one suture at a time starting with the internal sutures. I then perform cystoscopy after each suture tying. If I do not get ureteral spill after tying the suture, I remove and replace the suture and repeat cystoscopy until normal bilateral ureteral spill is achieved.
Key points for uterosacral ligament suspension. Achieving apical support at this point gives me the ability to build my anterior and posterior repair procedures off of this support. It is critical when performing uterosacral ligament suspension that you define the space between the ureter and rectum on each side. (Elevation of the cardinal pedicle and medial retraction of the rectum facilitate this.) The ligament runs down toward the sacrum when the patient is supine. You must follow that trajectory to be successful and avoid injury. One must also be careful not to be too deep on the ligament, as plication at that level may cause defecatory dysfunction.
Continue to: Anterior compartment repairs...
Anterior compartment repairs
The anterior compartment seems the most susceptible to forces within the pelvis and is a common site of prolapse. Many theories exist as to what causes a cystocele—distension, displacement, detachment, etc. While paravaginal defects exist, I believe that most cystoceles arise horizontally at the base of the bladder as the anterior endopelvic fascia detaches from the apex or cervix. The tissue then attenuates as the hernia progresses.
For surgical success: Make certain your repair addresses re-establishing continuity of the anterior endopelvic fascia with the fascia and ligaments at the vaginal apex; it will increase your success in treating anterior compartment prolapse.
We prefer to mobilize the epithelium in the midline from the vaginal apex to the mid‑urethra (if performing a midurethral sling, we stop short of the bladder neck and perform a separate suburethral incision). When incising the epithelium in the midline, the underlying fascia is also split in the midline, creating a midline defect. Once the epithelium is split and mobilized laterally off the underlying fascia, we can begin reconstruction.
The midline fascial defect that was just created is closed with a running 2-0 polyglactin from just beneath the bladder neck down to and including the fascia and uterosacral ligaments at the apex. This is accomplished in an upside down ‘T’ orientation (FIGURE 3). It is critical that the fascia is reunited at the base or you will leave the patient with a hernia.
For surgical success: To check intraoperatively that the fascia is reunited at the base, try to place an index finger between the base of the cystocele repair and the apex. If you can insert your finger, that is where the hernia still exists. If you meet resistance with your finger, you are palpating reunification of the anterior and apical fascia.
Technique for Kelly-Kennedy bladder neck plication. If the patient has mild incontinence that does not require a sling procedure, we now complete the second portion of the anterior repair starting with a Kelly-Kennedy bladder neck plication. Utilizing interrupted 1-0 polyglactin suture, vertical bites are taken periurethrally, starting at the midurethra and then the bladder neck. This nicely supports the urethra and proximal bladder neck and is very helpful for mild incontinence or for prophylactic benefit. Then starting beneath the bladder neck, the fascia is plicated again in the midline, reinforcing the suture line of the inverse ‘T’ with 2-0 polyglactin. The redundant epithelium is trimmed and reapproximated with interrupted 2-0 polyglactin (FIGURE 4). We tend to be more aggressive by adding the Kelly-Kennedy plication, which can lead to temporary voiding delay. We offer placement of a suprapubic catheter at the time of surgery or self-intermittent catherization.
Lastly, given that we have just dissected and then plicated the tissues beneath the bladder, I like to perform cystoscopy to be certain the bladder has not been violated. It is also important not to over-plicate the anterior fascia so that the sutures shear through the fascia and weaken the support or narrow the vaginal lumen.
Continue to: Posterior compartment repairs...
Posterior compartment repairs
Like with the anterior compartment, opinions differ as to the site of posterior compartment prolapse. Midline, lateral, distal, and site-specific defects and surgical approaches have been described. Research suggests that there is no benefit to the use of mesh in the posterior compartment.7 It is very important to recognize that over-plication of the posterior compartment can lead to narrowing/stricture and dyspareunia. Therefore, monitor vaginal caliber throughout repair of the posterior compartment.
Although we believe that a midline defect in the endopelvic fascia is primarily responsible for rectoceles, we also appreciate that the fascia must be reconstructed all the way to the perineal body and that narrowing the genital hiatus is very important and often underappreciated (FIGURE 5). Thus, perineal reconstruction is universally performed. I will emphasize again that reconstruction must be performed while also monitoring vaginal caliber. If it is too tight with the patient under anesthesia, it will be too tight when the patient recovers. Avoidance is the best option. If the patient does not desire a functional vagina (eg, an elderly patient), then narrowing is a desired goal.
Perineal reconstruction technique and tips for success
A retractor at 12 o’clock to support the apex and anterior wall can be helpful for visualization in the posterior compartment. We start with a v-shaped incision on the perineum. The width is determined by how much you want to build up the perineum and narrow the vagina (the wider the incision, the more building up of the perineal body and vaginal narrowing). A strip of epithelium is then mobilized in the midline (be careful not to excise too much). This dissection is carried all the way up the midline to just short of the tied apical suspension sutures at the posterior vaginal apex. The posterior dissection tends to be the most vascular in my experience.
Utilize cautery to obtain hemostasis along your dissection margins while protecting the underlying rectum. We have not found it necessary to dissect the posterior epithelium off the underlying fascia (that is an option at this point, however, if you feel more comfortable doing this). With an index finger in the vagina, compressing the rectum posteriorly, interrupted 1-0 polyglactin suture is placed through the epithelium and underlying fascia (avoiding the rectum) on one side, then the other, and then tied. The next sutures are placed utilizing the same technique, and the caliber of the vagina is noted with the placement of each suture (if it is too tight, then remove and replace the suture and recheck). It is important to realize you want to plicate the fascia in the midline and not perform an aggressive levatorplasty that could lead to muscle pain. Additionally, each suture should get the same purchase of tissue on each side, and the spacing of each suture should be uniform, like rungs on a ladder. Ultimately, the repair is carried down to the hymenal ring. At this point, the perineal reconstruction is performed, plicating the perineal body in the midline with deeper horizontal sutures and then closing the perineal skin with interrupted or subcuticular sutures (FIGURE 6). Completion of these repairs should orient the vagina toward the hollow of the sacrum (FIGURE 7), allowing downward forces to compress the vaginal supports posteriorly onto the pelvic floor instead of forcing it out the vaginal lumen (FIGURE 8).
Our patients generally stay in the hospital overnight, and we place a vaginal pack to provide topical pressure throughout the vagina overnight. We tell patients no lifting more than 15 lb and no intercourse for 6 weeks. While we do not tend to use hydrodissection in our repairs, it is a perfectly acceptable option.
Continue to: Commit to knowledge of native tissue techniques...
Commit to knowledge of native tissue techniques
Given the recent FDA ban on the sale of transvaginal mesh for POP and the public’s negative perception of mesh (based often on misleading information in the media), it is incumbent upon gynecologic surgeons to invest in learning or relearning effective native tissue techniques for the transvaginal treatment of POP. While not perfect, they offer an effective nonmesh treatment option for many of our patients.
- US Food and Drug Administration. FDA takes action to protect women’s health, orders manufacturers of surgical mesh intended for transvaginal repair of pelvic organ prolapse to stop selling all devices. . Published April 16, 2019. Accessed August 6, 2019.
- US Food and Drug Administration. Urogynecological surgical mesh implants. . Published July 10, 2019. Accessed August 5, 2019.
- US Food and Drug Administration. Effective date of requirement for premarket approval for surgical mesh for transvaginal pelvic organ prolapse repair. https://www.federalregister.gov/documents/2016/01/05/2015-33163/effective-date-of-requirement-for-premarket-approval-for-surgical-mesh-for-transvaginal-pelvic-organ. Published January 5, 2016. Accessed August 5, 2019.
- Lee RA. Atlas of Gynecologic Surgery. W.B. Saunders: Philadelphia, PA; 1992.
- Jelovsek JE, Barber MD, Brubaker L, et al. Effect of uterosacral ligament suspension vs sacrospinous ligament fixation with or without perioperative behavioral therapy for pelvic organ vaginal prolapse on surgical outcomes and prolapse symptoms at 5 years in the OPTIMAL randomized clinical trial. JAMA. 2018;319:1554-1565.
- DeLancey JO. Anatomic aspects of vaginal eversion after hysterectomy. Am J Obstet Gynecol. 1992;166(6 part 1):1717-1728.
- Paraiso MF, Barber MD, Muir TW, et al. Rectocele repair: a randomized trial of three surgical techniques including graft augmentation. Am J Obstet Gynecol. 2006;195:1762- 1771.
