User login
In the United States, gynecologic surgeons remove approximately one uterus every minute of the year.1 That rate translates to more than 525,000 hysterectomies annually in this country alone. Yet, despite the widespread availability of information on the benefits of a vaginal approach to hysterectomy, the great majority of these operations—close to 50%—are still performed via an open abdominal approach.2
As I pointed out last month in my “Update on Vaginal Hysterectomy,” the vaginal approach not only is more cosmetically pleasing than laparoscopic and robot-assisted hysterectomy (not to mention open abdominal surgery) but also has a lower complication rate.3
As I also noted, one reason for the low rate of vaginal hysterectomy may be the assumption, on the part of many gynecologic surgeons, that the techniques and tools they learned to use during training are still the only options available today. That assumption is wrong.
In this article, I describe the technique for vaginal hysterectomy using basic instru mentation. This article is based on a master class in vaginal hysterectomy produced by the AAGL and co-sponsored by the Am erican College of Obstetricians and Gynecologists and the Society of Gynecologic Surgeons. This master class offers continuing medical education credits and is avail able at http://www.aagl.org/vaghystwebinar.
For a look at innovative tools for this procedure, see my “Update on Vaginal Hysterectomy” in the September 2015 issue of this journal at obgmanagement.com.
Vaginal hysterectomy has few contraindications
Many commonly cited contraindications to the vaginal approach are not, in fact, absolute contraindications. An open or laparoscopic approach is preferred when the patient has a known cancer, of course, and when deep infiltrating endometriosis is present at the rectovaginal septum. However, previous pelvic surgery, nulliparity, an enlarged uterus, or lack of a prior vaginal delivery need not exclude the vaginal approach. Nor does a narrow introitus necessarily mandate a laparoscopic or open abdominal approach. In fact, in this article, I describe my basic technique in a patient (a cadaver) with a very narrow pubic arch, and I offer strategies for gaining some needed mobility and avoiding complications (TABLES 1 and 2).
Next month, in the November issue of OBG Management, John B. Gebhart, MD, will describe his vaginal technique for right salpingectomy with ovarian preservation, as well as his technique for right salpingo-oophorectomy.
Proper patient positioning is key
You can simplify the operation by positioning the patient so that her buttocks are over the edge of the table fairly far—at least 1 inch beyond the edge of the table for optimal exposure and greater access. If the patient is thin, it then becomes important to pad the sacrum because, when she is positioned that far off the table, all her weight comes to rest on the sacrum. In overweight patients, this is not an issue, but for thin patients, I place a bit of egg crate or gel beneath the sacrum.
For the procedure, I prefer to place my instruments on a tray that is kept on my lap. This arrangement frees the scrub technician from having to hand tools over my shoulder—and it saves time. I use a narrow, covered Mayo stand, and I place a stepstool beneath my feet to keep my knees at right angles so that things don’t slip during the operation.
Surgical technique
Choose an appropriate retractor
In a woman with a narrow introitus, I find that a posterior weighted speculum takes up too much space. Once I place a clamp on the cervix with that speculum in place, I don’t have much room to work. However, if I substitute a small Deaver retractor, which is narrower, I gain more workspace.
Inject the uterosacral ligaments
Grasp the cervix using a Jacobs vulsellum tenaculum. Use of a single tenaculum allows for much more movement than the use of instruments placed anteriorly and posteriorly. The Jacobs tenaculum obtains a better purchase on the tissue than a single tooth and is considerably less likely to tear through the tissue.
Before beginning the hysterectomy, locate the uterosacral ligaments and inject each one at its junction with the cervix, aspirating slightly before infiltrating the ligament with 0.25% to 0.50% bupivacaine with epinephrine, with dilute vasopressin mixed in. (I place 1 unit in 20 mL of the local solution.) Injection of this solution achieves 2 goals:
- improved intraoperative hemostasis
- postoperative pain relief.
Use a short needle with a needle extender attached to a control syringe rather than a spinal needle for greater control.
Enter the posterior peritoneal cavity
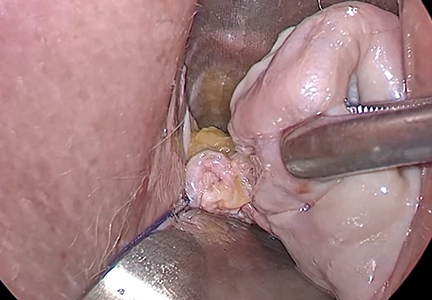
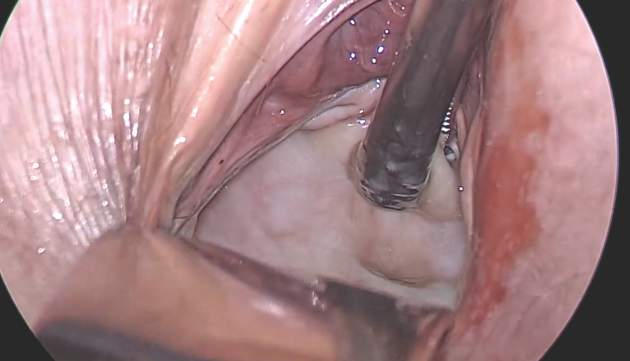
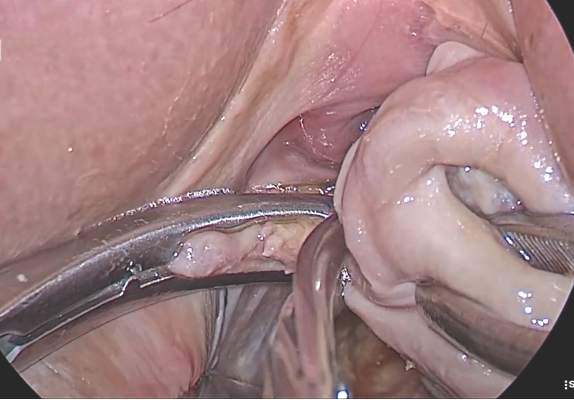
Before entering the peritoneal cavity, create a right angle with the Jacobs tenaculum and Deaver retractor in relation to the surgical field (FIGURE 1). This right angle is difficult to achieve when you are using a weighted speculum in a tight vagina. Once you have a right angle, tent the vaginal tissue in the midline (FIGURE 2).
In a nulliparous patient or a woman with a tight pelvis, you may discover that the peritoneum is pulled up between the uterosacral ligaments. One common pitfall arises when the surgeon, having dissected the vaginal epithelium, continues cutting into the vaginal epithelium instead of reaching into the peritoneal cavity. Palpate the tissue to ensure that there is no bowel in the way and stay at right angles while confidently grasping the peritoneum with a toothed forceps.
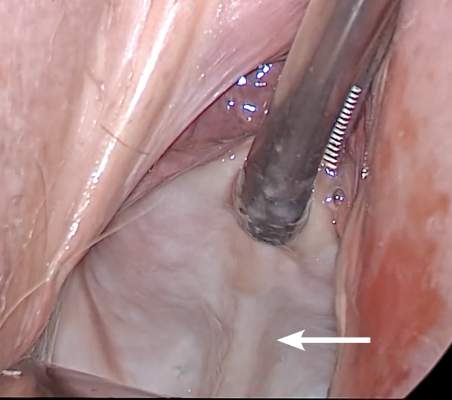
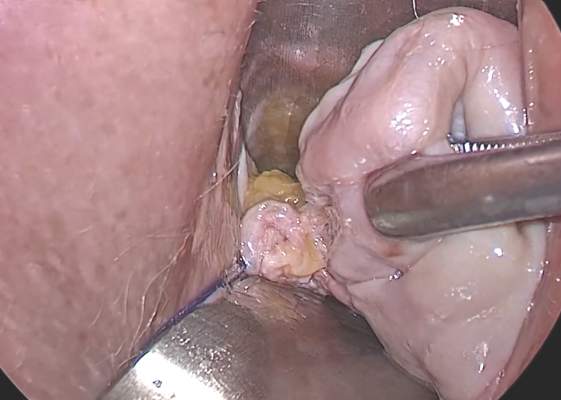
I like to use a bit of electrosurgery to incise the vaginal wall. I don’t begin at the cervix but incise more distally into the vaginal epithelium approximately 2 cm from the cervicovaginal junction. This strategy prevents dissection into the cervix and/or rectovaginal septum rather than the posterior
cul-de-sac (FIGURE 3).
Once the incision is made, it is possible to feel the posterior peritoneum. And as you tent the peritoneum, you can then very confidently extend the incision and enter the cavity posteriorly.
In a patient with significant adhesions such as this one, I feel around posteriorly to determine exactly where I am. One tactic I use is to release the tenaculum and regrasp the cervix with it. This allows for improved visualization and movement of the cervix as the procedure progresses. Depending on the case, it may be necessary to insert a sponge to hold bowel out of the way.
Avoid the bladder
Move the Deaver retractor to the anterior position, switch the Jacobs clamp to the anterior cervix, and pull straight down. Now that you have incised the vaginal epithelium posteriorly, the length of the cervix should be apparent to you, and you can easily determine the location of the bladder reflection.
Keep in mind that, in a postmenopausal patient, there will be fewer vaginal rugae to guide you. Place the Jacobs tenaculum as close to the midline as possible so that you can confidently grab the tissue without fear of grabbing the bladder. If you tilt the Jacobs clamp, you can feel the edge of the bladder reflection. Remember that postmenopausal patients with prolapse (or, occasionally, obese patients with cervical elongation but little actual descensus) may have altered anatomy.
You can create a bit more space in which to dissect by injecting the bupivacaine/ epinephrine solution into the vaginal epithelium. This technique also ensures that the vaginal epithelial incisions won’t bleed.
Now, tilt the Jacobs tenaculum downward and push the junction of the cervix with the bladder reflection toward you so that you have a good sense of how deeply to incise.
Once you’ve made the incision, reclamp the Jacobs tenaculum so that it holds all of that tissue, and repeat the maneuver, tilting the clamp downward and pushing the junction toward you. In this way, you create traction and countertraction, sweeping the tissue out of your way.
Always use sharp dissection. When adhesions are present, surgeons often get into trouble using blunt dissection and may inadvertently enter the bladder if they use a sponge-covered digit for dissection, because adhesions can be much denser than normal tissue. In such cases, the bladder tears open rather than the adhesions being swept away.
Consider this: You don’t need to enter the peritoneal cavity anteriorly in order to continue working on the procedure. You can safely protect the bladder throughout the case, until the very end, if necessary, in patients who have undergone multiple previous surgeries or cesarean deliveries.
Rather than enter the anterior peritoneum, I dissect as much of the vaginal epithelium as possible and place a second Deaver retractor posteriorly.
I massage the uterosacral ligament for about 10 seconds to lengthen it and create more descensus, then place a Ballantine Heaney clamp on the ligament.
Next, I cut the pedicle and suture it, maintaining a clamp on the uterosacral ligament suture so that I can use it later for repair of the vaginal cuff.
I recommend a vessel-sealing device to secure the major blood supply, but I do suture the uterosacral and round ligaments for attachment to the apex at the conclusion of the hysterectomy. I suggest that you place straight clamps to hold the uterosacral ligament sutures and curved clamps on the round ligament ties to help you keep track of what you’re doing.
I generally prefer to use a smaller vessel-sealing device, such as the LigaSure Max (Covidien), because it allows me to take very small bites of tissue. It is also less expensive because it uses a disposable electrode within a reusable Heaney-type clamp.
Many people have argued that we need to teach surgeons to suture vaginally and, for that reason, should avoid vessel sealing. My response: Why wouldn’t we want to use the very best technology available? Randomized trials have demonstrated a 50% reduction in pain relief postoperatively when we use vessel sealing.4 Less foreign material is left in the pelvis, lowering the risk of infection. And it really doesn’t matter which vessel-sealing technology you use, as long as you’re familiar with the specifics of the system you choose. Another advantage: There is no need to pass needles back and forth.
Take small bites of tissue
Because this patient has a very small uterus, a small bite of tissue will get you close to where you want to be. When you take a bite with the vessel sealer, try to protect the vaginal epithelium and vulva from the steam that is emitted. The clamp itself does not heat up, but the steam that is released from the tissue is 100° C, so place a finger between the clamp and the sidewall for protection. It is preferable to burn your own finger than to burn the patient.
Because you haven’t entered the peritoneal cavity anteriorly, it is important to ensure that you don’t take too big of a bite with the vessel sealer. Rather, stay where you know you’ve done your dissection, where things are safe.
One cardinal principle of surgery is that you shouldn’t operate where you can’t feel or see. One of the common errors in vaginal surgery is that surgeons start dissecting higher than they can see. It’s easy to get into trouble when you start pushing tissue or dissecting tissue that you can’t visualize.
At this point, the anterior Deaver retractor is not essential, so I remove it. If you don’t need it, don’t use it. I try to avoid metal when I can.
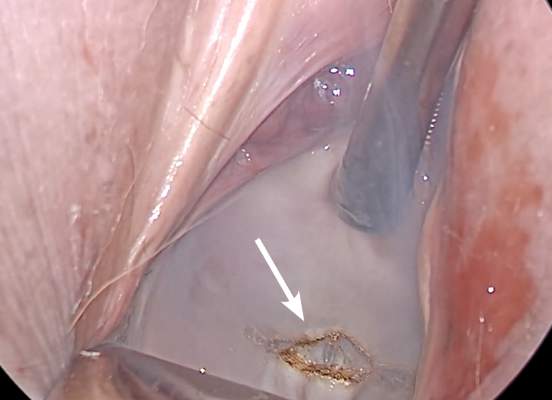
If I were using suture rather than vessel sealing, I would place a Heaney clamp on the uterosacral ligament and cut. Using a clamp-cut-tie technique, I would pull on the pedicle and cut just beyond the tip of the clamp to ensure that the suture will be secure (FIGURE 4). This approach would not be appropriate during use of a vessel sealer. In that case, you would want to cut to but not beyond the tip of the clamp.
One of the skills helpful in suturing is learning to move your elbow and wrist to achieve the proper angle. Determine where you want the suture to exit the tissue, and then angle your elbow and wrist so that the suture comes out where you want it. It’s easy to lose track of the needle tip, especially when you’re working in a limited space under the pubic symphysis, so use your shoulder, elbow, and wrist to control
suture placement.
Protect the anterior epithelium
Because you have not yet entered the peritoneal cavity anteriorly, it is important to protect the anterior epithelium and bladder. Reinsert a narrow Deaver retractor anteriorly, remove the Jacobs clamp, and replace the clamp laterally so that the cervix can be pulled off to the side (FIGURE 5).
One nice thing about some vessel sealers is that the surgeon can twist them in any direction. It isn’t necessary to move your hand; you simply move the device itself.
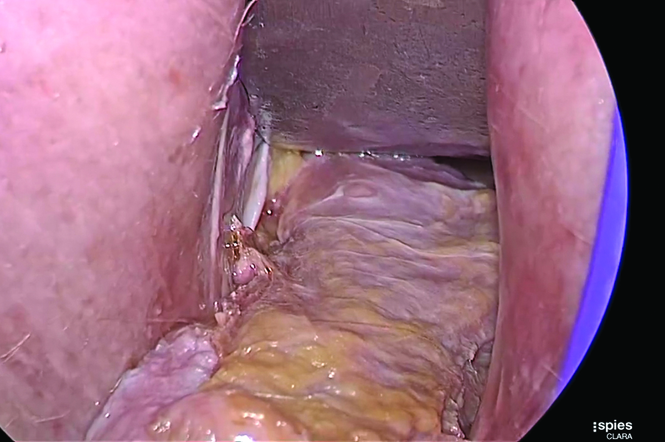
Once you have taken at least the descending branch of the uterine artery, remove the posterior retractor and pull downward on the Jacobs tenaculum. You should have reached just about to the level of the uterine fundus, with the anatomy well visualized (FIGURE 6). Next, open the anterior peritoneum.
Pay attention to the surgical field
Now that you have entered the peritoneum anteriorly as well as posteriorly, identify the broad ligament, keeping in mind that the ureter is retroperitoneal, not intraperitoneal. If you were to place a clamp from the posterior leaf of the broad ligament across to the anterior leaf of the broad ligament, you would be grasping all the vessels but not the ureter. In fact, the anterior Deaver retractor is lifting both ureters up and out of the way. If you pull the cervix off to the opposite side, you create an additional couple of centimeters—a safe space for the vessel sealer
(FIGURE 7).
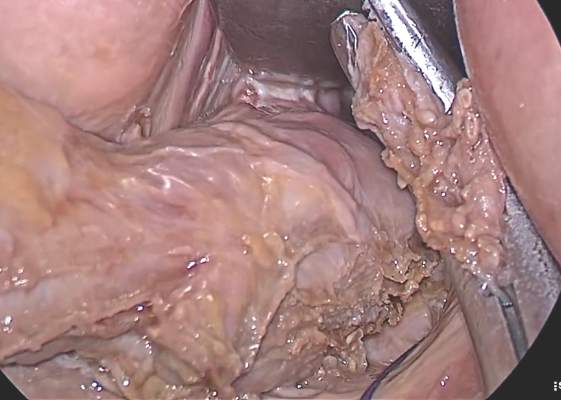
In placing the vessel sealer, there is no need to move out laterally, as there is no need for space to place suture. Instead, hug the uterus. At this point, the main concern is the risk of damaging any small bowel behind the uterine fundus that might be coming down into the surgical field, obscured from vision. And because there may be steam emitted at the tip of the vessel-sealing clamp, keep a finger back there to protect anything that might be in the field.
Last steps
Before taking the last bite of tissue on the right-hand side, place the round ligament in a Heaney clamp. Now that the round and utero-ovarian ligaments have been skeletonized, you can grasp the pedicle in a clamp. If the pedicle is especially thick, it may be beneficial to close the clamp, leave it on for a few seconds, and then reapply it. In that way, you obtain a better purchase.
Next, free the rest of the tissue with a vessel sealer, or cut it. I prefer to use a vessel sealer, and I again protect the adjacent tissue with my fingers anteriorly and posteriorly.
With the clamp remaining on the round ligament and utero-ovarian ligament
(FIGURE 8), which will be sutured, push the uterine tissue out of the way, back into the pelvis, to make room for suturing.
Because a postmenopausal vulva may be cut by the suture, it’s important to take pains not to abrade that tissue. Once you have finished suturing the round/utero-ovarian pedicle, leave the needle on the suture so that you can reconnect the round ligament to the anterior pubocervical ring to reconstruct the vaginal apex. For safekeeping, clamp the needle out of the way and tuck it beneath the drape.
Switching to the other side, use a Lahey clamp to flip the uterus, then clamp the pedicle and use the vessel sealer to separate it, again protecting the tissue beneath and ahead of the clamp. Sometimes, with an especially thick pedicle, the vessel sealer will signal that the tissue hasn’t been completely sealed. In that case, get another purchase of the pedicle, protect the adjacent tissue, and seal again.
Once the uterus has been removed completely, suture the utero-ovarian and round ligament on this side.
One tip to aid in the placement of suture is to move your clamped tissue in such a way as to prevent inadvertent suturing of other tissue (FIGURE 9).

An additional strategy for pain relief at this point is to infiltrate the round ligaments with local anesthetic. We know that we’re working with higher-level fibers—T10 to T12—through the round ligaments. By infiltrating them with anesthetic, you achieve denser pain relief for post- operative management.
Uterine reduction strategies facilitate vaginal removal of tissue
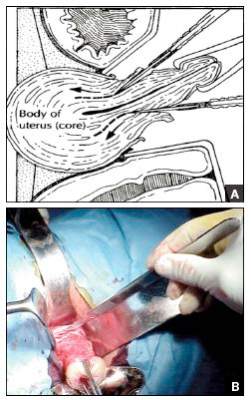
When the uterus is too large to remove intact through the vagina, there are a number of techniques for coring, wedging, and morcellating the tissue. As always, a complete knowledge of anatomy is essential, as well as an understanding that fibroids can frequently distort the uterus, twisting it to the left or right. It is important to anticipate such distortion to avoid the inadvertent destruction of anatomic landmarks or damage to the adnexae.
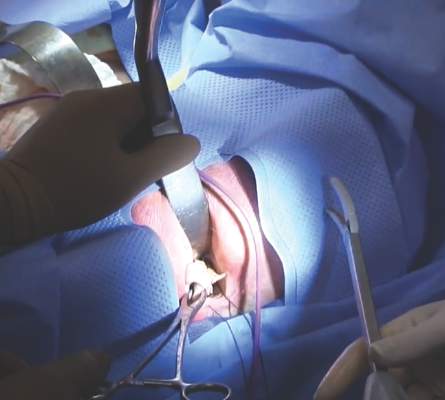
One straight-forward strategy is to debulk the uterus using a knife to core it, removing the central portion. In cases in which you need to keep the entire endometrial cavity intact, you can core the central portion of the uterus while grasping the cervix so that you can remove the endometrium intact for the pathologist (FIGURE).
For this strategy it is important to protect the vaginal sidewalls with metal. You can use another retractor to do that, pulling down on the cervix and beginning the morcellation. I generally prefer to use a short knife handle only because I want to be sure I’m not tempted to cut any higher than I can see.
For more on coring and wedging techniques, see the introductory video for the ACOG/SGS/AAGL master class on vaginal hysterectomy at http://www.aagl.org/vaghystwebinar.
Close the vaginal cuff
The reconstruction of the vaginal cuff is a critical component of any hysterectomy. My approach is to reattach the uterosacral ligaments to the posterior cuff and the round ligaments to the anterior cuff, thereby re- creating an intact pubocervical ring. It is not necessary to include the peritoneum in the cuff closure. In fact, kinking of the ureters is more likely when the peritoneum is closed.
Attach one uterosacral ligament, then place a running, full-thickness stitch across the posterior cuff, and attach the uterosacral ligament on the opposite side. Use the needle you left attached to the round ligament to bring the right pedicle to the anterior cuff at 10 o’clock (be sure you grasp the full thickness of the vaginal epithelium without compromising the bladder). Attach the left round-ligament pedicle at the 2 o’clock position. Then close the cuff side to side down to the uterosacral ligaments. This completely reconstructs the pubocervical ring and provides excellent support at the apex.
Share your thoughts on this article! Send your Letter to the Editor to rbarbieri@frontlinemedcom.com. Please include your name and the city and state in which you practice.
- Brigham and Women’s Hospital. Minimally Invasive Gynecologic Surgery: Hysterectomy Options. http://www .brighamandwomens.org/Departments_and_Services/obgyn /services/mininvgynsurg/mininvoptions/hysterectomy.aspx. Published October 3, 2014. Accessed September 2, 2015.
- American Congress of Obstetricians and Gynecologists. 2011 Women’s Health Stats & Facts. Washington, DC: ACOG; 2011. http://www.acog.org/~/media/NewsRoom/MediaKit.pdf. Accessed August 6, 2015.
- American College of Obstetricians and Gynecologists. Committee Opinion No. 444: Choosing the route of hysterectomy for benign disease. Obstet Gynecol. 2009; 114(5):1156–1158.
- Silva-Filho AL, Rodrigues AM, Vale de Castro Monteiro M, et al. Randomized study of bipolar vessel sealing system versus conventional suture ligature for vaginal hysterectomy. Eur J Obstet Gynecol Reprod Biol. 2009;146(2):200–203.
Barbara S. Levy, MD

Dr. Levy is Vice President for Health Policy at the American Congress of Obstetricians and Gynecologists in Washington, DC, and a past president of AAGL.
The author reports no financial relationships relevant to this article.
Barbara S. Levy, MD
Dr. Levy is Vice President for Health Policy at the American Congress of Obstetricians and Gynecologists in Washington, DC, and a past president of AAGL.
The author reports no financial relationships relevant to this article.
Barbara S. Levy, MD
Dr. Levy is Vice President for Health Policy at the American Congress of Obstetricians and Gynecologists in Washington, DC, and a past president of AAGL.
The author reports no financial relationships relevant to this article.
In the United States, gynecologic surgeons remove approximately one uterus every minute of the year.1 That rate translates to more than 525,000 hysterectomies annually in this country alone. Yet, despite the widespread availability of information on the benefits of a vaginal approach to hysterectomy, the great majority of these operations—close to 50%—are still performed via an open abdominal approach.2
As I pointed out last month in my “Update on Vaginal Hysterectomy,” the vaginal approach not only is more cosmetically pleasing than laparoscopic and robot-assisted hysterectomy (not to mention open abdominal surgery) but also has a lower complication rate.3
As I also noted, one reason for the low rate of vaginal hysterectomy may be the assumption, on the part of many gynecologic surgeons, that the techniques and tools they learned to use during training are still the only options available today. That assumption is wrong.
In this article, I describe the technique for vaginal hysterectomy using basic instru mentation. This article is based on a master class in vaginal hysterectomy produced by the AAGL and co-sponsored by the Am erican College of Obstetricians and Gynecologists and the Society of Gynecologic Surgeons. This master class offers continuing medical education credits and is avail able at http://www.aagl.org/vaghystwebinar.
For a look at innovative tools for this procedure, see my “Update on Vaginal Hysterectomy” in the September 2015 issue of this journal at obgmanagement.com.
Vaginal hysterectomy has few contraindications
Many commonly cited contraindications to the vaginal approach are not, in fact, absolute contraindications. An open or laparoscopic approach is preferred when the patient has a known cancer, of course, and when deep infiltrating endometriosis is present at the rectovaginal septum. However, previous pelvic surgery, nulliparity, an enlarged uterus, or lack of a prior vaginal delivery need not exclude the vaginal approach. Nor does a narrow introitus necessarily mandate a laparoscopic or open abdominal approach. In fact, in this article, I describe my basic technique in a patient (a cadaver) with a very narrow pubic arch, and I offer strategies for gaining some needed mobility and avoiding complications (TABLES 1 and 2).
Next month, in the November issue of OBG Management, John B. Gebhart, MD, will describe his vaginal technique for right salpingectomy with ovarian preservation, as well as his technique for right salpingo-oophorectomy.
Proper patient positioning is key
You can simplify the operation by positioning the patient so that her buttocks are over the edge of the table fairly far—at least 1 inch beyond the edge of the table for optimal exposure and greater access. If the patient is thin, it then becomes important to pad the sacrum because, when she is positioned that far off the table, all her weight comes to rest on the sacrum. In overweight patients, this is not an issue, but for thin patients, I place a bit of egg crate or gel beneath the sacrum.
For the procedure, I prefer to place my instruments on a tray that is kept on my lap. This arrangement frees the scrub technician from having to hand tools over my shoulder—and it saves time. I use a narrow, covered Mayo stand, and I place a stepstool beneath my feet to keep my knees at right angles so that things don’t slip during the operation.
Surgical technique
Choose an appropriate retractor
In a woman with a narrow introitus, I find that a posterior weighted speculum takes up too much space. Once I place a clamp on the cervix with that speculum in place, I don’t have much room to work. However, if I substitute a small Deaver retractor, which is narrower, I gain more workspace.
Inject the uterosacral ligaments
Grasp the cervix using a Jacobs vulsellum tenaculum. Use of a single tenaculum allows for much more movement than the use of instruments placed anteriorly and posteriorly. The Jacobs tenaculum obtains a better purchase on the tissue than a single tooth and is considerably less likely to tear through the tissue.
Before beginning the hysterectomy, locate the uterosacral ligaments and inject each one at its junction with the cervix, aspirating slightly before infiltrating the ligament with 0.25% to 0.50% bupivacaine with epinephrine, with dilute vasopressin mixed in. (I place 1 unit in 20 mL of the local solution.) Injection of this solution achieves 2 goals:
- improved intraoperative hemostasis
- postoperative pain relief.
Use a short needle with a needle extender attached to a control syringe rather than a spinal needle for greater control.
Enter the posterior peritoneal cavity
Before entering the peritoneal cavity, create a right angle with the Jacobs tenaculum and Deaver retractor in relation to the surgical field (FIGURE 1). This right angle is difficult to achieve when you are using a weighted speculum in a tight vagina. Once you have a right angle, tent the vaginal tissue in the midline (FIGURE 2).
In a nulliparous patient or a woman with a tight pelvis, you may discover that the peritoneum is pulled up between the uterosacral ligaments. One common pitfall arises when the surgeon, having dissected the vaginal epithelium, continues cutting into the vaginal epithelium instead of reaching into the peritoneal cavity. Palpate the tissue to ensure that there is no bowel in the way and stay at right angles while confidently grasping the peritoneum with a toothed forceps.
I like to use a bit of electrosurgery to incise the vaginal wall. I don’t begin at the cervix but incise more distally into the vaginal epithelium approximately 2 cm from the cervicovaginal junction. This strategy prevents dissection into the cervix and/or rectovaginal septum rather than the posterior
cul-de-sac (FIGURE 3).
Once the incision is made, it is possible to feel the posterior peritoneum. And as you tent the peritoneum, you can then very confidently extend the incision and enter the cavity posteriorly.
In a patient with significant adhesions such as this one, I feel around posteriorly to determine exactly where I am. One tactic I use is to release the tenaculum and regrasp the cervix with it. This allows for improved visualization and movement of the cervix as the procedure progresses. Depending on the case, it may be necessary to insert a sponge to hold bowel out of the way.
Avoid the bladder
Move the Deaver retractor to the anterior position, switch the Jacobs clamp to the anterior cervix, and pull straight down. Now that you have incised the vaginal epithelium posteriorly, the length of the cervix should be apparent to you, and you can easily determine the location of the bladder reflection.
Keep in mind that, in a postmenopausal patient, there will be fewer vaginal rugae to guide you. Place the Jacobs tenaculum as close to the midline as possible so that you can confidently grab the tissue without fear of grabbing the bladder. If you tilt the Jacobs clamp, you can feel the edge of the bladder reflection. Remember that postmenopausal patients with prolapse (or, occasionally, obese patients with cervical elongation but little actual descensus) may have altered anatomy.
You can create a bit more space in which to dissect by injecting the bupivacaine/ epinephrine solution into the vaginal epithelium. This technique also ensures that the vaginal epithelial incisions won’t bleed.
Now, tilt the Jacobs tenaculum downward and push the junction of the cervix with the bladder reflection toward you so that you have a good sense of how deeply to incise.
Once you’ve made the incision, reclamp the Jacobs tenaculum so that it holds all of that tissue, and repeat the maneuver, tilting the clamp downward and pushing the junction toward you. In this way, you create traction and countertraction, sweeping the tissue out of your way.
Always use sharp dissection. When adhesions are present, surgeons often get into trouble using blunt dissection and may inadvertently enter the bladder if they use a sponge-covered digit for dissection, because adhesions can be much denser than normal tissue. In such cases, the bladder tears open rather than the adhesions being swept away.
Consider this: You don’t need to enter the peritoneal cavity anteriorly in order to continue working on the procedure. You can safely protect the bladder throughout the case, until the very end, if necessary, in patients who have undergone multiple previous surgeries or cesarean deliveries.
Rather than enter the anterior peritoneum, I dissect as much of the vaginal epithelium as possible and place a second Deaver retractor posteriorly.
I massage the uterosacral ligament for about 10 seconds to lengthen it and create more descensus, then place a Ballantine Heaney clamp on the ligament.
Next, I cut the pedicle and suture it, maintaining a clamp on the uterosacral ligament suture so that I can use it later for repair of the vaginal cuff.
I recommend a vessel-sealing device to secure the major blood supply, but I do suture the uterosacral and round ligaments for attachment to the apex at the conclusion of the hysterectomy. I suggest that you place straight clamps to hold the uterosacral ligament sutures and curved clamps on the round ligament ties to help you keep track of what you’re doing.
I generally prefer to use a smaller vessel-sealing device, such as the LigaSure Max (Covidien), because it allows me to take very small bites of tissue. It is also less expensive because it uses a disposable electrode within a reusable Heaney-type clamp.
Many people have argued that we need to teach surgeons to suture vaginally and, for that reason, should avoid vessel sealing. My response: Why wouldn’t we want to use the very best technology available? Randomized trials have demonstrated a 50% reduction in pain relief postoperatively when we use vessel sealing.4 Less foreign material is left in the pelvis, lowering the risk of infection. And it really doesn’t matter which vessel-sealing technology you use, as long as you’re familiar with the specifics of the system you choose. Another advantage: There is no need to pass needles back and forth.
Take small bites of tissue
Because this patient has a very small uterus, a small bite of tissue will get you close to where you want to be. When you take a bite with the vessel sealer, try to protect the vaginal epithelium and vulva from the steam that is emitted. The clamp itself does not heat up, but the steam that is released from the tissue is 100° C, so place a finger between the clamp and the sidewall for protection. It is preferable to burn your own finger than to burn the patient.
Because you haven’t entered the peritoneal cavity anteriorly, it is important to ensure that you don’t take too big of a bite with the vessel sealer. Rather, stay where you know you’ve done your dissection, where things are safe.
One cardinal principle of surgery is that you shouldn’t operate where you can’t feel or see. One of the common errors in vaginal surgery is that surgeons start dissecting higher than they can see. It’s easy to get into trouble when you start pushing tissue or dissecting tissue that you can’t visualize.
At this point, the anterior Deaver retractor is not essential, so I remove it. If you don’t need it, don’t use it. I try to avoid metal when I can.
If I were using suture rather than vessel sealing, I would place a Heaney clamp on the uterosacral ligament and cut. Using a clamp-cut-tie technique, I would pull on the pedicle and cut just beyond the tip of the clamp to ensure that the suture will be secure (FIGURE 4). This approach would not be appropriate during use of a vessel sealer. In that case, you would want to cut to but not beyond the tip of the clamp.
One of the skills helpful in suturing is learning to move your elbow and wrist to achieve the proper angle. Determine where you want the suture to exit the tissue, and then angle your elbow and wrist so that the suture comes out where you want it. It’s easy to lose track of the needle tip, especially when you’re working in a limited space under the pubic symphysis, so use your shoulder, elbow, and wrist to control
suture placement.
Protect the anterior epithelium
Because you have not yet entered the peritoneal cavity anteriorly, it is important to protect the anterior epithelium and bladder. Reinsert a narrow Deaver retractor anteriorly, remove the Jacobs clamp, and replace the clamp laterally so that the cervix can be pulled off to the side (FIGURE 5).
One nice thing about some vessel sealers is that the surgeon can twist them in any direction. It isn’t necessary to move your hand; you simply move the device itself.
Once you have taken at least the descending branch of the uterine artery, remove the posterior retractor and pull downward on the Jacobs tenaculum. You should have reached just about to the level of the uterine fundus, with the anatomy well visualized (FIGURE 6). Next, open the anterior peritoneum.
Pay attention to the surgical field
Now that you have entered the peritoneum anteriorly as well as posteriorly, identify the broad ligament, keeping in mind that the ureter is retroperitoneal, not intraperitoneal. If you were to place a clamp from the posterior leaf of the broad ligament across to the anterior leaf of the broad ligament, you would be grasping all the vessels but not the ureter. In fact, the anterior Deaver retractor is lifting both ureters up and out of the way. If you pull the cervix off to the opposite side, you create an additional couple of centimeters—a safe space for the vessel sealer
(FIGURE 7).
In placing the vessel sealer, there is no need to move out laterally, as there is no need for space to place suture. Instead, hug the uterus. At this point, the main concern is the risk of damaging any small bowel behind the uterine fundus that might be coming down into the surgical field, obscured from vision. And because there may be steam emitted at the tip of the vessel-sealing clamp, keep a finger back there to protect anything that might be in the field.
Last steps
Before taking the last bite of tissue on the right-hand side, place the round ligament in a Heaney clamp. Now that the round and utero-ovarian ligaments have been skeletonized, you can grasp the pedicle in a clamp. If the pedicle is especially thick, it may be beneficial to close the clamp, leave it on for a few seconds, and then reapply it. In that way, you obtain a better purchase.
Next, free the rest of the tissue with a vessel sealer, or cut it. I prefer to use a vessel sealer, and I again protect the adjacent tissue with my fingers anteriorly and posteriorly.
With the clamp remaining on the round ligament and utero-ovarian ligament
(FIGURE 8), which will be sutured, push the uterine tissue out of the way, back into the pelvis, to make room for suturing.
Because a postmenopausal vulva may be cut by the suture, it’s important to take pains not to abrade that tissue. Once you have finished suturing the round/utero-ovarian pedicle, leave the needle on the suture so that you can reconnect the round ligament to the anterior pubocervical ring to reconstruct the vaginal apex. For safekeeping, clamp the needle out of the way and tuck it beneath the drape.
Switching to the other side, use a Lahey clamp to flip the uterus, then clamp the pedicle and use the vessel sealer to separate it, again protecting the tissue beneath and ahead of the clamp. Sometimes, with an especially thick pedicle, the vessel sealer will signal that the tissue hasn’t been completely sealed. In that case, get another purchase of the pedicle, protect the adjacent tissue, and seal again.
Once the uterus has been removed completely, suture the utero-ovarian and round ligament on this side.
One tip to aid in the placement of suture is to move your clamped tissue in such a way as to prevent inadvertent suturing of other tissue (FIGURE 9).
An additional strategy for pain relief at this point is to infiltrate the round ligaments with local anesthetic. We know that we’re working with higher-level fibers—T10 to T12—through the round ligaments. By infiltrating them with anesthetic, you achieve denser pain relief for post- operative management.
Uterine reduction strategies facilitate vaginal removal of tissue
When the uterus is too large to remove intact through the vagina, there are a number of techniques for coring, wedging, and morcellating the tissue. As always, a complete knowledge of anatomy is essential, as well as an understanding that fibroids can frequently distort the uterus, twisting it to the left or right. It is important to anticipate such distortion to avoid the inadvertent destruction of anatomic landmarks or damage to the adnexae.
One straight-forward strategy is to debulk the uterus using a knife to core it, removing the central portion. In cases in which you need to keep the entire endometrial cavity intact, you can core the central portion of the uterus while grasping the cervix so that you can remove the endometrium intact for the pathologist (FIGURE).
For this strategy it is important to protect the vaginal sidewalls with metal. You can use another retractor to do that, pulling down on the cervix and beginning the morcellation. I generally prefer to use a short knife handle only because I want to be sure I’m not tempted to cut any higher than I can see.
For more on coring and wedging techniques, see the introductory video for the ACOG/SGS/AAGL master class on vaginal hysterectomy at http://www.aagl.org/vaghystwebinar.
Close the vaginal cuff
The reconstruction of the vaginal cuff is a critical component of any hysterectomy. My approach is to reattach the uterosacral ligaments to the posterior cuff and the round ligaments to the anterior cuff, thereby re- creating an intact pubocervical ring. It is not necessary to include the peritoneum in the cuff closure. In fact, kinking of the ureters is more likely when the peritoneum is closed.
Attach one uterosacral ligament, then place a running, full-thickness stitch across the posterior cuff, and attach the uterosacral ligament on the opposite side. Use the needle you left attached to the round ligament to bring the right pedicle to the anterior cuff at 10 o’clock (be sure you grasp the full thickness of the vaginal epithelium without compromising the bladder). Attach the left round-ligament pedicle at the 2 o’clock position. Then close the cuff side to side down to the uterosacral ligaments. This completely reconstructs the pubocervical ring and provides excellent support at the apex.
Share your thoughts on this article! Send your Letter to the Editor to rbarbieri@frontlinemedcom.com. Please include your name and the city and state in which you practice.
- Brigham and Women’s Hospital. Minimally Invasive Gynecologic Surgery: Hysterectomy Options. http://www .brighamandwomens.org/Departments_and_Services/obgyn /services/mininvgynsurg/mininvoptions/hysterectomy.aspx. Published October 3, 2014. Accessed September 2, 2015.
- American Congress of Obstetricians and Gynecologists. 2011 Women’s Health Stats & Facts. Washington, DC: ACOG; 2011. http://www.acog.org/~/media/NewsRoom/MediaKit.pdf. Accessed August 6, 2015.
- American College of Obstetricians and Gynecologists. Committee Opinion No. 444: Choosing the route of hysterectomy for benign disease. Obstet Gynecol. 2009; 114(5):1156–1158.
- Silva-Filho AL, Rodrigues AM, Vale de Castro Monteiro M, et al. Randomized study of bipolar vessel sealing system versus conventional suture ligature for vaginal hysterectomy. Eur J Obstet Gynecol Reprod Biol. 2009;146(2):200–203.
In this Article
- 5 solutions to difficult vaginal access
- The need to take small bites of tissue
- Uterine reduction strategies