User login
The abdominal approach to hysterectomy remains the most common route to hysterectomy in the United States. Its greatest advantage: It allows the uterus to be removed intact.1–3
The recent US Food and Drug Administration (FDA) warning against the use of power morcellation in women with known or suspected uterine malignancy has left many gynecologic surgeons wondering what might be the optimal approach to the removal of a large uterus.4
Although most hysterectomies are performed for benign conditions—namely, uterine fibroids—malignancy should be considered in the differential diagnosis. When hysterectomy is performed laparoscopically, a large uterus must be morcellated intraperitoneally. Since the FDA safety communication was issued, some hospitals have imposed a moratorium on the use of power morcellators for removal of uterine tissue until more definitive evidence is put forth regarding safety and best practices. This chain of events allows us an opportunity to review the basics of abdominal hysterectomy.
For the sake of this discussion, I will assume that the hysterectomy is being performed for a benign indication as I highlight the Mayo Clinic approach to total abdominal hysterectomy (TAH).5
Preoperative considerations
The patient should be medically able to undergo operative intervention. If she has preexisting medical conditions, preoperative clearance should be obtained from her primary care provider, and her medical conditions should be optimized prior to surgical intervention.
Baseline laboratory studies include a complete blood count, electrolyte panel, glucose assessment, and an electrocardiogram (EKG). Bowel prep typically is not required. Provisions should be made to prevent deep venous thrombosis (DVT), usually by utilizing sequential compression devices, based on the individual patient’s risk factors.6,7
A prophylactic antibiotic to prevent surgical site infection (often a first-generation cephalosporin) should be given as a single intravenous (IV) dose prior to the incision.8 If bacterial vaginosis is present, treatment prior to surgery can reduce the frequency of vaginal cuff infection.9
Again, for the sake of this discussion, I will assume that malignancy has been ruled out.
Positioning and preparation
After induction of anesthesia, position the patient either in a dorsal supine (traditional) or lithotomy (yellow-fin stirrups) position and reexamine her to confirm the findings of the pelvic exam. If the patient is positioned in the supine position, use ankle straps to prevent her from moving as the Trendelenburg position advances during the procedure.
Prep the abdominal skin with a bactericidal agent (most often a povidone-iodine solution). Also prep the vagina with a povidone-iodine solution because the vaginal cuff will be opened during the TAH. Place a transurethral catheter to drain urine throughout the case. Use of a three-way catheter allows the bladder to be easily backfilled during the procedure for identification of its borders or assessment of its integrity.
Last, incorporate a surgical pause prior to the incision to confirm that you have the right patient, know the procedure and incision planned, and are aware of any allergies. Also confirm that antibiotics have been given.
Operative technique
Intraoperative principles
A planned approach avoids wasteful time and motion, and an adequate incision allows for sufficient exposure, which is critical but often underappreciated by the novice surgeon. We prefer a midline incision because it allows the most flexibility to adapt to intraoperative findings, but a Pfannenstiel incision also is an option.
Fixed retraction is paramount to “set up” exposure for the remainder of the case. We prefer a Balfour fixed retractor but, with smaller uteri, a self-retaining Alexis retractor (Applied Medical, Rancho Santa Margarita, California) affords decent exposure and may cause less postoperative abdominal wall discomfort; it also avoids the possibility of retractor-related neuropathy.
Moistened abdominal packing allows the bowel to be packed into the upper abdomen for the remainder of the case, which facilitates consistent exposure of the operative field. Adequate lighting is essential, as is one or more knowledgeable assistants.
Use sharp dissection throughout the procedure. Clean, sharp dissection averts injury to adjacent structures, such as the ureter, bladder, and rectum, and promotes recognition of any injuries, permitting immediate repair.
The application of proper traction and counter-traction on tissues allows accurate definition of the correct tissue planes and facilitates identification of important anatomic structures. Vital structures should be identified and, if necessary, mobilized before any clamps are placed or pedicles transected. Adhesions should be sharply lysed to facilitate exposure.
Freeing the bladder anteriorly and the rectum posteriorly prevents their inadvertent inclusion in closure of the vagina and minimizes the risk of fistula formation. The bladder and rectum should be sharply mobilized at least 1 cm beyond the site of planned vaginal transection.
Last, excellent support of the vaginal wall can be provided by securing the uterosacral-cardinal ligaments to the corners of the vaginal vault.
 |
| FIGURE 1: Place straight Kocher clamps to facilitate traction during the operation. |
 |
| FIGURE 2: Clamp and divide the right round ligament, opening the broad ligament. |
 |
| FIGURE 3: Identify the right ureter along the medial leaf of the broad ligament. |
Identifying the ureter
Once good exposure and adequate Trendelenburg position are achieved, place Kocher clamps across the cornual portion of the uterus (incorporating the round ligament, tube, and utero-ovarian pedicle) (FIGURE 1). This facilitates continuous traction and prevents back bleeding throughout the case.
With traction applied to the left, identify the right round ligament, clamp it with a Kocher clamp, and transect it. Incise the peritoneum parallel to the uterus and gonadal vessels (FIGURE 2). This opens the broad ligament and allows identification of the critical underlying structures (ureter, external and internal iliac vessels). Following the medial leaf of the broad ligament downward, identify the ureter by both visualization and palpation (FIGURE 3).
Although I do not discuss salpingo-oophorectomy in this article, be aware that the ureter is at risk when clamping the gonadal vessels near the pelvic brim.
Once the ureter is identified, create a window in the broad ligament above the ureter. In a medial to lateral fashion, place your index finger through that peritoneal window, making certain the ureter is below and out of the way. Place a Kocher clamp across the tube and utero-ovarian pedicle, and transect and suture-ligate the pedicle (preserving the tube and ovary). Repeat this procedure on the patient’s left side, using traction and counter-traction to facilitate exposure (FIGURE 4).
Mobilizing the bladder
With the assistant providing upward traction on the uterus, use Russian forceps to elevate the peritoneum overlying the bladder. Undermine and incise the peritoneum from the patient’s left to the right (FIGURE 5). Begin sharp dissection of the loose areolar tissue. By gently spreading the tissue using the tips of the scissors, and snipping the tissue in the midline, you allow the dissection to proceed down the lower uterine segment (FIGURE 6).
Any bleeding usually means you are too close to the bladder or have ventured too far laterally. If the patient has had a previous cesarean delivery, this area may be densely scarred. Often, it is easiest to dissect laterally around the scar on each side, where there is less dense scarring, and mobilize the tissue until the denser central scarring can be dissected. Note that the bladder attachment curves upward on each side and lateral to the cervix, over the lateral vagina and the uterine vessels.

It is absolutely critical to dissect and expose 1 or 2 cm of the entire anterior vaginal wall below the level of the cervix to be certain that the bladder has been fully mobilized and to prevent later incorporation into the vaginal cuff closure. The exact location of the cervix is best detected by placing a finger behind the uterus and using the thumb to compress the area of the anterior portion of the cervix under the bladder.
Fibroids can cause distortion of the anatomic planes we utilize. Be aware of the distortion and adjust your dissection accordingly. The structures of the urinary tract are most often affected; sharp dissection is necessary to mobilize the ureter and bladder in these cases. (See the case discussions)
 | 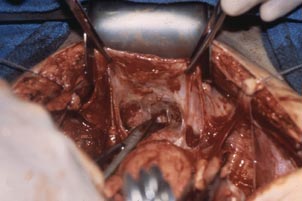 |
FIGURE 5: Upward traction on the peritoneum overlying the bladder facilitates development of the bladder flap off of the lower uterus. | FIGURE 6: Dissect the bladder off the lower uterus |
Large intramural or pedunculated myomas can be difficult surgical challenges. Broad-ligament myomas, however, are unique. Significant anatomic distortion can occur. Always consider the possibility of some degree of ureteral obstruction and be on the lookout for unrecognized bladder injury.
Case 1
This very large myoma essentially filled the pelvis but seems to arise from the left side of the uterus, distorting the anatomy. Note the attenuation of the round ligaments and the normal appearance of the tubes and ovaries (the left tube has a distal paratubal cyst.) Note also the bladder, particularly how sharp dissection will be required to mobilize it off the underlying mass.
To manage removal, at case outset, we placed bilateral external ureteral stents and used a lucite vaginal dilator to aid in respective ureter and vaginal apex identification. The bladder was attenuated over this large mass and was rather easily dissected, given the defined mass around it. The ureters were well lateral and inferior and readily identified with stent palpation. The cervix was certainly elongated and, after the uterine vessels were removed, the hysterectomy was completed without incident.
Surgical pearl: To extract very large masses during total abdominal hysterectomy, sometimes you have more “room” if the fixed retractor is removed. You can then use a series of handheld retractors (Deavor, Harrington, etc) on the side you are operating until the mass has been mobilized enough to place a fixed retractor.
CASE 2
 |  |
 |  |
This large cervical myoma is creating urinary urgency, frequency, and moderate obstruction of the right ureter. Sharp dissection is critical to mobilize the bladder well free of the myoma. We placed bilateral ureteral stents to start the case to aid in identification of the ureter.
The first illustration at right (top left) shows the operative appearance before the bladder flap was taken down. The second photo (top right) reveals the extent of this large myoma after the bladder has been sharply dissected free of the mass. The third photo (bottom left) displays the specimen sent to pathology (be sure to minimize the amount of vaginal tissue taken with the specimen). Note the distortion of the endocervical canal and cervix. The last photo (bottom right) reveals the sectioned specimen.
Surgical pearl: Use a three-way catheter and backfill the bladder for identification during the procedure and at the conclusion of the case to rule out bladder injury. A few drops of methylene blue added to the solution makes recognition easier.
Ligation of the uterine arteries
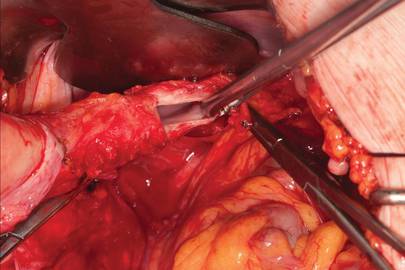
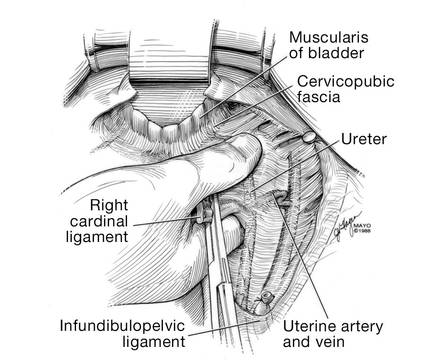
Apply cephalad traction to the uterus and place a Harrington retractor anteriorly to retract the bladder away from the cervix on the upper portion of the vagina. With the uterus pulled first to the left, palpate the right ureter between the thumb and index finger at the level of the uterine artery (FIGURE 7). Once you have determined the course of the ureter, place a Kocher clamp well down on the right side of the lower cervix at about a 45° angle, sliding off the side of the cervix (FIGURE 8). The clamp should now include the superior portion of the cardinal ligament with the uterine vessels and paracolpium immediately above the lateral vaginal fornix.
Transect the cardinal pedicle. Repeat the procedure on the left side after adjusting the Harrington retractor slightly to the left and identifying the course of the ureter where the Kocher clamp will be placed. Thus, a single Kocher clamp is placed on each side to control the blood supply.
It is paramount that you know the location of the ureter prior to placement and transection of the uterine vessels to prevent inadvertent injury or obstruction of the ureters.
Divide the uterine vessel–cardinal ligament complex close to the cervix (medial to the Kocher clamp), slightly undercutting the tip (FIGURE 9). This creates a fascial window, the anterior edge of which is the pubocervical fascia. This is subsequently developed and managed as a separate layer during the vaginal vault closure.
Repeat this procedure on the left side.
 |  |  |
| FIGURE 7: After mobilizing the bladder, palpate the right ureter prior to placement of a Kocher clamp on the cardinal vascular pedicle. | FIGURE 8: Place a single Kocher clamp on the right uterine vessels. See the right ureter well lateral of the clamp. | FIGURE 9: The right uterine vessels have been clamped and transected. The clamp is slightly undercut to allow access to the vaginal fornix. |
Preparing and opening the vaginal cuff
Develop the anterior pubocervical fascia by cutting with a scissors horizontally across the anterior vaginal wall at the level of the cervix (FIGURE 10). This layer of tissue will be utilized to close the vaginal cuff in a secondary layer later on. This technique will serve to close the pubocervical fascial ring at the vaginal vault and, with support of the uterosacral ligaments, provide support to the vaginal apex. At this point, the vagina has not yet been entered. The remaining tissue beneath the mobilized layer and the anterior cervix is the anterior vaginal wall.
Pull the uterus up and anterior toward the pubic symphysis to make the uterosacral ligaments prominent. Then transect the uterosacral ligaments close to the uterus (FIGURE 11). You may encounter minor bleeding, but there is no need to ligate the stumps at this point. Cut the tissue between the ligaments horizontally, similarly to the anterior dissection. With gentle finger dissection, as necessary, this should free the rectosigmoid colon from the posterior vaginal wall.
If this is a new technique for you, it may serve you well to place a stitch in each uterosacral ligament, below the spot where you will transect it, prior to cutting. When you have the uterus on tension, the ligaments are most recognizable, and these sutures can then be incorporated into the vaginal angles.
At this point there should be a circular area just beneath the cervix that is the vaginal wall at the apex of the vagina. Retract the uterus anteriorly and to the left, and enter the vagina posteriorly and laterally, just above the stump of the right uterosacral ligament (FIGURE 12). The uterus now can be removed by circumcising the vagina as close to the cervix as possible to avoid vaginal shortening. As the uterus is being removed, place four vulsellum tenacula successively at the 3, 12, 9, and 6 o’clock positions of the vaginal cuff as it is developed (FIGURE 13). Then swab povidone-iodine on the vaginal cuff and canal.
 |  |
| FIGURE 10: After mobilizing the bladder and securing the vascular pedicles, develop the anterior endopelvic fascia. It will be used as a second layer to close the vaginal cuff. | FIGURE 11: A. Transect the uterosacral ligaments. B. Mobilize the rectum posteriorly. |
 |  |
| FIGURE 12: Enter the right vaginal fornix and grasp it with a vulsellum tenaculum. | FIGURE 13: A. After entering the right vaginal fornix, extend the incision in a counter-clockwise fashion, preserving vaginal length. B. Placement of the tenaculum as the incision proceeds. |
Cuff closure
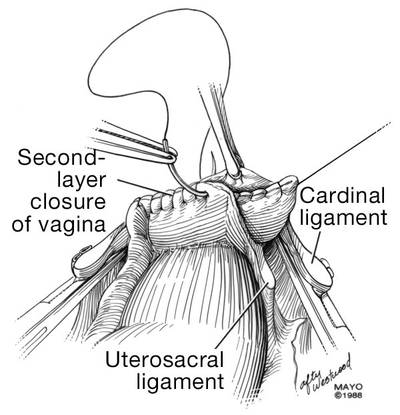
Place a lap salt sponge over the Kocher clamps to prevent suture entanglement. Use a 36-inch continuous 0-polyglactin suture to close the vaginal vault and achieve hemostasis. Begin suturing with a right vaginal angle stitch, placed so that the small vessels are ligated and the lateral supporting tissues from the base of the cardinal ligament are attached to the right vaginal angle. This closes the “window” that was created with slight undercutting of the cardinal ligament earlier. Continue suturing toward the left, with each bite placed submucosally so that the epithelial edges are approximated and inverted into the vagina. The suture does not enter the vagina (FIGURE 14). As you reach the left vaginal angle, obtain a healthy purchase of the left uterosacral ligament and then pass the needle laterally to the vaginal fornix angle, through the lateral supporting tissues at the base of the cardinal ligament, as was done on the right vaginal angle. Then lock the suture and return across the vaginal vault. This will plicate together the anterior and posterior pubocervical fascia layers developed earlier, creating a second layer, before closing the fascial ring at the vaginal apex. Incorporate the right uterosacral ligament into the right vaginal angle and tie the suture (FIGURES 15 AND 16).
Close the cuff and verify hemostasis. Use the lap salt sponge covering the Kocher clamps on the cardinal ligament pedicles to wipe the surgical field clean. Then use light cautery along the cuff and the base and back of the bladder. If there is some bleeding at the very corners of the vagina, it can usually be managed during suturing of the cardinal ligament pedicles into the corners of the vault.
Elevate the Kocher clamp containing the cardinal ligament and uterine vessels toward the midline. Then palpate the ureter between your index finger and thumb as it courses through the cardinal ligament toward the bladder. This step provides a second check on the location of the ureter (the first was when the clamp was originally placed) before the cardinal ligament is tied to the corner of the vault (FIGURE 17). The needle should enter the peritoneum, right uterosacral ligament, and full thickness of the right angle of the vagina just lateral to the suture used to close the vaginal apex. Bring the pedicle over the corner of the vagina and tie it close to the lateral aspect of the Kocher clamp, leaving an adequate stump. Then free-tie the stump of the cardinal ligament to add a double ligation of this vascular pedicle. Repeat this procedure on the opposite side (FIGURE 18). Then verify hemostasis throughout the operative field.
Take the patient out of Trendelenburg position and place her flat, and copiously irrigate the pelvis. Once needle and sponge counts are completed, close the abdomen in a layered fashion. Place a wound dressing and a Foley catheter, leaving the latter in place overnight.
 |  |
| FIGURE 14: A. Begin in the right vaginal corner, closing the area that was “undercut” (see FIGURE 10). B. Close the first layer in in a subcuticular manner. | FIGURE 15: The second layer of cuff closure utilizes the anterior and posterior endopelvic fascia and imbricates the first layer. |
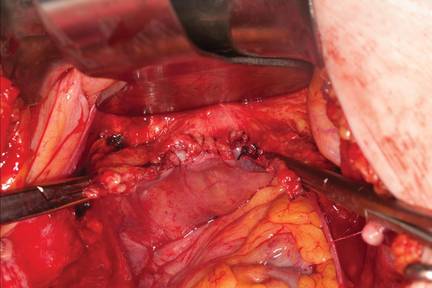 | |
FIGURE 16: Two-layer closure of the vaginal cuff. | |
 |  |
| FIGURE 17: Prior to suture ligation of the right uterine vessels, palpate the ureter again to identify its location. | FIGURE 18: Suture-ligate the uterine pedicles into the corners of the vaginal cuff. |
Share your thoughts on this article! Send your Letter to the Editor to rbarbieri@frontlinemedcom.com. Please include your name and the city and state in which you practice.
1. Wu JM, Wechter ME, Geller EJ, et al. Hysterectomy rates in the United States, 2003. Obstet Gynecol. 2007;110(5):1091–1095.
2. Falcone T, Walters MD. Hysterectomy for benign disease. Obstet Gynecol. 2008;111(3):753–767.
3. Unger JB, Paul R, Caldito G. Hysterectomy for the massive leiomyomatous uterus. Obstet Gynecol. 2002;100(6):1271–1275.
4. US Food and Drug Administration. Laparoscopic Uterine Power Morcellation in Hysterectomy and Myomectomy: FDA Safety Communication. http://www.fda.gov/MedicalDevices/Safety/AlertsandNotices/ucm393576.htm. Published April 17, 2014. Accessed September 15, 2014.
5. Webb MJ. Mayo Clinic Manual of Pelvic Surgery. 2nd ed. Philadelphia, PA: Lippincott Williams & Wilkins; 2000:55–72.
6. Committee on Practice Bulletins–Gynecology, American College of Obstetricians and Gynecologists. ACOG Practice Bulletin No. 84. Prevention of deep vein thrombosis and pulmonary embolism. Obstet Gynecol. 2007;110(2 pt 1):429–440.
7. Gould MK, Garcia DA, Wren SM, et al. Prevention of VTE in nonorthopedic surgical patients: antithrombotic therapy and prevention of thrombosis. 9th ed. American College of Chest Physicians Evidence-Based Clinical Practice Guidelines. Chest. 2012;141(2 suppl):e227S–e277S.
8. Committee on Practice Bulletins, American College of Obstetricians and Gynecologists. ACOG Practice Bulletin No. 74. Antibiotic prophylaxis for gynecologic procedures. Obstet Gynecol. 2006;108(1):225–234.
9. Larsson PG, Carlsson B. Does pre- and postoperative metronidazole treatment lower vaginal cuff infection rate after abdominal hysterectomy among women with bacterial vaginosis? Infect Dis Obstet Gynecol. 2002;10(3):133–140.
John B. Gebhart, MD, MS

Dr. Gebhart is Associate Professor of Obstetrics and Gynecology at the Mayo Clinic in Rochester, Minnesota.
The author reports no financial relationships relevant to this article.
John B. Gebhart, MD, MS
Dr. Gebhart is Associate Professor of Obstetrics and Gynecology at the Mayo Clinic in Rochester, Minnesota.
The author reports no financial relationships relevant to this article.
John B. Gebhart, MD, MS
Dr. Gebhart is Associate Professor of Obstetrics and Gynecology at the Mayo Clinic in Rochester, Minnesota.
The author reports no financial relationships relevant to this article.
The abdominal approach to hysterectomy remains the most common route to hysterectomy in the United States. Its greatest advantage: It allows the uterus to be removed intact.1–3
The recent US Food and Drug Administration (FDA) warning against the use of power morcellation in women with known or suspected uterine malignancy has left many gynecologic surgeons wondering what might be the optimal approach to the removal of a large uterus.4
Although most hysterectomies are performed for benign conditions—namely, uterine fibroids—malignancy should be considered in the differential diagnosis. When hysterectomy is performed laparoscopically, a large uterus must be morcellated intraperitoneally. Since the FDA safety communication was issued, some hospitals have imposed a moratorium on the use of power morcellators for removal of uterine tissue until more definitive evidence is put forth regarding safety and best practices. This chain of events allows us an opportunity to review the basics of abdominal hysterectomy.
For the sake of this discussion, I will assume that the hysterectomy is being performed for a benign indication as I highlight the Mayo Clinic approach to total abdominal hysterectomy (TAH).5
Preoperative considerations
The patient should be medically able to undergo operative intervention. If she has preexisting medical conditions, preoperative clearance should be obtained from her primary care provider, and her medical conditions should be optimized prior to surgical intervention.
Baseline laboratory studies include a complete blood count, electrolyte panel, glucose assessment, and an electrocardiogram (EKG). Bowel prep typically is not required. Provisions should be made to prevent deep venous thrombosis (DVT), usually by utilizing sequential compression devices, based on the individual patient’s risk factors.6,7
A prophylactic antibiotic to prevent surgical site infection (often a first-generation cephalosporin) should be given as a single intravenous (IV) dose prior to the incision.8 If bacterial vaginosis is present, treatment prior to surgery can reduce the frequency of vaginal cuff infection.9
Again, for the sake of this discussion, I will assume that malignancy has been ruled out.
Positioning and preparation
After induction of anesthesia, position the patient either in a dorsal supine (traditional) or lithotomy (yellow-fin stirrups) position and reexamine her to confirm the findings of the pelvic exam. If the patient is positioned in the supine position, use ankle straps to prevent her from moving as the Trendelenburg position advances during the procedure.
Prep the abdominal skin with a bactericidal agent (most often a povidone-iodine solution). Also prep the vagina with a povidone-iodine solution because the vaginal cuff will be opened during the TAH. Place a transurethral catheter to drain urine throughout the case. Use of a three-way catheter allows the bladder to be easily backfilled during the procedure for identification of its borders or assessment of its integrity.
Last, incorporate a surgical pause prior to the incision to confirm that you have the right patient, know the procedure and incision planned, and are aware of any allergies. Also confirm that antibiotics have been given.
Operative technique
Intraoperative principles
A planned approach avoids wasteful time and motion, and an adequate incision allows for sufficient exposure, which is critical but often underappreciated by the novice surgeon. We prefer a midline incision because it allows the most flexibility to adapt to intraoperative findings, but a Pfannenstiel incision also is an option.
Fixed retraction is paramount to “set up” exposure for the remainder of the case. We prefer a Balfour fixed retractor but, with smaller uteri, a self-retaining Alexis retractor (Applied Medical, Rancho Santa Margarita, California) affords decent exposure and may cause less postoperative abdominal wall discomfort; it also avoids the possibility of retractor-related neuropathy.
Moistened abdominal packing allows the bowel to be packed into the upper abdomen for the remainder of the case, which facilitates consistent exposure of the operative field. Adequate lighting is essential, as is one or more knowledgeable assistants.
Use sharp dissection throughout the procedure. Clean, sharp dissection averts injury to adjacent structures, such as the ureter, bladder, and rectum, and promotes recognition of any injuries, permitting immediate repair.
The application of proper traction and counter-traction on tissues allows accurate definition of the correct tissue planes and facilitates identification of important anatomic structures. Vital structures should be identified and, if necessary, mobilized before any clamps are placed or pedicles transected. Adhesions should be sharply lysed to facilitate exposure.
Freeing the bladder anteriorly and the rectum posteriorly prevents their inadvertent inclusion in closure of the vagina and minimizes the risk of fistula formation. The bladder and rectum should be sharply mobilized at least 1 cm beyond the site of planned vaginal transection.
Last, excellent support of the vaginal wall can be provided by securing the uterosacral-cardinal ligaments to the corners of the vaginal vault.
|
| FIGURE 1: Place straight Kocher clamps to facilitate traction during the operation. |
|
| FIGURE 2: Clamp and divide the right round ligament, opening the broad ligament. |
|
| FIGURE 3: Identify the right ureter along the medial leaf of the broad ligament. |
Identifying the ureter
Once good exposure and adequate Trendelenburg position are achieved, place Kocher clamps across the cornual portion of the uterus (incorporating the round ligament, tube, and utero-ovarian pedicle) (FIGURE 1). This facilitates continuous traction and prevents back bleeding throughout the case.
With traction applied to the left, identify the right round ligament, clamp it with a Kocher clamp, and transect it. Incise the peritoneum parallel to the uterus and gonadal vessels (FIGURE 2). This opens the broad ligament and allows identification of the critical underlying structures (ureter, external and internal iliac vessels). Following the medial leaf of the broad ligament downward, identify the ureter by both visualization and palpation (FIGURE 3).
Although I do not discuss salpingo-oophorectomy in this article, be aware that the ureter is at risk when clamping the gonadal vessels near the pelvic brim.
Once the ureter is identified, create a window in the broad ligament above the ureter. In a medial to lateral fashion, place your index finger through that peritoneal window, making certain the ureter is below and out of the way. Place a Kocher clamp across the tube and utero-ovarian pedicle, and transect and suture-ligate the pedicle (preserving the tube and ovary). Repeat this procedure on the patient’s left side, using traction and counter-traction to facilitate exposure (FIGURE 4).
Mobilizing the bladder
With the assistant providing upward traction on the uterus, use Russian forceps to elevate the peritoneum overlying the bladder. Undermine and incise the peritoneum from the patient’s left to the right (FIGURE 5). Begin sharp dissection of the loose areolar tissue. By gently spreading the tissue using the tips of the scissors, and snipping the tissue in the midline, you allow the dissection to proceed down the lower uterine segment (FIGURE 6).
Any bleeding usually means you are too close to the bladder or have ventured too far laterally. If the patient has had a previous cesarean delivery, this area may be densely scarred. Often, it is easiest to dissect laterally around the scar on each side, where there is less dense scarring, and mobilize the tissue until the denser central scarring can be dissected. Note that the bladder attachment curves upward on each side and lateral to the cervix, over the lateral vagina and the uterine vessels.
It is absolutely critical to dissect and expose 1 or 2 cm of the entire anterior vaginal wall below the level of the cervix to be certain that the bladder has been fully mobilized and to prevent later incorporation into the vaginal cuff closure. The exact location of the cervix is best detected by placing a finger behind the uterus and using the thumb to compress the area of the anterior portion of the cervix under the bladder.
Fibroids can cause distortion of the anatomic planes we utilize. Be aware of the distortion and adjust your dissection accordingly. The structures of the urinary tract are most often affected; sharp dissection is necessary to mobilize the ureter and bladder in these cases. (See the case discussions)
| |
FIGURE 5: Upward traction on the peritoneum overlying the bladder facilitates development of the bladder flap off of the lower uterus. | FIGURE 6: Dissect the bladder off the lower uterus |
Large intramural or pedunculated myomas can be difficult surgical challenges. Broad-ligament myomas, however, are unique. Significant anatomic distortion can occur. Always consider the possibility of some degree of ureteral obstruction and be on the lookout for unrecognized bladder injury.
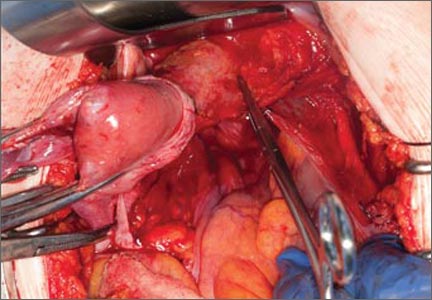
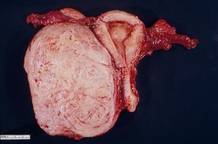
Case 1
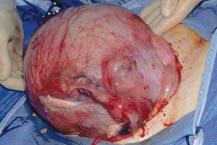
This very large myoma essentially filled the pelvis but seems to arise from the left side of the uterus, distorting the anatomy. Note the attenuation of the round ligaments and the normal appearance of the tubes and ovaries (the left tube has a distal paratubal cyst.) Note also the bladder, particularly how sharp dissection will be required to mobilize it off the underlying mass.
To manage removal, at case outset, we placed bilateral external ureteral stents and used a lucite vaginal dilator to aid in respective ureter and vaginal apex identification. The bladder was attenuated over this large mass and was rather easily dissected, given the defined mass around it. The ureters were well lateral and inferior and readily identified with stent palpation. The cervix was certainly elongated and, after the uterine vessels were removed, the hysterectomy was completed without incident.
Surgical pearl: To extract very large masses during total abdominal hysterectomy, sometimes you have more “room” if the fixed retractor is removed. You can then use a series of handheld retractors (Deavor, Harrington, etc) on the side you are operating until the mass has been mobilized enough to place a fixed retractor.
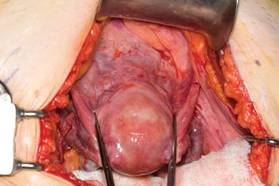
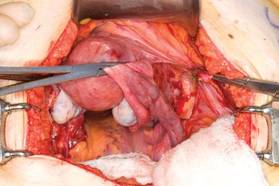
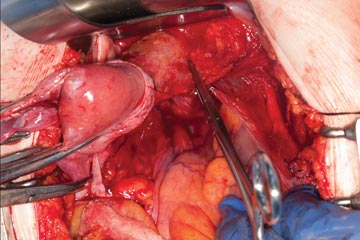
CASE 2
| |
| |
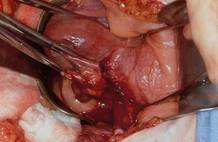
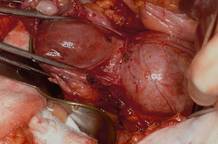
This large cervical myoma is creating urinary urgency, frequency, and moderate obstruction of the right ureter. Sharp dissection is critical to mobilize the bladder well free of the myoma. We placed bilateral ureteral stents to start the case to aid in identification of the ureter.
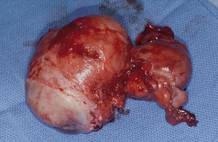
The first illustration at right (top left) shows the operative appearance before the bladder flap was taken down. The second photo (top right) reveals the extent of this large myoma after the bladder has been sharply dissected free of the mass. The third photo (bottom left) displays the specimen sent to pathology (be sure to minimize the amount of vaginal tissue taken with the specimen). Note the distortion of the endocervical canal and cervix. The last photo (bottom right) reveals the sectioned specimen.
Surgical pearl: Use a three-way catheter and backfill the bladder for identification during the procedure and at the conclusion of the case to rule out bladder injury. A few drops of methylene blue added to the solution makes recognition easier.
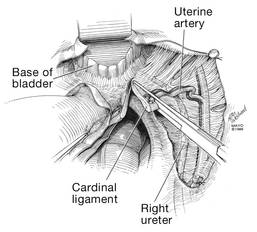
Ligation of the uterine arteries
Apply cephalad traction to the uterus and place a Harrington retractor anteriorly to retract the bladder away from the cervix on the upper portion of the vagina. With the uterus pulled first to the left, palpate the right ureter between the thumb and index finger at the level of the uterine artery (FIGURE 7). Once you have determined the course of the ureter, place a Kocher clamp well down on the right side of the lower cervix at about a 45° angle, sliding off the side of the cervix (FIGURE 8). The clamp should now include the superior portion of the cardinal ligament with the uterine vessels and paracolpium immediately above the lateral vaginal fornix.
Transect the cardinal pedicle. Repeat the procedure on the left side after adjusting the Harrington retractor slightly to the left and identifying the course of the ureter where the Kocher clamp will be placed. Thus, a single Kocher clamp is placed on each side to control the blood supply.
It is paramount that you know the location of the ureter prior to placement and transection of the uterine vessels to prevent inadvertent injury or obstruction of the ureters.
Divide the uterine vessel–cardinal ligament complex close to the cervix (medial to the Kocher clamp), slightly undercutting the tip (FIGURE 9). This creates a fascial window, the anterior edge of which is the pubocervical fascia. This is subsequently developed and managed as a separate layer during the vaginal vault closure.
Repeat this procedure on the left side.
| | |
| FIGURE 7: After mobilizing the bladder, palpate the right ureter prior to placement of a Kocher clamp on the cardinal vascular pedicle. | FIGURE 8: Place a single Kocher clamp on the right uterine vessels. See the right ureter well lateral of the clamp. | FIGURE 9: The right uterine vessels have been clamped and transected. The clamp is slightly undercut to allow access to the vaginal fornix. |
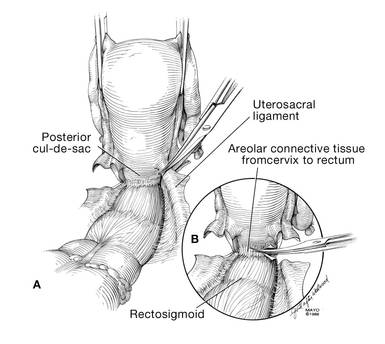
Preparing and opening the vaginal cuff
Develop the anterior pubocervical fascia by cutting with a scissors horizontally across the anterior vaginal wall at the level of the cervix (FIGURE 10). This layer of tissue will be utilized to close the vaginal cuff in a secondary layer later on. This technique will serve to close the pubocervical fascial ring at the vaginal vault and, with support of the uterosacral ligaments, provide support to the vaginal apex. At this point, the vagina has not yet been entered. The remaining tissue beneath the mobilized layer and the anterior cervix is the anterior vaginal wall.
Pull the uterus up and anterior toward the pubic symphysis to make the uterosacral ligaments prominent. Then transect the uterosacral ligaments close to the uterus (FIGURE 11). You may encounter minor bleeding, but there is no need to ligate the stumps at this point. Cut the tissue between the ligaments horizontally, similarly to the anterior dissection. With gentle finger dissection, as necessary, this should free the rectosigmoid colon from the posterior vaginal wall.
If this is a new technique for you, it may serve you well to place a stitch in each uterosacral ligament, below the spot where you will transect it, prior to cutting. When you have the uterus on tension, the ligaments are most recognizable, and these sutures can then be incorporated into the vaginal angles.
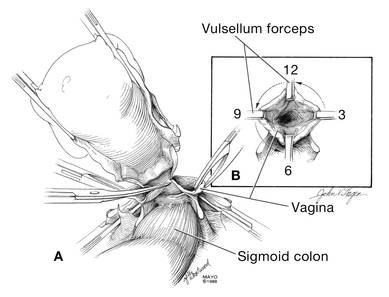
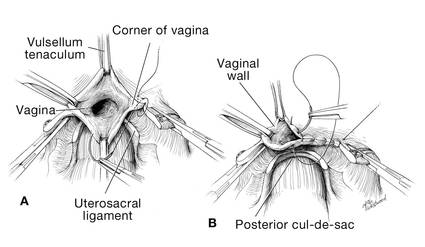
At this point there should be a circular area just beneath the cervix that is the vaginal wall at the apex of the vagina. Retract the uterus anteriorly and to the left, and enter the vagina posteriorly and laterally, just above the stump of the right uterosacral ligament (FIGURE 12). The uterus now can be removed by circumcising the vagina as close to the cervix as possible to avoid vaginal shortening. As the uterus is being removed, place four vulsellum tenacula successively at the 3, 12, 9, and 6 o’clock positions of the vaginal cuff as it is developed (FIGURE 13). Then swab povidone-iodine on the vaginal cuff and canal.
| |
| FIGURE 10: After mobilizing the bladder and securing the vascular pedicles, develop the anterior endopelvic fascia. It will be used as a second layer to close the vaginal cuff. | FIGURE 11: A. Transect the uterosacral ligaments. B. Mobilize the rectum posteriorly. |
| |
| FIGURE 12: Enter the right vaginal fornix and grasp it with a vulsellum tenaculum. | FIGURE 13: A. After entering the right vaginal fornix, extend the incision in a counter-clockwise fashion, preserving vaginal length. B. Placement of the tenaculum as the incision proceeds. |
Cuff closure
Place a lap salt sponge over the Kocher clamps to prevent suture entanglement. Use a 36-inch continuous 0-polyglactin suture to close the vaginal vault and achieve hemostasis. Begin suturing with a right vaginal angle stitch, placed so that the small vessels are ligated and the lateral supporting tissues from the base of the cardinal ligament are attached to the right vaginal angle. This closes the “window” that was created with slight undercutting of the cardinal ligament earlier. Continue suturing toward the left, with each bite placed submucosally so that the epithelial edges are approximated and inverted into the vagina. The suture does not enter the vagina (FIGURE 14). As you reach the left vaginal angle, obtain a healthy purchase of the left uterosacral ligament and then pass the needle laterally to the vaginal fornix angle, through the lateral supporting tissues at the base of the cardinal ligament, as was done on the right vaginal angle. Then lock the suture and return across the vaginal vault. This will plicate together the anterior and posterior pubocervical fascia layers developed earlier, creating a second layer, before closing the fascial ring at the vaginal apex. Incorporate the right uterosacral ligament into the right vaginal angle and tie the suture (FIGURES 15 AND 16).
Close the cuff and verify hemostasis. Use the lap salt sponge covering the Kocher clamps on the cardinal ligament pedicles to wipe the surgical field clean. Then use light cautery along the cuff and the base and back of the bladder. If there is some bleeding at the very corners of the vagina, it can usually be managed during suturing of the cardinal ligament pedicles into the corners of the vault.
Elevate the Kocher clamp containing the cardinal ligament and uterine vessels toward the midline. Then palpate the ureter between your index finger and thumb as it courses through the cardinal ligament toward the bladder. This step provides a second check on the location of the ureter (the first was when the clamp was originally placed) before the cardinal ligament is tied to the corner of the vault (FIGURE 17). The needle should enter the peritoneum, right uterosacral ligament, and full thickness of the right angle of the vagina just lateral to the suture used to close the vaginal apex. Bring the pedicle over the corner of the vagina and tie it close to the lateral aspect of the Kocher clamp, leaving an adequate stump. Then free-tie the stump of the cardinal ligament to add a double ligation of this vascular pedicle. Repeat this procedure on the opposite side (FIGURE 18). Then verify hemostasis throughout the operative field.
Take the patient out of Trendelenburg position and place her flat, and copiously irrigate the pelvis. Once needle and sponge counts are completed, close the abdomen in a layered fashion. Place a wound dressing and a Foley catheter, leaving the latter in place overnight.
| |
| FIGURE 14: A. Begin in the right vaginal corner, closing the area that was “undercut” (see FIGURE 10). B. Close the first layer in in a subcuticular manner. | FIGURE 15: The second layer of cuff closure utilizes the anterior and posterior endopelvic fascia and imbricates the first layer. |
| |
FIGURE 16: Two-layer closure of the vaginal cuff. | |
| |
| FIGURE 17: Prior to suture ligation of the right uterine vessels, palpate the ureter again to identify its location. | FIGURE 18: Suture-ligate the uterine pedicles into the corners of the vaginal cuff. |
Share your thoughts on this article! Send your Letter to the Editor to rbarbieri@frontlinemedcom.com. Please include your name and the city and state in which you practice.
The abdominal approach to hysterectomy remains the most common route to hysterectomy in the United States. Its greatest advantage: It allows the uterus to be removed intact.1–3
The recent US Food and Drug Administration (FDA) warning against the use of power morcellation in women with known or suspected uterine malignancy has left many gynecologic surgeons wondering what might be the optimal approach to the removal of a large uterus.4
Although most hysterectomies are performed for benign conditions—namely, uterine fibroids—malignancy should be considered in the differential diagnosis. When hysterectomy is performed laparoscopically, a large uterus must be morcellated intraperitoneally. Since the FDA safety communication was issued, some hospitals have imposed a moratorium on the use of power morcellators for removal of uterine tissue until more definitive evidence is put forth regarding safety and best practices. This chain of events allows us an opportunity to review the basics of abdominal hysterectomy.
For the sake of this discussion, I will assume that the hysterectomy is being performed for a benign indication as I highlight the Mayo Clinic approach to total abdominal hysterectomy (TAH).5
Preoperative considerations
The patient should be medically able to undergo operative intervention. If she has preexisting medical conditions, preoperative clearance should be obtained from her primary care provider, and her medical conditions should be optimized prior to surgical intervention.
Baseline laboratory studies include a complete blood count, electrolyte panel, glucose assessment, and an electrocardiogram (EKG). Bowel prep typically is not required. Provisions should be made to prevent deep venous thrombosis (DVT), usually by utilizing sequential compression devices, based on the individual patient’s risk factors.6,7
A prophylactic antibiotic to prevent surgical site infection (often a first-generation cephalosporin) should be given as a single intravenous (IV) dose prior to the incision.8 If bacterial vaginosis is present, treatment prior to surgery can reduce the frequency of vaginal cuff infection.9
Again, for the sake of this discussion, I will assume that malignancy has been ruled out.
Positioning and preparation
After induction of anesthesia, position the patient either in a dorsal supine (traditional) or lithotomy (yellow-fin stirrups) position and reexamine her to confirm the findings of the pelvic exam. If the patient is positioned in the supine position, use ankle straps to prevent her from moving as the Trendelenburg position advances during the procedure.
Prep the abdominal skin with a bactericidal agent (most often a povidone-iodine solution). Also prep the vagina with a povidone-iodine solution because the vaginal cuff will be opened during the TAH. Place a transurethral catheter to drain urine throughout the case. Use of a three-way catheter allows the bladder to be easily backfilled during the procedure for identification of its borders or assessment of its integrity.
Last, incorporate a surgical pause prior to the incision to confirm that you have the right patient, know the procedure and incision planned, and are aware of any allergies. Also confirm that antibiotics have been given.
Operative technique
Intraoperative principles
A planned approach avoids wasteful time and motion, and an adequate incision allows for sufficient exposure, which is critical but often underappreciated by the novice surgeon. We prefer a midline incision because it allows the most flexibility to adapt to intraoperative findings, but a Pfannenstiel incision also is an option.
Fixed retraction is paramount to “set up” exposure for the remainder of the case. We prefer a Balfour fixed retractor but, with smaller uteri, a self-retaining Alexis retractor (Applied Medical, Rancho Santa Margarita, California) affords decent exposure and may cause less postoperative abdominal wall discomfort; it also avoids the possibility of retractor-related neuropathy.
Moistened abdominal packing allows the bowel to be packed into the upper abdomen for the remainder of the case, which facilitates consistent exposure of the operative field. Adequate lighting is essential, as is one or more knowledgeable assistants.
Use sharp dissection throughout the procedure. Clean, sharp dissection averts injury to adjacent structures, such as the ureter, bladder, and rectum, and promotes recognition of any injuries, permitting immediate repair.
The application of proper traction and counter-traction on tissues allows accurate definition of the correct tissue planes and facilitates identification of important anatomic structures. Vital structures should be identified and, if necessary, mobilized before any clamps are placed or pedicles transected. Adhesions should be sharply lysed to facilitate exposure.
Freeing the bladder anteriorly and the rectum posteriorly prevents their inadvertent inclusion in closure of the vagina and minimizes the risk of fistula formation. The bladder and rectum should be sharply mobilized at least 1 cm beyond the site of planned vaginal transection.
Last, excellent support of the vaginal wall can be provided by securing the uterosacral-cardinal ligaments to the corners of the vaginal vault.
|
| FIGURE 1: Place straight Kocher clamps to facilitate traction during the operation. |
|
| FIGURE 2: Clamp and divide the right round ligament, opening the broad ligament. |
|
| FIGURE 3: Identify the right ureter along the medial leaf of the broad ligament. |
Identifying the ureter
Once good exposure and adequate Trendelenburg position are achieved, place Kocher clamps across the cornual portion of the uterus (incorporating the round ligament, tube, and utero-ovarian pedicle) (FIGURE 1). This facilitates continuous traction and prevents back bleeding throughout the case.
With traction applied to the left, identify the right round ligament, clamp it with a Kocher clamp, and transect it. Incise the peritoneum parallel to the uterus and gonadal vessels (FIGURE 2). This opens the broad ligament and allows identification of the critical underlying structures (ureter, external and internal iliac vessels). Following the medial leaf of the broad ligament downward, identify the ureter by both visualization and palpation (FIGURE 3).
Although I do not discuss salpingo-oophorectomy in this article, be aware that the ureter is at risk when clamping the gonadal vessels near the pelvic brim.
Once the ureter is identified, create a window in the broad ligament above the ureter. In a medial to lateral fashion, place your index finger through that peritoneal window, making certain the ureter is below and out of the way. Place a Kocher clamp across the tube and utero-ovarian pedicle, and transect and suture-ligate the pedicle (preserving the tube and ovary). Repeat this procedure on the patient’s left side, using traction and counter-traction to facilitate exposure (FIGURE 4).
Mobilizing the bladder
With the assistant providing upward traction on the uterus, use Russian forceps to elevate the peritoneum overlying the bladder. Undermine and incise the peritoneum from the patient’s left to the right (FIGURE 5). Begin sharp dissection of the loose areolar tissue. By gently spreading the tissue using the tips of the scissors, and snipping the tissue in the midline, you allow the dissection to proceed down the lower uterine segment (FIGURE 6).
Any bleeding usually means you are too close to the bladder or have ventured too far laterally. If the patient has had a previous cesarean delivery, this area may be densely scarred. Often, it is easiest to dissect laterally around the scar on each side, where there is less dense scarring, and mobilize the tissue until the denser central scarring can be dissected. Note that the bladder attachment curves upward on each side and lateral to the cervix, over the lateral vagina and the uterine vessels.
It is absolutely critical to dissect and expose 1 or 2 cm of the entire anterior vaginal wall below the level of the cervix to be certain that the bladder has been fully mobilized and to prevent later incorporation into the vaginal cuff closure. The exact location of the cervix is best detected by placing a finger behind the uterus and using the thumb to compress the area of the anterior portion of the cervix under the bladder.
Fibroids can cause distortion of the anatomic planes we utilize. Be aware of the distortion and adjust your dissection accordingly. The structures of the urinary tract are most often affected; sharp dissection is necessary to mobilize the ureter and bladder in these cases. (See the case discussions)
| |
FIGURE 5: Upward traction on the peritoneum overlying the bladder facilitates development of the bladder flap off of the lower uterus. | FIGURE 6: Dissect the bladder off the lower uterus |
Large intramural or pedunculated myomas can be difficult surgical challenges. Broad-ligament myomas, however, are unique. Significant anatomic distortion can occur. Always consider the possibility of some degree of ureteral obstruction and be on the lookout for unrecognized bladder injury.
Case 1
This very large myoma essentially filled the pelvis but seems to arise from the left side of the uterus, distorting the anatomy. Note the attenuation of the round ligaments and the normal appearance of the tubes and ovaries (the left tube has a distal paratubal cyst.) Note also the bladder, particularly how sharp dissection will be required to mobilize it off the underlying mass.
To manage removal, at case outset, we placed bilateral external ureteral stents and used a lucite vaginal dilator to aid in respective ureter and vaginal apex identification. The bladder was attenuated over this large mass and was rather easily dissected, given the defined mass around it. The ureters were well lateral and inferior and readily identified with stent palpation. The cervix was certainly elongated and, after the uterine vessels were removed, the hysterectomy was completed without incident.
Surgical pearl: To extract very large masses during total abdominal hysterectomy, sometimes you have more “room” if the fixed retractor is removed. You can then use a series of handheld retractors (Deavor, Harrington, etc) on the side you are operating until the mass has been mobilized enough to place a fixed retractor.
CASE 2
| |
| |
This large cervical myoma is creating urinary urgency, frequency, and moderate obstruction of the right ureter. Sharp dissection is critical to mobilize the bladder well free of the myoma. We placed bilateral ureteral stents to start the case to aid in identification of the ureter.
The first illustration at right (top left) shows the operative appearance before the bladder flap was taken down. The second photo (top right) reveals the extent of this large myoma after the bladder has been sharply dissected free of the mass. The third photo (bottom left) displays the specimen sent to pathology (be sure to minimize the amount of vaginal tissue taken with the specimen). Note the distortion of the endocervical canal and cervix. The last photo (bottom right) reveals the sectioned specimen.
Surgical pearl: Use a three-way catheter and backfill the bladder for identification during the procedure and at the conclusion of the case to rule out bladder injury. A few drops of methylene blue added to the solution makes recognition easier.
Ligation of the uterine arteries
Apply cephalad traction to the uterus and place a Harrington retractor anteriorly to retract the bladder away from the cervix on the upper portion of the vagina. With the uterus pulled first to the left, palpate the right ureter between the thumb and index finger at the level of the uterine artery (FIGURE 7). Once you have determined the course of the ureter, place a Kocher clamp well down on the right side of the lower cervix at about a 45° angle, sliding off the side of the cervix (FIGURE 8). The clamp should now include the superior portion of the cardinal ligament with the uterine vessels and paracolpium immediately above the lateral vaginal fornix.
Transect the cardinal pedicle. Repeat the procedure on the left side after adjusting the Harrington retractor slightly to the left and identifying the course of the ureter where the Kocher clamp will be placed. Thus, a single Kocher clamp is placed on each side to control the blood supply.
It is paramount that you know the location of the ureter prior to placement and transection of the uterine vessels to prevent inadvertent injury or obstruction of the ureters.
Divide the uterine vessel–cardinal ligament complex close to the cervix (medial to the Kocher clamp), slightly undercutting the tip (FIGURE 9). This creates a fascial window, the anterior edge of which is the pubocervical fascia. This is subsequently developed and managed as a separate layer during the vaginal vault closure.
Repeat this procedure on the left side.
| | |
| FIGURE 7: After mobilizing the bladder, palpate the right ureter prior to placement of a Kocher clamp on the cardinal vascular pedicle. | FIGURE 8: Place a single Kocher clamp on the right uterine vessels. See the right ureter well lateral of the clamp. | FIGURE 9: The right uterine vessels have been clamped and transected. The clamp is slightly undercut to allow access to the vaginal fornix. |
Preparing and opening the vaginal cuff
Develop the anterior pubocervical fascia by cutting with a scissors horizontally across the anterior vaginal wall at the level of the cervix (FIGURE 10). This layer of tissue will be utilized to close the vaginal cuff in a secondary layer later on. This technique will serve to close the pubocervical fascial ring at the vaginal vault and, with support of the uterosacral ligaments, provide support to the vaginal apex. At this point, the vagina has not yet been entered. The remaining tissue beneath the mobilized layer and the anterior cervix is the anterior vaginal wall.
Pull the uterus up and anterior toward the pubic symphysis to make the uterosacral ligaments prominent. Then transect the uterosacral ligaments close to the uterus (FIGURE 11). You may encounter minor bleeding, but there is no need to ligate the stumps at this point. Cut the tissue between the ligaments horizontally, similarly to the anterior dissection. With gentle finger dissection, as necessary, this should free the rectosigmoid colon from the posterior vaginal wall.
If this is a new technique for you, it may serve you well to place a stitch in each uterosacral ligament, below the spot where you will transect it, prior to cutting. When you have the uterus on tension, the ligaments are most recognizable, and these sutures can then be incorporated into the vaginal angles.
At this point there should be a circular area just beneath the cervix that is the vaginal wall at the apex of the vagina. Retract the uterus anteriorly and to the left, and enter the vagina posteriorly and laterally, just above the stump of the right uterosacral ligament (FIGURE 12). The uterus now can be removed by circumcising the vagina as close to the cervix as possible to avoid vaginal shortening. As the uterus is being removed, place four vulsellum tenacula successively at the 3, 12, 9, and 6 o’clock positions of the vaginal cuff as it is developed (FIGURE 13). Then swab povidone-iodine on the vaginal cuff and canal.
| |
| FIGURE 10: After mobilizing the bladder and securing the vascular pedicles, develop the anterior endopelvic fascia. It will be used as a second layer to close the vaginal cuff. | FIGURE 11: A. Transect the uterosacral ligaments. B. Mobilize the rectum posteriorly. |
| |
| FIGURE 12: Enter the right vaginal fornix and grasp it with a vulsellum tenaculum. | FIGURE 13: A. After entering the right vaginal fornix, extend the incision in a counter-clockwise fashion, preserving vaginal length. B. Placement of the tenaculum as the incision proceeds. |
Cuff closure
Place a lap salt sponge over the Kocher clamps to prevent suture entanglement. Use a 36-inch continuous 0-polyglactin suture to close the vaginal vault and achieve hemostasis. Begin suturing with a right vaginal angle stitch, placed so that the small vessels are ligated and the lateral supporting tissues from the base of the cardinal ligament are attached to the right vaginal angle. This closes the “window” that was created with slight undercutting of the cardinal ligament earlier. Continue suturing toward the left, with each bite placed submucosally so that the epithelial edges are approximated and inverted into the vagina. The suture does not enter the vagina (FIGURE 14). As you reach the left vaginal angle, obtain a healthy purchase of the left uterosacral ligament and then pass the needle laterally to the vaginal fornix angle, through the lateral supporting tissues at the base of the cardinal ligament, as was done on the right vaginal angle. Then lock the suture and return across the vaginal vault. This will plicate together the anterior and posterior pubocervical fascia layers developed earlier, creating a second layer, before closing the fascial ring at the vaginal apex. Incorporate the right uterosacral ligament into the right vaginal angle and tie the suture (FIGURES 15 AND 16).
Close the cuff and verify hemostasis. Use the lap salt sponge covering the Kocher clamps on the cardinal ligament pedicles to wipe the surgical field clean. Then use light cautery along the cuff and the base and back of the bladder. If there is some bleeding at the very corners of the vagina, it can usually be managed during suturing of the cardinal ligament pedicles into the corners of the vault.
Elevate the Kocher clamp containing the cardinal ligament and uterine vessels toward the midline. Then palpate the ureter between your index finger and thumb as it courses through the cardinal ligament toward the bladder. This step provides a second check on the location of the ureter (the first was when the clamp was originally placed) before the cardinal ligament is tied to the corner of the vault (FIGURE 17). The needle should enter the peritoneum, right uterosacral ligament, and full thickness of the right angle of the vagina just lateral to the suture used to close the vaginal apex. Bring the pedicle over the corner of the vagina and tie it close to the lateral aspect of the Kocher clamp, leaving an adequate stump. Then free-tie the stump of the cardinal ligament to add a double ligation of this vascular pedicle. Repeat this procedure on the opposite side (FIGURE 18). Then verify hemostasis throughout the operative field.
Take the patient out of Trendelenburg position and place her flat, and copiously irrigate the pelvis. Once needle and sponge counts are completed, close the abdomen in a layered fashion. Place a wound dressing and a Foley catheter, leaving the latter in place overnight.
| |
| FIGURE 14: A. Begin in the right vaginal corner, closing the area that was “undercut” (see FIGURE 10). B. Close the first layer in in a subcuticular manner. | FIGURE 15: The second layer of cuff closure utilizes the anterior and posterior endopelvic fascia and imbricates the first layer. |
| |
FIGURE 16: Two-layer closure of the vaginal cuff. | |
| |
| FIGURE 17: Prior to suture ligation of the right uterine vessels, palpate the ureter again to identify its location. | FIGURE 18: Suture-ligate the uterine pedicles into the corners of the vaginal cuff. |
Share your thoughts on this article! Send your Letter to the Editor to rbarbieri@frontlinemedcom.com. Please include your name and the city and state in which you practice.
1. Wu JM, Wechter ME, Geller EJ, et al. Hysterectomy rates in the United States, 2003. Obstet Gynecol. 2007;110(5):1091–1095.
2. Falcone T, Walters MD. Hysterectomy for benign disease. Obstet Gynecol. 2008;111(3):753–767.
3. Unger JB, Paul R, Caldito G. Hysterectomy for the massive leiomyomatous uterus. Obstet Gynecol. 2002;100(6):1271–1275.
4. US Food and Drug Administration. Laparoscopic Uterine Power Morcellation in Hysterectomy and Myomectomy: FDA Safety Communication. http://www.fda.gov/MedicalDevices/Safety/AlertsandNotices/ucm393576.htm. Published April 17, 2014. Accessed September 15, 2014.
5. Webb MJ. Mayo Clinic Manual of Pelvic Surgery. 2nd ed. Philadelphia, PA: Lippincott Williams & Wilkins; 2000:55–72.
6. Committee on Practice Bulletins–Gynecology, American College of Obstetricians and Gynecologists. ACOG Practice Bulletin No. 84. Prevention of deep vein thrombosis and pulmonary embolism. Obstet Gynecol. 2007;110(2 pt 1):429–440.
7. Gould MK, Garcia DA, Wren SM, et al. Prevention of VTE in nonorthopedic surgical patients: antithrombotic therapy and prevention of thrombosis. 9th ed. American College of Chest Physicians Evidence-Based Clinical Practice Guidelines. Chest. 2012;141(2 suppl):e227S–e277S.
8. Committee on Practice Bulletins, American College of Obstetricians and Gynecologists. ACOG Practice Bulletin No. 74. Antibiotic prophylaxis for gynecologic procedures. Obstet Gynecol. 2006;108(1):225–234.
9. Larsson PG, Carlsson B. Does pre- and postoperative metronidazole treatment lower vaginal cuff infection rate after abdominal hysterectomy among women with bacterial vaginosis? Infect Dis Obstet Gynecol. 2002;10(3):133–140.