User login
Careful attention to technique at the time of vaginal hysterectomy is vital. Equally important is prior consideration of potential complications and the best ways to address them. Four trouble spots include:
- uterine tissue extraction (Although this is not a complication of vaginal hysterectomy, tissue extraction aids in debulking and removal of a large uterus.)
- protection of the ureters (It is important to palpate these structures before placing cardinal pedicle clamps, to protect ureteral integrity.)
- repair of inadvertent cystotomy
- control of bleeding in the setting of adnexectomy.
I focus on optimal approaches to these 4 scenarios in this article.
For a review of vaginal hysterectomy technique, see “Vaginal hysterectomy with basic instrumentation,” by Barbara S. Levy, MD, which appeared in the October 2015 issue of OBG Management. For salpingectomy and salpingo-oophorectomy technique, see my article entitled “Salpingectomy after vaginal hysterectomy: Technique, tips, and pearls,” which appeared in the November issue of this journal.
Both articles are available in the archive at obgmanagement.com and, like this one, are based on the AAGL-produced Online Master Class on Vaginal Hysterectomy, a Web-based program cosponsored by the American College of Obstetricians and Gynecologists and the Society of Gynecologic Surgeons. That program is available at https://www.aagl.org/vaghystwebinar/.
A step toward success: Begin morcellation by splitting the uterus
Manual morcellation to reduce uterine size and ease transvaginal removal is a useful technique to know. Five aspects of manual morcellation warrant emphasis:
1. Anterior and posterior entry into the cul-de-sacs is essential before attempting morcellation.
2. The blood supply on both sides of the uterus must be controlled.
3. During resection, take care to cut only tissue that can be visualized. Avoid resection beyond what you can easily see.
4. Once morcellation is completed, always go back and check the pedicles for hemostasis. During morcellation, these pedicles tend to get stretched, and bleeding may arise that wasn’t present originally.
5. Morcellation should be performed only after malignancy has been ruled out—it is a technique intended for benign uteri only.
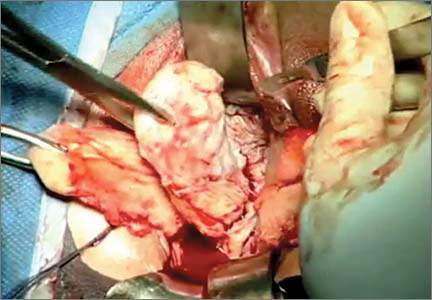
By bivalving the uterus it is possible to follow the endocervical canal up into the uterine cavity (FIGURE 1). Our technique at the Mayo Clinic is to place tenacula at the 3 and 9 o’clock positions prior to bivalving. A small amount of bleeding may occur because of collateral blood supply from the gonadal pedicles, but it should be minimal, as the uterine vessels have been secured.
FIGURE 1 Bivalve the uterus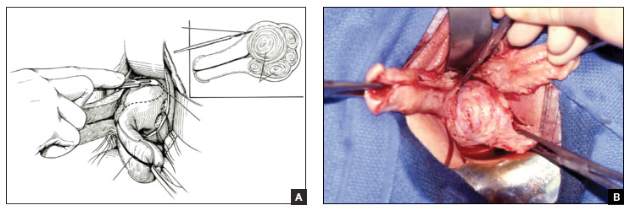 |
To begin morcellation, split the uterus down the midline, with tenacula placed at the 3- and 9-o’clock positions, then follow the endocervical canal into the uterine cavity (A). Use a knife blade to take portions of myomas and other tissue to debulk the uterus (B). |
Proceed with morcellation once the uterus is bivalved. Use a Jacobs tenaculum to grasp the serosal portion of the uterus. Apply downward traction with your nondominant hand, and use the knife blade to resect portions of the uterus so that it can be debulked.
When a large myoma is encountered during morcellation, it often is possible to “finger-fracture” some of the filmy adhesions holding it in place, or to follow the pseudo-capsule of the fibroid in order to shell it out. In many cases, fibroids can be removed intact using these methods. If intact removal is not possible, debulk the fibroid by taking individual “bites.”
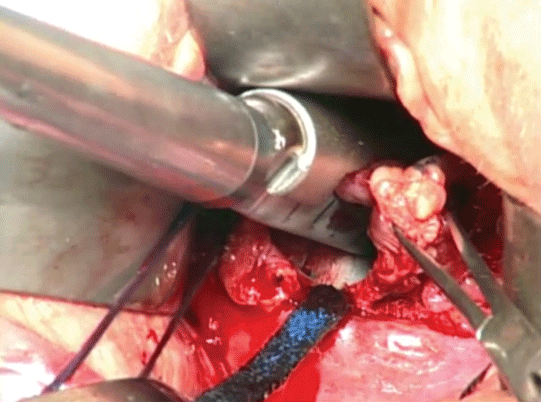
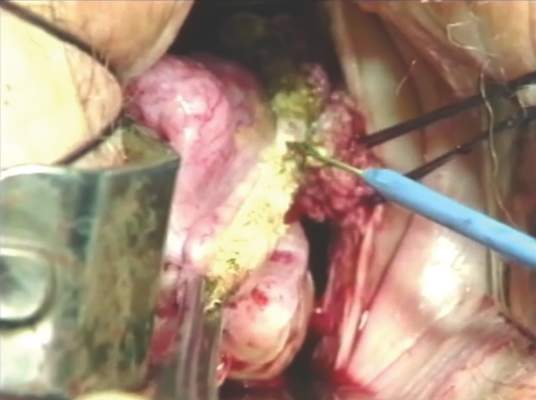
Tip. When the uterus is greatly enlarged, grasp it with a tenaculum so that it does not retract when you incise it. When large myomas are anticipated, keep an extra tenaculum on hand, as well as extra knife blades, as blades dull quickly when used to cut through calcified tissue. Continue to apply traction with your nondominant hand to allow each piece of tissue to be more readily developed (FIGURE 2).

Tip. When managing the round-ligament complex on each side, stay between the round ligaments (your “goal posts”) to avoid getting too lateral. Keep the cervix intact for orientation purposes. Focus on diminishing the bulk of the uterus so that you can get around the utero-ovarian pedicles.
To control the utero-ovarian pedicle on the patient’s right side, place a finger underneath it, with traction applied. Place a Heaney clamp from the top down. Repeat this action on the patient’s left side, but place the Heaney clamp from the bottom up.
Manual morcellation of tissue is useful in small uteri that are tough to access, but the procedure is very helpful in large uteri in order to remove them transvaginally.
Protect the ureters: Palpate them before clamping the pedicles
Palpating the ureters at the time of hysterectomy can protect their integrity during the procedure. The following technique has been used at the Mayo Clinic for many years and allows for location of the ureter so a cardinal pedicle clamp can be placed without injury.
Enter the anterior cul-de-sac so that you can insert a finger and palpate the ureter before you place the cardinal pedicle clamp on each side. Place Deaver retractors at the 12 o’clock and 2- to 3-o’clock positions. Insert your nondominant index finger into the anterior cul-de-sac and palpate the ureter against the Deaver clamp in the 2- to 3-o’clock position (FIGURE 3). (The ureter can be felt between your index finger and the Deaver retractor.) The ureter will have the most descent in a uterus that has some prolapse, compared with a nonprolapsed uterus.
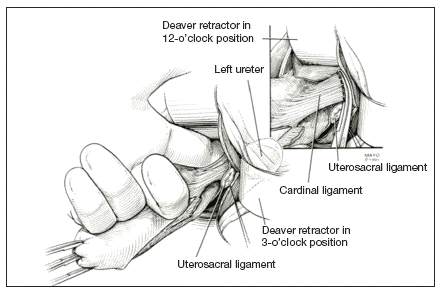
Tip. One common error is mistaking the edge of the vaginal cuff for the ureter. Be certain that you insert your finger deeply into the cul-de-sac so that it is the ureter you feel and not the cuff edge.
Successful cystotomy repair technique
Inadvertent cystotomy is a common fear for surgeons at the time of vaginal hysterectomy. I prefer to empty the bladder before beginning the hysterectomy because it reduces the target zone that a distended bladder presents. Some surgeons prefer to maintain a bit of fluid in the bladder so that, if they cut into the bladder, a small urine stream results. The approach is a matter of preference.
Cystotomy is most common during anterior dissection. If it occurs, recognize it and mark the defect with suture. Do not attempt to repair the hole at this point, but opt to finish the hysterectomy.
Cystoscopy is an important element of cystotomy repair. Once the hysterectomy is completed, look inside the bladder and determine where the defect is in relationship to the ureteral orifices. Typically, it will be beyond the interureteric ridge, along the posterior portion of the bladder, usually in the midline.
As critical as the repair itself is management of bladder drainage afterward. If you repair the hole thoroughly and drain the bladder adequately for 14 days, the defect should heal fully.
Technique for entry into anterior cul-de-sac
One way to avert bladder injury is to enter the anterior cul-de-sac very carefully. Begin by ensuring that the bladder is empty and placing a Deaver retractor at the 12 o’clock position. Also place tenacula anteriorly and posteriorly to help direct traction. This will allow good visualization of the bladder reflection.
Tip. One common mistake is making the incision too low or too near the cervix, which makes dissection more difficult and increases the likelihood that you will enter the wrong plane. Be sure you know where the bladder is, and make an adequate incision that is not too distal. Otherwise, dissection will be harder to carry out.
I prefer to make one clean incision with the knife, rather than multiple incisions, because multiple cuts increase the likelihood that you will inadvertently injure the wrong tissue. Use good traction and countertraction, and hug the uterus. Work low on the uterus, but not in the uterus. If you cut into muscle, you will get more bleeding and may end up digging a hole.
After you make the incision, put your finger through it to help develop that space further. You can confirm entry into the peritoneum by noting the characteristic slippery feel of the peritoneal lining. After you insert a Deaver retractor anteriorly, reinsert your finger and mobilize the area further. Then you can easily reach in and tent the peritoneum to cut it.
Technique for cystotomy repair
Two-layer closure is a minimum. On occasion, a third layer may be beneficial. Begin with running closure of the first layer using 2-0 chromic suture—a good suture choice in the urinary tract. This suture is inflammatory, which will help seal the wound, but it also dissolves quickly, preventing stone formation.
Use through-and-through closure on the first layer, followed by a second imbricating layer. If desired, use the peritoneum as a third layer.
Horizontal repair is typical, although vertical closure may be necessary if the defect is near a ureteral orifice and horizontal closure might compromise that side. That decision must be made intraoperatively.
When vertical repair is necessary, begin your repair just above the defect, placing the suture through and through. The hole should be visible. There is no need to be extramucosal in needle placement. Simply get a good bite of the tissue and run the repair down the bladder wall.
Next, stop and apply traction to the repair to check for any small defects that may have been overlooked. By placing a little traction on that first suture tag, any such defects will become apparent. Then go back and close them in a secondary imbricating layer.
After 2-layer closure, fill the bladder retrograde. I prefer to use a couple of drops of methylene blue in normal saline and place a clean white piece of packing material beneath the wound. If the packing material remains unstained by blue, the repair is watertight.
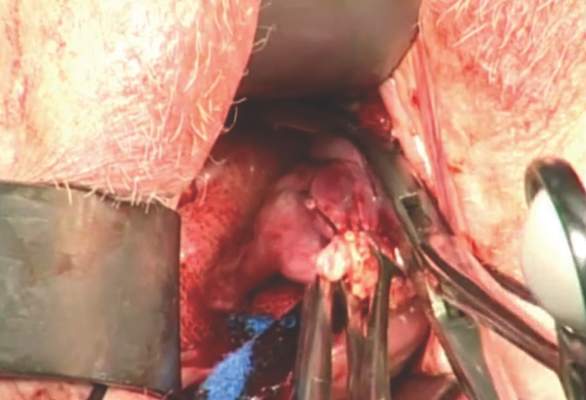
Incorporate the peritoneum as another layer of repair of the defect. I imbricate 2 layers in the bladder. Then, if necessary, I use that peritoneum as an additional layer (FIGURE 4).

Strategies to control bleeding at adnexectomy
Be vigilant for bleeding when removing the tubes and/or ovaries. At salpingectomy, be extremely gentle with the mesosalpinx because it can be avulsed easily off of surrounding tissue. If bleeding occurs, oversewing, or even ovary removal, could end up being the only options.
Good visualization is essential during vaginal procedures. Retractors, lighted suction irrigators, a headlamp, good overhead lighting, and appropriate instrumentation are critical for success.
Heaney clamp technique for vaginal oophorectomy
Begin by placing an Allis clamp on the utero-ovarian pedicle. Then clamp the ovary and tube with a second Allis clamp. Next, insert a Heaney clamp through the small window between the cardinal pedicle and the utero-ovarian pedicle (FIGURE 5). Clamp the tissue and place a free tie around it.
Because this is a major vascular pedicle, doubly ligate it. As you tie the first suture, have an assistant flash the clamp open and closed, then excise the specimen. There is no need to worry about losing the pedicle because it already has been ligated once. Next, stick-tie it, placing the needle distal to the free tie to avoid piercing the gonadal vessels beyond.
The technique is standard. Be gentle, and ensure good hemostasis when finished.
Tip. In my experience, any bleeding runs down from the pedicle rather than out toward me. So be sure to look down and below the pedicle to ensure hemostasis.
Additional pearls
- When performing vaginal hysterectomy, the ovaries are almost always removable transvaginally. There is no need to begin the case laparoscopically to remove the tubes and/or ovaries and then perform the hysterectomy vaginally.
- Deaver retractors offer good exposure; visualization is critical.
- Make sure the tissue is dry before you cut the last suture.
- If you prefer to use a laparoscopic stapler to secure the pedicles, proceed as before: Place an Allis clamp on the pedicle. Place a second clamp on the ovary and tube. Now you can insert the stapler into the created window, as with the Heaney clamp (FIGURE 6).
- Use a 60-mm stapler to cut the pedicle in one try. If using a 45-mm device, the stapler may need to be fired twice. This makes the procedure more expensive and risks more bleeding.
- When closing the stapler jaws, avoid clamping small bowel or packing material. Ensure stapler tip visibility well before firing.
The round ligament technique
When transecting the round ligament, it is critical to stay just beneath it to avoid bleeding and venturing into the mesosalpinx. Gently hug the tissue inferior to the round ligament and let it retract (FIGURE 7). This will allow isolation of the gonadal vessels nicely, especially if an adnexal mass is present. Then isolate the specimen and remove it, stick-tying the pedicle afterward to secure it.
When tying the pedicle, place the suture around the distal aspect to ensure that the back of the pedicle is enclosed, and do not lose it when you release the clamp. A slightly different technique is to use an endoloop to cross the gonadal vessels and control them. Use a suction irrigator and good lighting to get good exposure.
Next, place the clamp, making sure you don’t inadvertently grasp the packing material. Visualize both tips of the clamp before incising. Trim the specimen flush with the clamp. Then you can thread an endoloop over the top of the clamp. This is an inexpensive technique that allows a higher reach into the pelvic cavity. Finally, cinch down the endoloop to control the vessels.
When performing bilateral salpingo-oophorectomy, a long, fine clamp, such as the M.D. Anderson clamp, can help you reach up to control the gonadal vessels in the event that you lose your initial grip on those vessels (FIGURE 8).
Be prepared
Have a plan in place to manage any complications that arise during surgery. Just as obstetricians plan ahead to prepare for shoulder dystocia and other emergencies, gynecologic surgeons must prepare for surgical complications. Tissue extraction strategies can aid in the debulking and removal of large uteri, and the proper tools, lighting, and assistance are critical to success.
Share your thoughts on this article! Send your Letter to the Editor to rbarbieri@frontlinemedcom.com. Please include your name and the city and state in which you practice.

John B. Gebhart, MD, MS
Dr. Gebhart is Professor of Obstetrics and Gynecology and Surgery and Director of the Fellowship Program in Female Pelvic Medicine and Reconstructive Surgery at the Mayo Clinic in Rochester, Minnesota.
Dr. Gebhart reports that he is a consultant to Allergan and AMS.
John B. Gebhart, MD, MS
Dr. Gebhart is Professor of Obstetrics and Gynecology and Surgery and Director of the Fellowship Program in Female Pelvic Medicine and Reconstructive Surgery at the Mayo Clinic in Rochester, Minnesota.
Dr. Gebhart reports that he is a consultant to Allergan and AMS.
John B. Gebhart, MD, MS
Dr. Gebhart is Professor of Obstetrics and Gynecology and Surgery and Director of the Fellowship Program in Female Pelvic Medicine and Reconstructive Surgery at the Mayo Clinic in Rochester, Minnesota.
Dr. Gebhart reports that he is a consultant to Allergan and AMS.
Careful attention to technique at the time of vaginal hysterectomy is vital. Equally important is prior consideration of potential complications and the best ways to address them. Four trouble spots include:
- uterine tissue extraction (Although this is not a complication of vaginal hysterectomy, tissue extraction aids in debulking and removal of a large uterus.)
- protection of the ureters (It is important to palpate these structures before placing cardinal pedicle clamps, to protect ureteral integrity.)
- repair of inadvertent cystotomy
- control of bleeding in the setting of adnexectomy.
I focus on optimal approaches to these 4 scenarios in this article.
For a review of vaginal hysterectomy technique, see “Vaginal hysterectomy with basic instrumentation,” by Barbara S. Levy, MD, which appeared in the October 2015 issue of OBG Management. For salpingectomy and salpingo-oophorectomy technique, see my article entitled “Salpingectomy after vaginal hysterectomy: Technique, tips, and pearls,” which appeared in the November issue of this journal.
Both articles are available in the archive at obgmanagement.com and, like this one, are based on the AAGL-produced Online Master Class on Vaginal Hysterectomy, a Web-based program cosponsored by the American College of Obstetricians and Gynecologists and the Society of Gynecologic Surgeons. That program is available at https://www.aagl.org/vaghystwebinar/.
A step toward success: Begin morcellation by splitting the uterus
Manual morcellation to reduce uterine size and ease transvaginal removal is a useful technique to know. Five aspects of manual morcellation warrant emphasis:
1. Anterior and posterior entry into the cul-de-sacs is essential before attempting morcellation.
2. The blood supply on both sides of the uterus must be controlled.
3. During resection, take care to cut only tissue that can be visualized. Avoid resection beyond what you can easily see.
4. Once morcellation is completed, always go back and check the pedicles for hemostasis. During morcellation, these pedicles tend to get stretched, and bleeding may arise that wasn’t present originally.
5. Morcellation should be performed only after malignancy has been ruled out—it is a technique intended for benign uteri only.
By bivalving the uterus it is possible to follow the endocervical canal up into the uterine cavity (FIGURE 1). Our technique at the Mayo Clinic is to place tenacula at the 3 and 9 o’clock positions prior to bivalving. A small amount of bleeding may occur because of collateral blood supply from the gonadal pedicles, but it should be minimal, as the uterine vessels have been secured.
| FIGURE 1 Bivalve the uterus |
To begin morcellation, split the uterus down the midline, with tenacula placed at the 3- and 9-o’clock positions, then follow the endocervical canal into the uterine cavity (A). Use a knife blade to take portions of myomas and other tissue to debulk the uterus (B). |
Proceed with morcellation once the uterus is bivalved. Use a Jacobs tenaculum to grasp the serosal portion of the uterus. Apply downward traction with your nondominant hand, and use the knife blade to resect portions of the uterus so that it can be debulked.
When a large myoma is encountered during morcellation, it often is possible to “finger-fracture” some of the filmy adhesions holding it in place, or to follow the pseudo-capsule of the fibroid in order to shell it out. In many cases, fibroids can be removed intact using these methods. If intact removal is not possible, debulk the fibroid by taking individual “bites.”
Tip. When the uterus is greatly enlarged, grasp it with a tenaculum so that it does not retract when you incise it. When large myomas are anticipated, keep an extra tenaculum on hand, as well as extra knife blades, as blades dull quickly when used to cut through calcified tissue. Continue to apply traction with your nondominant hand to allow each piece of tissue to be more readily developed (FIGURE 2).
Tip. When managing the round-ligament complex on each side, stay between the round ligaments (your “goal posts”) to avoid getting too lateral. Keep the cervix intact for orientation purposes. Focus on diminishing the bulk of the uterus so that you can get around the utero-ovarian pedicles.
To control the utero-ovarian pedicle on the patient’s right side, place a finger underneath it, with traction applied. Place a Heaney clamp from the top down. Repeat this action on the patient’s left side, but place the Heaney clamp from the bottom up.
Manual morcellation of tissue is useful in small uteri that are tough to access, but the procedure is very helpful in large uteri in order to remove them transvaginally.
Protect the ureters: Palpate them before clamping the pedicles
Palpating the ureters at the time of hysterectomy can protect their integrity during the procedure. The following technique has been used at the Mayo Clinic for many years and allows for location of the ureter so a cardinal pedicle clamp can be placed without injury.
Enter the anterior cul-de-sac so that you can insert a finger and palpate the ureter before you place the cardinal pedicle clamp on each side. Place Deaver retractors at the 12 o’clock and 2- to 3-o’clock positions. Insert your nondominant index finger into the anterior cul-de-sac and palpate the ureter against the Deaver clamp in the 2- to 3-o’clock position (FIGURE 3). (The ureter can be felt between your index finger and the Deaver retractor.) The ureter will have the most descent in a uterus that has some prolapse, compared with a nonprolapsed uterus.
Tip. One common error is mistaking the edge of the vaginal cuff for the ureter. Be certain that you insert your finger deeply into the cul-de-sac so that it is the ureter you feel and not the cuff edge.
Successful cystotomy repair technique
Inadvertent cystotomy is a common fear for surgeons at the time of vaginal hysterectomy. I prefer to empty the bladder before beginning the hysterectomy because it reduces the target zone that a distended bladder presents. Some surgeons prefer to maintain a bit of fluid in the bladder so that, if they cut into the bladder, a small urine stream results. The approach is a matter of preference.
Cystotomy is most common during anterior dissection. If it occurs, recognize it and mark the defect with suture. Do not attempt to repair the hole at this point, but opt to finish the hysterectomy.
Cystoscopy is an important element of cystotomy repair. Once the hysterectomy is completed, look inside the bladder and determine where the defect is in relationship to the ureteral orifices. Typically, it will be beyond the interureteric ridge, along the posterior portion of the bladder, usually in the midline.
As critical as the repair itself is management of bladder drainage afterward. If you repair the hole thoroughly and drain the bladder adequately for 14 days, the defect should heal fully.
Technique for entry into anterior cul-de-sac
One way to avert bladder injury is to enter the anterior cul-de-sac very carefully. Begin by ensuring that the bladder is empty and placing a Deaver retractor at the 12 o’clock position. Also place tenacula anteriorly and posteriorly to help direct traction. This will allow good visualization of the bladder reflection.
Tip. One common mistake is making the incision too low or too near the cervix, which makes dissection more difficult and increases the likelihood that you will enter the wrong plane. Be sure you know where the bladder is, and make an adequate incision that is not too distal. Otherwise, dissection will be harder to carry out.
I prefer to make one clean incision with the knife, rather than multiple incisions, because multiple cuts increase the likelihood that you will inadvertently injure the wrong tissue. Use good traction and countertraction, and hug the uterus. Work low on the uterus, but not in the uterus. If you cut into muscle, you will get more bleeding and may end up digging a hole.
After you make the incision, put your finger through it to help develop that space further. You can confirm entry into the peritoneum by noting the characteristic slippery feel of the peritoneal lining. After you insert a Deaver retractor anteriorly, reinsert your finger and mobilize the area further. Then you can easily reach in and tent the peritoneum to cut it.
Technique for cystotomy repair
Two-layer closure is a minimum. On occasion, a third layer may be beneficial. Begin with running closure of the first layer using 2-0 chromic suture—a good suture choice in the urinary tract. This suture is inflammatory, which will help seal the wound, but it also dissolves quickly, preventing stone formation.
Use through-and-through closure on the first layer, followed by a second imbricating layer. If desired, use the peritoneum as a third layer.
Horizontal repair is typical, although vertical closure may be necessary if the defect is near a ureteral orifice and horizontal closure might compromise that side. That decision must be made intraoperatively.
When vertical repair is necessary, begin your repair just above the defect, placing the suture through and through. The hole should be visible. There is no need to be extramucosal in needle placement. Simply get a good bite of the tissue and run the repair down the bladder wall.
Next, stop and apply traction to the repair to check for any small defects that may have been overlooked. By placing a little traction on that first suture tag, any such defects will become apparent. Then go back and close them in a secondary imbricating layer.
After 2-layer closure, fill the bladder retrograde. I prefer to use a couple of drops of methylene blue in normal saline and place a clean white piece of packing material beneath the wound. If the packing material remains unstained by blue, the repair is watertight.
Incorporate the peritoneum as another layer of repair of the defect. I imbricate 2 layers in the bladder. Then, if necessary, I use that peritoneum as an additional layer (FIGURE 4).
Strategies to control bleeding at adnexectomy
Be vigilant for bleeding when removing the tubes and/or ovaries. At salpingectomy, be extremely gentle with the mesosalpinx because it can be avulsed easily off of surrounding tissue. If bleeding occurs, oversewing, or even ovary removal, could end up being the only options.
Good visualization is essential during vaginal procedures. Retractors, lighted suction irrigators, a headlamp, good overhead lighting, and appropriate instrumentation are critical for success.
Heaney clamp technique for vaginal oophorectomy
Begin by placing an Allis clamp on the utero-ovarian pedicle. Then clamp the ovary and tube with a second Allis clamp. Next, insert a Heaney clamp through the small window between the cardinal pedicle and the utero-ovarian pedicle (FIGURE 5). Clamp the tissue and place a free tie around it.
Because this is a major vascular pedicle, doubly ligate it. As you tie the first suture, have an assistant flash the clamp open and closed, then excise the specimen. There is no need to worry about losing the pedicle because it already has been ligated once. Next, stick-tie it, placing the needle distal to the free tie to avoid piercing the gonadal vessels beyond.
The technique is standard. Be gentle, and ensure good hemostasis when finished.
Tip. In my experience, any bleeding runs down from the pedicle rather than out toward me. So be sure to look down and below the pedicle to ensure hemostasis.
Additional pearls
- When performing vaginal hysterectomy, the ovaries are almost always removable transvaginally. There is no need to begin the case laparoscopically to remove the tubes and/or ovaries and then perform the hysterectomy vaginally.
- Deaver retractors offer good exposure; visualization is critical.
- Make sure the tissue is dry before you cut the last suture.
- If you prefer to use a laparoscopic stapler to secure the pedicles, proceed as before: Place an Allis clamp on the pedicle. Place a second clamp on the ovary and tube. Now you can insert the stapler into the created window, as with the Heaney clamp (FIGURE 6).
- Use a 60-mm stapler to cut the pedicle in one try. If using a 45-mm device, the stapler may need to be fired twice. This makes the procedure more expensive and risks more bleeding.
- When closing the stapler jaws, avoid clamping small bowel or packing material. Ensure stapler tip visibility well before firing.
The round ligament technique
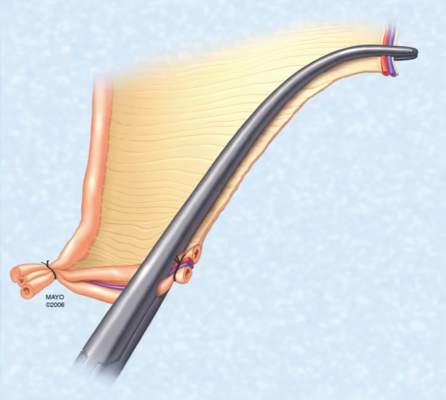
When transecting the round ligament, it is critical to stay just beneath it to avoid bleeding and venturing into the mesosalpinx. Gently hug the tissue inferior to the round ligament and let it retract (FIGURE 7). This will allow isolation of the gonadal vessels nicely, especially if an adnexal mass is present. Then isolate the specimen and remove it, stick-tying the pedicle afterward to secure it.
When tying the pedicle, place the suture around the distal aspect to ensure that the back of the pedicle is enclosed, and do not lose it when you release the clamp. A slightly different technique is to use an endoloop to cross the gonadal vessels and control them. Use a suction irrigator and good lighting to get good exposure.
Next, place the clamp, making sure you don’t inadvertently grasp the packing material. Visualize both tips of the clamp before incising. Trim the specimen flush with the clamp. Then you can thread an endoloop over the top of the clamp. This is an inexpensive technique that allows a higher reach into the pelvic cavity. Finally, cinch down the endoloop to control the vessels.
When performing bilateral salpingo-oophorectomy, a long, fine clamp, such as the M.D. Anderson clamp, can help you reach up to control the gonadal vessels in the event that you lose your initial grip on those vessels (FIGURE 8).
Be prepared
Have a plan in place to manage any complications that arise during surgery. Just as obstetricians plan ahead to prepare for shoulder dystocia and other emergencies, gynecologic surgeons must prepare for surgical complications. Tissue extraction strategies can aid in the debulking and removal of large uteri, and the proper tools, lighting, and assistance are critical to success.
Share your thoughts on this article! Send your Letter to the Editor to rbarbieri@frontlinemedcom.com. Please include your name and the city and state in which you practice.
Careful attention to technique at the time of vaginal hysterectomy is vital. Equally important is prior consideration of potential complications and the best ways to address them. Four trouble spots include:
- uterine tissue extraction (Although this is not a complication of vaginal hysterectomy, tissue extraction aids in debulking and removal of a large uterus.)
- protection of the ureters (It is important to palpate these structures before placing cardinal pedicle clamps, to protect ureteral integrity.)
- repair of inadvertent cystotomy
- control of bleeding in the setting of adnexectomy.
I focus on optimal approaches to these 4 scenarios in this article.
For a review of vaginal hysterectomy technique, see “Vaginal hysterectomy with basic instrumentation,” by Barbara S. Levy, MD, which appeared in the October 2015 issue of OBG Management. For salpingectomy and salpingo-oophorectomy technique, see my article entitled “Salpingectomy after vaginal hysterectomy: Technique, tips, and pearls,” which appeared in the November issue of this journal.
Both articles are available in the archive at obgmanagement.com and, like this one, are based on the AAGL-produced Online Master Class on Vaginal Hysterectomy, a Web-based program cosponsored by the American College of Obstetricians and Gynecologists and the Society of Gynecologic Surgeons. That program is available at https://www.aagl.org/vaghystwebinar/.
A step toward success: Begin morcellation by splitting the uterus
Manual morcellation to reduce uterine size and ease transvaginal removal is a useful technique to know. Five aspects of manual morcellation warrant emphasis:
1. Anterior and posterior entry into the cul-de-sacs is essential before attempting morcellation.
2. The blood supply on both sides of the uterus must be controlled.
3. During resection, take care to cut only tissue that can be visualized. Avoid resection beyond what you can easily see.
4. Once morcellation is completed, always go back and check the pedicles for hemostasis. During morcellation, these pedicles tend to get stretched, and bleeding may arise that wasn’t present originally.
5. Morcellation should be performed only after malignancy has been ruled out—it is a technique intended for benign uteri only.
By bivalving the uterus it is possible to follow the endocervical canal up into the uterine cavity (FIGURE 1). Our technique at the Mayo Clinic is to place tenacula at the 3 and 9 o’clock positions prior to bivalving. A small amount of bleeding may occur because of collateral blood supply from the gonadal pedicles, but it should be minimal, as the uterine vessels have been secured.
| FIGURE 1 Bivalve the uterus |
To begin morcellation, split the uterus down the midline, with tenacula placed at the 3- and 9-o’clock positions, then follow the endocervical canal into the uterine cavity (A). Use a knife blade to take portions of myomas and other tissue to debulk the uterus (B). |
Proceed with morcellation once the uterus is bivalved. Use a Jacobs tenaculum to grasp the serosal portion of the uterus. Apply downward traction with your nondominant hand, and use the knife blade to resect portions of the uterus so that it can be debulked.
When a large myoma is encountered during morcellation, it often is possible to “finger-fracture” some of the filmy adhesions holding it in place, or to follow the pseudo-capsule of the fibroid in order to shell it out. In many cases, fibroids can be removed intact using these methods. If intact removal is not possible, debulk the fibroid by taking individual “bites.”
Tip. When the uterus is greatly enlarged, grasp it with a tenaculum so that it does not retract when you incise it. When large myomas are anticipated, keep an extra tenaculum on hand, as well as extra knife blades, as blades dull quickly when used to cut through calcified tissue. Continue to apply traction with your nondominant hand to allow each piece of tissue to be more readily developed (FIGURE 2).
Tip. When managing the round-ligament complex on each side, stay between the round ligaments (your “goal posts”) to avoid getting too lateral. Keep the cervix intact for orientation purposes. Focus on diminishing the bulk of the uterus so that you can get around the utero-ovarian pedicles.
To control the utero-ovarian pedicle on the patient’s right side, place a finger underneath it, with traction applied. Place a Heaney clamp from the top down. Repeat this action on the patient’s left side, but place the Heaney clamp from the bottom up.
Manual morcellation of tissue is useful in small uteri that are tough to access, but the procedure is very helpful in large uteri in order to remove them transvaginally.
Protect the ureters: Palpate them before clamping the pedicles
Palpating the ureters at the time of hysterectomy can protect their integrity during the procedure. The following technique has been used at the Mayo Clinic for many years and allows for location of the ureter so a cardinal pedicle clamp can be placed without injury.
Enter the anterior cul-de-sac so that you can insert a finger and palpate the ureter before you place the cardinal pedicle clamp on each side. Place Deaver retractors at the 12 o’clock and 2- to 3-o’clock positions. Insert your nondominant index finger into the anterior cul-de-sac and palpate the ureter against the Deaver clamp in the 2- to 3-o’clock position (FIGURE 3). (The ureter can be felt between your index finger and the Deaver retractor.) The ureter will have the most descent in a uterus that has some prolapse, compared with a nonprolapsed uterus.
Tip. One common error is mistaking the edge of the vaginal cuff for the ureter. Be certain that you insert your finger deeply into the cul-de-sac so that it is the ureter you feel and not the cuff edge.
Successful cystotomy repair technique
Inadvertent cystotomy is a common fear for surgeons at the time of vaginal hysterectomy. I prefer to empty the bladder before beginning the hysterectomy because it reduces the target zone that a distended bladder presents. Some surgeons prefer to maintain a bit of fluid in the bladder so that, if they cut into the bladder, a small urine stream results. The approach is a matter of preference.
Cystotomy is most common during anterior dissection. If it occurs, recognize it and mark the defect with suture. Do not attempt to repair the hole at this point, but opt to finish the hysterectomy.
Cystoscopy is an important element of cystotomy repair. Once the hysterectomy is completed, look inside the bladder and determine where the defect is in relationship to the ureteral orifices. Typically, it will be beyond the interureteric ridge, along the posterior portion of the bladder, usually in the midline.
As critical as the repair itself is management of bladder drainage afterward. If you repair the hole thoroughly and drain the bladder adequately for 14 days, the defect should heal fully.
Technique for entry into anterior cul-de-sac
One way to avert bladder injury is to enter the anterior cul-de-sac very carefully. Begin by ensuring that the bladder is empty and placing a Deaver retractor at the 12 o’clock position. Also place tenacula anteriorly and posteriorly to help direct traction. This will allow good visualization of the bladder reflection.
Tip. One common mistake is making the incision too low or too near the cervix, which makes dissection more difficult and increases the likelihood that you will enter the wrong plane. Be sure you know where the bladder is, and make an adequate incision that is not too distal. Otherwise, dissection will be harder to carry out.
I prefer to make one clean incision with the knife, rather than multiple incisions, because multiple cuts increase the likelihood that you will inadvertently injure the wrong tissue. Use good traction and countertraction, and hug the uterus. Work low on the uterus, but not in the uterus. If you cut into muscle, you will get more bleeding and may end up digging a hole.
After you make the incision, put your finger through it to help develop that space further. You can confirm entry into the peritoneum by noting the characteristic slippery feel of the peritoneal lining. After you insert a Deaver retractor anteriorly, reinsert your finger and mobilize the area further. Then you can easily reach in and tent the peritoneum to cut it.
Technique for cystotomy repair
Two-layer closure is a minimum. On occasion, a third layer may be beneficial. Begin with running closure of the first layer using 2-0 chromic suture—a good suture choice in the urinary tract. This suture is inflammatory, which will help seal the wound, but it also dissolves quickly, preventing stone formation.
Use through-and-through closure on the first layer, followed by a second imbricating layer. If desired, use the peritoneum as a third layer.
Horizontal repair is typical, although vertical closure may be necessary if the defect is near a ureteral orifice and horizontal closure might compromise that side. That decision must be made intraoperatively.
When vertical repair is necessary, begin your repair just above the defect, placing the suture through and through. The hole should be visible. There is no need to be extramucosal in needle placement. Simply get a good bite of the tissue and run the repair down the bladder wall.
Next, stop and apply traction to the repair to check for any small defects that may have been overlooked. By placing a little traction on that first suture tag, any such defects will become apparent. Then go back and close them in a secondary imbricating layer.
After 2-layer closure, fill the bladder retrograde. I prefer to use a couple of drops of methylene blue in normal saline and place a clean white piece of packing material beneath the wound. If the packing material remains unstained by blue, the repair is watertight.
Incorporate the peritoneum as another layer of repair of the defect. I imbricate 2 layers in the bladder. Then, if necessary, I use that peritoneum as an additional layer (FIGURE 4).
Strategies to control bleeding at adnexectomy
Be vigilant for bleeding when removing the tubes and/or ovaries. At salpingectomy, be extremely gentle with the mesosalpinx because it can be avulsed easily off of surrounding tissue. If bleeding occurs, oversewing, or even ovary removal, could end up being the only options.
Good visualization is essential during vaginal procedures. Retractors, lighted suction irrigators, a headlamp, good overhead lighting, and appropriate instrumentation are critical for success.
Heaney clamp technique for vaginal oophorectomy
Begin by placing an Allis clamp on the utero-ovarian pedicle. Then clamp the ovary and tube with a second Allis clamp. Next, insert a Heaney clamp through the small window between the cardinal pedicle and the utero-ovarian pedicle (FIGURE 5). Clamp the tissue and place a free tie around it.
Because this is a major vascular pedicle, doubly ligate it. As you tie the first suture, have an assistant flash the clamp open and closed, then excise the specimen. There is no need to worry about losing the pedicle because it already has been ligated once. Next, stick-tie it, placing the needle distal to the free tie to avoid piercing the gonadal vessels beyond.
The technique is standard. Be gentle, and ensure good hemostasis when finished.
Tip. In my experience, any bleeding runs down from the pedicle rather than out toward me. So be sure to look down and below the pedicle to ensure hemostasis.
Additional pearls
- When performing vaginal hysterectomy, the ovaries are almost always removable transvaginally. There is no need to begin the case laparoscopically to remove the tubes and/or ovaries and then perform the hysterectomy vaginally.
- Deaver retractors offer good exposure; visualization is critical.
- Make sure the tissue is dry before you cut the last suture.
- If you prefer to use a laparoscopic stapler to secure the pedicles, proceed as before: Place an Allis clamp on the pedicle. Place a second clamp on the ovary and tube. Now you can insert the stapler into the created window, as with the Heaney clamp (FIGURE 6).
- Use a 60-mm stapler to cut the pedicle in one try. If using a 45-mm device, the stapler may need to be fired twice. This makes the procedure more expensive and risks more bleeding.
- When closing the stapler jaws, avoid clamping small bowel or packing material. Ensure stapler tip visibility well before firing.
The round ligament technique
When transecting the round ligament, it is critical to stay just beneath it to avoid bleeding and venturing into the mesosalpinx. Gently hug the tissue inferior to the round ligament and let it retract (FIGURE 7). This will allow isolation of the gonadal vessels nicely, especially if an adnexal mass is present. Then isolate the specimen and remove it, stick-tying the pedicle afterward to secure it.
When tying the pedicle, place the suture around the distal aspect to ensure that the back of the pedicle is enclosed, and do not lose it when you release the clamp. A slightly different technique is to use an endoloop to cross the gonadal vessels and control them. Use a suction irrigator and good lighting to get good exposure.
Next, place the clamp, making sure you don’t inadvertently grasp the packing material. Visualize both tips of the clamp before incising. Trim the specimen flush with the clamp. Then you can thread an endoloop over the top of the clamp. This is an inexpensive technique that allows a higher reach into the pelvic cavity. Finally, cinch down the endoloop to control the vessels.
When performing bilateral salpingo-oophorectomy, a long, fine clamp, such as the M.D. Anderson clamp, can help you reach up to control the gonadal vessels in the event that you lose your initial grip on those vessels (FIGURE 8).
Be prepared
Have a plan in place to manage any complications that arise during surgery. Just as obstetricians plan ahead to prepare for shoulder dystocia and other emergencies, gynecologic surgeons must prepare for surgical complications. Tissue extraction strategies can aid in the debulking and removal of large uteri, and the proper tools, lighting, and assistance are critical to success.
Share your thoughts on this article! Send your Letter to the Editor to rbarbieri@frontlinemedcom.com. Please include your name and the city and state in which you practice.
In this Article
- Ensuring ureter protection
- Cystotomy repair
- Bleeding control strategies
This article is based on the AAGL-produced and ACOG/SGS cosponsored Online Master Class on Vaginal Hysterectomy