User login
No doubt about it: Scanning the adnexae is the most challenging task in gynecologic ultrasonography (US). There are many reasons for the difficulty, but probably none more important than the fact that you are expected to reach a conclusion about what you see—or at least narrow the differential diagnosis.
Some ultrasound laboratories try to hedge their bets, sending the referring physician a report that is nothing more than an exhaustive differential diagnosis, similar to what we see in textbooks. Such a list is useless to a referring clinician, who has probably already considered most of the possibilities and involved the lab to help narrow them down. Labs that send such reports are usually trying to protect themselves from litigation—typically involving cases in which ovarian cancer was missed—or attempting to accomplish a “self-referral” by encouraging further imaging.1
The referring physician is not perfect, either. In our practice, we often receive reports like the following terse description:
A complex cyst was seen in the adnexa. Ovarian malignancy cannot be ruled out.
That’s it. No description of the actual sonographic characteristics. No Doppler velocity flow studies. Yet, the few remarks include a mention of malignancy, and the provider often suggests that “additional imaging such as CT and MRI should be considered.”
When we scrutinize the sonographic images upon which these reports are based, we often discover a corpus luteum, cystic teratoma, benign cystadenoma, endometrioma, or, even, a simple cyst.
The need for competency is compelling
Now that gynecologic US has matured as a field in its own right, the referring physician should expect much more from a laboratory’s pelvic scan than a long recitation of potential diagnoses. And the lab should expect more basic information from the referring provider.
That is the primary reason for this four-part series—to help you identify some of the most prevalent adnexal masses, so that you can exclude cases that are no cause for concern, such as a corpus luteum, and refer patients who really do need additional imaging and expertise, providing as much information in the process as you can.
In Part 1 of the series, we introduce you to basic concepts, recommend equipment, and step you through numerous fundamental scans. Part 2 will focus on nonneoplastic ovarian masses, Part 3 on ovarian neoplasms, and Part 4 on tubal entities such as ectopic pregnancy and torsion.
As much as possible, we educate you by providing actual scans that represent real cases, pointing out the elements that should grab your attention. After all, a picture paints a thousand words.
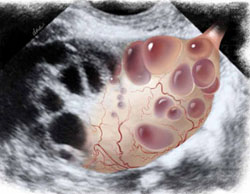
Ultrasound reveals the polycystic nature of a patient’s ovary. The hilus is prominently hyperechoic.
A few fundamental practices enhance consistency and thoroughness
Before we shift our focus to scanning techniques and interpretation of images, we’d like to offer several basic pointers.
Establish, and document, the hormonal milieu. One of the most important requirements of US imaging, particularly during the reproductive years, is determining and documenting the date of the patient’s last menstrual period (LMP). The reason? Physiologic and pathologic processes involving the reproductive organs are driven by the menstrual cycle—or by therapeutic (or pathologic) hormonal stimulation. We mark each scan with the date of the LMP. If the patient is on hormone therapy, we also mark the scan “HT.” We make these marks on the screen in a way that prevents their erasure every time the picture is frozen and unfrozen. This makes it possible for us to look at the scan days, weeks, or even years later and know what day of the cycle it represents. Every finding must be judged in light of the patient’s hormonal status.
Use a transvaginal transducer. It provides a high-resolution view of any pathology. If need be, it can be combined with a trans-abdominal transducer to afford a more deeply penetrating, panoramic view of the pelvis. We use a variety of transducers to achieve depth, color, power Doppler, and three- dimensional (3D) US.
Take a history and examine the patient. Before scanning your own patient, take a short history and perform a bimanual, palpatory pelvic exam. You may need to examine her again after the scan to verify a sonographic finding.
It is doubly important to take a history if you are scanning a referred patient. Omitting this element is no excuse for overlooking a disease or pathology.
A bimanual, palpatory pelvic exam may also be recommended for some referred patients.
A transvaginal scan is not always possible. There are a number of reasons why the transvaginal approach may not be advisable for some patients, including virginal status, atrophic postmenopausal vagina, agenesis of the vagina, and transverse vaginal septae. In such cases, the best alternative is a transrectal scan, which makes it possible to image the pelvic organs from almost exactly the same vantage point as transvaginal US.2 With proper explanation (particularly with virginal patients), the initial reluctance and apprehension can usually be assuaged.
Don’t trust the referral slip. We recommend that you read, but do not overly trust, the referral slip. It often offers little useful information.
Helpful scanning techniques
Consider applying these maneuvers:
- place your non-scanning hand on the patient’s abdomen to help mobilize the pelvic contents as the transvaginal probe slides across the organs
- use the probe as an “eye” while your palpating finger touches the cervix, uterus, ovaries, and any adnexal mass. Observe the mobility of these structures in relation to each other and the pelvic wall. This technique yields what is often referred to as the “sliding organs” sign. It is possible to identify pelvic adhesions (if the structures do not slide freely) or rule them out (if they do)
- pinpoint the origin of any pain the patient may have by touching the ovary, cervix, and any adnexal mass. This technique is important in cases of ectopic pregnancy, adnexal torsion, or inflammatory disease of the pelvis or adnexae.
Start with a basic scan of key structures
On the way “in” toward the adnexae, take the time to look at the bladder and urethra (FIGURE 1). Some common pathologies of the bladder are diverticulae; calculi; and a thick and vascular bladder wall suggestive of cancer or endometrioma. Ask the patient whether she has experienced any hematuria if any of these pathologies are detected.
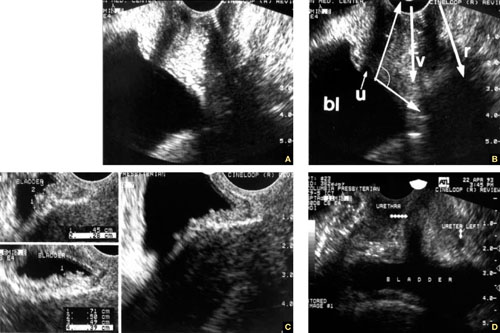
FIGURE 1 Imaging the bladder
(A, B) The bladder (bl), urethra (u), vagina (v), and rectum (r) appear in their proper relation in this sagittal view. The posterior angle of the bladder is also apparent (arrow closing an angle of about 110°). (C) Excessive thickness of the bladder wall suggests that this patient has cystitis. (D) Coronal view of the bladder and urethra (solid arrows).
Also take a look at the cervix, searching for Nabothian cysts, endocervical polyps, extreme vascularization (a possible indicator of cervical cancer), and prolapsing submucous myomas (FIGURE 2).
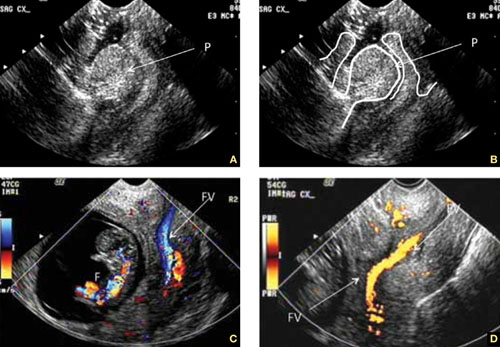
FIGURE 2 Uncommon pathology
A submucous myoma prolapses into the cervical canal in a 13-week intrauterine pregnancy. (A) Grayscale sagittal image and (B) outline view of the same image. (C,D) Color and power Doppler images show the blood supply to the myoma from the uterine cavity.
While you are looking, attempt to scan both kidneys and Morrison’s pouch. Large adnexal masses or fibroids of the uterus may put pressure on the ureter, causing various degrees of hydronephrosis.
Sometimes, when the right kidney is correctly imaged below the liver, you may detect fluid in the space between them (called Morrison’s space). This information has clear value that may aid in diagnosing the main pathology (i.e., ruptured tubal pregnancy, ascites, etc.).
Imaging of the ovaries
The best way to scan the ovaries is to use a high-frequency (4–9 MHz) transvaginal probe. In general, as the frequency of the probe increases, so does resolution of the image—but the ability to penetrate tissue diminishes. For this reason, for abdominal imaging, a 3-MHz probe is often used. For a transvaginal scan, in which the probe can be placed near an ovary, a 5-MHz probe is common. And for a scan of, say, the parathyroid gland, a 12-MHz probe is utilized.
During the reproductive years, the ovaries can be localized by their sonographic markers—the follicles (FIGURE 3A). The ovaries usually lie near the large hypogastric blood vessels (FIGURE 3B). During the secretory phase of the cycle, look for the corpus luteum, switching on the color or power Doppler mode to help locate it (FIGURES 3C, 3D).
The ovaries usually can be distinguished by their relative anechoic sono-texture in juxtaposition to the surrounding, constantly peristalsing small bowel. This strategy is the only help for spotting the ovaries in menopause, when they lose their follicles.
The size of the ovaries may be an important indicator of pathology. During the reproductive years, mean size is 8 mL (standard deviation [SD], 2–3 mL; range, 5–15 mL). Post-menopausal ovaries are small, with a mean size of 3.6 mL (SD, 1.4 mL; range, 1–14 mL).
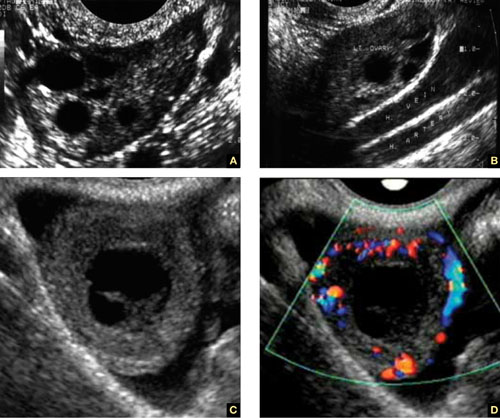
FIGURE 3 How to spot the ovaries
(A) Anechoic follicles are markers of the ovary during the reproductive years. (B) The ovaries in relation to the hypogastric vessels. (C) Gray-scale image of the corpus luteum and the same image in (D) color Doppler.
A word about terminology: Don’t call follicles “cysts”
During a normal menstrual cycle, one or more follicles mature, reaching about 2 to 2.5 cm in diameter around mid-cycle. Do not call these follicles “cysts” or “follicular cysts.” They are follicles. Calling them cysts, or even including the word cyst in their description, suggests to many gynecology and radiology providers—and to patients themselves—the idea of pathology.1
An exception to that rule: An ovary that is larger than 12 to 14 mL and has a hyperechoic hilus and more than 12 small (4–5 mm), peripherally pushed follicles is usually called “polycystic” (FIGURE 4).3 However, not every ovary that fulfills these sonographic criteria is indeed polycystic. At times normal ovaries may contain multiple follicles without any of the clinical or laboratory indications of a polycystic ovary. In these cases, the ovary may be of normal size and may lack a hyperechoic hilus with rich hilar vascularity. We term such ovaries “multicystic” in their appearance.

FIGURE 4 The polycystic ovary
(A) Gray-scale image of a polycystic ovary. The typical hyperechoic hilus is evident (H). (B) Gross pathologic section of a polycystic ovary. (C) 3D orthogonal planes of a large ovary with a multitude of small follicles pushed peripherally by a voluminous hyperechoic hilus. (D) 3D inversion rendering of the same ovary.
We employ 3D inversion rendering to better see and count the number of follicles (FIGURE 4D).
An ovary can have a polycystic appearance in the following clinical situations:
- hyperthyroid state (36% of affected women)
- hyperprolactinemia (50%)
- hypothalamic hypogonadism (24%).
It also can appear polycystic for no apparent reason.
Stay tuned!
Next month, we continue our focus on adnexal imaging by describing (and showing) nonneoplastic ovarian masses.
We want to hear from you! Tell us what you think.
1. Timor-Tritsch IE, Goldstein SR. The complexity of a complex mass and the simplicity of a simple cyst. J Ultrasound Med. 2005;24(3):255-258.
2. Timor-Tritsch IE, Monteagudo A, Rebarber A, Goldstein SR, Tsymbal T. Transrectal scanning an alternative when transvaginal scanning is not feasible. Ultrasound Obstet Gynecol. 2003;21(5):443-479.
3. Abdel Gadir A, Khatim MS, Mowafi RS, Alnaser HM, Muharib NS, Shaw RW. Implications of ultrasonically diagnosed polycystic ovaries. II. Studies of dynamic and pulsatile hormonal patterns. Human Reprod. 1992;7(4):458-461.
No doubt about it: Scanning the adnexae is the most challenging task in gynecologic ultrasonography (US). There are many reasons for the difficulty, but probably none more important than the fact that you are expected to reach a conclusion about what you see—or at least narrow the differential diagnosis.
Some ultrasound laboratories try to hedge their bets, sending the referring physician a report that is nothing more than an exhaustive differential diagnosis, similar to what we see in textbooks. Such a list is useless to a referring clinician, who has probably already considered most of the possibilities and involved the lab to help narrow them down. Labs that send such reports are usually trying to protect themselves from litigation—typically involving cases in which ovarian cancer was missed—or attempting to accomplish a “self-referral” by encouraging further imaging.1
The referring physician is not perfect, either. In our practice, we often receive reports like the following terse description:
A complex cyst was seen in the adnexa. Ovarian malignancy cannot be ruled out.
That’s it. No description of the actual sonographic characteristics. No Doppler velocity flow studies. Yet, the few remarks include a mention of malignancy, and the provider often suggests that “additional imaging such as CT and MRI should be considered.”
When we scrutinize the sonographic images upon which these reports are based, we often discover a corpus luteum, cystic teratoma, benign cystadenoma, endometrioma, or, even, a simple cyst.
The need for competency is compelling
Now that gynecologic US has matured as a field in its own right, the referring physician should expect much more from a laboratory’s pelvic scan than a long recitation of potential diagnoses. And the lab should expect more basic information from the referring provider.
That is the primary reason for this four-part series—to help you identify some of the most prevalent adnexal masses, so that you can exclude cases that are no cause for concern, such as a corpus luteum, and refer patients who really do need additional imaging and expertise, providing as much information in the process as you can.
In Part 1 of the series, we introduce you to basic concepts, recommend equipment, and step you through numerous fundamental scans. Part 2 will focus on nonneoplastic ovarian masses, Part 3 on ovarian neoplasms, and Part 4 on tubal entities such as ectopic pregnancy and torsion.
As much as possible, we educate you by providing actual scans that represent real cases, pointing out the elements that should grab your attention. After all, a picture paints a thousand words.
Ultrasound reveals the polycystic nature of a patient’s ovary. The hilus is prominently hyperechoic.
A few fundamental practices enhance consistency and thoroughness
Before we shift our focus to scanning techniques and interpretation of images, we’d like to offer several basic pointers.
Establish, and document, the hormonal milieu. One of the most important requirements of US imaging, particularly during the reproductive years, is determining and documenting the date of the patient’s last menstrual period (LMP). The reason? Physiologic and pathologic processes involving the reproductive organs are driven by the menstrual cycle—or by therapeutic (or pathologic) hormonal stimulation. We mark each scan with the date of the LMP. If the patient is on hormone therapy, we also mark the scan “HT.” We make these marks on the screen in a way that prevents their erasure every time the picture is frozen and unfrozen. This makes it possible for us to look at the scan days, weeks, or even years later and know what day of the cycle it represents. Every finding must be judged in light of the patient’s hormonal status.
Use a transvaginal transducer. It provides a high-resolution view of any pathology. If need be, it can be combined with a trans-abdominal transducer to afford a more deeply penetrating, panoramic view of the pelvis. We use a variety of transducers to achieve depth, color, power Doppler, and three- dimensional (3D) US.
Take a history and examine the patient. Before scanning your own patient, take a short history and perform a bimanual, palpatory pelvic exam. You may need to examine her again after the scan to verify a sonographic finding.
It is doubly important to take a history if you are scanning a referred patient. Omitting this element is no excuse for overlooking a disease or pathology.
A bimanual, palpatory pelvic exam may also be recommended for some referred patients.
A transvaginal scan is not always possible. There are a number of reasons why the transvaginal approach may not be advisable for some patients, including virginal status, atrophic postmenopausal vagina, agenesis of the vagina, and transverse vaginal septae. In such cases, the best alternative is a transrectal scan, which makes it possible to image the pelvic organs from almost exactly the same vantage point as transvaginal US.2 With proper explanation (particularly with virginal patients), the initial reluctance and apprehension can usually be assuaged.
Don’t trust the referral slip. We recommend that you read, but do not overly trust, the referral slip. It often offers little useful information.
Helpful scanning techniques
Consider applying these maneuvers:
- place your non-scanning hand on the patient’s abdomen to help mobilize the pelvic contents as the transvaginal probe slides across the organs
- use the probe as an “eye” while your palpating finger touches the cervix, uterus, ovaries, and any adnexal mass. Observe the mobility of these structures in relation to each other and the pelvic wall. This technique yields what is often referred to as the “sliding organs” sign. It is possible to identify pelvic adhesions (if the structures do not slide freely) or rule them out (if they do)
- pinpoint the origin of any pain the patient may have by touching the ovary, cervix, and any adnexal mass. This technique is important in cases of ectopic pregnancy, adnexal torsion, or inflammatory disease of the pelvis or adnexae.
Start with a basic scan of key structures
On the way “in” toward the adnexae, take the time to look at the bladder and urethra (FIGURE 1). Some common pathologies of the bladder are diverticulae; calculi; and a thick and vascular bladder wall suggestive of cancer or endometrioma. Ask the patient whether she has experienced any hematuria if any of these pathologies are detected.
FIGURE 1 Imaging the bladder
(A, B) The bladder (bl), urethra (u), vagina (v), and rectum (r) appear in their proper relation in this sagittal view. The posterior angle of the bladder is also apparent (arrow closing an angle of about 110°). (C) Excessive thickness of the bladder wall suggests that this patient has cystitis. (D) Coronal view of the bladder and urethra (solid arrows).
Also take a look at the cervix, searching for Nabothian cysts, endocervical polyps, extreme vascularization (a possible indicator of cervical cancer), and prolapsing submucous myomas (FIGURE 2).
FIGURE 2 Uncommon pathology
A submucous myoma prolapses into the cervical canal in a 13-week intrauterine pregnancy. (A) Grayscale sagittal image and (B) outline view of the same image. (C,D) Color and power Doppler images show the blood supply to the myoma from the uterine cavity.
While you are looking, attempt to scan both kidneys and Morrison’s pouch. Large adnexal masses or fibroids of the uterus may put pressure on the ureter, causing various degrees of hydronephrosis.
Sometimes, when the right kidney is correctly imaged below the liver, you may detect fluid in the space between them (called Morrison’s space). This information has clear value that may aid in diagnosing the main pathology (i.e., ruptured tubal pregnancy, ascites, etc.).
Imaging of the ovaries
The best way to scan the ovaries is to use a high-frequency (4–9 MHz) transvaginal probe. In general, as the frequency of the probe increases, so does resolution of the image—but the ability to penetrate tissue diminishes. For this reason, for abdominal imaging, a 3-MHz probe is often used. For a transvaginal scan, in which the probe can be placed near an ovary, a 5-MHz probe is common. And for a scan of, say, the parathyroid gland, a 12-MHz probe is utilized.
During the reproductive years, the ovaries can be localized by their sonographic markers—the follicles (FIGURE 3A). The ovaries usually lie near the large hypogastric blood vessels (FIGURE 3B). During the secretory phase of the cycle, look for the corpus luteum, switching on the color or power Doppler mode to help locate it (FIGURES 3C, 3D).
The ovaries usually can be distinguished by their relative anechoic sono-texture in juxtaposition to the surrounding, constantly peristalsing small bowel. This strategy is the only help for spotting the ovaries in menopause, when they lose their follicles.
The size of the ovaries may be an important indicator of pathology. During the reproductive years, mean size is 8 mL (standard deviation [SD], 2–3 mL; range, 5–15 mL). Post-menopausal ovaries are small, with a mean size of 3.6 mL (SD, 1.4 mL; range, 1–14 mL).
FIGURE 3 How to spot the ovaries
(A) Anechoic follicles are markers of the ovary during the reproductive years. (B) The ovaries in relation to the hypogastric vessels. (C) Gray-scale image of the corpus luteum and the same image in (D) color Doppler.
A word about terminology: Don’t call follicles “cysts”
During a normal menstrual cycle, one or more follicles mature, reaching about 2 to 2.5 cm in diameter around mid-cycle. Do not call these follicles “cysts” or “follicular cysts.” They are follicles. Calling them cysts, or even including the word cyst in their description, suggests to many gynecology and radiology providers—and to patients themselves—the idea of pathology.1
An exception to that rule: An ovary that is larger than 12 to 14 mL and has a hyperechoic hilus and more than 12 small (4–5 mm), peripherally pushed follicles is usually called “polycystic” (FIGURE 4).3 However, not every ovary that fulfills these sonographic criteria is indeed polycystic. At times normal ovaries may contain multiple follicles without any of the clinical or laboratory indications of a polycystic ovary. In these cases, the ovary may be of normal size and may lack a hyperechoic hilus with rich hilar vascularity. We term such ovaries “multicystic” in their appearance.
FIGURE 4 The polycystic ovary
(A) Gray-scale image of a polycystic ovary. The typical hyperechoic hilus is evident (H). (B) Gross pathologic section of a polycystic ovary. (C) 3D orthogonal planes of a large ovary with a multitude of small follicles pushed peripherally by a voluminous hyperechoic hilus. (D) 3D inversion rendering of the same ovary.
We employ 3D inversion rendering to better see and count the number of follicles (FIGURE 4D).
An ovary can have a polycystic appearance in the following clinical situations:
- hyperthyroid state (36% of affected women)
- hyperprolactinemia (50%)
- hypothalamic hypogonadism (24%).
It also can appear polycystic for no apparent reason.
Stay tuned!
Next month, we continue our focus on adnexal imaging by describing (and showing) nonneoplastic ovarian masses.
We want to hear from you! Tell us what you think.
1. Timor-Tritsch IE, Goldstein SR. The complexity of a complex mass and the simplicity of a simple cyst. J Ultrasound Med. 2005;24(3):255-258.
2. Timor-Tritsch IE, Monteagudo A, Rebarber A, Goldstein SR, Tsymbal T. Transrectal scanning an alternative when transvaginal scanning is not feasible. Ultrasound Obstet Gynecol. 2003;21(5):443-479.
3. Abdel Gadir A, Khatim MS, Mowafi RS, Alnaser HM, Muharib NS, Shaw RW. Implications of ultrasonically diagnosed polycystic ovaries. II. Studies of dynamic and pulsatile hormonal patterns. Human Reprod. 1992;7(4):458-461.